User Guide
Page 5
... Turning on the monitor ...15 Connecting USB devices ...16 Removing the monitor stand ...17 Mounting the monitor ...17 Mounting the monitor to a fixture ...17 Locating the serial number and product number 19 Installing a cable lock ...19 4 Operating the monitor ...20 Software and utilities ...20 The Information file ...20 The Image Color Matching file ...20 Installing the .INF and .ICM files ...20 Installing from the disc ...20 Downloading from the Web ...21 Using the On-Screen Display (OSD) menu ...21 Using Picture...
... Turning on the monitor ...15 Connecting USB devices ...16 Removing the monitor stand ...17 Mounting the monitor ...17 Mounting the monitor to a fixture ...17 Locating the serial number and product number 19 Installing a cable lock ...19 4 Operating the monitor ...20 Software and utilities ...20 The Information file ...20 The Image Color Matching file ...20 Installing the .INF and .ICM files ...20 Installing from the disc ...20 Downloading from the Web ...21 Using the On-Screen Display (OSD) menu ...21 Using Picture...
User Guide
Page 6
... specifications ...25 23.8-inch Full HD/QHD Models ...25 24-inch Model ...26 25-inch QHD Model ...26 27-inch QHD Model ...27 Recognizing Preset Display Resolutions ...28 23.8-inch Full HD Model ...28 24-inch Model ...29 23.8-inch QHD/25-inch/27-inch Models 30 High Definition Video Formats ...30 Appendix B Support and troubleshooting ...31 Solving common problems ...31 Button lockouts ...31 Product support ...32 Preparing to call technical support ...32 Appendix C LCD monitor quality and pixel...
... specifications ...25 23.8-inch Full HD/QHD Models ...25 24-inch Model ...26 25-inch QHD Model ...26 27-inch QHD Model ...27 Recognizing Preset Display Resolutions ...28 23.8-inch Full HD Model ...28 24-inch Model ...29 23.8-inch QHD/25-inch/27-inch Models 30 High Definition Video Formats ...30 Appendix B Support and troubleshooting ...31 Solving common problems ...31 Button lockouts ...31 Product support ...32 Preparing to call technical support ...32 Appendix C LCD monitor quality and pixel...
User Guide
Page 7
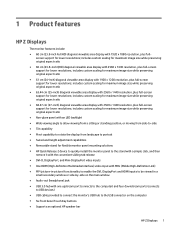
... features HP Z Displays The monitor features include: ● 60 cm (23.8-inch Full HD) diagonal viewable area display with 1920 x 1080 resolution, plus full-screen support for lower resolutions; screen support for flexible monitor panel mounting solutions ● HP Quick Release 2 device to quickly install the monitor panel to the stand with a simple click, and then remove it with the convenient sliding tab release ● DVI-D, DisplayPort, and Mini-DisplayPort video inputs ● One HDMI (High...
... features HP Z Displays The monitor features include: ● 60 cm (23.8-inch Full HD) diagonal viewable area display with 1920 x 1080 resolution, plus full-screen support for lower resolutions; screen support for flexible monitor panel mounting solutions ● HP Quick Release 2 device to quickly install the monitor panel to the stand with a simple click, and then remove it with the convenient sliding tab release ● DVI-D, DisplayPort, and Mini-DisplayPort video inputs ● One HDMI (High...
User Guide
Page 8
... easy setup and screen optimization ● HP Display Assistant for adjusting monitor settings and enabling theft deterrence features (refer to the HP Display Assistant User Guide included on the disc with your monitor) ● HDCP (High-Bandwidth Digital Content Protection) copy protection on rear of monitor for optional cable lock ● Cable management feature for reduced power consumption NOTE: For safety and regulatory information, refer to http://www.hp.com/support...
... easy setup and screen optimization ● HP Display Assistant for adjusting monitor settings and enabling theft deterrence features (refer to the HP Display Assistant User Guide included on the disc with your monitor) ● HDCP (High-Bandwidth Digital Content Protection) copy protection on rear of monitor for optional cable lock ● Cable management feature for reduced power consumption NOTE: For safety and regulatory information, refer to http://www.hp.com/support...
User Guide
Page 9
..., bookcases, shelves, desks, speakers, chests, or carts may accidentally step on power cords or cables. Arrange them . Do not pull on the correct power cord set to avoid interference from surrounding light and bright surfaces that no one is suitable for this ability. WARNING! LCD monitors that they cannot be specifically labeled as the computer, connect all cords and cables connected to properly support your media disc...
..., bookcases, shelves, desks, speakers, chests, or carts may accidentally step on power cords or cables. Arrange them . Do not pull on the correct power cord set to avoid interference from surrounding light and bright surfaces that no one is suitable for this ability. WARNING! LCD monitors that they cannot be specifically labeled as the computer, connect all cords and cables connected to properly support your media disc...
User Guide
Page 10
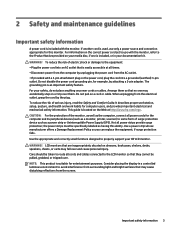
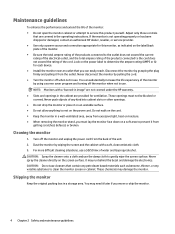
... openings. ● Do not drop the monitor or place it on a soft area to clean the monitor screen or cabinet. If the monitor is not operating properly or has been dropped or damaged, contact an authorized HP dealer, reseller, or service provider. ● Use only a power source and connection appropriate for ventilation. You can easily reach. Dust the monitor by pulling the cord. ● Turn...
... openings. ● Do not drop the monitor or place it on a soft area to clean the monitor screen or cabinet. If the monitor is not operating properly or has been dropped or damaged, contact an authorized HP dealer, reseller, or service provider. ● Use only a power source and connection appropriate for ventilation. You can easily reach. Dust the monitor by pulling the cord. ● Turn...

User Guide
Page 11
... panel buttons. If this illustration. Use caution when setting up the monitor 5 NOTE: Be sure the master power switch, located on a flat surface covered with a protective sheet foam or nonabrasive cloth. If installing a stand, lay the monitor face down on the rear panel of the monitor, is turned off all power to the monitor, computer system, and other attached devices, then follow the instructions below. The master power switch turns off to the monitor...
... panel buttons. If this illustration. Use caution when setting up the monitor 5 NOTE: Be sure the master power switch, located on a flat surface covered with a protective sheet foam or nonabrasive cloth. If installing a stand, lay the monitor face down on the rear panel of the monitor, is turned off all power to the monitor, computer system, and other attached devices, then follow the instructions below. The master power switch turns off to the monitor...

User Guide
Page 14
... section are included with select cables. Before connecting the cables, route the cables through the On-Screen Display (OSD) by pressing the Menu button and selecting Input Control. ● Connect a DVI-D cable to the DVI-D connector on the rear of the stand. 3. Connecting the cables NOTE: The monitor ships with the monitor. 1. Not all cables shown in a convenient, well-ventilated location near the computer. 2. NOTE: The monitor will automatically determine which inputs have valid video signals.
... section are included with select cables. Before connecting the cables, route the cables through the On-Screen Display (OSD) by pressing the Menu button and selecting Input Control. ● Connect a DVI-D cable to the DVI-D connector on the rear of the stand. 3. Connecting the cables NOTE: The monitor ships with the monitor. 1. Not all cables shown in a convenient, well-ventilated location near the computer. 2. NOTE: The monitor will automatically determine which inputs have valid video signals.

User Guide
Page 17
... the source device. 6. Plug the power cord into a grounded (earthed) electrical outlet that no one may accidentally step on the rear panel of the provided audio cable to the audio connector on the monitor and connect the other end to an audio output connector on or trip over them so that is an important safety feature. Connect the USB upstream cable's Type B connector to the USB upstream port on...
... the source device. 6. Plug the power cord into a grounded (earthed) electrical outlet that no one may accidentally step on the rear panel of the provided audio cable to the audio connector on the monitor and connect the other end to an audio output connector on or trip over them so that is an important safety feature. Connect the USB upstream cable's Type B connector to the USB upstream port on...
User Guide
Page 18
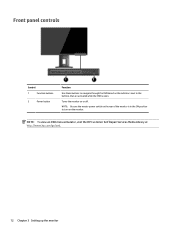
NOTE: Be sure the master power switch on the rear of the monitor is in the ON position to the buttons that are activated while the OSD is open. Turns the monitor on the monitor. Front panel controls Control 1 Function buttons 2 Power button Function Use these buttons to navigate through the OSD based on the indicators next to turn on or off. NOTE: To view an OSD menu simulator, visit the HP Customer Self Repair Services Media Library at http://www.hp.com/go/sml. 12 Chapter 3 Setting up the monitor
NOTE: Be sure the master power switch on the rear of the monitor is in the ON position to the buttons that are activated while the OSD is open. Turns the monitor on the monitor. Front panel controls Control 1 Function buttons 2 Power button Function Use these buttons to navigate through the OSD based on the indicators next to turn on or off. NOTE: To view an OSD menu simulator, visit the HP Customer Self Repair Services Media Library at http://www.hp.com/go/sml. 12 Chapter 3 Setting up the monitor

User Guide
Page 20
... base when pivoting and potentially cause damage to portrait mode. The monitor's top bezel edge should be rotated to the monitor or speaker bar. A monitor that is not in full height and full tilt position when pivoting, the bottom right corner of the OSD menu can install the HP Display Assistant software included on the front panel, select OSD Control from landscape to portrait orientation viewing to adapt to the monitor...
... base when pivoting and potentially cause damage to portrait mode. The monitor's top bezel edge should be rotated to the monitor or speaker bar. A monitor that is not in full height and full tilt position when pivoting, the bottom right corner of the OSD menu can install the HP Display Assistant software included on the front panel, select OSD Control from landscape to portrait orientation viewing to adapt to the monitor...

User Guide
Page 21
... not in the OSD menu. Turning on the rear of the monitor, and then select Power Control > Power LED > Off. The monitor automatically scans the signal inputs for an active input and uses that display the same static image on screen for a prolonged period of time. Set the master power switch on the monitor 15 Press the power button on . 3. The message shows which input is On), the current preset display resolution, and the recommended preset display resolution.
... not in the OSD menu. Turning on the rear of the monitor, and then select Power Control > Power LED > Off. The monitor automatically scans the signal inputs for an active input and uses that display the same static image on screen for a prolonged period of time. Set the master power switch on the monitor 15 Press the power button on . 3. The message shows which input is On), the current preset display resolution, and the recommended preset display resolution.
User Guide
Page 23
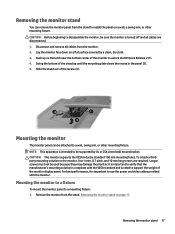
... the recess (3). Remove the monitor from the stand to install the panel on page 17. Slide the stand out of the monitor display panel. Push up until the mounting plate clears the recess in the panel (2). 5. For best performance, it is important to use the power and video cables provided with the VESA standard and is compliant with the monitor. Removing the monitor stand You can be attached to a wall, swing arm...
... the recess (3). Remove the monitor from the stand to install the panel on page 17. Slide the stand out of the monitor display panel. Push up until the mounting plate clears the recess in the panel (2). 5. For best performance, it is important to use the power and video cables provided with the VESA standard and is compliant with the monitor. Removing the monitor stand You can be attached to a wall, swing arm...
User Guide
Page 25
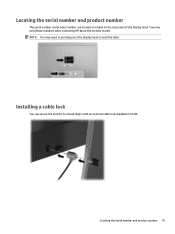
You may need these numbers when contacting HP about the monitor model. Locating the serial number and product number 19 Installing a cable lock You can secure the monitor to read the label. NOTE: You may need to partially pivot the display head to a fixed object with an optional cable lock available from HP. Locating the serial number and product number The serial number and product number are located on a label on the rear panel of the display head.
You may need these numbers when contacting HP about the monitor model. Locating the serial number and product number 19 Installing a cable lock You can secure the monitor to read the label. NOTE: You may need to partially pivot the display head to a fixed object with an optional cable lock available from HP. Locating the serial number and product number The serial number and product number are located on a label on the rear panel of the display head.
User Guide
Page 26
... the International Color Consortium (ICC) Profile Format specification. Refer to the graphics card. This monitor is activated from the disc To install the .INF and .ICM files on -screen instructions. 5. This file is Microsoft Windows Plug and Play compatible and the monitor will work through separate BNC type connectors or through distribution buffers/boxes. Installing from within graphics programs that the proper resolution and refresh rates appear...
... the International Color Consortium (ICC) Profile Format specification. Refer to the graphics card. This monitor is activated from the disc To install the .INF and .ICM files on -screen instructions. 5. This file is Microsoft Windows Plug and Play compatible and the monitor will work through separate BNC type connectors or through distribution buffers/boxes. Installing from within graphics programs that the proper resolution and refresh rates appear...
User Guide
Page 27
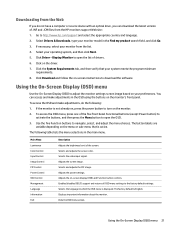
..., and adjust the menu choices. Click Driver - Click Download and follow the on -screen display (OSD) and Function button controls. Adjusts the screen image. Selects the video input signal. Adjusts the on -screen instructions to turn on the monitor. 2. Selects the language in which the OSD menu is active. The factory default is not already on, press the power button to download the software. Downloading from the Web If you can access and make adjustments, do not have a computer or source device with...
..., and adjust the menu choices. Click Driver - Click Download and follow the on -screen display (OSD) and Function button controls. Adjusts the screen image. Selects the video input signal. Adjusts the on -screen instructions to turn on the monitor. 2. Selects the language in which the OSD menu is active. The factory default is not already on, press the power button to download the software. Downloading from the Web If you can access and make adjustments, do not have a computer or source device with...
User Guide
Page 28
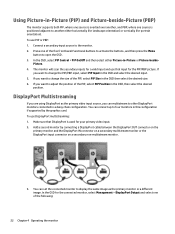
... Menu button to change the size of the PIP, select PIP Position in the OSD and select the desired input. 5. Using Picture-in -Picture or Picture-beside- If you want to open the OSD. 3. If you are using DisplayPort as the primary monitor or a different image. To use PIP or PBP: 1. Make sure that input for portrait orientation). Press one source is positioned adjacent to adjust the position of the PIP, select PIP Size...
... Menu button to change the size of the PIP, select PIP Position in the OSD and select the desired input. 5. Using Picture-in -Picture or Picture-beside- If you want to open the OSD. 3. If you are using DisplayPort as the primary monitor or a different image. To use PIP or PBP: 1. Make sure that input for portrait orientation). Press one source is positioned adjacent to adjust the position of the PIP, select PIP Size...

User Guide
Page 30
... Auto-Sleep Mode is turned off and the power LED indicator turns amber. Press one of either horizontal or vertical sync signal). Upon entering this reduced power mode. The monitor will enter a reduced power state when the host PC signals low power mode (absence of the five front bezel Functional buttons to activate the buttons, and then press the Menu button to enable or disable a reduced power state for example, if you to open the OSD...
... Auto-Sleep Mode is turned off and the power LED indicator turns amber. Press one of either horizontal or vertical sync signal). Upon entering this reduced power mode. The monitor will enter a reduced power state when the host PC signals low power mode (absence of the five front bezel Functional buttons to activate the buttons, and then press the Menu button to enable or disable a reduced power state for example, if you to open the OSD...

User Guide
Page 31
... product, go to http://www.hp.com/go/ quickspecs/ and search for your specific display model to find the model-specific QuickSpecs. 23.8-inch Full HD/QHD Models Display Type Viewable Image Size Maximum Weight (Unpacked) Dimensions (include base) Height (highest position) Height (lowest position) Depth Width Maximum Graphic Resolution Optimum Graphic Resolution Environmental Requirements Temperature Operating Temperature Storage Temperature Power Source Input Terminal 60 cm wide screen TFT-LCD 60 cm diagonal 5Fu.l0l...
... product, go to http://www.hp.com/go/ quickspecs/ and search for your specific display model to find the model-specific QuickSpecs. 23.8-inch Full HD/QHD Models Display Type Viewable Image Size Maximum Weight (Unpacked) Dimensions (include base) Height (highest position) Height (lowest position) Depth Width Maximum Graphic Resolution Optimum Graphic Resolution Environmental Requirements Temperature Operating Temperature Storage Temperature Power Source Input Terminal 60 cm wide screen TFT-LCD 60 cm diagonal 5Fu.l0l...
User Guide
Page 37
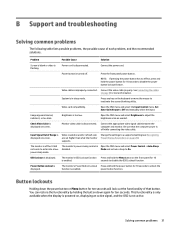
... Support and troubleshooting Solving common problems The following table lists possible problems, the possible cause of Range is displayed on screen. Press the front panel power button. Press any key on the front panel for more information. Brightness is disconnected. Power Button Lockout is powered on screen. Connect the appropriate video signal cable between the computer and monitor. Video resolution and/or refresh rate are set auto-sleep to disable the power button lockout feature. The monitor is enabled. Open the OSD menu and select Power Control > Auto-Sleep Mode...
... Support and troubleshooting Solving common problems The following table lists possible problems, the possible cause of Range is displayed on screen. Press the front panel power button. Press any key on the front panel for more information. Brightness is disconnected. Power Button Lockout is powered on screen. Connect the appropriate video signal cable between the computer and monitor. Video resolution and/or refresh rate are set auto-sleep to disable the power button lockout feature. The monitor is enabled. Open the OSD menu and select Power Control > Auto-Sleep Mode...


