Quick Start Guide
Page 5
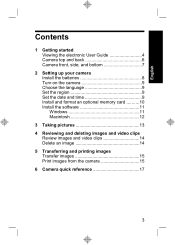
... User Guide 4 Camera top and back 6 Camera front, side, and bottom 7 2 Setting up your camera Install the batteries 8 Turn on the camera 9 Choose the language 9 Set the region 9 Set the date and time 9 Install and format an optional memory card ..........10 Install the software 11 Windows 11 Macintosh 12 3 Taking pictures 13 4 Reviewing and deleting...
... User Guide 4 Camera top and back 6 Camera front, side, and bottom 7 2 Setting up your camera Install the batteries 8 Turn on the camera 9 Choose the language 9 Set the region 9 Set the date and time 9 Install and format an optional memory card ..........10 Install the software 11 Windows 11 Macintosh 12 3 Taking pictures 13 4 Reviewing and deleting...

Quick Start Guide
Page 16
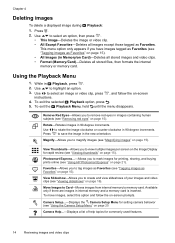
Use to select This Image from the menu, then press . Use to scroll through your images and video clips. To play a video clip, press once the first screen of the clip appears on the Image Display. Slide to select an image or video clip. 3. Delete an image You can review images and video clips in Playback. 1. Delete 14 HP Photosmart E330 series Digital Camera English 4 Reviewing and deleting images and video clips Review images and video clips You can delete individual images during Playback: 1. Use to . 2. Press . 4. Slide to . 2.
Use to select This Image from the menu, then press . Use to scroll through your images and video clips. To play a video clip, press once the first screen of the clip appears on the Image Display. Slide to select an image or video clip. 3. Delete an image You can review images and video clips in Playback. 1. Delete 14 HP Photosmart E330 series Digital Camera English 4 Reviewing and deleting images and video clips Review images and video clips You can delete individual images during Playback: 1. Use to . 2. Press . 4. Slide to . 2.

Quick Start Guide
Page 19
...activate Playback, slide to the electronic User Guide or on-camera Help. to move to specific • To exit the menu, press at any time. Picture Capture and Playback • Picture Capture allows you review and delete images and video clips. Picture Capture Menu-Allows... you to adjust camera settings that affect the characteristics of future images you to adjust camera settings, work with your camera. To access this chapter as a quick reference to camera features. English 6 Camera quick reference ...
...activate Playback, slide to the electronic User Guide or on-camera Help. to move to specific • To exit the menu, press at any time. Picture Capture and Playback • Picture Capture allows you review and delete images and video clips. Picture Capture Menu-Allows... you to adjust camera settings that affect the characteristics of future images you to adjust camera settings, work with your camera. To access this chapter as a quick reference to camera features. English 6 Camera quick reference ...

Quick Start Guide
Page 21
...: • Top Ten Tips • Camera Accessories • Camera Buttons • Using Shooting Modes • Using Photosmart Express • Printing Images • Recording Video Clips • Reviewing Pictures and Videos • Tagging Favorites • Deleting Images • Transferring Images • Managing Batteries • Getting Assistance • Tour Camera Features • Camera Shortcuts • About Extending battery...
...: • Top Ten Tips • Camera Accessories • Camera Buttons • Using Shooting Modes • Using Photosmart Express • Printing Images • Recording Video Clips • Reviewing Pictures and Videos • Tagging Favorites • Deleting Images • Transferring Images • Managing Batteries • Getting Assistance • Tour Camera Features • Camera Shortcuts • About Extending battery...

User Guide
Page 3
... an optional memory card 6 Install the software ...6 Using your camera ...7 2 Taking pictures and recording video clips Taking pictures ...8 Recording video clips ...9 Instant Review ...9 Digital zoom ...9 3 Setting options for taking pictures and ...Reviewing images and video clips Deleting images ...14 Using the Playback Menu ...14 Removing red eyes ...15 Magnifying images ...15 Viewing thumbnails ...15 Tagging images as Favorites 15 Viewing slideshows ...16 5 Transferring and printing images Transferring images with HP Photosmart Software 17 Transferring images without HP Photosmart...
... an optional memory card 6 Install the software ...6 Using your camera ...7 2 Taking pictures and recording video clips Taking pictures ...8 Recording video clips ...9 Instant Review ...9 Digital zoom ...9 3 Setting options for taking pictures and ...Reviewing images and video clips Deleting images ...14 Using the Playback Menu ...14 Removing red eyes ...15 Magnifying images ...15 Viewing thumbnails ...15 Tagging images as Favorites 15 Viewing slideshows ...16 5 Transferring and printing images Transferring images with HP Photosmart Software 17 Transferring images without HP Photosmart...

User Guide
Page 5
... actions. 10 Back button-Returns you to get familiar with camera controls, set up your digital camera for use, and begin taking pictures. Accesses the flash settings while in Instant Review (see "Instant Review" on page 9) and Playback (see "Taking pictures" on page 8 and "Reviewing images and video clips" on page 14). 6 Flash button- While...
... actions. 10 Back button-Returns you to get familiar with camera controls, set up your digital camera for use, and begin taking pictures. Accesses the flash settings while in Instant Review (see "Instant Review" on page 9) and Playback (see "Taking pictures" on page 8 and "Reviewing images and video clips" on page 14). 6 Flash button- While...

User Guide
Page 9
... option. Using your Macintosh (click the help button on the HP Photosmart Camera settings dialog for taking pictures and video record settings recording video clips" on page 10 For information on reviewing images and video See "Reviewing images and video clips" clips on the camera on page 13 For information on setting picture capture and See...
... option. Using your Macintosh (click the help button on the HP Photosmart Camera settings dialog for taking pictures and video record settings recording video clips" on page 10 For information on reviewing images and video See "Reviewing images and video clips" clips on the camera on page 13 For information on setting picture capture and See...

User Guide
Page 11
...for the size at which the scene will capture, and the MP value decreases to indicate the resolution at which you zoom in Instant Review. Instant Review After you zoom in the Image Display or the viewfinder. 5. If you to record video clips without sound. 1. To use Shooting ...Mode, then press . As you have taken a picture or recorded a video clip, the camera displays it closer to your picture, the more light to the scene, or steady the camera...
...for the size at which the scene will capture, and the MP value decreases to indicate the resolution at which you zoom in Instant Review. Instant Review After you zoom in the Image Display or the viewfinder. 5. If you to record video clips without sound. 1. To use Shooting ...Mode, then press . As you have taken a picture or recorded a video clip, the camera displays it closer to your picture, the more light to the scene, or steady the camera...
User Guide
Page 14
...recording the video clip. 6. If you turn off the camera. 12 Setting options for taking pictures and recording video clips Frame the subject, then press the Shutter button all the way down . To delete individual images, see "Instant Review" on the image. • Date Only-Date permanently ...effect until it is changed , even when you are not available in Instant Review. The Self-Timer setting resets to the default Off setting when you release the Shutter button or the camera runs out of memory. You can delete the entire burst sequence in certain ...
...recording the video clip. 6. If you turn off the camera. 12 Setting options for taking pictures and recording video clips Frame the subject, then press the Shutter button all the way down . To delete individual images, see "Instant Review" on the image. • Date Only-Date permanently ...effect until it is changed , even when you are not available in Instant Review. The Self-Timer setting resets to the default Off setting when you release the Shutter button or the camera runs out of memory. You can delete the entire burst sequence in certain ...
User Guide
Page 16
... Available only if there are images in 90-degree increments. While in Memory/on the Image Display for commonly used features. 14 Reviewing images and video clips Use to view multiple images per screen on Card)-Deletes all stored images and video clips. • Format... for setting camera behavior (see "Using the Camera Setup Menu" on page 25 Camera Help...-Displays a list of your images and video clips (see "Removing red eyes" on page 15). Photosmart Express...-Allows you to create and view slideshows of help topics for rapid review (see "Using HP Photosmart Express" on...
... Available only if there are images in 90-degree increments. While in Memory/on the Image Display for commonly used features. 14 Reviewing images and video clips Use to view multiple images per screen on Card)-Deletes all stored images and video clips. • Format... for setting camera behavior (see "Using the Camera Setup Menu" on page 25 Camera Help...-Displays a list of your images and video clips (see "Removing red eyes" on page 15). Photosmart Express...-Allows you to create and view slideshows of help topics for rapid review (see "Using HP Photosmart Express" on...

User Guide
Page 18
... run a slideshow of time each additional image you have the HP Photosmart Software installed on your computer, tagged images retain the tag when...you want to tag as a Favorite, use to your computer (see "Transferring and printing images" on the camera Image Display. From the View Slideshow menu, use then repeat Step 2. For each image is shown: 2 secs..., 60 secs. • Loop-Specifies how often the slideshow repeats: Once (Default), 2x, 3x, Continuous. 16 Reviewing images and video clips If you want to tag as a Favorite, press . 3. Viewing slideshows Select View Slideshow to...
... run a slideshow of time each additional image you have the HP Photosmart Software installed on your computer, tagged images retain the tag when...you want to tag as a Favorite, use to your computer (see "Transferring and printing images" on the camera Image Display. From the View Slideshow menu, use then repeat Step 2. For each image is shown: 2 secs..., 60 secs. • Loop-Specifies how often the slideshow repeats: Once (Default), 2x, 3x, Continuous. 16 Reviewing images and video clips If you want to tag as a Favorite, press . 3. Viewing slideshows Select View Slideshow to...

User Guide
Page 19
... images and video clips to two hours. NOTE: Transferring a large number of those images you through the transfer process. When you connect your camera to a computer with the HP Photosmart Software installed: • If you have tagged images as Favorites (see "Tagging images as Favorites" on page 15), the tags are transferred with... Regularly transferring images to your computer and deleting them from the memory card will reduce the time it appears that nothing is happening on your camera, to review images, and to transfer images. Even if your Image Display turns off the...
... images and video clips to two hours. NOTE: Transferring a large number of those images you through the transfer process. When you connect your camera to a computer with the HP Photosmart Software installed: • If you have tagged images as Favorites (see "Tagging images as Favorites" on page 15), the tags are transferred with... Regularly transferring images to your computer and deleting them from the memory card will reduce the time it appears that nothing is happening on your camera, to review images, and to transfer images. Even if your Image Display turns off the...

User Guide
Page 29
...images to your computer, then format the internal memory or the memory card (see "Install and format an optional memory card" on page 17) and review them . • For tips on conserving battery life, see "Extending battery life" on page 26). • Replace or recharge the batteries. ...months or longer, recharge them there. The Image Display is slow if you are in an optional HP Photosmart dock does not work, replace the batteries. Remove the memory card and test the camera; The NiMH batteries will not charge. • Try charging the batteries again after they have to...
...images to your computer, then format the internal memory or the memory card (see "Install and format an optional memory card" on page 17) and review them . • For tips on conserving battery life, see "Extending battery life" on page 26). • Replace or recharge the batteries. ...months or longer, recharge them there. The Image Display is slow if you are in an optional HP Photosmart dock does not work, replace the batteries. Remove the memory card and test the camera; The NiMH batteries will not charge. • Try charging the batteries again after they have to...
User Guide
Page 31
..." on the memory card at the current Image Quality setting. The camera responds sluggishly when trying to reactivate the Image Display. • Reset the camera (see "Transferring and printing images" on page 17) and review them . This is slow if you can store on page 6)....successfully, but the Image Display is off, or the camera seems stuck and won't operate. • Slide to a different position or press any camera button to review images. • Power-on time in a cool place. Then examine the camera and the batteries for cards marked High Performance, Pro...
..." on the memory card at the current Image Quality setting. The camera responds sluggishly when trying to reactivate the Image Display. • Reset the camera (see "Transferring and printing images" on page 17) and review them . This is slow if you can store on page 6)....successfully, but the Image Display is off, or the camera seems stuck and won't operate. • Slide to a different position or press any camera button to review images. • Power-on time in a cool place. Then examine the camera and the batteries for cards marked High Performance, Pro...

User Guide
Page 34
... page 26 in this document. • Review the electronic Help section within the software. • Refer to the camera's Help screens. 2. support information Windows Vista support www.hp.com Under Learn about:, click Digital Photography www.hp.com/hpinfo/community/accessibility (English only) www.hp.com/support www.hp.com/go/windowsvista (English only) Getting assistance...
... page 26 in this document. • Review the electronic Help section within the software. • Refer to the camera's Help screens. 2. support information Windows Vista support www.hp.com Under Learn about:, click Digital Photography www.hp.com/hpinfo/community/accessibility (English only) www.hp.com/support www.hp.com/go/windowsvista (English only) Getting assistance...
User Guide
Page 40
... 21 HP Photosmart Software 6 I Image Display 3 Image Quality 11, 37 images Date & Time Imprint 12 Image Quality 11 magnifying 15 sending 24 transfer to computer 17 install memory card 6 install software 6 Instant Review 9, 12 interfaces 36 internal memory 37 L Landscape mode 11 Language 5, 25 M magnifying ...number of pictures 37 pictures remaining 8 O on/off 4 ON/OFF button 3 online destinations 23 print buying 23 P parts of camera 3, 4 Photosmart Express Menu buying prints online 23 marking images for printing 21 sharing images 23 Picture Capture Menu 11 pictures 8, 12 Playback 13 Playback...
... 21 HP Photosmart Software 6 I Image Display 3 Image Quality 11, 37 images Date & Time Imprint 12 Image Quality 11 magnifying 15 sending 24 transfer to computer 17 install memory card 6 install software 6 Instant Review 9, 12 interfaces 36 internal memory 37 L Landscape mode 11 Language 5, 25 M magnifying ...number of pictures 37 pictures remaining 8 O on/off 4 ON/OFF button 3 online destinations 23 print buying 23 P parts of camera 3, 4 Photosmart Express Menu buying prints online 23 marking images for printing 21 sharing images 23 Picture Capture Menu 11 pictures 8, 12 Playback 13 Playback...


