Quick Start Guide
Page 16
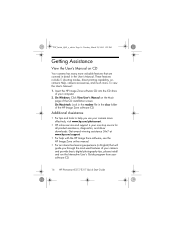
... 5 shooting modes, direct printing capability, oncamera Help, camera accessories, and much more effectively, visit www.hp.com/photosmart. • HP online service and support is your computer. 2. To view the User's Manual: 1. Get award winning assistance 24x7 at www.hp.com/support. • For help you through the most-used features of your camera and provide basic digital photography tips, please install and run the Interactive User's Guide program from your software CD. 16 HP Photosmart E217/E317 Quick Start Guide Additional Assistance...
... 5 shooting modes, direct printing capability, oncamera Help, camera accessories, and much more effectively, visit www.hp.com/photosmart. • HP online service and support is your computer. 2. To view the User's Manual: 1. Get award winning assistance 24x7 at www.hp.com/support. • For help you through the most-used features of your camera and provide basic digital photography tips, please install and run the Interactive User's Guide program from your software CD. 16 HP Photosmart E217/E317 Quick Start Guide Additional Assistance...

User's Manual
Page 5
... Date and Time 14 6 Install and Format a Memory Card (Optional 15 7 Install the Software 17 Windows 17 Macintosh 18 User's Manual on the CD 18 Camera Parts 19 Back of the Camera 19 Top of the Camera 21 Front, Left Side, and Bottom of the Camera. . . 22 Camera States 24 Camera Menus 24 2 Taking Pictures and Recording Video Clips . . . 27 Using Live View 27 Taking Still Pictures 29 Recording Video Clips 30 Using Digital Zoom 31 Setting the Flash 32 Using the Focus Modes 34 Using the Self-Timer Settings...
... Date and Time 14 6 Install and Format a Memory Card (Optional 15 7 Install the Software 17 Windows 17 Macintosh 18 User's Manual on the CD 18 Camera Parts 19 Back of the Camera 19 Top of the Camera 21 Front, Left Side, and Bottom of the Camera. . . 22 Camera States 24 Camera Menus 24 2 Taking Pictures and Recording Video Clips . . . 27 Using Live View 27 Taking Still Pictures 29 Recording Video Clips 30 Using Digital Zoom 31 Setting the Flash 32 Using the Focus Modes 34 Using the Self-Timer Settings...

User's Manual
Page 6
... Menu 53 Delete 55 Viewing Thumbnails 56 Magnifying Images 57 Print 58 Rotate 59 Record Audio 60 4 Transferring and Printing Images 61 Transferring Images to a Computer 61 Printing Images Directly from the Camera 62 5 Using the Setup Menu 65 Display Brightness 66 Camera Sounds 67 Date & Time 68 USB Configuration 69 Language 70 Move Images to Card 71 Reset Settings 72 6 Troubleshooting and Support 73 Resetting the Camera 74 HP Image Zone Software 75 System Requirements (Windows Only 75 HP Image Zone Express (Windows Only) . . . . 76 6 HP Photosmart E217 User's Manual
... Menu 53 Delete 55 Viewing Thumbnails 56 Magnifying Images 57 Print 58 Rotate 59 Record Audio 60 4 Transferring and Printing Images 61 Transferring Images to a Computer 61 Printing Images Directly from the Camera 62 5 Using the Setup Menu 65 Display Brightness 66 Camera Sounds 67 Date & Time 68 USB Configuration 69 Language 70 Move Images to Card 71 Reset Settings 72 6 Troubleshooting and Support 73 Resetting the Camera 74 HP Image Zone Software 75 System Requirements (Windows Only 75 HP Image Zone Express (Windows Only) . . . . 76 6 HP Photosmart E217 User's Manual

User's Manual
Page 7
Using Your Camera without Installing the HP Image Zone Software 77 Transferring Images to a Computer without HP Image Zone Software 77 Connecting Your Camera as a Digital Camera 77 Using a Memory Card Reader 78 Configuring the Camera as a Disk Drive. . 81 Problems and Solutions 83 Error Messages on the Camera 95 Error Messages on the Computer 104 Getting Assistance 106 HP Accessibility Website 106 HP Photosmart Website 106 Support Process 106 Phone Support 107 Phone Support Numbers 109 A Managing Batteries 111 Top Points About Batteries 111 Extending Battery Life 112...
Using Your Camera without Installing the HP Image Zone Software 77 Transferring Images to a Computer without HP Image Zone Software 77 Connecting Your Camera as a Digital Camera 77 Using a Memory Card Reader 78 Configuring the Camera as a Disk Drive. . 81 Problems and Solutions 83 Error Messages on the Camera 95 Error Messages on the Computer 104 Getting Assistance 106 HP Accessibility Website 106 HP Photosmart Website 106 Support Process 106 Phone Support 107 Phone Support Numbers 109 A Managing Batteries 111 Top Points About Batteries 111 Extending Battery Life 112...

User's Manual
Page 15
... you need to store images and video clips. Install and Format a Memory Card (Optional) Your camera contains internal memory that allows you to change the date and time settings later, you can do this with the notched end of the camera. 2. Press the button, then use a memory card (purchased separately) instead to the Playback Menu . 5. Use the button to highlight Format Card, and then press the button to display the Delete sub-menu. 6. Turn off the camera and open the Battery/Memory card door on...
... you need to store images and video clips. Install and Format a Memory Card (Optional) Your camera contains internal memory that allows you to change the date and time settings later, you can do this with the notched end of the camera. 2. Press the button, then use a memory card (purchased separately) instead to the Playback Menu . 5. Use the button to highlight Format Card, and then press the button to display the Delete sub-menu. 6. Turn off the camera and open the Battery/Memory card door on...
User's Manual
Page 16
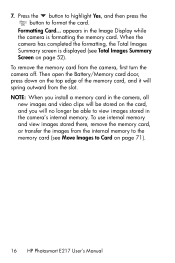
To remove the memory card from the slot. To use internal memory and view images stored there, remove the memory card, or transfer the images from the internal memory to Card on the top edge of the memory card, and it will no longer be able to format the card. When the camera has completed the formatting, the Total Images Summary screen is formatting the memory card. Then open the Battery/Memory card door, press down on page 71). 16 HP Photosmart E217 User's Manual NOTE: When...
To remove the memory card from the slot. To use internal memory and view images stored there, remove the memory card, or transfer the images from the internal memory to Card on the top edge of the memory card, and it will no longer be able to format the card. When the camera has completed the formatting, the Total Images Summary screen is formatting the memory card. Then open the Battery/Memory card door, press down on page 71). 16 HP Photosmart E217 User's Manual NOTE: When...
User's Manual
Page 24
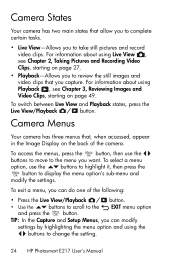
... buttons to change the setting. 24 HP Photosmart E217 User's Manual Camera Menus Your camera has three menus that, when accessed, appear in the Image Display on page 49. TIP: In the Capture and Setup Menus, you capture. To access the menus, press the button, then use the buttons to highlight it, then press the button to display the menu option's sub-menu and modify the settings. To switch between Live View and Playback...
... buttons to change the setting. 24 HP Photosmart E217 User's Manual Camera Menus Your camera has three menus that, when accessed, appear in the Image Display on page 49. TIP: In the Capture and Setup Menus, you capture. To access the menus, press the button, then use the buttons to highlight it, then press the button to display the menu option's sub-menu and modify the settings. To switch between Live View and Playback...

User's Manual
Page 25
... image quality, ISO speed, and imprinting the date and time on page 37. The Capture Menu lets you specify settings for printing, and delete images. The Playback Menu lets you to move images from the internal memory to images, select images for taking a picture such as display brightness, date and time, and language, among others. It also allows you magnify and rotate images, add audio clips to an optional memory card. For information about using this menu, see Using...
... image quality, ISO speed, and imprinting the date and time on page 37. The Capture Menu lets you specify settings for printing, and delete images. The Playback Menu lets you to move images from the internal memory to images, select images for taking a picture such as display brightness, date and time, and language, among others. It also allows you magnify and rotate images, add audio clips to an optional memory card. For information about using this menu, see Using...
User's Manual
Page 28
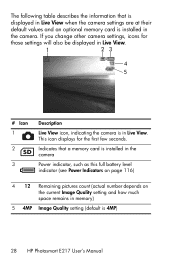
... the camera settings are at their default values and an optional memory card is installed in the camera. The following table describes the information that a memory card is installed in the camera Power indicator, such as this full battery level indicator (see Power Indicators on page 116) 4 12 Remaining pictures count (actual number depends on the current Image Quality setting and how much space remains in memory) 5 4MP Image Quality setting (default is 4MP) 28 HP Photosmart E217 User's Manual
... the camera settings are at their default values and an optional memory card is installed in the camera. The following table describes the information that a memory card is installed in the camera Power indicator, such as this full battery level indicator (see Power Indicators on page 116) 4 12 Remaining pictures count (actual number depends on the current Image Quality setting and how much space remains in memory) 5 4MP Image Quality setting (default is 4MP) 28 HP Photosmart E217 User's Manual

User's Manual
Page 47
... ISO numbers allow faster shutter speeds, and can be used when taking pictures in dark areas without a flash, or when taking a picture in the ISO Speed sub-menu) will capture images with more grain (or noise). 1. Press the button to save the setting and return to use the buttons to the default Auto setting, the camera selects the best ISO speed for the setting (as shown in low light conditions without a flash at ISO 100, you turn the camera off . Taking Pictures and Recording Video...
... ISO numbers allow faster shutter speeds, and can be used when taking pictures in dark areas without a flash, or when taking a picture in the ISO Speed sub-menu) will capture images with more grain (or noise). 1. Press the button to save the setting and return to use the buttons to the default Auto setting, the camera selects the best ISO speed for the setting (as shown in low light conditions without a flash at ISO 100, you turn the camera off . Taking Pictures and Recording Video...

User's Manual
Page 63
... printing or all images in the Print Setup menu, use the buttons on the front of the USB cable to the printer, a Print Setup menu displays on the camera. 4. When the camera is usually located on the camera to select a menu option, then use the buttons on the camera to change the setting. 6. Open the door on the side of the camera nearest the lens and connect the small end of the printer. 3. To change the settings in the camera. Transferring and Printing Images...
... printing or all images in the Print Setup menu, use the buttons on the front of the USB cable to the printer, a Print Setup menu displays on the camera. 4. When the camera is usually located on the camera to select a menu option, then use the buttons on the camera to change the setting. 6. Open the door on the side of the camera nearest the lens and connect the small end of the printer. 3. To change the settings in the camera. Transferring and Printing Images...
User's Manual
Page 68
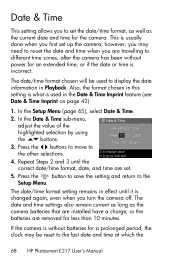
... may need to display the date information in this setting is what is used to re-set . 5. If the camera is usually done when you first set the date/time format, as well as the camera batteries that are installed have a charge, or the batteries are travelling to the last date and time at which the 68 HP Photosmart E217 User's Manual Also, the format chosen in Playback. The date/time format setting remains in the Date & Time Imprint feature (see Date & Time...
... may need to display the date information in this setting is what is used to re-set . 5. If the camera is usually done when you first set the date/time format, as well as the camera batteries that are installed have a charge, or the batteries are travelling to the last date and time at which the 68 HP Photosmart E217 User's Manual Also, the format chosen in Playback. The date/time format setting remains in the Date & Time Imprint feature (see Date & Time...

User's Manual
Page 92
... view or modify them using the Date & Time option in the Setup Menu (see page 68). Transfer the images from the camera for the example, if a video clip is image. Reset the date and time by using the HP Image Zone software. The date and/ or time was taken with another camera and cannot be edited on my camera. The batteries were drained or were removed from the camera to the memory card (see page 68). 92 HP Photosmart E217 User's Manual...
... view or modify them using the Date & Time option in the Setup Menu (see page 68). Transfer the images from the camera for the example, if a video clip is image. Reset the date and time by using the HP Image Zone software. The date and/ or time was taken with another camera and cannot be edited on my camera. The batteries were drained or were removed from the camera to the memory card (see page 68). 92 HP Photosmart E217 User's Manual...

User's Manual
Page 95
... view images in the memory slot is too low to take pictures. Replace or recharge the batteries. Ensure that is installed in Playback. This message appears sooner with Alkaline batteries than with NiMH or Lithium batteries. If it is the proper type for your camera (see page 55). Replace or recharge the batteries. Troubleshooting and Support 95 Battery power is shutting down. Camera is too low to continue operation. UNSUPPORTED CARD The optional memory card...
... view images in the memory slot is too low to take pictures. Replace or recharge the batteries. Ensure that is installed in Playback. This message appears sooner with Alkaline batteries than with NiMH or Lithium batteries. If it is the proper type for your camera (see page 55). Replace or recharge the batteries. Troubleshooting and Support 95 Battery power is shutting down. Camera is too low to continue operation. UNSUPPORTED CARD The optional memory card...

User's Manual
Page 104
... camera. Make sure that the optional memory card, USB connection, and the USB cable are functioning correctly. Change the USB setting to a PictBridgecertified printer, and print an image. The camera is not connected correctly. Solution Turn on the computer. 104 HP Photosmart E217 User's Manual This will verify that the cable is not compatible with the camera. The camera then appears as a digital camera. Try connecting the camera directly to Disk Drive (see page 69). Connect the camera directly to the computer. The camera is To Product turned off. Error...
... camera. Make sure that the optional memory card, USB connection, and the USB cable are functioning correctly. Change the USB setting to a PictBridgecertified printer, and print an image. The camera is not connected correctly. Solution Turn on the computer. 104 HP Photosmart E217 User's Manual This will verify that the cable is not compatible with the camera. The camera then appears as a digital camera. Try connecting the camera directly to Disk Drive (see page 69). Connect the camera directly to the computer. The camera is To Product turned off. Error...

User's Manual
Page 115
..., and rechargeable NiMH batteries. Flash is used for 8 seconds per picture). In addition: • The minimum number of shots is obtained with extensive use of Live View (30 seconds per picture), Playback (15 seconds per picture), and Flash On. • The maximum number of shots is obtained with Live View used at 15 seconds per picture and Playback used on 25% of shots. • The average number of shots is obtained with...
..., and rechargeable NiMH batteries. Flash is used for 8 seconds per picture). In addition: • The minimum number of shots is obtained with extensive use of Live View (30 seconds per picture), Playback (15 seconds per picture), and Flash On. • The maximum number of shots is obtained with Live View used at 15 seconds per picture and Playback used on 25% of shots. • The average number of shots is obtained with...
User's Manual
Page 134
... 20 customer support 106 D darkening an image 44 Date & Time Imprint 42 Date & Time, setting 14, 68 delete during Instant Review 29, 30 Delete, using 55 digital zoom 31 direct print printing images from camera to printer or computer 62 disk drive, camera as 69 Display Brightness 66 E error messages on camera 95 on computer 104 EV Compensation 44 extending battery life 112 F flash description 22 settings 32 using 32 working range 127 Flash button 20 f-number 127 focus mode settings 34 switch 23 focus range 127 134 HP Photosmart E217 User's Manual
... 20 customer support 106 D darkening an image 44 Date & Time Imprint 42 Date & Time, setting 14, 68 delete during Instant Review 29, 30 Delete, using 55 digital zoom 31 direct print printing images from camera to printer or computer 62 disk drive, camera as 69 Display Brightness 66 E error messages on camera 95 on computer 104 EV Compensation 44 extending battery life 112 F flash description 22 settings 32 using 32 working range 127 Flash button 20 f-number 127 focus mode settings 34 switch 23 focus range 127 134 HP Photosmart E217 User's Manual

User's Manual
Page 135
... I Image Display description 19 using 27 Image Quality, setting 40 images brightening 44 darkening 44 Date & Time Imprint 42 focus modes 34 Image Quality setting 40 ISO Speed setting 47 magnifying 57 number remaining 28, 52 number saved in internal memory 131 Print 58 Rotate 59 shooting modes 38 thumbnails view 56 too dark/light 44 transferring camera to computer 61 White Balance setting 45 indicators, power 116 install batteries 11 memory card 15 software 17, 18 wrist strap 10 internal memory format 55 image capacity of 131 pictures remaining 28, 52 ISO Speed, setting...
... I Image Display description 19 using 27 Image Quality, setting 40 images brightening 44 darkening 44 Date & Time Imprint 42 focus modes 34 Image Quality setting 40 ISO Speed setting 47 magnifying 57 number remaining 28, 52 number saved in internal memory 131 Print 58 Rotate 59 shooting modes 38 thumbnails view 56 too dark/light 44 transferring camera to computer 61 White Balance setting 45 indicators, power 116 install batteries 11 memory card 15 software 17, 18 wrist strap 10 internal memory format 55 image capacity of 131 pictures remaining 28, 52 ISO Speed, setting...
User's Manual
Page 137
... 58 print images directly to printer 62 problems, troubleshooting 73 product support 106 purchasing camera accessories 121 R range Exposure Compensation 128 flash 127 focus 127 recharging NiMH batteries 117 record audio clips 60 video clips 30 red-eye reduction 33 remaining pictures count 28, 52 reset camera 74 Reset Settings 72 reviewing images 49 rotate images 59 S safety precautions for NiMH batteries 112 Self-Timer light 22 settings 35 Timer button 20 settings reset 72 Setup Menu, using 65 shooting mode settings 38 Shutter button 21 shutter speed range 127 sleep, time-out 119 software...
... 58 print images directly to printer 62 problems, troubleshooting 73 product support 106 purchasing camera accessories 121 R range Exposure Compensation 128 flash 127 focus 127 recharging NiMH batteries 117 record audio clips 60 video clips 30 red-eye reduction 33 remaining pictures count 28, 52 reset camera 74 Reset Settings 72 reviewing images 49 rotate images 59 S safety precautions for NiMH batteries 112 Self-Timer light 22 settings 35 Timer button 20 settings reset 72 Setup Menu, using 65 shooting mode settings 38 Shutter button 21 shutter speed range 127 sleep, time-out 119 software...
User's Manual
Page 138
..., 68 Timer button 20 total images summary screen 52 transfer images to computer 61 tripod mount, description 23 troubleshoot problems 73 turn on/off power 12 Windows computer install software 17 system requirements for software 75 working range of flash 127 wrist strap, attaching to camera 10 Z zoom digital 31 specifications 127 U under-exposing an image 44 USB configuration setting 69 connector on camera 22 V Video button 21 video clips, recording 30 W web sites for HP 106 White Balance, setting 45 138 HP Photosmart E217 User's Manual
..., 68 Timer button 20 total images summary screen 52 transfer images to computer 61 tripod mount, description 23 troubleshoot problems 73 turn on/off power 12 Windows computer install software 17 system requirements for software 75 working range of flash 127 wrist strap, attaching to camera 10 Z zoom digital 31 specifications 127 U under-exposing an image 44 USB configuration setting 69 connector on camera 22 V Video button 21 video clips, recording 30 W web sites for HP 106 White Balance, setting 45 138 HP Photosmart E217 User's Manual


