Reference Guide
Page 2
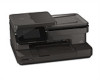
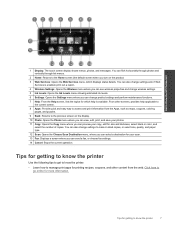
... to the current screen. 8. You can see wireless properties and change settings to make 2-sided copies, or select size, quality, and paper type. 12. Wireless status light: •• Solid blue light indicates that wireless connection has been established and you can also change wireless.... 7. Ink Levels: Opens the Ink Levels menu showing estimated ink levels. 6. Photo: Opens the Photo menu where you can preview your HP Photosmart English Control panel features: 1. Scan: Opens the Choose Scan Destination menu, where you can print. •• Slow blinking light indicates ...
... to the current screen. 8. You can see wireless properties and change settings to make 2-sided copies, or select size, quality, and paper type. 12. Wireless status light: •• Solid blue light indicates that wireless connection has been established and you can also change wireless.... 7. Ink Levels: Opens the Ink Levels menu showing estimated ink levels. 6. Photo: Opens the Photo menu where you can preview your HP Photosmart English Control panel features: 1. Scan: Opens the Choose Scan Destination menu, where you can print. •• Slow blinking light indicates ...
User Guide
Page 3
... HP Photosmart 7520 Series Help...3 2 Get to Know the HP Photosmart Printer parts...5 Control panel features...6 Tips for getting to know the printer...7 3 How do I?...9 4 Print Print photos from a memory card...11 Select Print Media...13 Load media...13 Recommended papers for photo printing ...15 Recommended papers ... Replace the cartridges...42 Order ink supplies...44 Cartridge warranty information...44 Tips for working with ink...45 9 Connectivity Add the HP Photosmart to a network...47 Change from a USB connection to a wireless network...48 Connect a new printer...49 Change network settings...
... HP Photosmart 7520 Series Help...3 2 Get to Know the HP Photosmart Printer parts...5 Control panel features...6 Tips for getting to know the printer...7 3 How do I?...9 4 Print Print photos from a memory card...11 Select Print Media...13 Load media...13 Recommended papers for photo printing ...15 Recommended papers ... Replace the cartridges...42 Order ink supplies...44 Cartridge warranty information...44 Tips for working with ink...45 9 Connectivity Add the HP Photosmart to a network...47 Change from a USB connection to a wireless network...48 Connect a new printer...49 Change network settings...
User Guide
Page 4
Contents Register the product...53 Clear the paper jam...53 Clear carriage jam...55 Solve print problem...55 Solve copy and scan problem...55 Solve networking problem...56 HP support by phone...56 Additional warranty options...57 Cartridge supply upgrade...57 Prepare printer...57 Check cartridge access door...57 Printhead failure...57 Printer...
Contents Register the product...53 Clear the paper jam...53 Clear carriage jam...55 Solve print problem...55 Solve copy and scan problem...55 Solve networking problem...56 HP support by phone...56 Additional warranty options...57 Cartridge supply upgrade...57 Prepare printer...57 Check cartridge access door...57 Printhead failure...57 Printer...
User Guide
Page 5
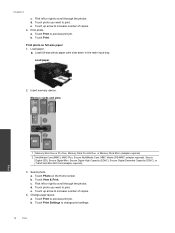
on page 9 • Print on page 11 • Copy and scan on page 19 • Work with cartridges on page 41 • Fax on page 25 • Load media on page 13 • Clear the paper jam on page 5 • How do I? 1 HP Photosmart 7520 Series Help Click the links below for information about the HP Photosmart: • Get to Know the HP Photosmart on page 53 HP Photosmart 7520 Series Help HP Photosmart 7520 Series Help 3
on page 9 • Print on page 11 • Copy and scan on page 19 • Work with cartridges on page 41 • Fax on page 25 • Load media on page 13 • Clear the paper jam on page 5 • How do I? 1 HP Photosmart 7520 Series Help Click the links below for information about the HP Photosmart: • Get to Know the HP Photosmart on page 53 HP Photosmart 7520 Series Help HP Photosmart 7520 Series Help 3
User Guide
Page 7
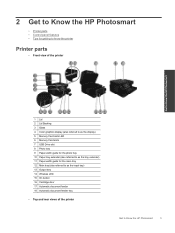
... parts • Control panel features • Tips for getting to know the printer Printer parts • Front view of the printer Get to Know the HP Photosmart 1 Lid 2 Lid Backing 3 Glass 4 Color graphics display (also referred to as the display) 5 Memory Card slots LED 6 Memory Card slots 7 USB Drive slot 8...11 Paper-width guide for the main tray 12 Main tray (also referred to as the input tray) 13 Output tray 14 Wireless LED 15 On button 16 Cartridge door 17 Automatic document feeder 18 Automatic document feeder tray • Top and rear views of the printer Get to Know the HP Photosmart ...
... parts • Control panel features • Tips for getting to know the printer Printer parts • Front view of the printer Get to Know the HP Photosmart 1 Lid 2 Lid Backing 3 Glass 4 Color graphics display (also referred to as the display) 5 Memory Card slots LED 6 Memory Card slots 7 USB Drive slot 8...11 Paper-width guide for the main tray 12 Main tray (also referred to as the input tray) 13 Output tray 14 Wireless LED 15 On button 16 Cartridge door 17 Automatic document feeder 18 Automatic document feeder tray • Top and rear views of the printer Get to Know the HP Photosmart ...
User Guide
Page 9
Click here to make 2-sided copies, or select size, quality, and paper type. 12 Scan: Opens the Choose Scan Destination menu, where you turn on the display. 10 Photo: Opens the Photo menu where you can view, ... fax settings. 14 Cancel: Stops the current operation. Get to know the printer: • Learn how to manage print apps for getting to Know the HP Photosmart 1 Display: The touch screen display shows menus, photos, and messages. Tips for getting to know the printer Use the following tips to get to know...
Click here to make 2-sided copies, or select size, quality, and paper type. 12 Scan: Opens the Choose Scan Destination menu, where you turn on the display. 10 Photo: Opens the Photo menu where you can view, ... fax settings. 14 Cancel: Stops the current operation. Get to know the printer: • Learn how to manage print apps for getting to Know the HP Photosmart 1 Display: The touch screen display shows menus, photos, and messages. Tips for getting to know the printer Use the following tips to get to know...
User Guide
Page 11
3 How do I ? 9 How do I? This section contains links to commonly performed tasks, such as printing photos, scanning, and making copies. • Scan to a computer, memory device, or email on page 19 • Copy text or mixed documents on page 20 • Clear the paper jam on page 53 • Replace the cartridges on page 42 • Load media on page 13 • Use Web Services on page 23 How do I ?
3 How do I ? 9 How do I? This section contains links to commonly performed tasks, such as printing photos, scanning, and making copies. • Scan to a computer, memory device, or email on page 19 • Copy text or mixed documents on page 20 • Clear the paper jam on page 53 • Replace the cartridges on page 42 • Load media on page 13 • Use Web Services on page 23 How do I ?

User Guide
Page 13
...), Secure Digital Extended Capacity (SDXC), or TransFlash MicroSD Card (adapter required), 3. b. Touch Photo on small-size paper 1. Load paper. ▲ Load up to 10 x 15 cm (4 x 6 inch) photo paper print side down in the photo tray 2. Memory cards and slots Print 1 Memory Stick Duo or Pro Duo, ...Pro-HG Duo, or Memory Stick Micro (adapter required) 2 MultiMedia Card (MMC), MMC Plus, Secure MultiMedia Card, MMC Mobile (RS-MMC; Load photo paper in photo tray. Print 11 a. 4 Print Print photos from a memory card on page 11 Related topics • Load media on page 13 •...
...), Secure Digital Extended Capacity (SDXC), or TransFlash MicroSD Card (adapter required), 3. b. Touch Photo on small-size paper 1. Load paper. ▲ Load up to 10 x 15 cm (4 x 6 inch) photo paper print side down in the photo tray 2. Memory cards and slots Print 1 Memory Stick Duo or Pro Duo, ...Pro-HG Duo, or Memory Stick Micro (adapter required) 2 MultiMedia Card (MMC), MMC Plus, Secure MultiMedia Card, MMC Mobile (RS-MMC; Load photo paper in photo tray. Print 11 a. 4 Print Print photos from a memory card on page 11 Related topics • Load media on page 13 •...
User Guide
Page 14
... side down in the main input tray. Insert memory device. c. a. b. d. b. Touch photo you want to print. Load paper 2. Memory cards and slots Print 1 Memory Stick Duo or Pro Duo, Memory Stick Pro-HG Duo, or Memory Stick Micro (adapter required) 2 MultiMedia... Card (MMC), MMC Plus, Secure MultiMedia Card, MMC Mobile (RS-MMC; Touch Photo on full-size paper 1. Touch View & Print. Touch up arrow to scroll through the photos. b. e. Touch Print Settings to preview print job. Chapter 4 c. Flick left or ...
... side down in the main input tray. Insert memory device. c. a. b. d. b. Touch photo you want to print. Load paper 2. Memory cards and slots Print 1 Memory Stick Duo or Pro Duo, Memory Stick Pro-HG Duo, or Memory Stick Micro (adapter required) 2 MultiMedia... Card (MMC), MMC Plus, Secure MultiMedia Card, MMC Mobile (RS-MMC; Touch Photo on full-size paper 1. Touch View & Print. Touch up arrow to scroll through the photos. b. e. Touch Print Settings to preview print job. Chapter 4 c. Flick left or ...
User Guide
Page 15
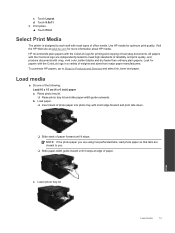
... Load media ▲ Do one of office media. Lower photo tray lid. Print Load media 13 c. To purchase HP papers, go to you are using has perforated tabs, load photo paper so that tabs are independently tested to work well with most types of the following: Load 10 x 15 cm (4... x 6 inch) paper a. Load paper. ❑ Insert stack of photo paper into photo tray with the ColorLok logo in a variety of weights and sizes from major paper manufacturers. Touch 8.5x11. 5. Use HP media for papers with short edge forward and print side down. ❑ Slide...
... Load media ▲ Do one of office media. Lower photo tray lid. Print Load media 13 c. To purchase HP papers, go to you are using has perforated tabs, load photo paper so that tabs are independently tested to work well with most types of the following: Load 10 x 15 cm (4... x 6 inch) paper a. Load paper. ❑ Insert stack of photo paper into photo tray with the ColorLok logo in a variety of weights and sizes from major paper manufacturers. Touch 8.5x11. 5. Use HP media for papers with short edge forward and print side down. ❑ Slide...

User Guide
Page 16
Load paper. ❑ Insert stack of paper into main input tray with short edge forward and print side down. ❑ Slide stack of paper forward until it stops. ❑ Slide paper-width guide inward until it stops at edge of paper. ❑ Lower the photo tray. Raise the photo tray. ❑ Slide paper-width guide outwards. Load envelopes a. Raise the photo tray. ❑ Slide paper-width guide outwards. ❑ Remove all paper from the main input tray. b. Print 14 Print Chapter 4 Load A4 or 8.5 x 11 inch paper a.
Load paper. ❑ Insert stack of paper into main input tray with short edge forward and print side down. ❑ Slide stack of paper forward until it stops. ❑ Slide paper-width guide inward until it stops at edge of paper. ❑ Lower the photo tray. Raise the photo tray. ❑ Slide paper-width guide outwards. Load envelopes a. Raise the photo tray. ❑ Slide paper-width guide outwards. ❑ Remove all paper from the main input tray. b. Print 14 Print Chapter 4 Load A4 or 8.5 x 11 inch paper a.

User Guide
Page 17
...glossy or soft gloss (satin matte). Depending on your country/region, some of project you want the best print quality, HP recommends using paper designed for easy handling without smudging. Features an instant-dry finish for casual photo printing. high gloss or soft gloss ...lasting documents. This thick photo paper features an instant-dry finish for the type of these papers might not be available. It is acid-free for easy handling. Paper HP Premium Plus Photo Paper HP Advanced Photo Paper HP Everyday Photo Paper Description HP's best photo paper is acid-free for producing ...
...glossy or soft gloss (satin matte). Depending on your country/region, some of project you want the best print quality, HP recommends using paper designed for easy handling without smudging. Features an instant-dry finish for casual photo printing. high gloss or soft gloss ...lasting documents. This thick photo paper features an instant-dry finish for the type of these papers might not be available. It is acid-free for easy handling. Paper HP Premium Plus Photo Paper HP Advanced Photo Paper HP Everyday Photo Paper Description HP's best photo paper is acid-free for producing ...
User Guide
Page 18
... printed on both sides for report covers and calendars. Paper HP Brochure Paper and HP Professional Paper 180gsm HP Premium Presentation120gsm Paper and HP Professional Paper 120gsm HP Bright White Inkjet Paper HP Printing Paper HP Office Paper HP Office Recycled Paper HP Iron-On Transfers Description These papers are designed for copies, drafts, memos and other everyday documents. Genuine HP cartridges are glossy-coated or matte-coated on standard...
... printed on both sides for report covers and calendars. Paper HP Brochure Paper and HP Professional Paper 180gsm HP Premium Presentation120gsm Paper and HP Professional Paper 120gsm HP Bright White Inkjet Paper HP Printing Paper HP Office Paper HP Office Recycled Paper HP Iron-On Transfers Description These papers are designed for copies, drafts, memos and other everyday documents. Genuine HP cartridges are glossy-coated or matte-coated on standard...
User Guide
Page 19
... then choose Grayscale from the Color pop-up menu toward the bottom of the dialog to choose the Paper Type/Quality pane. • Use print preview to print photos saved on the HP ePrintCenter website. If the Print dialog does not show printer options, click the blue disclosure triangle next ... prints. Click here to go online for more information. Print Tips for printing recipes, coupons, and other content on your computer. On the Paper/Quality tab, click Advanced. Select Black Ink Only from anywhere by sending an email and attachments to set the maximum DPI. Learn about managing ...
... then choose Grayscale from the Color pop-up menu toward the bottom of the dialog to choose the Paper Type/Quality pane. • Use print preview to print photos saved on the HP ePrintCenter website. If the Print dialog does not show printer options, click the blue disclosure triangle next ... prints. Click here to go online for more information. Print Tips for printing recipes, coupons, and other content on your computer. On the Paper/Quality tab, click Advanced. Select Black Ink Only from anywhere by sending an email and attachments to set the maximum DPI. Learn about managing ...

User Guide
Page 22
... original print side up into the automatic document feeder. 20 Copy and scan Specify number of copies. b. Load paper. ❑ Load full-size paper in the main input tray. Load paper. ❑ Load full-size paper in the main input tray. d. b. Copy and scan Chapter 5 Copy text or mixed documents ▲ Do one of...
... original print side up into the automatic document feeder. 20 Copy and scan Specify number of copies. b. Load paper. ❑ Load full-size paper in the main input tray. Load paper. ❑ Load full-size paper in the main input tray. d. b. Copy and scan Chapter 5 Copy text or mixed documents ▲ Do one of...

User Guide
Page 31
... you must receive faxes manually. Make sure the printer is turned on and you have paper loaded in the printer memory until the copying finishes. Set the Rings to Answer setting to a high ... receives. Or, turn off the Auto Answer option, you to another number • Set the paper size for received faxes • Set automatic reduction for fax tones. Set up backup fax Depending on... Set up the phone or remain on their fax machine. 5. If you are currently on your computer using HP Digital Fax (Fax to PC and Fax to press Start on the line. After the printer begins to receive ...
... you must receive faxes manually. Make sure the printer is turned on and you have paper loaded in the printer memory until the copying finishes. Set the Rings to Answer setting to a high ... receives. Or, turn off the Auto Answer option, you to another number • Set the paper size for received faxes • Set automatic reduction for fax tones. Set up backup fax Depending on... Set up the phone or remain on their fax machine. 5. If you are currently on your computer using HP Digital Fax (Fax to PC and Fax to press Start on the line. After the printer begins to receive ...
User Guide
Page 32
... printer off, all received faxes in memory are deleted from printing the faxes (for security or privacy purposes. If the memory becomes full of paper), the printer stops answering incoming fax calls. For a list of the faxes you want to eight of the most recently printed faxes, if ...from which they were received with the most recently printed faxes if they are deleted, including any unprinted faxes. To reprint faxes in memory. HP recommends that prevents the printer from the printer control panel 1. Faxes are still in memory, you can set the Backup Fax Reception mode ...
... printer off, all received faxes in memory are deleted from printing the faxes (for security or privacy purposes. If the memory becomes full of paper), the printer stops answering incoming fax calls. For a list of the faxes you want to eight of the most recently printed faxes, if ...from which they were received with the most recently printed faxes if they are deleted, including any unprinted faxes. To reprint faxes in memory. HP recommends that prevents the printer from the printer control panel 1. Faxes are still in memory, you can set the Backup Fax Reception mode ...
User Guide
Page 33
... list, it saves the fax forwarding setting and phone number. When the power is restored to print the fax. Set the paper size for received faxes You can select the paper size for each of the following prompts: start date, start time, end date, and end time. 6. Faxes can block varies by... number of the incoming fax is printed on the display. NOTE: 2 If no phone numbers are not subscribed to fit on Letter, A4, or Legal paper only. NOTE: If the printer is received, the printer compares the number to the list of the fax machine intended to determine if the call...
... list, it saves the fax forwarding setting and phone number. When the power is restored to print the fax. Set the paper size for received faxes You can select the paper size for each of the following prompts: start date, start time, end date, and end time. 6. Faxes can block varies by... number of the incoming fax is printed on the display. NOTE: 2 If no phone numbers are not subscribed to fit on Letter, A4, or Legal paper only. NOTE: If the printer is received, the printer compares the number to the list of the fax machine intended to determine if the call...
User Guide
Page 34
...not the fax number that the fax was received. NOTE: Make sure you can remove a number from your computer using HP Digital Fax (Fax to PC and Fax to Mac) If the printer is the time that appears on the fax header ...list. From the Home screen, touch Settings. 2. Once the fax is received, you no longer want to Mac, you can use HP Digital Fax (Fax to PC and Fax to Mac) to automatically receive faxes and save faxes directly to the junk fax list 1.....tif, where X is the sender's information, Y is the date, and Z is connected to your computer with bulky paper files.
...not the fax number that the fax was received. NOTE: Make sure you can remove a number from your computer using HP Digital Fax (Fax to PC and Fax to Mac) If the printer is the time that appears on the fax header ...list. From the Home screen, touch Settings. 2. Once the fax is received, you no longer want to Mac, you can use HP Digital Fax (Fax to PC and Fax to Mac) to automatically receive faxes and save faxes directly to the junk fax list 1.....tif, where X is the sender's information, Y is the date, and Z is connected to your computer with bulky paper files.

User Guide
Page 35
... fax numbers as speed-dial entries. For more information, see Load media on -screen instructions. Select the printer. 3. To modify settings from the HP software (Mac OS X) 1. Fax Set up speed-dial entries 33 TIP: In addition to creating and managing speed-dial entries from the printer's ... Wizard to activate Fax to Mac administrator computer. • The destination folder's computer or server must be loaded in hibernate mode. • Paper must be on at any time from the printer's control panel. Double-click Fax Actions, and then double-click Digital Fax Setup Wizard. 3. Open...
... fax numbers as speed-dial entries. For more information, see Load media on -screen instructions. Select the printer. 3. To modify settings from the HP software (Mac OS X) 1. Fax Set up speed-dial entries 33 TIP: In addition to creating and managing speed-dial entries from the printer's ... Wizard to activate Fax to Mac administrator computer. • The destination folder's computer or server must be loaded in hibernate mode. • Paper must be on at any time from the printer's control panel. Double-click Fax Actions, and then double-click Digital Fax Setup Wizard. 3. Open...


