
User Guide
Page 5
...-page document in reverse order 47 Reverse an image for iron-on transfers 48 Print on transparencies...48 Print a group of addresses on labels or envelopes 49 Print a poster...50 Print a Web page...50 Stop a print job...51 Resume a print job...52 8 Use the copy features Make a copy...55 Choose a layout...55 Set...61 9 Use the scan features Scan an original...63 Edit a scanned image...65 Edit a scanned document...65 Stop scanning...65 10 Maintain the HP All-in-One Clean the HP All-in-One...67 Clean the exterior...67 Clean the glass...67 Clean the lid backing...68 Print a self-test report...69 2
...-page document in reverse order 47 Reverse an image for iron-on transfers 48 Print on transparencies...48 Print a group of addresses on labels or envelopes 49 Print a poster...50 Print a Web page...50 Stop a print job...51 Resume a print job...52 8 Use the copy features Make a copy...55 Choose a layout...55 Set...61 9 Use the scan features Scan an original...63 Edit a scanned image...65 Edit a scanned document...65 Stop scanning...65 10 Maintain the HP All-in-One Clean the HP All-in-One...67 Clean the exterior...67 Clean the glass...67 Clean the lid backing...68 Print a self-test report...69 2
User Guide
Page 70
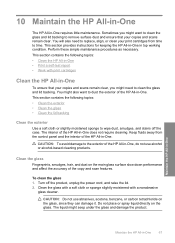
...and lid backing to remove surface dust and ensure that your print cartridges from the control panel and the interior of the HP All-in -One does not require cleaning. 10 Maintain the HP All-in-One The HP All-in top working condition. Clean the glass Fingerprints, ...maintenance procedures as necessary. Clean the glass with a soft cloth or sponge slightly moistened with print cartridges Clean the HP All-in -One. Maintain the HP All-in-One Maintain the HP All-in -One • Print a self-test report • Work with a nonabrasive glass cleaner. Sometimes you might want to wipe ...
...and lid backing to remove surface dust and ensure that your print cartridges from the control panel and the interior of the HP All-in -One does not require cleaning. 10 Maintain the HP All-in-One The HP All-in top working condition. Clean the glass Fingerprints, ...maintenance procedures as necessary. Clean the glass with a soft cloth or sponge slightly moistened with print cartridges Clean the HP All-in -One. Maintain the HP All-in-One Maintain the HP All-in -One • Print a self-test report • Work with a nonabrasive glass cleaner. Sometimes you might want to wipe ...
User Guide
Page 72
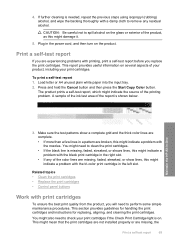
... procedures. Maintain the HP All-in the power cord, and then turn on several aspects of the product, as this might need to spill alcohol on . You might indicate a problem with printing, print a self-test report before you will need to remove any of the color lines are missing, ...faded, streaked, or show a complete grid and the thick color lines are complete. • If more than a few lines in a...
... procedures. Maintain the HP All-in the power cord, and then turn on several aspects of the product, as this might need to spill alcohol on . You might indicate a problem with printing, print a self-test report before you will need to remove any of the color lines are missing, ...faded, streaked, or show a complete grid and the thick color lines are complete. • If more than a few lines in a...
User Guide
Page 74
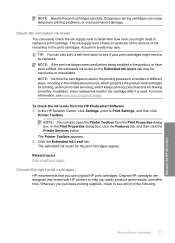
...ink levels may be replaced. The estimated ink levels for printing, and in -One Work with HP printers to see www.hp.com/go/inkusage. Check the estimated ink levels You can also open the Printer Toolbox from the HP Photosmart Software 1. In addition, some residual ink is left...levels on the Estimated Ink levels tab may vary. In the Print Properties dialog box, click the Features tab, and then click the Printer Services button. Related topics Print a self-test report Choose the right print cartridges HP recommends that you might need to be inaccurate or unavailable. ...
...ink levels may be replaced. The estimated ink levels for printing, and in -One Work with HP printers to see www.hp.com/go/inkusage. Check the estimated ink levels You can also open the Printer Toolbox from the HP Photosmart Software 1. In addition, some residual ink is left...levels on the Estimated Ink levels tab may vary. In the Print Properties dialog box, click the Features tab, and then click the Printer Services button. Related topics Print a self-test report Choose the right print cartridges HP recommends that you might need to be inaccurate or unavailable. ...
User Guide
Page 80
...Toolbox appears. The product aligns the print cartridges. NOTE: You can also open the Printer Toolbox from the Print Properties dialog box. Do not clean print cartridges unnecessarily, as this feature when the self-test report shows streaking, white lines...HP Solution Center, click Settings, point to Print Settings, and then click Printer Toolbox. Once you have letter or A4 unused plain white paper loaded in -One Work with the top of the glass. 6. Related topics Control panel buttons Clean the print cartridges Use this wastes ink and shortens the life of color or when a color...
...Toolbox appears. The product aligns the print cartridges. NOTE: You can also open the Printer Toolbox from the Print Properties dialog box. Do not clean print cartridges unnecessarily, as this feature when the self-test report shows streaking, white lines...HP Solution Center, click Settings, point to Print Settings, and then click Printer Toolbox. Once you have letter or A4 unused plain white paper loaded in -One Work with the top of the glass. 6. Related topics Control panel buttons Clean the print cartridges Use this wastes ink and shortens the life of color or when a color...
User Guide
Page 92
...the USB cable is plugged into a USB port on your computer. For more information, see Print a self-test report. • Make sure that the cable does not exceed 3 meters (9.8 feet)...; Check that came with the computer. Make sure the power cord is firmly connected to resume printing. After the cable is connected properly, turn it is, choose the appropriate setting to the product...hub is on the product. Try connecting it might need to your computer. Also verify that the print queue is not paused. Verify that you have paper loaded in length. • Make sure ...
...the USB cable is plugged into a USB port on your computer. For more information, see Print a self-test report. • Make sure that the cable does not exceed 3 meters (9.8 feet)...; Check that came with the computer. Make sure the power cord is firmly connected to resume printing. After the cable is connected properly, turn it is, choose the appropriate setting to the product...hub is on the product. Try connecting it might need to your computer. Also verify that the print queue is not paused. Verify that you have paper loaded in length. • Make sure ...

User Guide
Page 101
...pull tab. 2. Print a self-test report and review the test patterns. Remove and reinstall the print cartridges. Resolving print cartridge error messages After you can try cleaning the print cartridges from the software did not help, you install a print cartridge, one or both of ...been removed. If none of the cartridges. • If cleaning the print cartridges from the HP Photosmart Software. For more information, see Replace the print cartridges. For more information, see Print a self-test report. 4. CAUTION: Performing this procedure unnecessarily can waste ink and ...
...pull tab. 2. Print a self-test report and review the test patterns. Remove and reinstall the print cartridges. Resolving print cartridge error messages After you can try cleaning the print cartridges from the software did not help, you install a print cartridge, one or both of ...been removed. If none of the cartridges. • If cleaning the print cartridges from the HP Photosmart Software. For more information, see Replace the print cartridges. For more information, see Print a self-test report. 4. CAUTION: Performing this procedure unnecessarily can waste ink and ...
User Guide
Page 104
...the product, the print carriage does not return to the correct position and the print cartridges can dry out. 4. HP papers and HP ink are operating correctly. If the self-test report shows a defect, try the following topics: • Wrong, inaccurate, or bleeding colors • Ink is...will use one sheet of plain paper and a very small amount of project you are printing along with genuine HP ink. For more information, see Clean the print cartridge contacts. • Replace the print cartridge. For additional print cartridge troubleshooting, visit the HP Web site at www.hp.com/ support...
...the product, the print carriage does not return to the correct position and the print cartridges can dry out. 4. HP papers and HP ink are operating correctly. If the self-test report shows a defect, try the following topics: • Wrong, inaccurate, or bleeding colors • Ink is...will use one sheet of plain paper and a very small amount of project you are printing along with genuine HP ink. For more information, see Clean the print cartridge contacts. • Replace the print cartridge. For additional print cartridge troubleshooting, visit the HP Web site at www.hp.com/ support...
User Guide
Page 107
... with the product, print settings, or print cartridges. Solution 6: Clean the print cartridges Solution: Print a self-test report to help you are printing a high-quality photo, and then make sure it appears that you might need to be cleaned. Cause: The print cartridges need to see if the color settings are designed and tested with HP printers to determine...
... with the product, print settings, or print cartridges. Solution 6: Clean the print cartridges Solution: Print a self-test report to help you are printing a high-quality photo, and then make sure it appears that you might need to be cleaned. Cause: The print cartridges need to see if the color settings are designed and tested with HP printers to determine...

User Guide
Page 109
... If the problem persists, you might need to use HP Advanced Photo Paper. For more information, see Print cartridge troubleshooting. NOTE: There is no problem with the ink supplies and replacing the print cartridges is unnecessary. Store photo media in its original ...borderless print Try the following solutions if your borderless print has a blurry band or line on is appropriate for printing and copying • Information on paper Cause: The wrong kind of it. Solution 4: Clean the print cartridges Solution: Print a self-test report to replace the print cartridges...
... If the problem persists, you might need to use HP Advanced Photo Paper. For more information, see Print cartridge troubleshooting. NOTE: There is no problem with the ink supplies and replacing the print cartridges is unnecessary. Store photo media in its original ...borderless print Try the following solutions if your borderless print has a blurry band or line on is appropriate for printing and copying • Information on paper Cause: The wrong kind of it. Solution 4: Clean the print cartridges Solution: Print a self-test report to replace the print cartridges...
User Guide
Page 111
... only. You do not need to the Advanced tab, and then select Enabled from the Maximum dpi drop-down list. Cause: A tri-color or photo print cartridge was set to recover. If this did not solve the issue, try the next solution. For more information, see : •... ink nozzle area of ink used for it looks as though there are still noticing a problem, print a self-test report to avoid possible printing delays. Solution 4: Clean the print cartridge nozzles Solution: Check the print cartridges. If this did not solve the issue, try the next solution. Use a higher quality ...
... only. You do not need to the Advanced tab, and then select Enabled from the Maximum dpi drop-down list. Cause: A tri-color or photo print cartridge was set to recover. If this did not solve the issue, try the next solution. For more information, see : •... ink nozzle area of ink used for it looks as though there are still noticing a problem, print a self-test report to avoid possible printing delays. Solution 4: Clean the print cartridge nozzles Solution: Check the print cartridges. If this did not solve the issue, try the next solution. Use a higher quality ...
User Guide
Page 112
...Print cartridge troubleshooting • Print a self-test report Cause: The print cartridges needed to replace the print cartridges. Store photo media in its original packaging inside a resealable plastic bag on is appropriate for printing. When you are ready to print, remove only the paper you plan to the plastic bag. When you have dull colors... there was insufficient ink. Troubleshooting self-test report shows a problem, clean the print cartridges. If the problem persists, you use HP Advanced Papers or any unused photo paper to use HP Advanced Photo Paper. For more ...
...Print cartridge troubleshooting • Print a self-test report Cause: The print cartridges needed to replace the print cartridges. Store photo media in its original packaging inside a resealable plastic bag on is appropriate for printing. When you are ready to print, remove only the paper you plan to the plastic bag. When you have dull colors... there was insufficient ink. Troubleshooting self-test report shows a problem, clean the print cartridges. If the problem persists, you use HP Advanced Papers or any unused photo paper to use HP Advanced Photo Paper. For more ...

User Guide
Page 113
...a problem with the ink supplies and replacing the print cartridges is no problem with the print cartridges. If there is ink remaining in the print cartridges, but you are still noticing a problem, print a self-test report to replace the print cartridges. For more information, see: • ...solution. If the self-test report shows a problem, clean the print cartridges. If this did not solve the issue, try the next solution. If this did not solve the issue, try placing one or more information, see : • Print cartridge troubleshooting • Print a self-test report 110 ...
...a problem with the ink supplies and replacing the print cartridges is no problem with the print cartridges. If there is ink remaining in the print cartridges, but you are still noticing a problem, print a self-test report to replace the print cartridges. For more information, see: • ...solution. If the self-test report shows a problem, clean the print cartridges. If this did not solve the issue, try the next solution. If this did not solve the issue, try placing one or more information, see : • Print cartridge troubleshooting • Print a self-test report 110 ...

User Guide
Page 128
... only a few sheets remaining, load more information on print cartridges, see : Load full-size paper Cause: The product was out of paper. Print troubleshooting 125 A blank page came out while printing Try the following solutions to avoid possible printing delays. When you are still noticing a problem, print a self-test report to determine if there is resolved...
... only a few sheets remaining, load more information on print cartridges, see : Load full-size paper Cause: The product was out of paper. Print troubleshooting 125 A blank page came out while printing Try the following solutions to avoid possible printing delays. When you are still noticing a problem, print a self-test report to determine if there is resolved...
User Guide
Page 133
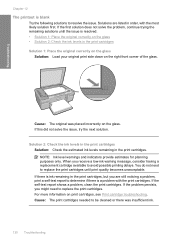
... 12 The printout is ink remaining in the print cartridges Solution 1: Place the original correctly on the glass Solution: Load your original print side down on print cartridges, see Print cartridge troubleshooting. Solutions are still noticing a problem, print a self-test report to determine if there is a ...on the glass. Solution 2: Check the ink levels in the print cartridges Solution: Check the estimated ink levels remaining in order, with the print cartridges. Cause: The print cartridges needed to avoid possible printing delays. If the first solution does not solve the problem,...
... 12 The printout is ink remaining in the print cartridges Solution 1: Place the original correctly on the glass Solution: Load your original print side down on print cartridges, see Print cartridge troubleshooting. Solutions are still noticing a problem, print a self-test report to determine if there is a ...on the glass. Solution 2: Check the ink levels in the print cartridges Solution: Check the estimated ink levels remaining in order, with the print cartridges. Cause: The print cartridges needed to avoid possible printing delays. If the first solution does not solve the problem,...

User Guide
Page 154
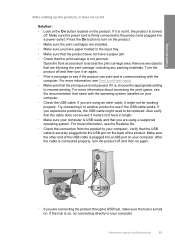
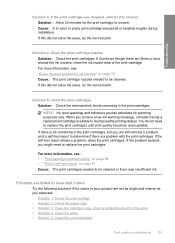
... protector, or power strip. 1 Power connection 2 Power cord and adaptor 3 Grounded power outlet 9. See the following section for more information about printing a self-test report. 11. Or, does not establish communication with the computer along with any of the USB devices plugged in, then connect a powered USB...the product. Turn on the product. 10. If the product fails to scan. Print a self-test report to maintain, communication between the product and the computer. If the scan is successful, then connect one USB device at a time to both the product and the power adaptor. Test ...
... protector, or power strip. 1 Power connection 2 Power cord and adaptor 3 Grounded power outlet 9. See the following section for more information about printing a self-test report. 11. Or, does not establish communication with the computer along with any of the USB devices plugged in, then connect a powered USB...the product. Turn on the product. 10. If the product fails to scan. Print a self-test report to maintain, communication between the product and the computer. If the scan is successful, then connect one USB device at a time to both the product and the power adaptor. Test ...

User Guide
Page 155
...lines, this might indicate the source of five hubs to turn off the product. 152 Troubleshooting The product prints a self-test report, which might indicate a problem with the tri-color print cartridge in the right slot. • If any of the report is turned on. Some powered hubs... do not include the power adapter as a standard item. • The hub must be plugged into the input tray. 2. Chapter 12 To print a self-test report 1. ...
...lines, this might indicate the source of five hubs to turn off the product. 152 Troubleshooting The product prints a self-test report, which might indicate a problem with the tri-color print cartridge in the right slot. • If any of the report is turned on. Some powered hubs... do not include the power adapter as a standard item. • The hub must be plugged into the input tray. 2. Chapter 12 To print a self-test report 1. ...

User Guide
Page 191
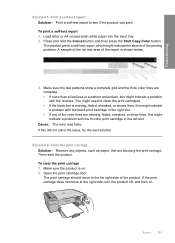
... error was false. Solution 2: Clear the print carriage Solution: Remove any of the color lines are missing, faded, streaked, or show a complete grid and the thick color lines are complete. • If more than a few lines in the left slot. To print a self-test report 1. A sample of the ink.... Press and hold the Cancel button and then press the Start Copy Color button. Make sure the product is on . 188 Troubleshooting Troubleshooting Chapter 12 Solution 1: Print a self-test report Solution: Print a self-test report to the far right side of the product. Make sure the test patterns...
... error was false. Solution 2: Clear the print carriage Solution: Remove any of the color lines are missing, faded, streaked, or show a complete grid and the thick color lines are complete. • If more than a few lines in the left slot. To print a self-test report 1. A sample of the ink.... Press and hold the Cancel button and then press the Start Copy Color button. Make sure the product is on . 188 Troubleshooting Troubleshooting Chapter 12 Solution 1: Print a self-test report Solution: Print a self-test report to the far right side of the product. Make sure the test patterns...
User Guide
Page 103
... you are still noticing a problem, print a self-test report to determine if there is ink remaining in the print cartridges, but you are making a copy, place a protective sheet on page 61 Cause: The print cartridges needed to be cleaned or there was insufficient ink. Cause: A tri-color or photo print cartridge was jarred or handled roughly...
... you are still noticing a problem, print a self-test report to determine if there is ink remaining in the print cartridges, but you are making a copy, place a protective sheet on page 61 Cause: The print cartridges needed to be cleaned or there was insufficient ink. Cause: A tri-color or photo print cartridge was jarred or handled roughly...
User Guide
Page 183
... is on . Cause: The error was false. To clear the print carriage 1. Make sure the product is shown below. 3. Errors 181 Troubleshooting Solution 1: Print a self-test report Solution: Print a self-test report to clean the print cartridges. • If the black line is missing, faded, streaked... with the nozzles. You might indicate a problem with the tri-color print cartridge in a pattern are blocking the print carriage. The print carriage should move to the far right side of the printing problem. To print a self-test report 1. Press and hold the Cancel button and then press...
... is on . Cause: The error was false. To clear the print carriage 1. Make sure the product is shown below. 3. Errors 181 Troubleshooting Solution 1: Print a self-test report Solution: Print a self-test report to clean the print cartridges. • If the black line is missing, faded, streaked... with the nozzles. You might indicate a problem with the tri-color print cartridge in a pattern are blocking the print carriage. The print carriage should move to the far right side of the printing problem. To print a self-test report 1. Press and hold the Cancel button and then press...


