Service Guide
Page 18
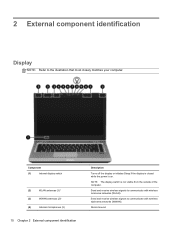
Send and receive wireless signals to communicate with wireless local area networks (WLAN). Record sound. Component (1) Internal display switch (2) WLAN antennas (3)* (3) WWAN antennas (2)* (4) Internal microphones (2) 10 Chapter 2 External component identification Description Turns off the display or initiates Sleep if the ...
Send and receive wireless signals to communicate with wireless local area networks (WLAN). Record sound. Component (1) Internal display switch (2) WLAN antennas (3)* (3) WWAN antennas (2)* (4) Internal microphones (2) 10 Chapter 2 External component identification Description Turns off the display or initiates Sleep if the ...

Service Guide
Page 19
... to the section of the computer. For optimal transmission, keep the areas immediately around the antennas free from the outside of the computer. Record sound. Display 11 Component (1) Internal display switch (2) WLAN antennas (2)* (3) WWAN antennas (2)* (select models only) (4) Internal microphone(s) (1 or ... light (select models only) On: The webcam is in use . To use the webcam, select Start > All Programs > HP > HP Webcam. (7) Ambient light sensor When activated, the sensor automatically adjusts the display brightness based on . To see wireless regulatory notices,...
... to the section of the computer. For optimal transmission, keep the areas immediately around the antennas free from the outside of the computer. Record sound. Display 11 Component (1) Internal display switch (2) WLAN antennas (2)* (3) WWAN antennas (2)* (select models only) (4) Internal microphone(s) (1 or ... light (select models only) On: The webcam is in use . To use the webcam, select Start > All Programs > HP > HP Webcam. (7) Ambient light sensor When activated, the sensor automatically adjusts the display brightness based on . To see wireless regulatory notices,...
Service Guide
Page 23
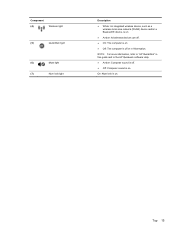
Top 15 On: Num lock is on . NOTE: For more information, refer to "HP QuickWeb" in Hibernation. Component (4) Wireless light (5) QuickWeb light (6) Mute light (7) Num lock light Description ● White: An integrated wireless device, such as a wireless local area network (WLAN) device and/or a Bluetooth® device, is on. ● Amber: All wireless devices are off. ● On: The computer is on. ● Off: The computer is off or in this guide and to the HP Quickweb software Help ● Amber: Computer sound is off. ● Off: Computer sound is on .
Top 15 On: Num lock is on . NOTE: For more information, refer to "HP QuickWeb" in Hibernation. Component (4) Wireless light (5) QuickWeb light (6) Mute light (7) Num lock light Description ● White: An integrated wireless device, such as a wireless local area network (WLAN) device and/or a Bluetooth® device, is on. ● Amber: All wireless devices are off. ● On: The computer is on. ● Off: The computer is off or in this guide and to the HP Quickweb software Help ● Amber: Computer sound is off. ● Off: Computer sound is on .
Service Guide
Page 25
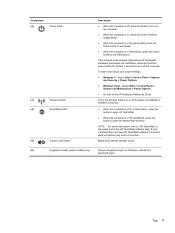
...button briefly to exit Sleep. ● When the computer is in HP QuickWeb, press the button to open the default Web browser. Allows a fingerprint logon to the HP QuickWeb software Help. To learn more information, refer to "HP QuickWeb" in this guide and to Windows, instead of a password .... ● When the computer is in Hibernation, press the button briefly to exit Hibernation. Mutes and restores speaker sound. NOTE: For more about your computer does not have HP QuickWeb software, the button does not perform any action or function. If your power settings: ● Windows 7-Select ...
...button briefly to exit Sleep. ● When the computer is in HP QuickWeb, press the button to open the default Web browser. Allows a fingerprint logon to the HP QuickWeb software Help. To learn more information, refer to "HP QuickWeb" in this guide and to Windows, instead of a password .... ● When the computer is in Hibernation, press the button briefly to exit Hibernation. Mutes and restores speaker sound. NOTE: For more about your computer does not have HP QuickWeb software, the button does not perform any action or function. If your power settings: ● Windows 7-Select ...

Service Guide
Page 29
... Blinking turquoise: The hard drive or optical drive is being accessed. ● Amber: HP 3D DriveGuard has temporarily parked the hard drive. Connect optional USB devices. or - Produces SRS Premium sound (select models only). These models show a slightly different icon. (4) ExpressCard slot (select.... Connects an optional IEEE 1394 or 1394a device, such as a camcorder. NOTE: To use the SRS Premium sound software, select Start > All Programs > SRS Premium Sound. Component (1) Power connector (2) 1394 port (3) USB or SuperSpeed USB ports (2) - NOTE: Some models support SuperSpeed ...
... Blinking turquoise: The hard drive or optical drive is being accessed. ● Amber: HP 3D DriveGuard has temporarily parked the hard drive. Connect optional USB devices. or - Produces SRS Premium sound (select models only). These models show a slightly different icon. (4) ExpressCard slot (select.... Connects an optional IEEE 1394 or 1394a device, such as a camcorder. NOTE: To use the SRS Premium sound software, select Start > All Programs > SRS Premium Sound. Component (1) Power connector (2) 1394 port (3) USB or SuperSpeed USB ports (2) - NOTE: Some models support SuperSpeed ...
Service Guide
Page 31
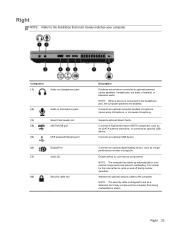
...-out (headphone) jack (2) Audio-in (microphone) jack (3) Smart Card reader slot (4) eSATA/USB port (5) USB powered/charging port (6) DisplayPort (7) Vents (2) (8) Security cable slot Description Produces sound when connected to the illustration that most closely matches your computer. NOTE: When a device is connected to cool internal components and prevent overheating. NOTE: The...
...-out (headphone) jack (2) Audio-in (microphone) jack (3) Smart Card reader slot (4) eSATA/USB port (5) USB powered/charging port (6) DisplayPort (7) Vents (2) (8) Security cable slot Description Produces sound when connected to the illustration that most closely matches your computer. NOTE: When a device is connected to cool internal components and prevent overheating. NOTE: The...
Service Guide
Page 32
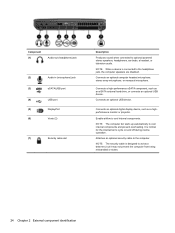
... to cool internal components. Component (1) Audio-out (headphone) jack (2) Audio-in (microphone) jack (3) eSATA/USB port (4) USB port (5) DisplayPort (6) Vents (2) (7) Security cable slot Description Produces sound when connected to cool internal components and prevent overheating. NOTE: The computer fan starts up automatically to optional powered stereo speakers, headphones, ear buds, a headset...
... to cool internal components. Component (1) Audio-out (headphone) jack (2) Audio-in (microphone) jack (3) eSATA/USB port (4) USB port (5) DisplayPort (6) Vents (2) (7) Security cable slot Description Produces sound when connected to cool internal components and prevent overheating. NOTE: The computer fan starts up automatically to optional powered stereo speakers, headphones, ear buds, a headset...
Service Guide
Page 33
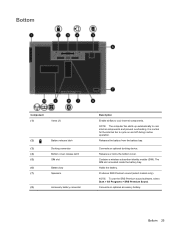
NOTE: To use the SRS Premium sound software, select Start > All Programs > SRS Premium Sound. Releases the battery from the battery bay. Connects an optional accessory battery. Connects an optional docking device. Holds the battery. Bottom 25 ... or locks the bottom cover. The SIM slot is normal for the internal fan to cycle on and off during routine operation. Produces SRS Premium sound (select models only). It is located inside the battery bay. Bottom Component (1) Vents (3) (2) Battery release latch (3) Docking connector (4) Bottom cover release latch (5) ...
NOTE: To use the SRS Premium sound software, select Start > All Programs > SRS Premium Sound. Releases the battery from the battery bay. Connects an optional accessory battery. Connects an optional docking device. Holds the battery. Bottom 25 ... or locks the bottom cover. The SIM slot is normal for the internal fan to cycle on and off during routine operation. Produces SRS Premium sound (select models only). It is located inside the battery bay. Bottom Component (1) Vents (3) (2) Battery release latch (3) Docking connector (4) Bottom cover release latch (5) ...

Reference Guide
Page 23
Click the Dialing Rules tab. 5. Click Hardware and Sound. 3. Enter the area code, a carrier code (if necessary), and the number for the new location setting. 7. Do one of the cable (2) toward the computer. To ...
Click the Dialing Rules tab. 5. Click Hardware and Sound. 3. Enter the area code, a carrier code (if necessary), and the number for the new location setting. 7. Do one of the cable (2) toward the computer. To ...

Reference Guide
Page 25
Audio Your computer provides a variety of audio-related functions: ● Play music. ● Record sound. ● Download music from the Internet. ● Create multimedia presentations. ● Transmit sound and images with the fn key) ● Media keys Refer to the Getting Started guide for information about your computer model, you may have the...
Audio Your computer provides a variety of audio-related functions: ● Play music. ● Record sound. ● Download music from the Internet. ● Create multimedia presentations. ● Transmit sound and images with the fn key) ● Media keys Refer to the Getting Started guide for information about your computer model, you may have the...

Reference Guide
Page 26
... hotkeys (specific keys pressed in a setting free of volume controls your computer has. When the Sound window opens, click the Sounds tab. Select Start > Control Panel > Hardware and Sound > Sound. 2. Adjusting the volume Depending on your computer model, you can also be controlled through the operating... personal injury, adjust the volume before putting on your computer, select Start > Control Panel > Hardware and Sound > Sound. To check the recording functions on headphones, earbuds, or a headset. Save the file to the Regulatory, Safety and Environmental Notices.
... hotkeys (specific keys pressed in a setting free of volume controls your computer has. When the Sound window opens, click the Sounds tab. Select Start > Control Panel > Hardware and Sound > Sound. 2. Adjusting the volume Depending on your computer model, you can also be controlled through the operating... personal injury, adjust the volume before putting on your computer, select Start > Control Panel > Hardware and Sound > Sound. To check the recording functions on headphones, earbuds, or a headset. Save the file to the Regulatory, Safety and Environmental Notices.

Reference Guide
Page 27
Save the file to your computer, follow these steps: 1. Click Start Recording and speak into the microphone. To check the recording functions on your computer, select Start > Control Panel > Audio. Open a multimedia program and play back the sound. To confirm or change the audio settings on your desktop. 3. Select Start > All Programs > Accessories > Sound Recorder. 2. Audio 17
Save the file to your computer, follow these steps: 1. Click Start Recording and speak into the microphone. To check the recording functions on your computer, select Start > Control Panel > Audio. Open a multimedia program and play back the sound. To confirm or change the audio settings on your desktop. 3. Select Start > All Programs > Accessories > Sound Recorder. 2. Audio 17
Reference Guide
Page 43
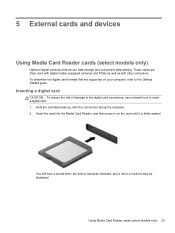
... cards and devices Using Media Card Reader cards (select models only) Optional digital cards provide secure data storage and convenient data sharing. You will hear a sound when the device has been detected, and a menu of damage to the digital card connectors, use minimal force to the Getting Started guide. Using Media...
... cards and devices Using Media Card Reader cards (select models only) Optional digital cards provide secure data storage and convenient data sharing. You will hear a sound when the device has been detected, and a menu of damage to the digital card connectors, use minimal force to the Getting Started guide. Using Media...
Reference Guide
Page 46
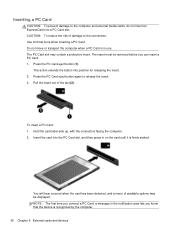
... it is firmly seated. Press the PC Card eject button (1). Hold the card label-side up, with the connectors facing the computer. 2. You will hear a sound when the card has been detected, and a menu of available options may contain a protective insert. Press the PC Card eject button again to release the...
... it is firmly seated. Press the PC Card eject button (1). Hold the card label-side up, with the connectors facing the computer. 2. You will hear a sound when the card has been detected, and a menu of available options may contain a protective insert. Press the PC Card eject button again to release the...
Reference Guide
Page 48
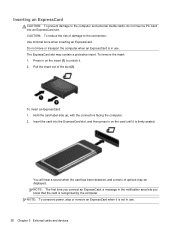
... Press in on the card until it is firmly seated. Hold the card label-side up, with the connectors facing the computer. 2. You will hear a sound when the card has been detected, and a menu of the slot (2). The ExpressCard slot may be displayed. NOTE: To conserve power, stop or remove an...
... Press in on the card until it is firmly seated. Hold the card label-side up, with the connectors facing the computer. 2. You will hear a sound when the card has been detected, and a menu of the slot (2). The ExpressCard slot may be displayed. NOTE: To conserve power, stop or remove an...
Reference Guide
Page 51
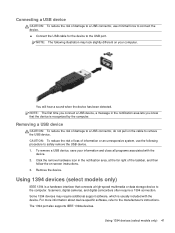
... system, use minimal force to connect the device. ▲ Connect the USB cable for the device to safely remove the USB device. 1. You will hear a sound when the device has been detected.
... system, use minimal force to connect the device. ▲ Connect the USB cable for the device to safely remove the USB device. 1. You will hear a sound when the device has been detected.

Reference Guide
Page 52
... the 1394 device. 1. CAUTION: To reduce the risk of the taskbar, and then follow the on the cable to the manufacturer's instructions. You will hear a sound when the device has been detected. To remove a 1394 device, save your information and close all programs associated with the device. Click the remove hardware...
... the 1394 device. 1. CAUTION: To reduce the risk of the taskbar, and then follow the on the cable to the manufacturer's instructions. You will hear a sound when the device has been detected. To remove a 1394 device, save your information and close all programs associated with the device. Click the remove hardware...

Reference Guide
Page 53
... device. ▲ To connect an eSATA device to the computer, connect the eSATA cable for the device to remove the eSATA device. You will hear a sound when the device has been detected. Remove the device.
... device. ▲ To connect an eSATA device to the computer, connect the eSATA cable for the device to remove the eSATA device. You will hear a sound when the device has been detected. Remove the device.
Reference Guide
Page 59
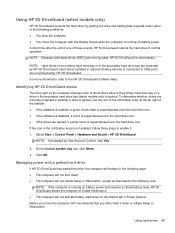
.... On the Icon in the following ways: ● The computer will not shut down or initiate Sleep or Hibernation. Before you move the computer, HP recommends that a drive in the primary hard drive bay or a drive in the secondary hard drive bay (select models only) is not enabled, follow.... ● The computer will not activate battery alarms set on the Alarms tab in Power Options. Click OK. Select Start > Control Panel > Hardware and Sound > HP 3D DriveGuard. Managing power with the display closed while the computer is running on battery power and reaches a critical battery level...
.... On the Icon in the following ways: ● The computer will not shut down or initiate Sleep or Hibernation. Before you move the computer, HP recommends that a drive in the primary hard drive bay or a drive in the secondary hard drive bay (select models only) is not enabled, follow.... ● The computer will not activate battery alarms set on the Alarms tab in Power Options. Click OK. Select Start > Control Panel > Hardware and Sound > HP 3D DriveGuard. Managing power with the display closed while the computer is running on battery power and reaches a critical battery level...


