HP ProtectTools Security Software 2010
Page 15
...Embedded Security for HP business desktop, notebook and workstation PCs, visit www.hp.com/ go/...HP, including more information on the embedded security chip solution for HP ProtectTools features and benefits Feature W orks with HP...entire hard drive (minus 5GB for HP ProtectTools versions 4.0 or later support the... for HP ProtectTools Face Recognition for HP ProtectTools provides a new level of convenience for HP ProtectTools ... is present, Credential Manager for HP ProtectTools version 4.0 and later, ... HP ProtectTools uses it to set up and use, provides multifactor authentication into the HP ...
...Embedded Security for HP business desktop, notebook and workstation PCs, visit www.hp.com/ go/...HP, including more information on the embedded security chip solution for HP ProtectTools features and benefits Feature W orks with HP...entire hard drive (minus 5GB for HP ProtectTools versions 4.0 or later support the... for HP ProtectTools Face Recognition for HP ProtectTools provides a new level of convenience for HP ProtectTools ... is present, Credential Manager for HP ProtectTools version 4.0 and later, ... HP ProtectTools uses it to set up and use, provides multifactor authentication into the HP ...

Service Guide
Page 6
... Workstation guidelines 59 Equipment guidelines 60 Component replacement procedures 61 Service tag ...61 Computer feet ...62 Battery ...63 SIM ...64 Display assembly components (panel, bezel, webcam, microphone 65 Bottom door ...69 Smart card reader ...70 Optical drive ...71 Upgrade bay ...73 Hard drive ...75 RTC battery ...77 Memory modules ...78 WWAN...
... Workstation guidelines 59 Equipment guidelines 60 Component replacement procedures 61 Service tag ...61 Computer feet ...62 Battery ...63 SIM ...64 Display assembly components (panel, bezel, webcam, microphone 65 Bottom door ...69 Smart card reader ...70 Optical drive ...71 Upgrade bay ...73 Hard drive ...75 RTC battery ...77 Memory modules ...78 WWAN...
Service Guide
Page 12
...rpm ● 320-GB, 7200-rpm Integrated dual-array microphone √ (webcam models only) Integrated mono (non-webcam models) √ HD audio √ Stereo speakers (2) √ Integrated webcam (720p HD) √ 56K V.92 MDC data/fax modem √ ...network interface card (non-vPro models) S3/S4/S5 wake on LAN √ NIC power down technology √ Ethernet cable not included √ HP EliteBook 8460p Notebook PC √ HP EliteBook 8460w Mobile Workstation √ √ √ √ √ √ √ √ √ √ √ √...
...rpm ● 320-GB, 7200-rpm Integrated dual-array microphone √ (webcam models only) Integrated mono (non-webcam models) √ HD audio √ Stereo speakers (2) √ Integrated webcam (720p HD) √ 56K V.92 MDC data/fax modem √ ...network interface card (non-vPro models) S3/S4/S5 wake on LAN √ NIC power down technology √ Ethernet cable not included √ HP EliteBook 8460p Notebook PC √ HP EliteBook 8460w Mobile Workstation √ √ √ √ √ √ √ √ √ √ √ √...

Service Guide
Page 19
...computer. Send and receive wireless signals to communicate with wireless local area networks (WLAN). Display 11 To use the webcam, select Start > All Programs > HP > HP Webcam. (7) Ambient light sensor When activated, the sensor automatically adjusts the display brightness based on . For optimal transmission,...and Environmental Notices that applies to activate the keyboard light. *The antennas are located in Help and Support. On: The webcam is on the lighting conditions in your country or region. These notices are not visible from obstructions. To see wireless ...
...computer. Send and receive wireless signals to communicate with wireless local area networks (WLAN). Display 11 To use the webcam, select Start > All Programs > HP > HP Webcam. (7) Ambient light sensor When activated, the sensor automatically adjusts the display brightness based on . For optimal transmission,...and Environmental Notices that applies to activate the keyboard light. *The antennas are located in Help and Support. On: The webcam is on the lighting conditions in your country or region. These notices are not visible from obstructions. To see wireless ...

Service Guide
Page 20
To use the webcam, select Start > All Programs > HP > HP Webcam. *The antennas are located in Help and Support. 12 Chapter 2 External component identification These notices are not visible from obstructions. For optimal transmission, keep the areas immediately around the antennas free from the outside of the Regulatory, Safety and Environmental Notices that applies to the section of the computer. To see wireless regulatory notices, refer to your country or region. Component Description (6) Webcam (select models only) Records video and captures still photographs.
To use the webcam, select Start > All Programs > HP > HP Webcam. *The antennas are located in Help and Support. 12 Chapter 2 External component identification These notices are not visible from obstructions. For optimal transmission, keep the areas immediately around the antennas free from the outside of the Regulatory, Safety and Environmental Notices that applies to the section of the computer. To see wireless regulatory notices, refer to your country or region. Component Description (6) Webcam (select models only) Records video and captures still photographs.
Service Guide
Page 44
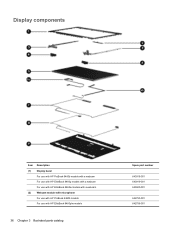
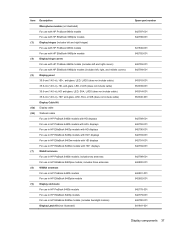
Display components Item Description (1) Display bezel For use with HP ProBook 6460b models with a webcam For use with HP EliteBook 8460p models with a webcam For use with HP EliteBook 8460w models with a webcam (2) Webcam module with microphone For use with HP ProBook 6460b models For use with HP EliteBook 8460p/w models 36 Chapter 3 Illustrated parts catalog Spare part number 643918-001 643919-001 643920-001 642795-001 642796-001
Display components Item Description (1) Display bezel For use with HP ProBook 6460b models with a webcam For use with HP EliteBook 8460p models with a webcam For use with HP EliteBook 8460w models with a webcam (2) Webcam module with microphone For use with HP ProBook 6460b models For use with HP EliteBook 8460p/w models 36 Chapter 3 Illustrated parts catalog Spare part number 643918-001 643919-001 643920-001 642795-001 642796-001
Service Guide
Page 45
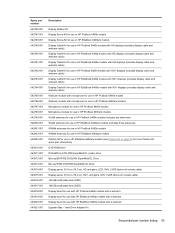
...) Display Cable Kit (6a) Display cable (6b) Webcam cable For use in HP ProBook 6460b models with HD displays For use in HP ProBook 6460b models with HD+ displays For use in HP EliteBook 8460p models with HD displays For use in HP EliteBook 8460p models with HD+ displays For use in HP EliteBook 8460w models with HD displays For use...
...) Display Cable Kit (6a) Display cable (6b) Webcam cable For use in HP ProBook 6460b models with HD displays For use in HP ProBook 6460b models with HD+ displays For use in HP EliteBook 8460p models with HD displays For use in HP EliteBook 8460p models with HD+ displays For use in HP EliteBook 8460w models with HD displays For use...
Service Guide
Page 61
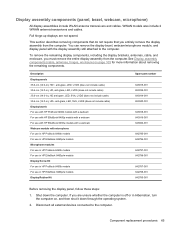
... not include cable) 160-GB solid-state drive (SSD) 128-GB solid-state drive (SSD) Display bezel for use with HP ProBook 6460b models with a webcam Display bezel for use with HP EliteBook 8460p models with a webcam Display bezel for use with HP EliteBook 8460w models with a webcam Upgrade Bay - Hard Drive Adapter Kit Sequential part number listing 53
... not include cable) 160-GB solid-state drive (SSD) 128-GB solid-state drive (SSD) Display bezel for use with HP ProBook 6460b models with a webcam Display bezel for use with HP EliteBook 8460p models with a webcam Display bezel for use with HP EliteBook 8460w models with a webcam Upgrade Bay - Hard Drive Adapter Kit Sequential part number listing 53
Service Guide
Page 73
... use in ), HD+ anti-glare, LED, SVA, LVDS (does not include cable) Display bezels For use with HP ProBook 6460b models with a webcam For use with HP EliteBook 8460p models with a webcam For use with HP EliteBook 8460w models with a webcam Webcam module with the display assembly still attached to the computer. This section describes removing components that do not...
... use in ), HD+ anti-glare, LED, SVA, LVDS (does not include cable) Display bezels For use with HP ProBook 6460b models with a webcam For use with HP EliteBook 8460p models with a webcam For use with HP EliteBook 8460w models with a webcam Webcam module with the display assembly still attached to the computer. This section describes removing components that do not...

Service Guide
Page 75
...6. If it sits at the top of the display panel (1). 11. Disconnect the display panel cable from the module (2), and then remove the webcam. 7. Remove the six Phillips PM2.5×5.0 screws (2) that secure the display panel to the brackets. Pivot the display panel upward until it is ...necessary to replace the webcam module, gently pull the module away from the doublesided tape on the display enclosure (1), disconnect the webcam cable from the back of the display panel. 9. Component replacement procedures 67 Remove ...
...6. If it sits at the top of the display panel (1). 11. Disconnect the display panel cable from the module (2), and then remove the webcam. 7. Remove the six Phillips PM2.5×5.0 screws (2) that secure the display panel to the brackets. Pivot the display panel upward until it is ...necessary to replace the webcam module, gently pull the module away from the doublesided tape on the display enclosure (1), disconnect the webcam cable from the back of the display panel. 9. Component replacement procedures 67 Remove ...
Service Guide
Page 117
... of display spare parts, see Bottom cover on page 95) j. b. Bottom cover (see Display components on page 88) i. Keyboard (see Display assembly components (panel, bezel, webcam, microphone) on page 65. Disconnect the power from the computer by first unplugging the power cord from the AC outlet, and then unplugging the AC...
... of display spare parts, see Bottom cover on page 95) j. b. Bottom cover (see Display components on page 88) i. Keyboard (see Display assembly components (panel, bezel, webcam, microphone) on page 65. Disconnect the power from the computer by first unplugging the power cord from the AC outlet, and then unplugging the AC...

Service Guide
Page 118
Lift the display assembly (3) straight up and remove it. Remove the antennas from the system board. 3. Disconnect the display cable (1) and webcam cable (2) from the holes they route through in the computer (1) that the wireless antenna cables are routed and arranged properly. Failure to the computer. 4. CAUTION: ...
Lift the display assembly (3) straight up and remove it. Remove the antennas from the system board. 3. Disconnect the display cable (1) and webcam cable (2) from the holes they route through in the computer (1) that the wireless antenna cables are routed and arranged properly. Failure to the computer. 4. CAUTION: ...

Service Guide
Page 120
Lift the display panel from its routing path (1) and the webcam cable from the display enclosure (3). 12. If it is necessary to remove the display panel/webcam cable, remove the display cable from its routing path (2). 13. Disconnect the display panel cable from the back of the display panel (3), and then remove the display panel cable from the panel (4). 112 Chapter 4 Removal and replacement procedures 11.
Lift the display panel from its routing path (1) and the webcam cable from the display enclosure (3). 12. If it is necessary to remove the display panel/webcam cable, remove the display cable from its routing path (2). 13. Disconnect the display panel cable from the back of the display panel (3), and then remove the display panel cable from the panel (4). 112 Chapter 4 Removal and replacement procedures 11.

Service Guide
Page 125
Position the computer right-side up, with the front toward you. 2. Disconnect the following cables from the system board (as necessary): ● (1): Antenna cables from the rubber clamp ● (2): Lid sensor board cable ● (3): Display cable ● (4): Webcam cable ● (5): Fingerprint reader cable Component replacement procedures 117 Remove the system board: 1.
Position the computer right-side up, with the front toward you. 2. Disconnect the following cables from the system board (as necessary): ● (1): Antenna cables from the rubber clamp ● (2): Lid sensor board cable ● (3): Display cable ● (4): Webcam cable ● (5): Fingerprint reader cable Component replacement procedures 117 Remove the system board: 1.

Service Guide
Page 159
... 21 hard drive recovery 136, 140 heat sink removal 90 spare part number 34, 52, 90 hinge removal 113 spare part number 49 HP QuickWeb light 15 I integrated webcam light, identifying 11 internal display switch 10, 11 internal microphones, identifying 10, 11 J jacks audio-in (microphone) 23, 24 audio-out (headphone) 23...
... 21 hard drive recovery 136, 140 heat sink removal 90 spare part number 34, 52, 90 hinge removal 113 spare part number 49 HP QuickWeb light 15 I integrated webcam light, identifying 11 internal display switch 10, 11 internal microphones, identifying 10, 11 J jacks audio-in (microphone) 23, 24 audio-out (headphone) 23...
Service Guide
Page 160
light sensor, identifying 11 lights battery 20 caps lock 14 hard drive 21 HP QuickWeb 15 mute 15 num lock 15 power 14, 20 webcam 11 wireless 15, 20 M mass storage devices, spare part numbers 41 Media Card Reader, identifying 21...memory module 3 microphone 4 modem module 4 operating system 7 optical drives 4 pointing devices 6 ports 5 power requirements 6 processors 1 product name 1 security 7 serviceability 9 webcam 4 wireless 5 product name 1 Q QuickWeb button, identifying 17 R recovery partition 136, 140 removal/replacement preliminaries 56 procedures 61 restoring the hard drive 136, 140 RJ-...
light sensor, identifying 11 lights battery 20 caps lock 14 hard drive 21 HP QuickWeb 15 mute 15 num lock 15 power 14, 20 webcam 11 wireless 15, 20 M mass storage devices, spare part numbers 41 Media Card Reader, identifying 21...memory module 3 microphone 4 modem module 4 operating system 7 optical drives 4 pointing devices 6 ports 5 power requirements 6 processors 1 product name 1 security 7 serviceability 9 webcam 4 wireless 5 product name 1 Q QuickWeb button, identifying 17 R recovery partition 136, 140 removal/replacement preliminaries 56 procedures 61 restoring the hard drive 136, 140 RJ-...
Service Guide
Page 161
... 23, 24 USB ports, identifying 21, 23, 24 V vents, identifying 23, 24, 25 volume mute button, identifying 17 W webcam 11, 12 product description 4 spare part number 36, 53, 65 webcam light, identifying 11 webcam, identifying 11, 12 Windows 7 operating system DVD 137 Windows Backup and Restore 134 Windows Vista operating system DVD 140...
... 23, 24 USB ports, identifying 21, 23, 24 V vents, identifying 23, 24, 25 volume mute button, identifying 17 W webcam 11, 12 product description 4 spare part number 36, 53, 65 webcam light, identifying 11 webcam, identifying 11, 12 Windows 7 operating system DVD 137 Windows Backup and Restore 134 Windows Vista operating system DVD 140...
Reference Guide
Page 6
Audio ...15 Adjusting the volume ...16 Checking audio functions on the computer 16 Webcam (select models only) ...18 Video ...19 VGA ...19 HDMI ...20 Configuring audio for HDMI 20 Intel Wireless Display (select models only 21 4 Power management ...22 ...
Audio ...15 Adjusting the volume ...16 Checking audio functions on the computer 16 Webcam (select models only) ...18 Video ...19 VGA ...19 HDMI ...20 Configuring audio for HDMI 20 Intel Wireless Display (select models only 21 4 Power management ...22 ...

Reference Guide
Page 25
3 Multimedia Your computer may include the following: ● Integrated speaker(s) ● Integrated microphone(s) ● Integrated webcam ● Preinstalled multimedia software ● Multimedia buttons or keys Using the media activity controls Depending on an optional external optical drive (purchased separately). Audio Your ...
3 Multimedia Your computer may include the following: ● Integrated speaker(s) ● Integrated microphone(s) ● Integrated webcam ● Preinstalled multimedia software ● Multimedia buttons or keys Using the media activity controls Depending on an optional external optical drive (purchased separately). Audio Your ...

Reference Guide
Page 28
You can use the webcam to the Getting Started guide. The webcam software enables you can preview and save the photo or video recording. With the preinstalled software, you to experiment with the following features: ● Capturing ...and sharing video ● Streaming video with instant message software ● Taking still photos For information on using the webcam, select Start > Help and Support. 18 Chapter 3 Multimedia For information on how to access the...
You can use the webcam to the Getting Started guide. The webcam software enables you can preview and save the photo or video recording. With the preinstalled software, you to experiment with the following features: ● Capturing ...and sharing video ● Streaming video with instant message software ● Taking still photos For information on using the webcam, select Start > Help and Support. 18 Chapter 3 Multimedia For information on how to access the...


