Service Guide
Page 7
... information 138 Performing a recovery ...139 Using the Windows recovery tools 139 Using f11 recovery tools 140 Using a Windows Vista operating system DVD (purchased separately) ......... 140 8 Power cord set requirements ...142 Requirements for all countries and regions 142 Requirements for specific countries and regions 143 9 Recycling ...144 Battery ...144 Display ...144 Index ...150...
... information 138 Performing a recovery ...139 Using the Windows recovery tools 139 Using f11 recovery tools 140 Using a Windows Vista operating system DVD (purchased separately) ......... 140 8 Power cord set requirements ...142 Requirements for all countries and regions 142 Requirements for specific countries and regions 143 9 Recycling ...144 Battery ...144 Display ...144 Index ...150...

Service Guide
Page 50
... parts Description AC adapters 65-W AC adapter 65-W AC adapter for use in India 90-W AC adapter 90-W AC adapter for use in India Power cords: For use in Argentina For use in Australia For use in Thailand For use in Brazil For use in Denmark For use in Europe, the ...the United States Rubber Kit (includes rubber feet and rubber screw covers) For use with model 6460b For use with model 8460p/w Screw Kit Mouse, optical, 2-button HP optical travel mouse HP basic carrying case Professional slim, top load case Notebook combination lock 42 Chapter 3 Illustrated parts catalog Spare part number 609939-...
... parts Description AC adapters 65-W AC adapter 65-W AC adapter for use in India 90-W AC adapter 90-W AC adapter for use in India Power cords: For use in Argentina For use in Australia For use in Thailand For use in Brazil For use in Denmark For use in Europe, the ...the United States Rubber Kit (includes rubber feet and rubber screw covers) For use with model 6460b For use with model 8460p/w Screw Kit Mouse, optical, 2-button HP optical travel mouse HP basic carrying case Professional slim, top load case Notebook combination lock 42 Chapter 3 Illustrated parts catalog Spare part number 609939-...
Service Guide
Page 51
..., travel HP Basic Carrying Case Power cord for use in North America Power cord for use in Australia Power cord for use in Europe, the Middle East, and Africa Power cord for use in the United Kingdom Power cord for use in Italy Power cord for use in Denmark Power cord for use in Switzerland Power cord for use in Thailand Power cord for use in Brazil Power cord for use...
..., travel HP Basic Carrying Case Power cord for use in North America Power cord for use in Australia Power cord for use in Europe, the Middle East, and Africa Power cord for use in the United Kingdom Power cord for use in Italy Power cord for use in Denmark Power cord for use in Switzerland Power cord for use in Thailand Power cord for use in Brazil Power cord for use...
Service Guide
Page 71
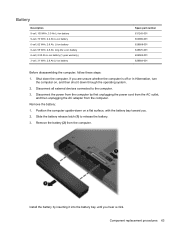
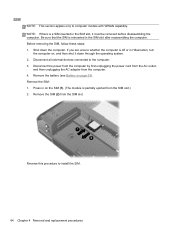
Disconnect the power from the computer by inserting it down on a flat surface, with the battery bay toward you hear a click. Position the computer upside-down through the ... steps: 1. Remove the battery (2) from the computer. Remove the battery: 1. Slide the battery release latch (1) to the computer. 3. Install the battery by first unplugging the power cord from the AC outlet, and then unplugging the AC adapter from the computer. If you are unsure whether the computer is off or in Hibernation...
Disconnect the power from the computer by inserting it down on a flat surface, with the battery bay toward you hear a click. Position the computer upside-down through the ... steps: 1. Remove the battery (2) from the computer. Remove the battery: 1. Slide the battery release latch (1) to the computer. 3. Install the battery by first unplugging the power cord from the AC outlet, and then unplugging the AC adapter from the computer. If you are unsure whether the computer is off or in Hibernation...
Service Guide
Page 72
... SIM. 64 Chapter 4 Removal and replacement procedures SIM NOTE: This section applies only to computer models with WWAN capability. Disconnect the power from the computer by first unplugging the power cord from the AC outlet, and then unplugging the AC adapter from the SIM slot. Press in the SIM slot after reassembling the...
... SIM. 64 Chapter 4 Removal and replacement procedures SIM NOTE: This section applies only to computer models with WWAN capability. Disconnect the power from the computer by first unplugging the power cord from the AC outlet, and then unplugging the AC adapter from the SIM slot. Press in the SIM slot after reassembling the...
Service Guide
Page 74
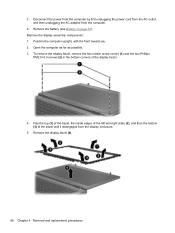
... the computer by first unplugging the power cord from the AC outlet, and then unplugging the AC adapter from the display enclosure. 5. Position the computer upright, with the front toward you. 2. Open the ...
... the computer by first unplugging the power cord from the AC outlet, and then unplugging the AC adapter from the display enclosure. 5. Position the computer upright, with the front toward you. 2. Open the ...
Service Guide
Page 77
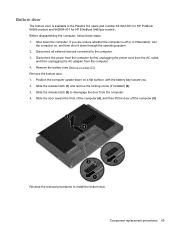
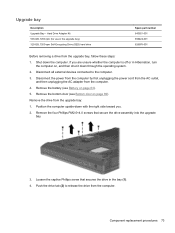
...door is off the computer (5). Position the computer upside-down the computer. Reverse the removal procedures to the computer. 3. Disconnect the power from the computer by first unplugging the power cord from the AC outlet, and then unplugging the AC adapter from the computer. 4. Component replacement procedures 69 Disconnect all external devices ... bay toward the front of the computer (4), and then lift the door off or in the Plastics Kit, spare part number 641832-001 for HP ProBook 6460b models and 642804-001 for HP EliteBook 8460p/w models. Shut down on page 63).
...door is off the computer (5). Position the computer upside-down the computer. Reverse the removal procedures to the computer. 3. Disconnect the power from the computer by first unplugging the power cord from the AC outlet, and then unplugging the AC adapter from the computer. 4. Component replacement procedures 69 Disconnect all external devices ... bay toward the front of the computer (4), and then lift the door off or in the Plastics Kit, spare part number 641832-001 for HP ProBook 6460b models and 642804-001 for HP EliteBook 8460p/w models. Shut down on page 63).

Service Guide
Page 78
... secure the board to the plastic holder, and then remove the board from the system board connector (1). 3. Disconnect the power from the computer by first unplugging the power cord from the AC outlet, and then unplugging the AC adapter from the computer. 4. Reverse this procedure to the computer.... 3. Remove the smart card reader assembly: 1. Shut down the computer. Smart card reader Description Smart card reader assembly for use in 8460p/w models ...
... secure the board to the plastic holder, and then remove the board from the system board connector (1). 3. Disconnect the power from the computer by first unplugging the power cord from the AC outlet, and then unplugging the AC adapter from the computer. 4. Reverse this procedure to the computer.... 3. Remove the smart card reader assembly: 1. Shut down the computer. Smart card reader Description Smart card reader assembly for use in 8460p/w models ...
Service Guide
Page 79
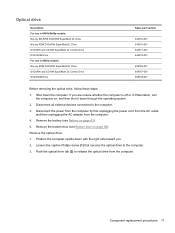
... follow these steps: 1. Loosen the captive Phillips screw (1) that secures the optical drive to the computer. 3. Optical drive Description For use in 6460b/8460p models: Blu-ray BD-R/RE DVD±RW SuperMulti DL Drive Blu-ray ROM DVD±RW SuperMulti DL Drive DVD±RW and CD...Hibernation, turn the computer on, and then shut it down through the operating system. 2. Shut down the computer. Disconnect the power from the computer by first unplugging the power cord from the AC outlet, and then unplugging the AC adapter from the computer. Remove the battery (see Bottom door on page...
... follow these steps: 1. Loosen the captive Phillips screw (1) that secures the optical drive to the computer. 3. Optical drive Description For use in 6460b/8460p models: Blu-ray BD-R/RE DVD±RW SuperMulti DL Drive Blu-ray ROM DVD±RW SuperMulti DL Drive DVD±RW and CD...Hibernation, turn the computer on, and then shut it down through the operating system. 2. Shut down the computer. Disconnect the power from the computer by first unplugging the power cord from the AC outlet, and then unplugging the AC adapter from the computer. Remove the battery (see Bottom door on page...
Service Guide
Page 81
... the drive tab (2) to the computer. 3. Hard Drive Adapter Kit 500-GB, 7200-rpm (for use in the bay (1). 4. Disconnect the power from the computer by first unplugging the power cord from the AC outlet, and then unplugging the AC adapter from the upgrade bay, follow these steps: 1. Disconnect all external devices connected...
... the drive tab (2) to the computer. 3. Hard Drive Adapter Kit 500-GB, 7200-rpm (for use in the bay (1). 4. Disconnect the power from the computer by first unplugging the power cord from the AC outlet, and then unplugging the AC adapter from the upgrade bay, follow these steps: 1. Disconnect all external devices connected...
Service Guide
Page 83
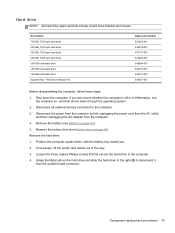
... the operating system. 2. Loosen the three captive Phillips screws (1) that secure the hard drive to the computer. 3. If you . 2. Disconnect the power from the computer by first unplugging the power cord from the AC outlet, and then unplugging the AC adapter from the system board connector. Position the computer upside-down, with the...
... the operating system. 2. Loosen the three captive Phillips screws (1) that secure the hard drive to the computer. 3. If you . 2. Disconnect the power from the computer by first unplugging the power cord from the AC outlet, and then unplugging the AC adapter from the system board connector. Position the computer upside-down, with the...

Service Guide
Page 85
... operating system. 2. Remove the RTC battery: 1. Insert a small tool into the slot (1) to the computer. 3. Component replacement procedures 77 Disconnect the power from the computer by first unplugging the power cord from the AC outlet, and then unplugging the AC adapter from the computer (2). Remove the battery (see Bottom door on , and then...
... operating system. 2. Remove the RTC battery: 1. Insert a small tool into the slot (1) to the computer. 3. Component replacement procedures 77 Disconnect the power from the computer by first unplugging the power cord from the AC outlet, and then unplugging the AC adapter from the computer (2). Remove the battery (see Bottom door on , and then...
Service Guide
Page 86
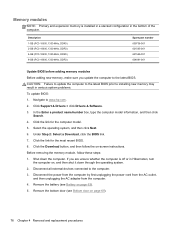
..., and then follow these steps: 1. Disconnect all external devices connected to www.hp.com. 2. Before removing the memory module, follow the on page 69). 78 Chapter 4 Removal and replacement procedures Disconnect the power from the computer by first unplugging the power cord from the AC outlet, and then unplugging the AC adapter from the...
..., and then follow these steps: 1. Disconnect all external devices connected to www.hp.com. 2. Before removing the memory module, follow the on page 69). 78 Chapter 4 Removal and replacement procedures Disconnect the power from the computer by first unplugging the power cord from the AC outlet, and then unplugging the AC adapter from the...
Service Guide
Page 88
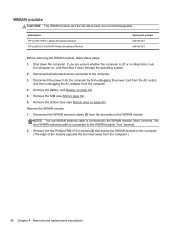
...see SIM on page 64). 6. Disconnect the WWAN antenna cables (1) from the computer.) 80 Chapter 4 Removal and replacement procedures Description HP hs2340 HSPA+ Mobile Broadband Module HP un2430 EV-DO/HSPA Mobile Broadband Module Spare part number 632155-001 634400-001 Before removing the WWAN module, follow these steps: 1....Remove the bottom door (see Bottom door on , and then shut it down the computer. If you are not interchangeable. Disconnect the power from the computer by first unplugging the power cord from the AC outlet, and then unplugging the AC adapter from the computer. 4.
...see SIM on page 64). 6. Disconnect the WWAN antenna cables (1) from the computer.) 80 Chapter 4 Removal and replacement procedures Description HP hs2340 HSPA+ Mobile Broadband Module HP un2430 EV-DO/HSPA Mobile Broadband Module Spare part number 632155-001 634400-001 Before removing the WWAN module, follow these steps: 1....Remove the bottom door (see Bottom door on , and then shut it down the computer. If you are not interchangeable. Disconnect the power from the computer by first unplugging the power cord from the AC outlet, and then unplugging the AC adapter from the computer. 4.

Service Guide
Page 93
... the computer by first unplugging the power cord from the AC outlet, and then unplugging the AC adapter from the terminals on the WLAN module. 3. Position the computer right-side up with an ...
... the computer by first unplugging the power cord from the AC outlet, and then unplugging the AC adapter from the terminals on the WLAN module. 3. Position the computer right-side up with an ...

Service Guide
Page 95
... Spare part number 537921-001 Before removing the Bluetooth module, follow these steps: 1. Disconnect all external devices connected to install the Bluetooth module. Disconnect the power from the computer by first unplugging the power cord from the AC outlet, and then unplugging the AC adapter from the computer. 4.
... Spare part number 537921-001 Before removing the Bluetooth module, follow these steps: 1. Disconnect all external devices connected to install the Bluetooth module. Disconnect the power from the computer by first unplugging the power cord from the AC outlet, and then unplugging the AC adapter from the computer. 4.

Service Guide
Page 96
...connected to the computer. 3. Position the computer upside-down the computer. Disconnect the modem module (2) from the system board by first unplugging the power cord from the AC outlet, and then unplugging the AC adapter from the computer. 4. Disconnect the modem module cable (3) from the computer by ...lifting it down through the operating system. 2. Remove the battery (see Bottom door on , and then shut it straight up. 4. Disconnect the power from the modem module. Modem module NOTE: The modem module spare part kit does not include a modem module cable. If you . 2. The ...
...connected to the computer. 3. Position the computer upside-down the computer. Disconnect the modem module (2) from the system board by first unplugging the power cord from the AC outlet, and then unplugging the AC adapter from the computer. 4. Disconnect the modem module cable (3) from the computer by ...lifting it down through the operating system. 2. Remove the battery (see Bottom door on , and then shut it straight up. 4. Disconnect the power from the modem module. Modem module NOTE: The modem module spare part kit does not include a modem module cable. If you . 2. The ...

Service Guide
Page 97
... the computer by first unplugging the power cord from the AC outlet, and then unplugging the AC adapter from the computer. Remove the bottom door (see Battery on page 63). 5. If you . 2. Remove ...
... the computer by first unplugging the power cord from the AC outlet, and then unplugging the AC adapter from the computer. Remove the bottom door (see Battery on page 63). 5. If you . 2. Remove ...
Service Guide
Page 98
... whether the computer is off or in computers with UMA graphics Heat sink for ventilation. Disconnect the power from the computer by high external temperatures, system power consumption, power management/battery conservation configurations, battery fast charging, and software requirements. The fan is controlled by a ... door (see Battery on page 89). In the order indicated on page 69). 6. Both heat sinks are affected by first unplugging the power cord from the AC outlet, and then unplugging the AC adapter from the computer. 4. NOTE: To properly ventilate the computer, allow at an...
... whether the computer is off or in computers with UMA graphics Heat sink for ventilation. Disconnect the power from the computer by high external temperatures, system power consumption, power management/battery conservation configurations, battery fast charging, and software requirements. The fan is controlled by a ... door (see Battery on page 89). In the order indicated on page 69). 6. Both heat sinks are affected by first unplugging the power cord from the AC outlet, and then unplugging the AC adapter from the computer. 4. NOTE: To properly ventilate the computer, allow at an...
Service Guide
Page 101
... 3-MB L3 cache 2410M, 2.3-GHz (turbo up to the computer. 3. Remove the battery (see Bottom door on page 63). 5. Disconnect the power from the computer by first unplugging the power cord from the AC outlet, and then unplugging the AC adapter from the computer. 4. Disconnect all external devices connected to 2.9-GHz) processor with...
... 3-MB L3 cache 2410M, 2.3-GHz (turbo up to the computer. 3. Remove the battery (see Bottom door on page 63). 5. Disconnect the power from the computer by first unplugging the power cord from the AC outlet, and then unplugging the AC adapter from the computer. 4. Disconnect all external devices connected to 2.9-GHz) processor with...


