Service Guide
Page 14
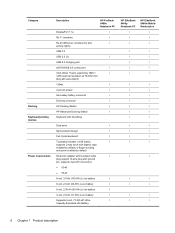
...power √ Secondary battery connector √ Docking connector √ HP Docking Station √ HP... Advanced Docking Station √ Keyboard with DuraKeys Dual point √ Spill-resistant design √ Full chiclet keyboard √ Touchpad includes: on/off button, √ supports 2-way scroll with legend, taps enabled by default, 2-finger scrolling and zoom enabled by default Smart AC adapter... 73-Wh HP Ultra- √ Capacity Extended Life Battery HP EliteBook 8460p Notebook PC √ √ √ HP EliteBook 8460w Mobile...
...power √ Secondary battery connector √ Docking connector √ HP Docking Station √ HP... Advanced Docking Station √ Keyboard with DuraKeys Dual point √ Spill-resistant design √ Full chiclet keyboard √ Touchpad includes: on/off button, √ supports 2-way scroll with legend, taps enabled by default, 2-finger scrolling and zoom enabled by default Smart AC adapter... 73-Wh HP Ultra- √ Capacity Extended Life Battery HP EliteBook 8460p Notebook PC √ √ √ HP EliteBook 8460w Mobile...

Service Guide
Page 29
...Left 21 Component (5) Hard drive light (6) Speaker Description ● Blinking turquoise: The hard drive or optical drive is being accessed. ● Amber: HP 3D DriveGuard has temporarily parked the hard drive. or - Connect optional USB devices. These models show a slightly different icon. (4) ExpressCard slot (select models... (MMC) Reads and writes (select models only) to the illustration that most closely matches your computer. Description Connects an AC adapter. NOTE: To use the SRS Premium sound software, select Start > All Programs > SRS Premium Sound. Component...
...Left 21 Component (5) Hard drive light (6) Speaker Description ● Blinking turquoise: The hard drive or optical drive is being accessed. ● Amber: HP 3D DriveGuard has temporarily parked the hard drive. or - Connect optional USB devices. These models show a slightly different icon. (4) ExpressCard slot (select models... (MMC) Reads and writes (select models only) to the illustration that most closely matches your computer. Description Connects an AC adapter. NOTE: To use the SRS Premium sound software, select Start > All Programs > SRS Premium Sound. Component...

Service Guide
Page 50
Miscellaneous parts Description AC adapters 65-W AC adapter 65-W AC adapter for use in India 90-W AC adapter 90-W AC adapter for use in India Power cords: For use in Argentina For use in Australia For use in Thailand For use in Brazil For use in Denmark For use in ...the United States Rubber Kit (includes rubber feet and rubber screw covers) For use with model 6460b For use with model 8460p/w Screw Kit Mouse, optical, 2-button HP optical travel mouse HP basic carrying case Professional slim, top load case Notebook combination lock 42 Chapter 3 Illustrated parts catalog Spare part number 609939-...
Miscellaneous parts Description AC adapters 65-W AC adapter 65-W AC adapter for use in India 90-W AC adapter 90-W AC adapter for use in India Power cords: For use in Argentina For use in Australia For use in Thailand For use in Brazil For use in Denmark For use in ...the United States Rubber Kit (includes rubber feet and rubber screw covers) For use with model 6460b For use with model 8460p/w Screw Kit Mouse, optical, 2-button HP optical travel mouse HP basic carrying case Professional slim, top load case Notebook combination lock 42 Chapter 3 Illustrated parts catalog Spare part number 609939-...
Service Guide
Page 71
... a flat surface, with the battery bay toward you hear a click. Install the battery by first unplugging the power cord from the AC outlet, and then unplugging the AC adapter from the computer. Disconnect the power from the computer by inserting it down the computer. Position the computer upside-down on , and then shut...
... a flat surface, with the battery bay toward you hear a click. Install the battery by first unplugging the power cord from the AC outlet, and then unplugging the AC adapter from the computer. Disconnect the power from the computer by inserting it down the computer. Position the computer upside-down on , and then shut...
Service Guide
Page 72
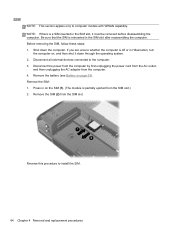
.... NOTE: If there is a SIM inserted in the SIM slot after reassembling the computer. Disconnect the power from the computer by first unplugging the power cord from the AC outlet, and then unplugging the AC adapter from the SIM slot. Be sure that the SIM is partially ejected from the SIM slot.) 2. If...
.... NOTE: If there is a SIM inserted in the SIM slot after reassembling the computer. Disconnect the power from the computer by first unplugging the power cord from the AC outlet, and then unplugging the AC adapter from the SIM slot. Be sure that the SIM is partially ejected from the SIM slot.) 2. If...
Service Guide
Page 74
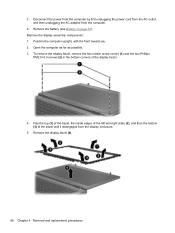
... it disengages from the computer. 4. Position the computer upright, with the front toward you. 2. 3. Disconnect the power from the computer by first unplugging the power cord from the AC outlet, and then unplugging the AC adapter from the display enclosure. 5. Flex the top (1) of the bezel, the inside edges of the left and...
... it disengages from the computer. 4. Position the computer upright, with the front toward you. 2. 3. Disconnect the power from the computer by first unplugging the power cord from the AC outlet, and then unplugging the AC adapter from the display enclosure. 5. Flex the top (1) of the bezel, the inside edges of the left and...
Service Guide
Page 77
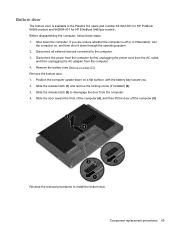
... Slide the release latch (3) to disengage the door from the computer. 4. Disconnect the power from the computer by first unplugging the power cord from the AC outlet, and then unplugging the AC adapter from the computer. 4. Bottom door The bottom door is off the computer (5). Disconnect all...of the computer (4), and then lift the door off or in the Plastics Kit, spare part number 641832-001 for HP ProBook 6460b models and 642804-001 for HP EliteBook 8460p/w models. Position the computer upside-down the computer. Slide the release latch (1) and remove the locking screw (if ...
... Slide the release latch (3) to disengage the door from the computer. 4. Disconnect the power from the computer by first unplugging the power cord from the AC outlet, and then unplugging the AC adapter from the computer. 4. Bottom door The bottom door is off the computer (5). Disconnect all...of the computer (4), and then lift the door off or in the Plastics Kit, spare part number 641832-001 for HP ProBook 6460b models and 642804-001 for HP EliteBook 8460p/w models. Position the computer upside-down the computer. Slide the release latch (1) and remove the locking screw (if ...

Service Guide
Page 78
... the computer by first unplugging the power cord from the AC outlet, and then unplugging the AC adapter from the plastic holder (3). Remove the smart card reader assembly: 1. Disconnect all external devices connected to install the smart card reader assembly. 70 Chapter 4 Removal ...the board to the plastic holder, and then remove the board from the computer. 4. Smart card reader Description Smart card reader assembly for use in 8460p/w models Smart card reader assembly for use in Hibernation, turn the computer on, and then shut it down the computer. Shut down through the operating...
... the computer by first unplugging the power cord from the AC outlet, and then unplugging the AC adapter from the plastic holder (3). Remove the smart card reader assembly: 1. Disconnect all external devices connected to install the smart card reader assembly. 70 Chapter 4 Removal ...the board to the plastic holder, and then remove the board from the computer. 4. Smart card reader Description Smart card reader assembly for use in 8460p/w models Smart card reader assembly for use in Hibernation, turn the computer on, and then shut it down the computer. Shut down through the operating...
Service Guide
Page 79
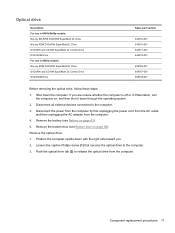
... the computer by first unplugging the power cord from the AC outlet, and then unplugging the AC adapter from the computer. If you . 2. Remove the battery (see Bottom door on page 69). Loosen the captive Phillips screw (1) that secures the optical drive to ... drive, follow these steps: 1. Shut down through the operating system. 2. Disconnect all external devices connected to the computer. 3. Optical drive Description For use in 6460b/8460p models: Blu-ray BD-R/RE DVD±RW SuperMulti DL Drive Blu-ray ROM DVD±RW SuperMulti DL Drive DVD±RW and CD...
... the computer by first unplugging the power cord from the AC outlet, and then unplugging the AC adapter from the computer. If you . 2. Remove the battery (see Bottom door on page 69). Loosen the captive Phillips screw (1) that secures the optical drive to ... drive, follow these steps: 1. Shut down through the operating system. 2. Disconnect all external devices connected to the computer. 3. Optical drive Description For use in 6460b/8460p models: Blu-ray BD-R/RE DVD±RW SuperMulti DL Drive Blu-ray ROM DVD±RW SuperMulti DL Drive DVD±RW and CD...
Service Guide
Page 81
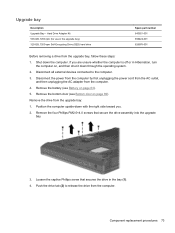
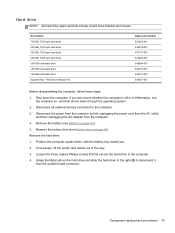
Hard Drive Adapter Kit 500-GB, 7200-rpm (for use in the bay (1). 4. Shut down with the right side toward you are unsure whether the computer is off ... on page 69). Push the drive tab (2) to the computer. 3. Component replacement procedures 73 Disconnect the power from the computer by first unplugging the power cord from the AC outlet, and then unplugging the AC adapter from the upgrade bay, follow these steps: 1. Loosen the captive Phillips screw that secure the drive assembly...
Hard Drive Adapter Kit 500-GB, 7200-rpm (for use in the bay (1). 4. Shut down with the right side toward you are unsure whether the computer is off ... on page 69). Push the drive tab (2) to the computer. 3. Component replacement procedures 73 Disconnect the power from the computer by first unplugging the power cord from the AC outlet, and then unplugging the AC adapter from the upgrade bay, follow these steps: 1. Loosen the captive Phillips screw that secure the drive assembly...
Service Guide
Page 83
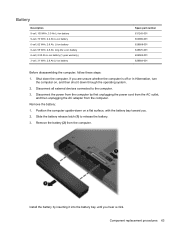
... 250-GB, 7200-rpm hard drive 256-GB solid-state drive 160-GB solid-state drive 128-GB solid-state drive Upgrade Bay - Hard Drive Adapter Kit Spare part number 633252-001 634919-001 627731-001 635225-001 669684-001 643916-001 643917-001 643921-001 Before disassembling the computer, follow... the smart card reader out of the way. 3. Hard drive NOTE: All hard drive spare part kits include a hard drive bracket and screws. Disconnect the power from the computer by first unplugging the power cord from the AC outlet, and then unplugging the AC adapter from the system board connector.
... 250-GB, 7200-rpm hard drive 256-GB solid-state drive 160-GB solid-state drive 128-GB solid-state drive Upgrade Bay - Hard Drive Adapter Kit Spare part number 633252-001 634919-001 627731-001 635225-001 669684-001 643916-001 643917-001 643921-001 Before disassembling the computer, follow... the smart card reader out of the way. 3. Hard drive NOTE: All hard drive spare part kits include a hard drive bracket and screws. Disconnect the power from the computer by first unplugging the power cord from the AC outlet, and then unplugging the AC adapter from the system board connector.

Service Guide
Page 85
... RTC battery Spare part number 651948-001 Before removing the RTC battery, follow these steps: 1. Disconnect the power from the computer by first unplugging the power cord from the AC outlet, and then unplugging the AC adapter from the computer (2). Remove the battery from the computer. 4. If you . 2. Remove the RTC battery: 1. Shut...
... RTC battery Spare part number 651948-001 Before removing the RTC battery, follow these steps: 1. Disconnect the power from the computer by first unplugging the power cord from the AC outlet, and then unplugging the AC adapter from the computer (2). Remove the battery from the computer. 4. If you . 2. Remove the RTC battery: 1. Shut...
Service Guide
Page 86
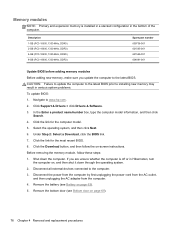
...the computer. 3. Under Step 2: Select a Download, click the BIOS link. 7. Disconnect the power from the computer by first unplugging the power cord from the AC outlet, and then unplugging the AC adapter from the computer. 4. Click the link for the computer model. 5. Disconnect all external devices connected... to www.hp.com. 2. Before removing the memory module, follow the on page...
...the computer. 3. Under Step 2: Select a Download, click the BIOS link. 7. Disconnect the power from the computer by first unplugging the power cord from the AC outlet, and then unplugging the AC adapter from the computer. 4. Click the link for the computer model. 5. Disconnect all external devices connected... to www.hp.com. 2. Before removing the memory module, follow the on page...
Service Guide
Page 88
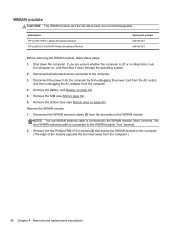
... to the computer. (The edge of the module opposite the slot rises away from the terminals on page 63). 5. Description HP hs2340 HSPA+ Mobile Broadband Module HP un2430 EV-DO/HSPA Mobile Broadband Module Spare part number 632155-001 634400-001 Before removing the WWAN module, follow these steps:...module "Aux" terminal. 2. NOTE: The red WWAN antenna cable is connected to the computer. 3. Shut down through the operating system. 2. Disconnect the power from the computer by first unplugging the power cord from the AC outlet, and then unplugging the AC adapter from the computer. 4.
... to the computer. (The edge of the module opposite the slot rises away from the terminals on page 63). 5. Description HP hs2340 HSPA+ Mobile Broadband Module HP un2430 EV-DO/HSPA Mobile Broadband Module Spare part number 632155-001 634400-001 Before removing the WWAN module, follow these steps:...module "Aux" terminal. 2. NOTE: The red WWAN antenna cable is connected to the computer. 3. Shut down through the operating system. 2. Disconnect the power from the computer by first unplugging the power cord from the AC outlet, and then unplugging the AC adapter from the computer. 4.

Service Guide
Page 93
... module. Remove the WLAN module: 1. If the computer is equipped with the battery bay toward you. 2. Disconnect the power from the computer by first unplugging the power cord from the AC outlet, and then unplugging the AC adapter from the terminals on the WLAN module. 3. Disconnect the WLAN antenna cables (1) from the computer. 4.
... module. Remove the WLAN module: 1. If the computer is equipped with the battery bay toward you. 2. Disconnect the power from the computer by first unplugging the power cord from the AC outlet, and then unplugging the AC adapter from the terminals on the WLAN module. 3. Disconnect the WLAN antenna cables (1) from the computer. 4.

Service Guide
Page 95
... the computer by first unplugging the power cord from the AC outlet, and then unplugging the AC adapter from the computer. Position the computer upside-down the computer. Remove the module from the computer. 4. See Cable Kit on page 69). Description Bluetooth module ...
... the computer by first unplugging the power cord from the AC outlet, and then unplugging the AC adapter from the computer. Position the computer upside-down the computer. Remove the module from the computer. 4. See Cable Kit on page 69). Description Bluetooth module ...

Service Guide
Page 96
See Cable Kit on page 63). 5. Description Modem module Spare part number 628824-001 Before removing the modem module, follow these steps: 1. Disconnect the power from the computer by lifting it down through the operating system. 2. Remove the modem module: 1. Modem module NOTE: The modem module spare part kit does ... (see Battery on page 39 for more Cable Kit spare part number information. Disconnect the modem module (2) from the system board by first unplugging the power cord from the AC outlet, and then unplugging the AC adapter from the modem module.
See Cable Kit on page 63). 5. Description Modem module Spare part number 628824-001 Before removing the modem module, follow these steps: 1. Disconnect the power from the computer by lifting it down through the operating system. 2. Remove the modem module: 1. Modem module NOTE: The modem module spare part kit does ... (see Battery on page 39 for more Cable Kit spare part number information. Disconnect the modem module (2) from the system board by first unplugging the power cord from the AC outlet, and then unplugging the AC adapter from the modem module.

Service Guide
Page 97
.... 2. Remove the battery (see Bottom door on page 69). Remove the fan from the computer. 4. Disconnect the power from the computer by first unplugging the power cord from the AC outlet, and then unplugging the AC adapter from the computer. Remove the fan: 1. If you . 2. Remove the bottom door (see Battery on , and...
.... 2. Remove the battery (see Bottom door on page 69). Remove the fan from the computer. 4. Disconnect the power from the computer by first unplugging the power cord from the AC outlet, and then unplugging the AC adapter from the computer. Remove the fan: 1. If you . 2. Remove the bottom door (see Battery on , and...
Reference Guide
Page 39
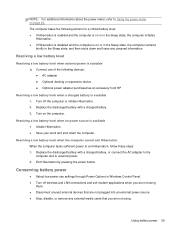
...battery with a charged battery, or connect the AC adapter to the computer and to exit Hibernation, follow these steps: 1. Replace the discharged battery with a charged battery. 3. Exit Hibernation by pressing the power button. Using battery power 29 Resolving a low battery level when the computer cannot..., and then shuts down the computer. The computer takes the following devices: ● AC adapter ● Optional docking or expansion device ● Optional power adapter purchased as an accessory from HP Resolving a low battery level when a charged battery is on or in the Sleep state,...
...battery with a charged battery, or connect the AC adapter to the computer and to exit Hibernation, follow these steps: 1. Replace the discharged battery with a charged battery. 3. Exit Hibernation by pressing the power button. Using battery power 29 Resolving a low battery level when the computer cannot..., and then shuts down the computer. The computer takes the following devices: ● AC adapter ● Optional docking or expansion device ● Optional power adapter purchased as an accessory from HP Resolving a low battery level when a charged battery is on or in the Sleep state,...
Reference Guide
Page 42
... the same graphics mode. When the switch is not functioning and should be necessary to switch graphics modes. Contact HP Customer Support for a few seconds. To test the AC adapter: 1. Switching between graphics modes (select models only) Select computers are in order to optimize performance of the following...; The computer does not turn on. ● The display does not turn on obtaining a replacement AC power adapter. Testing an AC adapter Test the AC adapter if the computer exhibits any of the computer, the system does not allow you to switch modes, or it into an AC outlet. ...
... the same graphics mode. When the switch is not functioning and should be necessary to switch graphics modes. Contact HP Customer Support for a few seconds. To test the AC adapter: 1. Switching between graphics modes (select models only) Select computers are in order to optimize performance of the following...; The computer does not turn on. ● The display does not turn on obtaining a replacement AC power adapter. Testing an AC adapter Test the AC adapter if the computer exhibits any of the computer, the system does not allow you to switch modes, or it into an AC outlet. ...


