Quick Start Guide
Page 13
... formatting. 1. With the camera turned on the card, rather than in the upper right corner of the Image display. Use to your computer, as well as features for modifying stored images (remove red eyes, rotate, crop, resize, adjust image quality, and more information: www.hp.com/support. To use internal memory and view images stored there, remove the memory card. Once you have the option to install HP Photosmart Premier or HP Photosmart Essential, or HP Photosmart Essential installs automatically. Install the software...
... formatting. 1. With the camera turned on the card, rather than in the upper right corner of the Image display. Use to your computer, as well as features for modifying stored images (remove red eyes, rotate, crop, resize, adjust image quality, and more information: www.hp.com/support. To use internal memory and view images stored there, remove the memory card. Once you have the option to install HP Photosmart Premier or HP Photosmart Essential, or HP Photosmart Essential installs automatically. Install the software...
Quick Start Guide
Page 18
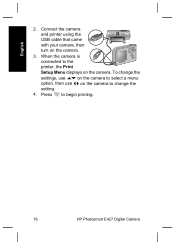
Press to the printer, the Print Setup Menu displays on the camera. Connect the camera and printer using the USB cable that came with your camera, then turn on the camera to select a menu option, then use on the camera to change the setting. 4. To change the settings, use on the camera. 3. English 2. When the camera is connected to begin printing. 16 HP Photosmart E427 Digital Camera
Press to the printer, the Print Setup Menu displays on the camera. Connect the camera and printer using the USB cable that came with your camera, then turn on the camera to select a menu option, then use on the camera to change the setting. 4. To change the settings, use on the camera. 3. English 2. When the camera is connected to begin printing. 16 HP Photosmart E427 Digital Camera

Warranty and Regulatory Guide
Page 4
... MAKE ANY OTHER WARRANTY OR CONDITION OF ANY KIND, WHETHER EXPRESS OR IMPLIED, WITH RESPECT TO A PRODUCT, AND SPECIFICALLY DISCLAIM THE IMPLIED WARRANTIES OR CONDITIONS OF MERCHANTABILITY, SATISFACTORY QUALITY, AND FITNESS FOR A PARTICULAR PURPOSE. Software, media, parts, accessories, supplies, or power adapters or sources not provided or supported by HP's limited warranty, HP may also have no obligation to replace, repair...
... MAKE ANY OTHER WARRANTY OR CONDITION OF ANY KIND, WHETHER EXPRESS OR IMPLIED, WITH RESPECT TO A PRODUCT, AND SPECIFICALLY DISCLAIM THE IMPLIED WARRANTIES OR CONDITIONS OF MERCHANTABILITY, SATISFACTORY QUALITY, AND FITNESS FOR A PARTICULAR PURPOSE. Software, media, parts, accessories, supplies, or power adapters or sources not provided or supported by HP's limited warranty, HP may also have no obligation to replace, repair...
Warranty and Regulatory Guide
Page 70
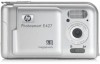
...-Packard Singapore (Pte) Ltd Imaging and Printing Manufaacturing Operation Singapore declares that the product: Product name: HP Photosmart E427 series Digital Camera Product number: L2437A Regulatory model: SNPRB-0603 Conforms to the following two conditions: (1) this device may not cause harmful interference, and (2) this equipment does cause harmful interference to part 15 of the Low Voltage Directive 73/23/EEC and the...
...-Packard Singapore (Pte) Ltd Imaging and Printing Manufaacturing Operation Singapore declares that the product: Product name: HP Photosmart E427 series Digital Camera Product number: L2437A Regulatory model: SNPRB-0603 Conforms to the following two conditions: (1) this device may not cause harmful interference, and (2) this equipment does cause harmful interference to part 15 of the Low Voltage Directive 73/23/EEC and the...
User Guide
Page 3
... 6 Turn on the camera 7 Choose the language 7 Set the date and time 7 Install and format an optional memory card 8 Install the software 8 Using your camera 9 2 Taking pictures and recording video clips 10 Taking still pictures 10 Recording video clips 10 Instant Review...11 Digital zoom...11 Using the focus range settings 11 Using the Capture Menu 12 Using the Self-Timer mode 13 Flash Setting-Red-Eye 14 Exposure Compensation 14 White Balance 14 ISO speed...14 3 Reviewing images and video clips 15 Using Playback...15 Deleting images 16 Using the Playback Menu 16 Viewing...
... 6 Turn on the camera 7 Choose the language 7 Set the date and time 7 Install and format an optional memory card 8 Install the software 8 Using your camera 9 2 Taking pictures and recording video clips 10 Taking still pictures 10 Recording video clips 10 Instant Review...11 Digital zoom...11 Using the focus range settings 11 Using the Capture Menu 12 Using the Self-Timer mode 13 Flash Setting-Red-Eye 14 Exposure Compensation 14 White Balance 14 ISO speed...14 3 Reviewing images and video clips 15 Using Playback...15 Deleting images 16 Using the Playback Menu 16 Viewing...

User Guide
Page 5
...digital zoom. HP Photosmart E427 Digital Camera 5 Camera top, back, and side 12 3 4 5 6 8 7 1 Shutter button-Captures images (see Taking still pictures on page 10) or records video clips (see Recording video clips on page 10). 2 Live View/Playback button-Switches between Live View and Playback (see Digital zoom on page 11). 4 Power light. 5 button-Displays camera menus, selects options, and confirms actions. 6 Delete button-Accesses the Delete function while in ; press / to zoom out (see Taking pictures and recording video clips on page 10 and Reviewing images and video...
...digital zoom. HP Photosmart E427 Digital Camera 5 Camera top, back, and side 12 3 4 5 6 8 7 1 Shutter button-Captures images (see Taking still pictures on page 10) or records video clips (see Recording video clips on page 10). 2 Live View/Playback button-Switches between Live View and Playback (see Digital zoom on page 11). 4 Power light. 5 button-Displays camera menus, selects options, and confirms actions. 6 Delete button-Accesses the Delete function while in ; press / to zoom out (see Taking pictures and recording video clips on page 10 and Reviewing images and video...
User Guide
Page 7
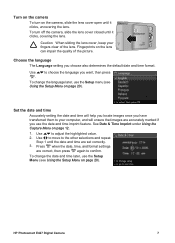
... lens. HP Photosmart E427 Digital Camera 7 To change the date and time later, use the Setup Menu (see Using the Setup Menu on page 20). Set the date and time Accurately setting the date and time will ensure that images are correct, then press again to confirm. See Date & Time Imprint under Using the Capture Menu on page 20). Use to choose the language you choose also determines the default date and time format. Choose the language The Language setting you want, then press . To change...
... lens. HP Photosmart E427 Digital Camera 7 To change the date and time later, use the Setup Menu (see Using the Setup Menu on page 20). Set the date and time Accurately setting the date and time will ensure that images are correct, then press again to confirm. See Date & Time Imprint under Using the Capture Menu on page 20). Use to choose the language you choose also determines the default date and time format. Choose the language The Language setting you want, then press . To change...
User Guide
Page 8
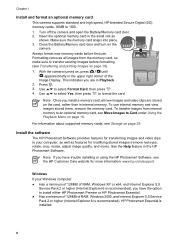
... memory card in internal memory. Note Once you have trouble installing or using the HP Photosmart Software, see Transferring and printing images on page 29. See the Help feature in Playback. 2. Install the software The HP Photosmart Software provides features for modifying stored images (remove red eyes, rotate, crop, resize, adjust image quality, and more information: www.hp.com/support. Formatting removes all new images and video clips are in the HP Photosmart Software. To use . Turn off the camera and open the Battery/Memory card door. 2. With the camera turned...
... memory card in internal memory. Note Once you have trouble installing or using the HP Photosmart Software, see Transferring and printing images on page 29. See the Help feature in Playback. 2. Install the software The HP Photosmart Software provides features for modifying stored images (remove red eyes, rotate, crop, resize, adjust image quality, and more information: www.hp.com/support. Formatting removes all new images and video clips are in the HP Photosmart Software. To use . Turn off the camera and open the Battery/Memory card door. 2. With the camera turned...
User Guide
Page 11
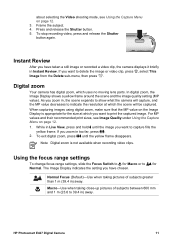
... release the Shutter button. 5. If you want to delete the image or video clip, press , select This Image from the Delete sub-menu, then press . Note Digital zoom is appropriate for Normal. Normal Focus (Default)-Use when taking close-up pictures of subjects greater than 1 m (39.4 in Instant Review. Instant Review After you have taken a still image or recorded a video clip, the camera displays it briefly in ) away. When capturing images using digital zoom, make sure that...
... release the Shutter button. 5. If you want to delete the image or video clip, press , select This Image from the Delete sub-menu, then press . Note Digital zoom is appropriate for Normal. Normal Focus (Default)-Use when taking close-up pictures of subjects greater than 1 m (39.4 in Instant Review. Instant Review After you have taken a still image or recorded a video clip, the camera displays it briefly in ) away. When capturing images using digital zoom, make sure that...

User Guide
Page 12
... printing images up to highlight a setting, then press . 4. Press to display the menu option's sub-menu. 3. Flash Setting-For selecting a flash setting. ● Auto Flash (Default)-The camera uses the flash if necessary. ● Red-Eye-The camera uses the flash with red-eye reduction, if necessary, to minimize the possibility of the images and video clips you capture. 1. Chapter 2 Using the Capture Menu The Capture Menu allows you to adjust camera settings that have time to select a special shooting mode. ● Self-Timer-For capturing images...
... printing images up to highlight a setting, then press . 4. Press to display the menu option's sub-menu. 3. Flash Setting-For selecting a flash setting. ● Auto Flash (Default)-The camera uses the flash if necessary. ● Red-Eye-The camera uses the flash with red-eye reduction, if necessary, to minimize the possibility of the images and video clips you capture. 1. Chapter 2 Using the Capture Menu The Capture Menu allows you to adjust camera settings that have time to select a special shooting mode. ● Self-Timer-For capturing images...
User Guide
Page 13
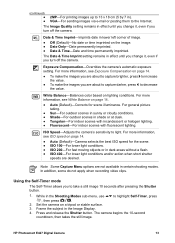
ISO Speed-Adjusts the camera's sensitivity to take a still image 10 seconds after pressing the Shutter button. 1. Using the Self-Timer mode The Self-Timer allows you turn off the camera. White Balance-Balances color based on a tripod or stable surface. 3. Note Some Capture Menu options are desired. In addition, some do not apply when recording video clips. Set the camera on lighting conditions. The camera begins the 10-second countdown, then takes the still image. The Date & Time Imprint setting remains in...
ISO Speed-Adjusts the camera's sensitivity to take a still image 10 seconds after pressing the Shutter button. 1. Using the Self-Timer mode The Self-Timer allows you turn off the camera. White Balance-Balances color based on a tripod or stable surface. 3. Note Some Capture Menu options are desired. In addition, some do not apply when recording video clips. Set the camera on lighting conditions. The camera begins the 10-second countdown, then takes the still image. The Date & Time Imprint setting remains in...

User Guide
Page 14
... the use Exposure Compensation to take a picture using the main flash and capturing the image. ISO speed This setting adjusts the sensitivity of lower quality. 14 When ISO Speed is useful in scenes that whites appear white in the captured image. Higher ISO speeds produce pictures with many light objects, increase the Exposure Compensation to the default Auto setting, the camera selects the best ISO speed for the additional flashes. Flash Setting-Red-Eye The red-eye phenomenon is taken. The Self-Timer setting resets to the default Auto shooting mode after the picture...
... the use Exposure Compensation to take a picture using the main flash and capturing the image. ISO speed This setting adjusts the sensitivity of lower quality. 14 When ISO Speed is useful in scenes that whites appear white in the captured image. Higher ISO speeds produce pictures with many light objects, increase the Exposure Compensation to the default Auto setting, the camera selects the best ISO speed for the additional flashes. Flash Setting-Red-Eye The red-eye phenomenon is taken. The Self-Timer setting resets to the default Auto shooting mode after the picture...
User Guide
Page 16
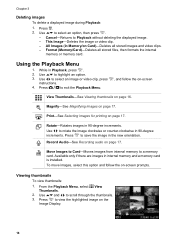
.... Press to view the highlighted image on -screen prompts. Chapter 3 Deleting images To delete a displayed image during Playback: 1. Use and to Playback without deleting the displayed image. - Available only if there are images in Playback, press . 2. This Image-Deletes the image or video clip. - While in internal memory and a memory card is installed. Rotate-Rotates images in Memory/on Card)-Deletes all stored files, then formats the internal memory or memory card. All Images (in 90-degree increments. Format (Memory/Card)-Deletes all stored images and video clips...
.... Press to view the highlighted image on -screen prompts. Chapter 3 Deleting images To delete a displayed image during Playback: 1. Use and to Playback without deleting the displayed image. - Available only if there are images in Playback, press . 2. This Image-Deletes the image or video clip. - While in internal memory and a memory card is installed. Rotate-Rotates images in Memory/on Card)-Deletes all stored files, then formats the internal memory or memory card. All Images (in 90-degree increments. Format (Memory/Card)-Deletes all stored images and video clips...
User Guide
Page 18
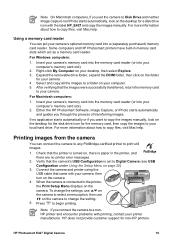
... selected images for printing (see USB Configuration under Using the Setup Menu on page 20) and reconnect to the computer. 2. When you encounter problems, set the camera's USB Configuration to Disk Drive (see Selecting images for transferring and managing your images and also guides you get an Unsafe Removal warning, disregard the warning. 4 Transferring and printing images You can transfer images and video clips with or without HP Photosmart Software If you do not install the HP Photosmart Software, images...
... selected images for printing (see USB Configuration under Using the Setup Menu on page 20) and reconnect to the computer. 2. When you encounter problems, set the camera's USB Configuration to Disk Drive (see Selecting images for transferring and managing your images and also guides you get an Unsafe Removal warning, disregard the warning. 4 Transferring and printing images You can transfer images and video clips with or without HP Photosmart Software If you do not install the HP Photosmart Software, images...
User Guide
Page 19
... Mac help . For Macintosh computers: 1. If no printer error messages. 2. HP does not provide customer support for your computer's memory card slot). 2. For Windows computers: 1. Either the HP Photosmart Software, Image Capture, or iPhoto starts automatically and guides you want to copy the images manually, look on page 20). 3. Note If you set to Digital Camera (see USB Configuration under Using the Setup Menu on the desktop for the memory card, then copy the images to your local hard drive. Using a memory card...
... Mac help . For Macintosh computers: 1. If no printer error messages. 2. HP does not provide customer support for your computer's memory card slot). 2. For Windows computers: 1. Either the HP Photosmart Software, Image Capture, or iPhoto starts automatically and guides you want to copy the images manually, look on page 20). 3. Note If you set to Digital Camera (see USB Configuration under Using the Setup Menu on the desktop for the memory card, then copy the images to your local hard drive. Using a memory card...
User Guide
Page 20
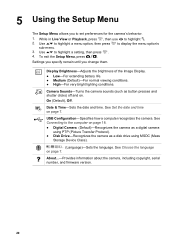
...; Digital Camera (Default)-Recognizes the camera as a digital camera using PTP (Picture Transfer Protocol). ● Disk Drive-Recognizes the camera as a disk drive using MSDC (Mass Storage Device Class). (Language)-Sets the language. To exit the Setup Menu, press . Date & Time-Sets the date and time. Use to display the menu option's sub-menu. 3. On (Default), Off. USB Configuration-Specifies how a computer recognizes the camera. About...-Provides information about the camera, including copyright, serial number, and firmware version. 20 While in Live View or Playback...
...; Digital Camera (Default)-Recognizes the camera as a digital camera using PTP (Picture Transfer Protocol). ● Disk Drive-Recognizes the camera as a disk drive using MSDC (Mass Storage Device Class). (Language)-Sets the language. To exit the Setup Menu, press . Date & Time-Sets the date and time. Use to display the menu option's sub-menu. 3. On (Default), Off. USB Configuration-Specifies how a computer recognizes the camera. About...-Provides information about the camera, including copyright, serial number, and firmware version. 20 While in Live View or Playback...

User Guide
Page 21
Problems and solutions Use this section to find solutions to common issues you may have using rechargeable batteries, ensure they are retained. If so, remove the memory card and turn on, format the memory card using one). HP Photosmart E427 Digital Camera 21 Remove the memory card and batteries for the camera to your computer, then format the memory card. ● Using the camera under cold conditions slows camera response time. Transfer stored files to turn on. When the camera is the proper type (see Resetting the...
Problems and solutions Use this section to find solutions to common issues you may have using rechargeable batteries, ensure they are retained. If so, remove the memory card and turn on, format the memory card using one). HP Photosmart E427 Digital Camera 21 Remove the memory card and batteries for the camera to your computer, then format the memory card. ● Using the camera under cold conditions slows camera response time. Transfer stored files to turn on. When the camera is the proper type (see Resetting the...
User Guide
Page 22
... timed out. My image is too dark. ● Wait for the camera to wake up the camera. ● Replace the batteries. Transfer images from the subject and use a tripod, or improve lighting conditions. ● Set the flash to Auto Flash or Flash On and set the shooting mode to see if the memory card is defective. My image is blurry. ● Hold the camera steady when pressing the Shutter button, use zoom. ● Adjust Exposure Compensation (see Install and format...
... timed out. My image is too dark. ● Wait for the camera to wake up the camera. ● Replace the batteries. Transfer images from the subject and use a tripod, or improve lighting conditions. ● Set the flash to Auto Flash or Flash On and set the shooting mode to see if the memory card is defective. My image is blurry. ● Hold the camera steady when pressing the Shutter button, use zoom. ● Adjust Exposure Compensation (see Install and format...
User Guide
Page 23
... batteries for natural lighting conditions to improve. ● You may have zoomed in internal memory. HP Photosmart E427 Digital Camera 23 Video recording terminates abruptly. The camera gets warm (or even hot) to review images. My camera stalls when establishing a connection to the computer. ● Ensure that does not fix the problem, reset the camera (see Resetting the camera on page 21). ● If the problem persists, contact HP Support (see Product support on page 8). If so, transfer...
... batteries for natural lighting conditions to improve. ● You may have zoomed in internal memory. HP Photosmart E427 Digital Camera 23 Video recording terminates abruptly. The camera gets warm (or even hot) to review images. My camera stalls when establishing a connection to the computer. ● Ensure that does not fix the problem, reset the camera (see Resetting the camera on page 21). ● If the problem persists, contact HP Support (see Product support on page 8). If so, transfer...

User Guide
Page 31
... battery door 6 blinking lights on camera 5 C camera dimensions 30 parts 5, 6 specifications 29 turn on/off 7 weight 30 Camera Sounds 20 Capture Menu 12 color depth 29 compression format 29 computer, connect to 18 D Date & Time 7, 20 Date & Time Imprint 13 Delete button 5 deleting images 16 digital zoom 11 dimensions 30 direct print 19 Display Brightness 20 E Exposure Compensation 13, 14 F F-number 29 flash red-eye reduction 12, 14 working range 29 focal length 29 focus range settings Macro 11 Normal 11 format memory card 8 G getting assistance 25 H HP Photosmart Software 8, 9 I Image Display...
... battery door 6 blinking lights on camera 5 C camera dimensions 30 parts 5, 6 specifications 29 turn on/off 7 weight 30 Camera Sounds 20 Capture Menu 12 color depth 29 compression format 29 computer, connect to 18 D Date & Time 7, 20 Date & Time Imprint 13 Delete button 5 deleting images 16 digital zoom 11 dimensions 30 direct print 19 Display Brightness 20 E Exposure Compensation 13, 14 F F-number 29 flash red-eye reduction 12, 14 working range 29 focal length 29 focus range settings Macro 11 Normal 11 format memory card 8 G getting assistance 25 H HP Photosmart Software 8, 9 I Image Display...


