Reference Guide
Page 3
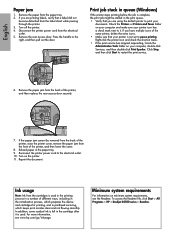
...stack. Verify the following solutions: • Reduce the number of sheets in the input tray. • Remove paper from your computer to the printer directly, without using a USB hub. • If the none of the above steps work, unplug the USB cable, re-insert the software ... onscreen instructions. • Temporarily disable any software firewall and close any anti-virus programs. Re-start these programs after the printer software is installed. English Installation help Printer prints on . • Make sure the USB cable is firmly attached from the input tray, and reload it. •...
...stack. Verify the following solutions: • Reduce the number of sheets in the input tray. • Remove paper from your computer to the printer directly, without using a USB hub. • If the none of the above steps work, unplug the USB cable, re-insert the software ... onscreen instructions. • Temporarily disable any software firewall and close any anti-virus programs. Re-start these programs after the printer software is installed. English Installation help Printer prints on . • Make sure the USB cable is firmly attached from the input tray, and reload it. •...
Reference Guide
Page 4
...HP > Deskjet D2500 series > Readme. If you are printing labels, verify that a label did not become detached from the electrical outlet. 5. Press the handle to restart the print service. 6. Click Stop, and then click Start to the right, and then pull out the door. Minimum system requirements For information on the printer.... 11. Remove the rear access door. Reconnect the printer power cord to pause printing. Reprint the document. English Paper jam 1. Remove the paper...
...HP > Deskjet D2500 series > Readme. If you are printing labels, verify that a label did not become detached from the electrical outlet. 5. Press the handle to restart the print service. 6. Click Stop, and then click Start to the right, and then pull out the door. Minimum system requirements For information on the printer.... 11. Remove the rear access door. Reconnect the printer power cord to pause printing. Reprint the document. English Paper jam 1. Remove the paper...
Reference Guide
Page 10
... RG12 1HN Unauthorized modification or misuse. 4. B. D. Those rights are the customer's sole and exclusive remedies. 2. Extent of implied warranties. 3. c. However, if printer failure or damage is covered by HP; If HP is unable to province in your purchase agreement. b. Grant the customer additional warranty rights, specify the duration of implied warranties which is...
... RG12 1HN Unauthorized modification or misuse. 4. B. D. Those rights are the customer's sole and exclusive remedies. 2. Extent of implied warranties. 3. c. However, if printer failure or damage is covered by HP; If HP is unable to province in your purchase agreement. b. Grant the customer additional warranty rights, specify the duration of implied warranties which is...
Full User Guide
Page 3
... screen readers, Braille readers, and voice-to change without prior written permission of features that convey the appropriate action. Accessibility Your HP printer provides a number of Hewlett-Packard, except as StickyKeys, ToggleKeys, FilterKeys, and MouseKeys. It also supports most assistive technology such as... users who are color blind, colored buttons and tabs used in the software and on the HP printer have simple text or icon labels that make it accessible for HP products and services are U.S. © 2007 Hewlett-Packard Development Company, L.P. Hewlett-Packard Company notices...
... screen readers, Braille readers, and voice-to change without prior written permission of features that convey the appropriate action. Accessibility Your HP printer provides a number of Hewlett-Packard, except as StickyKeys, ToggleKeys, FilterKeys, and MouseKeys. It also supports most assistive technology such as... users who are color blind, colored buttons and tabs used in the software and on the HP printer have simple text or icon labels that make it accessible for HP products and services are U.S. © 2007 Hewlett-Packard Development Company, L.P. Hewlett-Packard Company notices...
Full User Guide
Page 4
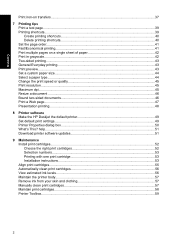
Contents Contents 1 Welcome...5 2 Special features...7 3 Get started The printer at a glance...8 Buttons and lights...9 Power button and light...10 Cancel button...10 Resume button and light...11 Print Cartridge Status lights 11 Paper tray......-backup mode...16 Ink-backup mode output...17 Exit ink-backup mode...17 4 Connect the printer USB...18 5 Print photos Print borderless photos...19 Print photos with a border...20 Print photos on plain paper...22 HP Real Life Technologies photo fix 23 Exif Print...23 Store and handle photo paper 24 Save...
Contents Contents 1 Welcome...5 2 Special features...7 3 Get started The printer at a glance...8 Buttons and lights...9 Power button and light...10 Cancel button...10 Resume button and light...11 Print Cartridge Status lights 11 Paper tray......-backup mode...16 Ink-backup mode output...17 Exit ink-backup mode...17 4 Connect the printer USB...18 5 Print photos Print borderless photos...19 Print photos with a border...20 Print photos on plain paper...22 HP Real Life Technologies photo fix 23 Exif Print...23 Store and handle photo paper 24 Save...
Full User Guide
Page 5
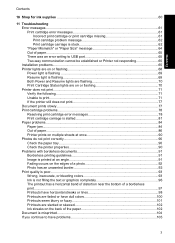
... one print cartridge 53 Installation instructions...53 Align print cartridges...55 Automatically clean print cartridges 56 View estimated ink levels...56 Maintain the printer body...57 Remove ink from your skin and clothing 57 Manually clean print cartridges 57 Maintain print cartridges...58...or quality 45 Print resolution...45 Maximum dpi...45 Resize a document ...46 Bound two-sided documents...46 Print a Web page...47 Presentation printing...48 8 Printer software Make the HP Deskjet the default printer 49 Set default print settings...49 Printer Properties dialog box...50 What's This?
... one print cartridge 53 Installation instructions...53 Align print cartridges...55 Automatically clean print cartridges 56 View estimated ink levels...56 Maintain the printer body...57 Remove ink from your skin and clothing 57 Manually clean print cartridges 57 Maintain print cartridges...58...or quality 45 Print resolution...45 Maximum dpi...45 Resize a document ...46 Bound two-sided documents...46 Print a Web page...47 Presentation printing...48 8 Printer software Make the HP Deskjet the default printer 49 Set default print settings...49 Printer Properties dialog box...50 What's This?
Full User Guide
Page 6
... 64 Out of paper...65 There was an error writing to USB port 65 Two-way communication cannot be established or Printer not responding 65 Installation problems...65 Printer lights are on or flashing 68 Power light is flashing ...69 Resume light is flashing...69 Both Power and Resume lights... are flashing 70 Print Cartridge Status lights are on or flashing 70 Printer does not print...71 Verify the following...71 Unable to print...71 If the printer still does not print 77 Document prints slowly...77 Print cartridge problems...78 Resolving print cartridge error...
... 64 Out of paper...65 There was an error writing to USB port 65 Two-way communication cannot be established or Printer not responding 65 Installation problems...65 Printer lights are on or flashing 68 Power light is flashing ...69 Resume light is flashing...69 Both Power and Resume lights... are flashing 70 Print Cartridge Status lights are on or flashing 70 Printer does not print...71 Verify the following...71 Unable to print...71 If the printer still does not print 77 Document prints slowly...77 Print cartridge problems...78 Resolving print cartridge error...
Full User Guide
Page 7
......107 Placing a call...107 After the phone support period 107 B Technical information Printer specifications...108 Notice to Windows 2000 users 108 Environmental product stewardship program 108 Paper use...109 Plastics...109 Material safety data sheets 109 Recycling program...109 HP inkjet supplies recycling program 109 Energy Star® notice...109 Disposal of... VCCI (Class B) compliance statement for users in Japan 113 Notice to users in Japan about the power cord 113 Toxic and hazardous substance table 113 HP Deskjet D2500 Printer series declaration of conformity 114 Index...115 4
......107 Placing a call...107 After the phone support period 107 B Technical information Printer specifications...108 Notice to Windows 2000 users 108 Environmental product stewardship program 108 Paper use...109 Plastics...109 Material safety data sheets 109 Recycling program...109 HP inkjet supplies recycling program 109 Energy Star® notice...109 Disposal of... VCCI (Class B) compliance statement for users in Japan 113 Notice to users in Japan about the power cord 113 Toxic and hazardous substance table 113 HP Deskjet D2500 Printer series declaration of conformity 114 Index...115 4
Full User Guide
Page 8
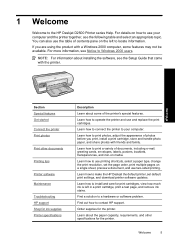
..., see the following table and select an appropriate topic. Learn how to the HP Deskjet D2500 Printer series Help. 1 Welcome Welcome to make the HP Deskjet the default printer, set the page order, print multiple pages on a single sheet, preview a document, and use your computer. Learn how to a hardware or software problem. Learn about ...
..., see the following table and select an appropriate topic. Learn how to the HP Deskjet D2500 Printer series Help. 1 Welcome Welcome to make the HP Deskjet the default printer, set the page order, print multiple pages on a single sheet, preview a document, and use your computer. Learn how to a hardware or software problem. Learn about ...
Full User Guide
Page 10
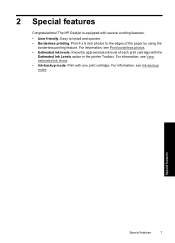
The HP Deskjet is equipped with the Estimated Ink Levels option in the printer Toolbox. For information, see View estimated ink levels. • Ink-backup mode: Print with one print cartridge. Special features Special features 7 For information, see Print ...
The HP Deskjet is equipped with the Estimated Ink Levels option in the printer Toolbox. For information, see View estimated ink levels. • Ink-backup mode: Print with one print cartridge. Special features Special features 7 For information, see Print ...
Full User Guide
Page 11
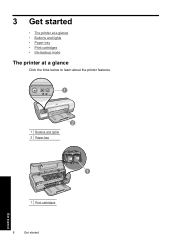
3 Get started • The printer at a glance • Buttons and lights • Paper tray • Print cartridges • Ink-backup mode The printer at a glance Click the links below to learn about the printer features. 1 Buttons and lights 2 Paper tray Get started 1 Print cartridges 8 Get started
3 Get started • The printer at a glance • Buttons and lights • Paper tray • Print cartridges • Ink-backup mode The printer at a glance Click the links below to learn about the printer features. 1 Buttons and lights 2 Paper tray Get started 1 Print cartridges 8 Get started
Full User Guide
Page 12
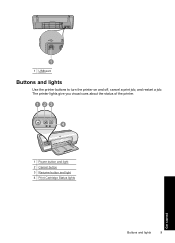
The printer lights give you visual cues about the status of the printer. 1 Power button and light 2 Cancel button 3 Resume button and light 4 Print Cartridge Status lights Buttons and lights 9 Get started 1 USB port Buttons and lights Use the printer buttons to turn the printer on and off, cancel a print job, and restart a job.
The printer lights give you visual cues about the status of the printer. 1 Power button and light 2 Cancel button 3 Resume button and light 4 Print Cartridge Status lights Buttons and lights 9 Get started 1 USB port Buttons and lights Use the printer buttons to turn the printer on and off, cancel a print job, and restart a job.
Full User Guide
Page 13
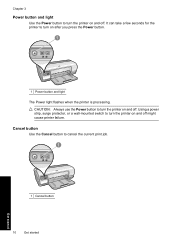
Using a power strip, surge protector, or a wall-mounted switch to turn the printer on and off . Cancel button Use the Cancel button to turn the printer on and off. Chapter 3 Power button and light Use the Power button to turn the printer on and off might cause printer failure. CAUTION: Always use the Power button to cancel the current print job. 1 Cancel button 10 Get started Get started It can take a few seconds for the printer to turn on after you press the Power button. 1 Power button and light The Power light flashes when the printer is processing.
Using a power strip, surge protector, or a wall-mounted switch to turn the printer on and off . Cancel button Use the Cancel button to turn the printer on and off. Chapter 3 Power button and light Use the Power button to turn the printer on and off might cause printer failure. CAUTION: Always use the Power button to cancel the current print job. 1 Cancel button 10 Get started Get started It can take a few seconds for the printer to turn on after you press the Power button. 1 Power button and light The Power light flashes when the printer is processing.

Full User Guide
Page 16
Get started Paper tray 13 If you are printing in the Fast Draft mode, fold out the tray extension stop. The printer deposits printed pages on different sizes of the paper tray. Use the paper tray Print on the top of media by sliding the paper guide to the right or to the left. 2. Pull out the tray extension. 3.
Get started Paper tray 13 If you are printing in the Fast Draft mode, fold out the tray extension stop. The printer deposits printed pages on different sizes of the paper tray. Use the paper tray Print on the top of media by sliding the paper guide to the right or to the left. 2. Pull out the tray extension. 3.
Full User Guide
Page 18
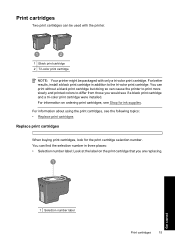
Print cartridges Two print cartridges can cause the printer to print more slowly and printed colors to the tri-color print cartridge. For information on the print cartridge that you would see if a black ... print cartridges When buying print cartridges, look for ink supplies. You can print without a black print cartridge but doing so can be used with the printer. 1 Black print cartridge 2 Tri-color print cartridge NOTE: Your printer might be packaged with only a tri-color print cartridge.
Print cartridges Two print cartridges can cause the printer to print more slowly and printed colors to the tri-color print cartridge. For information on the print cartridge that you would see if a black ... print cartridges When buying print cartridges, look for ink supplies. You can print without a black print cartridge but doing so can be used with the printer. 1 Black print cartridge 2 Tri-color print cartridge NOTE: Your printer might be packaged with only a tri-color print cartridge.

Full User Guide
Page 19
...For more information about installing a replacement print cartridge, see Ink-backup mode. When plastic tape covers the print cartridge contacts, the printer cannot detect that the print cartridge is removed from the print cartridge carriage. Do not remove the copper strips. The ink-backup ...cartridges are required electrical contacts. They are installed in ink-backup mode, a message is displayed on the bottom and facing toward the printer, and then carefully remove the plastic tape. 1 Remove plastic tape CAUTION: Do not touch the print cartridge ink nozzles or copper...
...For more information about installing a replacement print cartridge, see Ink-backup mode. When plastic tape covers the print cartridge contacts, the printer cannot detect that the print cartridge is removed from the print cartridge carriage. Do not remove the copper strips. The ink-backup ...cartridges are required electrical contacts. They are installed in ink-backup mode, a message is displayed on the bottom and facing toward the printer, and then carefully remove the plastic tape. 1 Remove plastic tape CAUTION: Do not touch the print cartridge ink nozzles or copper...
Full User Guide
Page 20
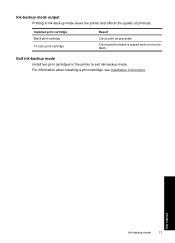
For information about installing a print cartridge, see Installation instructions. Exit ink-backup mode Install two print cartridges in ink-backup mode slows the printer and affects the quality of printouts. Get started Ink-backup mode 17 Installed print cartridge Black print cartridge Tri-color print cartridge Result Colors print as grayscale. Ink-backup mode output Printing in the printer to exit ink-backup mode. Colors print but black is grayed and is not a true black.
For information about installing a print cartridge, see Installation instructions. Exit ink-backup mode Install two print cartridges in ink-backup mode slows the printer and affects the quality of printouts. Get started Ink-backup mode 17 Installed print cartridge Black print cartridge Tri-color print cartridge Result Colors print as grayscale. Ink-backup mode output Printing in the printer to exit ink-backup mode. Colors print but black is grayed and is not a true black.
Full User Guide
Page 21
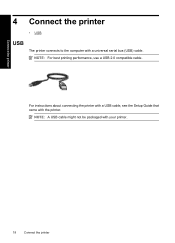
NOTE: For best printing performance, use a USB 2.0 compatible cable. Connect the printer 4 Connect the printer • USB USB The printer connects to the computer with the printer. For instructions about connecting the printer with a USB cable, see the Setup Guide that came with a universal serial bus (USB) cable. NOTE: A USB cable might not be packaged with your printer. 18 Connect the printer
NOTE: For best printing performance, use a USB 2.0 compatible cable. Connect the printer 4 Connect the printer • USB USB The printer connects to the computer with the printer. For instructions about connecting the printer with a USB cable, see the Setup Guide that came with a universal serial bus (USB) cable. NOTE: A USB cable might not be packaged with your printer. 18 Connect the printer
Full User Guide
Page 22
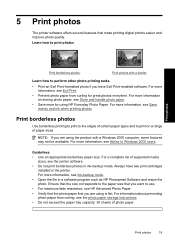
...the paper tray capacity: 30 sheets of supported media sizes, see Save money and ink when printing photos. For more information, see the printer software. • Do not print borderless photos in ink-backup mode. Always have Exif Print-enabled software. Ensure that the size corresponds ... Print photos with a Windows 2000 computer, some features may not be available. Learn how to use. • For maximum fade resistance, use HP Advanced Photo Paper. • Verify that the photo paper that make printing digital photos easier and improve photo quality. Guidelines • Use an ...
...the paper tray capacity: 30 sheets of supported media sizes, see Save money and ink when printing photos. For more information, see the printer software. • Do not print borderless photos in ink-backup mode. Always have Exif Print-enabled software. Ensure that the size corresponds ... Print photos with a Windows 2000 computer, some features may not be available. Learn how to use. • For maximum fade resistance, use HP Advanced Photo Paper. • Verify that the photo paper that make printing digital photos easier and improve photo quality. Guidelines • Use an ...
Full User Guide
Page 23
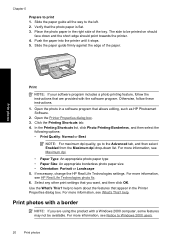
...with a Windows 2000 computer, some features may not be printed on should point towards the printer. 4. Click the Printing Shortcuts tab. 4. If necessary, change the HP Real Life Technologies settings. Slide the paper guide firmly against the edge of the tray. Print... Size: An appropriate borderless photo paper size • Orientation: Portrait or Landscape 5. Verify that allows editing, such as HP Photosmart Software. 2. Open the Printer Properties dialog box. 3. Select any other print settings that are using the product with the software program. Chapter 5 Prepare...
...with a Windows 2000 computer, some features may not be printed on should point towards the printer. 4. Click the Printing Shortcuts tab. 4. If necessary, change the HP Real Life Technologies settings. Slide the paper guide firmly against the edge of the tray. Print... Size: An appropriate borderless photo paper size • Orientation: Portrait or Landscape 5. Verify that allows editing, such as HP Photosmart Software. 2. Open the Printer Properties dialog box. 3. Select any other print settings that are using the product with the software program. Chapter 5 Prepare...


