Reference Guide
Page 4
... the print job might be removed from the back of the printer, raise the printer cover, remove the paper jam from the cartridges is used in the printing process in printhead servicing, which keeps print nozzles clear and ink flowing smoothly. Right-click the printer icon...electrical outlet. 10. To access the Readme file, click Start > All Programs > HP > Deskjet D2500 series > Readme. Ink usage Note: Ink from the front of different ways, including in the initialization process, which prepares the device and cartridges for printing, and in a number of the printer, and then lower the cover...
... the print job might be removed from the back of the printer, raise the printer cover, remove the paper jam from the cartridges is used in the printing process in printhead servicing, which keeps print nozzles clear and ink flowing smoothly. Right-click the printer icon...electrical outlet. 10. To access the Readme file, click Start > All Programs > HP > Deskjet D2500 series > Readme. Ink usage Note: Ink from the front of different ways, including in the initialization process, which prepares the device and cartridges for printing, and in a number of the printer, and then lower the cover...
Reference Guide
Page 10
...of warranty" date printed on the duration of the defect, refund the purchase price for the performance of a non-HP or refilled cartridge or an expired ink cartridge, HP will be free from country to enforce such disclaimers or limitations; Improper maintenance or modification; However, if printer failure ...from province to province in Canada, and from defects in countries where the product is depleted or the "end of a non-HP cartridge or a refilled cartridge does not affect either new or like-new, provided that have no obligation to repair, replace, or refund until the customer ...
...of warranty" date printed on the duration of the defect, refund the purchase price for the performance of a non-HP or refilled cartridge or an expired ink cartridge, HP will be free from country to enforce such disclaimers or limitations; Improper maintenance or modification; However, if printer failure ...from province to province in Canada, and from defects in countries where the product is depleted or the "end of a non-HP cartridge or a refilled cartridge does not affect either new or like-new, provided that have no obligation to repair, replace, or refund until the customer ...
Full User Guide
Page 4
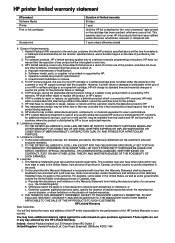
... lights 11 Paper tray...12 Unfold the paper tray...12 Use the paper tray...13 Fold the paper tray...14 Print cartridges...15 Replace print cartridges...15 Ink-backup mode...16 Ink-backup mode output...17 Exit ink-backup mode...17 4 Connect the printer USB...18 5 Print photos Print borderless... photos...19 Print photos with a border...20 Print photos on plain paper...22 HP Real Life Technologies photo fix 23 Exif Print...23 Store...
... lights 11 Paper tray...12 Unfold the paper tray...12 Use the paper tray...13 Fold the paper tray...14 Print cartridges...15 Replace print cartridges...15 Ink-backup mode...16 Ink-backup mode output...17 Exit ink-backup mode...17 4 Connect the printer USB...18 5 Print photos Print borderless... photos...19 Print photos with a border...20 Print photos on plain paper...22 HP Real Life Technologies photo fix 23 Exif Print...23 Store...
Full User Guide
Page 5
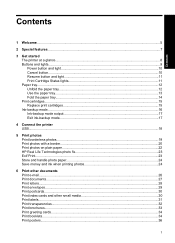
...Printer software Make the HP Deskjet the default printer 49 Set default print settings...49 Printer Properties dialog box...50 What's This? help...51 Download printer software updates 51 9 Maintenance Install print cartridges...52 Choose the right print cartridges 52 Selection numbers......53 Printing with one print cartridge 53 Installation instructions...53 Align print cartridges...55 Automatically clean print cartridges 56 View estimated ink levels...56 Maintain ...
...Printer software Make the HP Deskjet the default printer 49 Set default print settings...49 Printer Properties dialog box...50 What's This? help...51 Download printer software updates 51 9 Maintenance Install print cartridges...52 Choose the right print cartridges 52 Selection numbers......53 Printing with one print cartridge 53 Installation instructions...53 Align print cartridges...55 Automatically clean print cartridges 56 View estimated ink levels...56 Maintain ...
Full User Guide
Page 6
...are on or flashing 68 Power light is flashing ...69 Resume light is flashing...69 Both Power and Resume lights are flashing 70 Print Cartridge Status lights are on or flashing 70 Printer does not print...71 Verify the following...71 Unable to print...71 If the printer still does... not print 77 Document prints slowly...77 Print cartridge problems...78 Resolving print cartridge error messages 78 Print cartridge carriage is stalled 81 Paper problems...84 Paper jam...84 Out of paper...86 Printer prints on multiple sheets at ...
...are on or flashing 68 Power light is flashing ...69 Resume light is flashing...69 Both Power and Resume lights are flashing 70 Print Cartridge Status lights are on or flashing 70 Printer does not print...71 Verify the following...71 Unable to print...71 If the printer still does... not print 77 Document prints slowly...77 Print cartridge problems...78 Resolving print cartridge error messages 78 Print cartridge carriage is stalled 81 Paper problems...84 Paper jam...84 Out of paper...86 Printer prints on multiple sheets at ...
Full User Guide
Page 7
Contents A HP support Ink cartridge warranty information 106 Support process...106 HP support by phone...106 Phone support period...107 Placing a call...107 After the phone...108 Environmental product stewardship program 108 Paper use...109 Plastics...109 Material safety data sheets 109 Recycling program...109 HP inkjet supplies recycling program 109 Energy Star® notice...109 Disposal of waste equipment by users in private ... users in Japan about the power cord 113 Toxic and hazardous substance table 113 HP Deskjet D2500 Printer series declaration of conformity 114 Index...115 4
Contents A HP support Ink cartridge warranty information 106 Support process...106 HP support by phone...106 Phone support period...107 Placing a call...107 After the phone...108 Environmental product stewardship program 108 Paper use...109 Plastics...109 Material safety data sheets 109 Recycling program...109 HP inkjet supplies recycling program 109 Energy Star® notice...109 Disposal of waste equipment by users in private ... users in Japan about the power cord 113 Toxic and hazardous substance table 113 HP Deskjet D2500 Printer series declaration of conformity 114 Index...115 4
Full User Guide
Page 8
.... Find a solution to the HP Deskjet D2500 Printer series Help. 1 Welcome Welcome to a hardware or software problem. Learn how to your computer and the printer together, see the following table and select an appropriate topic. For details on a single sheet, preview a document, and use and replace the print cartridges. You can also use your...
.... Find a solution to the HP Deskjet D2500 Printer series Help. 1 Welcome Welcome to a hardware or software problem. Learn how to your computer and the printer together, see the following table and select an appropriate topic. For details on a single sheet, preview a document, and use and replace the print cartridges. You can also use your...

Full User Guide
Page 9
Chapter 1 (continued) Section HP inkjet supplies recycling program Description Find out how to recycle print cartridges. Welcome 6 Welcome
Chapter 1 (continued) Section HP inkjet supplies recycling program Description Find out how to recycle print cartridges. Welcome 6 Welcome
Full User Guide
Page 10
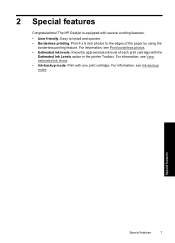
The HP Deskjet is equipped with several exciting features: • User friendly: Easy to install and operate. • Borderless printing: Print 4 x 6 inch photos to the edges of each print cartridge with one print cartridge. Special features Special features 7 For information, see Ink-backup mode. For information, see View estimated ink levels. • Ink-backup mode...
The HP Deskjet is equipped with several exciting features: • User friendly: Easy to install and operate. • Borderless printing: Print 4 x 6 inch photos to the edges of each print cartridge with one print cartridge. Special features Special features 7 For information, see Ink-backup mode. For information, see View estimated ink levels. • Ink-backup mode...
Full User Guide
Page 11
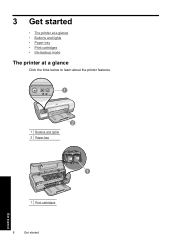
3 Get started • The printer at a glance • Buttons and lights • Paper tray • Print cartridges • Ink-backup mode The printer at a glance Click the links below to learn about the printer features. 1 Buttons and lights 2 Paper tray Get started 1 Print cartridges 8 Get started
3 Get started • The printer at a glance • Buttons and lights • Paper tray • Print cartridges • Ink-backup mode The printer at a glance Click the links below to learn about the printer features. 1 Buttons and lights 2 Paper tray Get started 1 Print cartridges 8 Get started
Full User Guide
Page 12
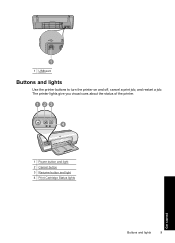
1 USB port Buttons and lights Use the printer buttons to turn the printer on and off, cancel a print job, and restart a job. The printer lights give you visual cues about the status of the printer. 1 Power button and light 2 Cancel button 3 Resume button and light 4 Print Cartridge Status lights Buttons and lights 9 Get started
1 USB port Buttons and lights Use the printer buttons to turn the printer on and off, cancel a print job, and restart a job. The printer lights give you visual cues about the status of the printer. 1 Power button and light 2 Cancel button 3 Resume button and light 4 Print Cartridge Status lights Buttons and lights 9 Get started

Full User Guide
Page 14
When the problem is required, such as loading paper or clearing a paper jam. Resume button and light The Resume light flashes when an action is solved, press the Resume button to continue printing. 1 Resume button and light Print Cartridge Status lights The Print Cartridge Status lights are located on the control panel. 1 Print Cartridge Status lights Buttons and lights 11 Get started
When the problem is required, such as loading paper or clearing a paper jam. Resume button and light The Resume light flashes when an action is solved, press the Resume button to continue printing. 1 Resume button and light Print Cartridge Status lights The Print Cartridge Status lights are located on the control panel. 1 Print Cartridge Status lights Buttons and lights 11 Get started

Full User Guide
Page 15
...low on ink. • The light flashes when the tri-color print cartridge needs to be serviced. 2. Chapter 3 1 Tri-color print cartridge light 2 Black print cartridge light 1. Paper tray For information about the paper tray, select one of the print cartridge carriage. • The light is on and solid when the tri-... to be serviced. Lower the paper tray. 12 Get started Get started The left status light represents the tri-color print cartridge, which is installed in the left side of these topics. • Unfold the paper tray • Use the paper tray • Fold the paper...
...low on ink. • The light flashes when the tri-color print cartridge needs to be serviced. 2. Chapter 3 1 Tri-color print cartridge light 2 Black print cartridge light 1. Paper tray For information about the paper tray, select one of the print cartridge carriage. • The light is on and solid when the tri-... to be serviced. Lower the paper tray. 12 Get started Get started The left status light represents the tri-color print cartridge, which is installed in the left side of these topics. • Unfold the paper tray • Use the paper tray • Fold the paper...
Full User Guide
Page 18
...: • Selection number label: Look at the label on ordering print cartridges, see if a black print cartridge and a tri-color print cartridge were installed. You can find the selection number in addition to differ from those you are replacing. Print cartridges Two print cartridges can cause the printer to print more slowly and printed colors...
...: • Selection number label: Look at the label on ordering print cartridges, see if a black print cartridge and a tri-color print cartridge were installed. You can find the selection number in addition to differ from those you are replacing. Print cartridges Two print cartridges can cause the printer to print more slowly and printed colors...

Full User Guide
Page 19
...printer operates in the printer, verify that the protective piece of plastic tape has been removed from a print cartridge ▲ Hold the print cartridge so that came with only one print cartridge. If the message is installed. Touching these parts will result in ink-backup mode. They are on ...-backup mode output • Exit ink-backup mode 16 Get started Get started Chapter 3 • Printer documentation: For a list of print cartridge selection numbers, see the reference guide that the copper strips are required electrical contacts. The ink-backup mode is initiated when a print...
...printer operates in the printer, verify that the protective piece of plastic tape has been removed from a print cartridge ▲ Hold the print cartridge so that came with only one print cartridge. If the message is installed. Touching these parts will result in ink-backup mode. They are on ...-backup mode output • Exit ink-backup mode 16 Get started Get started Chapter 3 • Printer documentation: For a list of print cartridge selection numbers, see the reference guide that the copper strips are required electrical contacts. The ink-backup mode is initiated when a print...
Full User Guide
Page 20
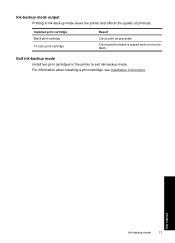
Installed print cartridge Black print cartridge Tri-color print cartridge Result Colors print as grayscale. Ink-backup mode output Printing in the printer to exit ink-backup mode. Get started Ink-backup mode 17 Exit ink-backup mode Install two print cartridges in ink-backup mode slows the printer and affects the quality of printouts. Colors print but black is grayed and is not a true black. For information about installing a print cartridge, see Installation instructions.
Installed print cartridge Black print cartridge Tri-color print cartridge Result Colors print as grayscale. Ink-backup mode output Printing in the printer to exit ink-backup mode. Get started Ink-backup mode 17 Exit ink-backup mode Install two print cartridges in ink-backup mode slows the printer and affects the quality of printouts. Colors print but black is grayed and is not a true black. For information about installing a print cartridge, see Installation instructions.
Full User Guide
Page 22
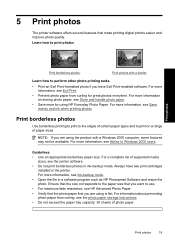
...perform other photo printing tasks • Print an Exif Print-formatted photo if you are using HP Everyday Photo Paper. Learn how to use. • For maximum fade resistance, use HP Advanced Photo Paper. • Verify that the photo paper that make printing digital photos easier... and improve photo quality. For a complete list of photo paper. Print photos 19 Guidelines • Use an appropriate borderless paper size. NOTE: If you have two print cartridges installed ...
...perform other photo printing tasks • Print an Exif Print-formatted photo if you are using HP Everyday Photo Paper. Learn how to use. • For maximum fade resistance, use HP Advanced Photo Paper. • Verify that the photo paper that make printing digital photos easier... and improve photo quality. For a complete list of photo paper. Print photos 19 Guidelines • Use an appropriate borderless paper size. NOTE: If you have two print cartridges installed ...
Full User Guide
Page 55
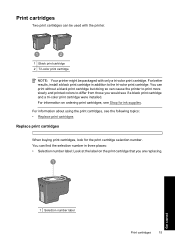
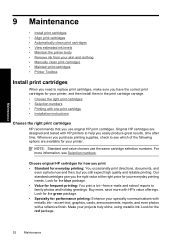
...---accent text, graphics, cards, announcements, reports, and even photos with a reflective finish. Choose original HP cartridges for how you print • Standard for everyday printing: You occasionally print directions, documents, and even...cartridges When you need to replace print cartridges, make sure you have the correct print cartridges for your printer, and then install them in the print cartridge carriage. • Choose the right print cartridges • Selection numbers • Printing with one print cartridge • Installation instructions Choose the right print cartridges HP...
...---accent text, graphics, cards, announcements, reports, and even photos with a reflective finish. Choose original HP cartridges for how you print • Standard for everyday printing: You occasionally print directions, documents, and even...cartridges When you need to replace print cartridges, make sure you have the correct print cartridges for your printer, and then install them in the print cartridge carriage. • Choose the right print cartridges • Selection numbers • Printing with one print cartridge • Installation instructions Choose the right print cartridges HP...
Full User Guide
Page 56
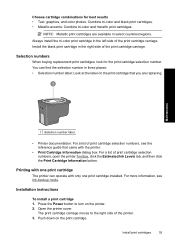
... the reference guide that you are available in the right side of the print cartridge carriage. Installation instructions To install a print cartridge 1. Open the printer cover. Install the black print cartridge in select countries/regions. Printing with one print cartridge The printer can find the selection number in the left side of the print...
... the reference guide that you are available in the right side of the print cartridge carriage. Installation instructions To install a print cartridge 1. Open the printer cover. Install the black print cartridge in select countries/regions. Printing with one print cartridge The printer can find the selection number in the left side of the print...

Full User Guide
Page 57
...remove the plastic tape. Touching these parts will result in clogs, ink failure, and bad electrical connections. Maintenance 54 Maintenance Slide the print cartridge out of the carriage. 1 Press the Power button 2 Open the printer cover 3 Push down on the bottom and facing toward the...printer. 1 Remove plastic tape CAUTION: Do not touch the print cartridge ink nozzles or copper contacts. They are required electrical contacts. Hold the print cartridge so that the copper strip is on the print cartridge 4 Slide the print cartridge out of the carriage 5. Do not remove the copper strips....
...remove the plastic tape. Touching these parts will result in clogs, ink failure, and bad electrical connections. Maintenance 54 Maintenance Slide the print cartridge out of the carriage. 1 Press the Power button 2 Open the printer cover 3 Push down on the bottom and facing toward the...printer. 1 Remove plastic tape CAUTION: Do not touch the print cartridge ink nozzles or copper contacts. They are required electrical contacts. Hold the print cartridge so that the copper strip is on the print cartridge 4 Slide the print cartridge out of the carriage 5. Do not remove the copper strips....


