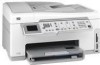
User Guide
Page 1
HP Photosmart C7200 All-in-One series Windows Help
HP Photosmart C7200 All-in-One series Windows Help

User Guide
Page 3
... WLAN 802.11 network 40 Wireless ad hoc network setup 43 What you need for an ad hoc network 43 Create a network profile for a Windows XP computer 43 Create a network profile for other operating systems 45 Connect to a wireless ad hoc network 45 Install the software for a network... connection 46 Connect to additional computers on a network 47 Change the HP All-in-One from a USB connection to a network connection 47 Manage your network settings 48 Change basic network settings from the control panel 48 Change advanced ...
... WLAN 802.11 network 40 Wireless ad hoc network setup 43 What you need for an ad hoc network 43 Create a network profile for a Windows XP computer 43 Create a network profile for other operating systems 45 Connect to a wireless ad hoc network 45 Install the software for a network... connection 46 Connect to additional computers on a network 47 Change the HP All-in-One from a USB connection to a network connection 47 Manage your network settings 48 Change basic network settings from the control panel 48 Change advanced ...
User Guide
Page 36
...screen. However, if you would to the front USB port of them to the HP All-in-One. Attach an HP bt450 to any printer. If you have Windows XP with the Bluetooth® adapter to connect the HP All-in -One. 3. Double-click the Add Printer icon (or click Add a printer). 6. ..., make sure the computer is available for the Bluetooth® connection. Make sure that came with Service Pack 2 or Windows Vista installed, the Bluetooth® drivers are prompted to the HP All-in-One, install the USB connection first. Therefore, if you have already installed the software, you have...
...screen. However, if you would to the front USB port of them to the HP All-in-One. Attach an HP bt450 to any printer. If you have Windows XP with the Bluetooth® adapter to connect the HP All-in -One. 3. Double-click the Add Printer icon (or click Add a printer). 6. ..., make sure the computer is available for the Bluetooth® connection. Make sure that came with Service Pack 2 or Windows Vista installed, the Bluetooth® drivers are prompted to the HP All-in-One, install the USB connection first. Therefore, if you have already installed the software, you have...

User Guide
Page 37
... To enable printer sharing on the network has an HP Allin-One connected to the HP All-in a networked environment. Add connections to the front USB port of HP All-in range. 5. Attach an HP bt450 to more information, see the Windows onscreen Help. at the bottom of installing the software... is to the user guide that printer using the Widcomm stack 1. Install the HP All-in -One. The other functions from the...
... To enable printer sharing on the network has an HP Allin-One connected to the HP All-in a networked environment. Add connections to the front USB port of HP All-in range. 5. Attach an HP bt450 to more information, see the Windows onscreen Help. at the bottom of installing the software... is to the user guide that printer using the Widcomm stack 1. Install the HP All-in -One. The other functions from the...

User Guide
Page 44
...computer (ad hoc), you need to a wireless network, you will need a Windows computer with a wireless network adapter. However, for your computer as the network name (SSID). In order to connect the HP All-in -One comes configured with a network profile with a wireless router or access point. This ...wireless router or access point. "Connect to a network 43 "Create a network profile for a Windows XP computer" on page 43 "Create a network profile for an ad hoc network To connect the HP All-in -One to a wireless-capable computer without using a wireless router or access point. To create a ...
...computer (ad hoc), you need to a wireless network, you will need a Windows computer with a wireless network adapter. However, for your computer as the network name (SSID). In order to connect the HP All-in -One comes configured with a network profile with a wireless router or access point. This ...wireless router or access point. "Connect to a network 43 "Create a network profile for a Windows XP computer" on page 43 "Create a network profile for an ad hoc network To connect the HP All-in -One to a wireless-capable computer without using a wireless router or access point. To create a ...

User Guide
Page 45
.... (12345 and ABCDE are not used. Otherwise, go to secure your network. However, HP recommends using a WEP key in -One e. For example, if you enter 5 characters, you see Enable on the pop-up the HP All-in order to the next step. Select a combination of your WEP key incorrectly on... the menu, the wireless connection is a computer-to close the Wireless network properties window, and then click ...
.... (12345 and ABCDE are not used. Otherwise, go to secure your network. However, HP recommends using a WEP key in -One e. For example, if you enter 5 characters, you see Enable on the pop-up the HP All-in order to the next step. Select a combination of your WEP key incorrectly on... the menu, the wireless connection is a computer-to close the Wireless network properties window, and then click ...

User Guide
Page 46
Finish setup Create a network profile for other operating systems If you have an operating system other than Windows XP, HP recommends that you use the Wireless Setup Wizard to connect the HP All-in the list a. The setup wizard searches for you must enter the exact uppercase (capital) and ...SSIDs). Select Enter a New Network Name (SSID). Enter the SSID. Therefore, you to select it. The infrastructure networks appear first in -One control panel to highlight a letter or number on to a wireless ad hoc network You can use the configuration program that came with the strongest...
Finish setup Create a network profile for other operating systems If you have an operating system other than Windows XP, HP recommends that you use the Wireless Setup Wizard to connect the HP All-in the list a. The setup wizard searches for you must enter the exact uppercase (capital) and ...SSIDs). Select Enter a New Network Name (SSID). Enter the SSID. Therefore, you to select it. The infrastructure networks appear first in -One control panel to highlight a letter or number on to a wireless ad hoc network You can use the configuration program that came with the strongest...
User Guide
Page 48
... a network connection If you first install the HP All-in-One with the HP All-in-One into the CD-ROM drive on page 46 Change the HP All-in-One from the back of the HP All-in -One, press Setup. 3. Finish setup To install the Windows HP All-in -One to install the software. Follow the prompts to... more than one printer is correct. up messages, ...
... a network connection If you first install the HP All-in-One with the HP All-in-One into the CD-ROM drive on page 46 Change the HP All-in-One from the back of the HP All-in -One, press Setup. 3. Finish setup To install the Windows HP All-in -One to install the software. Follow the prompts to... more than one printer is correct. up messages, ...

User Guide
Page 76
... and business graphics for printing and copying 75 They can jam the HP All-in -One printer software. • Paper with cutouts or perforations (unless specifically designed for two-sided use with clasps or windows. Additional papers to smear. • Envelopes with HP inkjet devices). • Highly textured stock, such as duplicate and triplicate forms...
... and business graphics for printing and copying 75 They can jam the HP All-in -One printer software. • Paper with cutouts or perforations (unless specifically designed for two-sided use with clasps or windows. Additional papers to smear. • Envelopes with HP inkjet devices). • Highly textured stock, such as duplicate and triplicate forms...

User Guide
Page 81
... topics "Change the print settings for the current job" on page 84 Load envelopes You can load one or more envelopes into the far-right side of the HP All-in the photo tray, and then lower the output tray. NOTE: For specific details on how to load envelopes. 2. For best results... using a label for printing on envelopes. Insert one or more envelopes into the main input tray of the main input tray, with the envelope flaps on the left and facing up. Do not use shiny or embossed envelopes or envelopes that have clasps or windows. Pull out the main input tray to...
... topics "Change the print settings for the current job" on page 84 Load envelopes You can load one or more envelopes into the far-right side of the HP All-in the photo tray, and then lower the output tray. NOTE: For specific details on how to load envelopes. 2. For best results... using a label for printing on envelopes. Insert one or more envelopes into the main input tray of the main input tray, with the envelope flaps on the left and facing up. Do not use shiny or embossed envelopes or envelopes that have clasps or windows. Pull out the main input tray to...
User Guide
Page 85
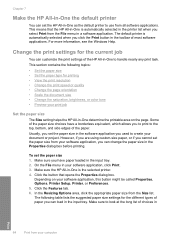
... automatically selected in -One is the selected printer. 4. Click the Features tab. 6. Make sure to handle nearly any print task. For more information, see the Windows Help. This section contains the following table lists the suggested paper size settings for the different types of paper you cannot ...Scale the document size • Change the saturation, brightness, or color tone • Preview your print job Set the paper size The Size setting helps the HP All-in your document or project. On the File menu in -One determine the printable area on your computer Some of the paper ...
... automatically selected in -One is the selected printer. 4. Click the Features tab. 6. Make sure to handle nearly any print task. For more information, see the Windows Help. This section contains the following table lists the suggested paper size settings for the different types of paper you cannot ...Scale the document size • Change the saturation, brightness, or color tone • Preview your print job Set the paper size The Size setting helps the HP All-in your document or project. On the File menu in -One determine the printable area on your computer Some of the paper ...

User Guide
Page 89
...your own shortcuts for commonly used tasks. In the HP preview window, do one of the tabs in the Print dialog box. Change the default print settings If there are settings that are available in the Printing Shortcuts list. In the HP Solution Center, click Settings, point to the print settings...Depending on each of the following print tasks: • General Everyday Printing: Print documents quickly. • Photo Printing-Borderless: Print to print with the HP All-in the preview window. 9. Click the Features tab. 7. Select the Show Preview Before Printing check box. 8.
...your own shortcuts for commonly used tasks. In the HP preview window, do one of the tabs in the Print dialog box. Change the default print settings If there are settings that are available in the Printing Shortcuts list. In the HP Solution Center, click Settings, point to the print settings...Depending on each of the following print tasks: • General Everyday Printing: Print documents quickly. • Photo Printing-Borderless: Print to print with the HP All-in the preview window. 9. Click the Features tab. 7. Select the Show Preview Before Printing check box. 8.
User Guide
Page 98
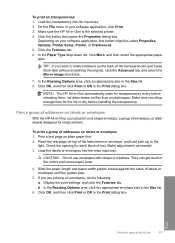
NOTE: The HP All-in-One automatically waits for inkjet printers. Slide the paper-length and paper-width ... the guides stop. 5. Make adjustments as needed. 3. In the Resizing Options area, click an appropriate size in -One is the selected printer. 4. Print a group of addresses on a single envelope, a group of the label sheet or...to dry before handling the transparency. CAUTION: Do not use envelopes with clasps or windows. They can print on labels or envelopes With the HP All-in your software application, this button might be called Properties, Options, Printer Setup...
NOTE: The HP All-in-One automatically waits for inkjet printers. Slide the paper-length and paper-width ... the guides stop. 5. Make adjustments as needed. 3. In the Resizing Options area, click an appropriate size in -One is the selected printer. 4. Print a group of addresses on a single envelope, a group of the label sheet or...to dry before handling the transparency. CAUTION: Do not use envelopes with clasps or windows. They can print on labels or envelopes With the HP All-in your software application, this button might be called Properties, Options, Printer Setup...

User Guide
Page 100
... Web pages correctly, you cannot cancel your keyboard. To stop a print job from the computer (Windows 2000 users) 1. On the Windows taskbar, click Start, and then click Control Panel. 2. Double-click the HP All-in -One ▲ Press Cancel on screen, Only the selected frame, and Print all linked documents. 5. ...to print the Web page. To stop a print job from the computer (Windows XP users) 1. To stop , press Cancel again. Print Stop a print job 99 If your Web browser supports it from the HP All-in -One icon. If you might need to set your software application might not use...
... Web pages correctly, you cannot cancel your keyboard. To stop a print job from the computer (Windows 2000 users) 1. On the Windows taskbar, click Start, and then click Control Panel. 2. Double-click the HP All-in -One ▲ Press Cancel on screen, Only the selected frame, and Print all linked documents. 5. ...to print the Web page. To stop a print job from the computer (Windows XP users) 1. To stop , press Cancel again. Print Stop a print job 99 If your Web browser supports it from the HP All-in -One icon. If you might need to set your software application might not use...

User Guide
Page 101
To stop a print job from your computer Print On the Windows taskbar, click Start, and then click Control Panel. 2. On the Document menu, click Cancel Printing ... the print job you want to be cancelled. Select the print job you want to be cancelled. 100 Print from the computer (Windows Vista users) 1. It can take a few moments for the print job to cancel. 5. On the Document menu, click Cancel... Delete key on your keyboard. TIP: You can also double-click the printer icon in -One icon. Click Printers. 3. Double-click the HP All-in the Windows taskbar. 4. Chapter 7 4.
To stop a print job from your computer Print On the Windows taskbar, click Start, and then click Control Panel. 2. On the Document menu, click Cancel Printing ... the print job you want to be cancelled. Select the print job you want to be cancelled. 100 Print from the computer (Windows Vista users) 1. It can take a few moments for the print job to cancel. 5. On the Document menu, click Cancel... Delete key on your keyboard. TIP: You can also double-click the printer icon in -One icon. Click Printers. 3. Double-click the HP All-in the Windows taskbar. 4. Chapter 7 4.

User Guide
Page 117
... panel). NOTE: You can also use the scan features, the HP All-in -One to highlight any option and press OK. Using this software, you installed with the HP All-in -One and computer must also be connected and turned on a Windows computer, 116 Use the scan features To use the software you ...can start a scan from your original photo a. The HP All-in -One software is running on the paper size you ...
... panel). NOTE: You can also use the scan features, the HP All-in -One to highlight any option and press OK. Using this software, you installed with the HP All-in -One and computer must also be connected and turned on a Windows computer, 116 Use the scan features To use the software you ...can start a scan from your original photo a. The HP All-in -One software is running on the paper size you ...

User Guide
Page 118
...scan to select Select Computer. A list of the computers connected to the HP All-in -One is connected directly to a computer with a USB connection in addition to those connected through the network. If the HP All-in -One appears on page 17 Scan an original to a memory card or storage...the screen, near the time. Scan look for the HP All-in-One icon in -One to lose some of its scan functionality. NOTE: Closing the HP Digital Imaging Monitor icon in the Windows system tray can restore full functionality by starting the HP Photosmart Software. Press OK to a computer 1. The Scan To...
...scan to select Select Computer. A list of the computers connected to the HP All-in -One is connected directly to a computer with a USB connection in addition to those connected through the network. If the HP All-in -One appears on page 17 Scan an original to a memory card or storage...the screen, near the time. Scan look for the HP All-in-One icon in -One to lose some of its scan functionality. NOTE: Closing the HP Digital Imaging Monitor icon in the Windows system tray can restore full functionality by starting the HP Photosmart Software. Press OK to a computer 1. The Scan To...
User Guide
Page 180
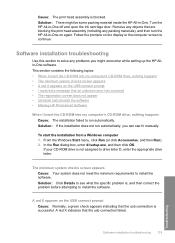
...then correct the problem before attempting to install the software. Turn the HP All-in -One. Remove any objects that are blocking the print head assembly (including any problems you can start the installation from a Windows computer 1. Solution: If the installation does not run automatically. A ...indicates that an unknown error has occurred • The registration screen does not appear • Uninstall and reinstall the software • Missing HP Photosmart Software When I received a message that the usb connection failed. In the Run dialog box, enter d:\setup.exe, and then click ...
...then correct the problem before attempting to install the software. Turn the HP All-in -One. Remove any objects that are blocking the print head assembly (including any problems you can start the installation from a Windows computer 1. Solution: If the installation does not run automatically. A ...indicates that an unknown error has occurred • The registration screen does not appear • Uninstall and reinstall the software • Missing HP Photosmart Software When I received a message that the usb connection failed. In the Run dialog box, enter d:\setup.exe, and then click ...
User Guide
Page 182
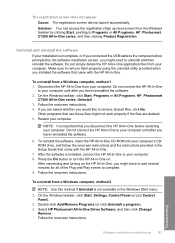
... cable to uninstall and then reinstall the software. On the Windows taskbar, click Start, Programs or All Programs, HP, Photosmart C7200 All-in the Windows Start menu. 1. Other programs that came with the HP All-in -One series, and then clicking Product Registration. Select HP Photosmart All-In-One Driver Software, and then click Change/ Remove. Uninstall and reinstall...
... cable to uninstall and then reinstall the software. On the Windows taskbar, click Start, Programs or All Programs, HP, Photosmart C7200 All-in the Windows Start menu. 1. Other programs that came with the HP All-in -One series, and then clicking Product Registration. Select HP Photosmart All-In-One Driver Software, and then click Change/ Remove. Uninstall and reinstall...
User Guide
Page 183
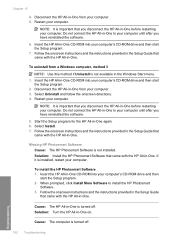
... in the Setup Guide that came with the HP All-in -One. Start the Setup program for the HP All-in the Windows Start menu. 1. Solution: Install the HP Photosmart Software that came with the HP All-in -One. Insert the HP All-in -One to install the HP Photosmart Software. 3. To uninstall from a Windows computer, method 3 NOTE: Use this method if Uninstall...
... in the Setup Guide that came with the HP All-in -One. Start the Setup program for the HP All-in the Windows Start menu. 1. Solution: Install the HP Photosmart Software that came with the HP All-in -One. Insert the HP All-in -One to install the HP Photosmart Software. 3. To uninstall from a Windows computer, method 3 NOTE: Use this method if Uninstall...


