Setup Guide
Page 4
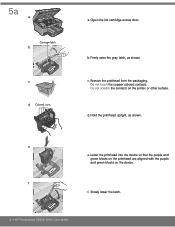
Remove the printhead from the packaging. Do not scratch the contacts on the device. d. e g f e. f. Slowly lower the latch. 4 • HP Photosmart C6300 All-in-One series c. Do not touch the copper colored contacts. Hold the printhead upright, as shown. Open the ink cartridge access door. Firmly raise the gray latch, as shown. Lower the printhead into the device so that the purple and green blocks on the printhead are aligned with the purple and green blocks on the printer or other surface. 5a a Carriage latch b c d Colored icons f a. b.
Remove the printhead from the packaging. Do not scratch the contacts on the device. d. e g f e. f. Slowly lower the latch. 4 • HP Photosmart C6300 All-in-One series c. Do not touch the copper colored contacts. Hold the printhead upright, as shown. Open the ink cartridge access door. Firmly raise the gray latch, as shown. Lower the printhead into the device so that the purple and green blocks on the printhead are aligned with the purple and green blocks on the printer or other surface. 5a a Carriage latch b c d Colored icons f a. b.
Setup Guide
Page 5
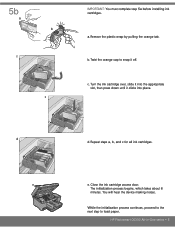
Turn the ink cartridge over, slide it into place. Close the ink cartridge access door. HP Photosmart C6300 All-in-One series • 5 a. b. d d. The initialization process begins, which takes about 6 minutes. Repeat steps a, b, and c for all ink cartridges. Remove the plastic wrap by pulling the orange tab. c. 5b a b c c IMPORTANT: You must complete step 5a before installing ink cartridges. You will hear...
Turn the ink cartridge over, slide it into place. Close the ink cartridge access door. HP Photosmart C6300 All-in-One series • 5 a. b. d d. The initialization process begins, which takes about 6 minutes. Repeat steps a, b, and c for all ink cartridges. Remove the plastic wrap by pulling the orange tab. c. 5b a b c c IMPORTANT: You must complete step 5a before installing ink cartridges. You will hear...
Basic Guide
Page 3
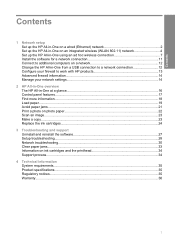
Contents Contents 1 Network setup Set up the HP All-in-One on a wired (Ethernet) network 2 Set up the HP All-in-One on an integrated wireless (WLAN 802.11) network 4 Set up the HP All-in-One using an ad hoc wireless connection 7 Install the software for a network connection 11 Connect to ...your network settings 14 2 HP All-in-One overview The HP All-in-One at a glance 16 Control panel features...17 Find more information...18 Load paper...19 Avoid paper jams...21 Print a photo on photo paper...22 Scan an image...23 Make a copy...23 Replace the ink cartridges...24 3 Troubleshooting and ...
Contents Contents 1 Network setup Set up the HP All-in-One on a wired (Ethernet) network 2 Set up the HP All-in-One on an integrated wireless (WLAN 802.11) network 4 Set up the HP All-in-One using an ad hoc wireless connection 7 Install the software for a network connection 11 Connect to ...your network settings 14 2 HP All-in-One overview The HP All-in-One at a glance 16 Control panel features...17 Find more information...18 Load paper...19 Avoid paper jams...21 Print a photo on photo paper...22 Scan an image...23 Make a copy...23 Replace the ink cartridges...24 3 Troubleshooting and ...
Basic Guide
Page 18
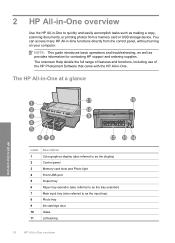
...USB storage device. 2 HP All-in-One overview Use the HP All-in-One to as making a copy, scanning documents, or printing photos from the control panel, without turning on your computer. You can access many HP All-in -One. The HP All-in-One at a glance HP All-in-One overview Label Description 1... tray (also referred to quickly and easily accomplish tasks such as the input tray) 8 Photo tray 9 Ink cartridge door 10 Glass 11 Lid backing 16 HP All-in-One overview NOTE: This guide introduces basic operations and troubleshooting, as well as provides information for contacting...
...USB storage device. 2 HP All-in-One overview Use the HP All-in-One to as making a copy, scanning documents, or printing photos from the control panel, without turning on your computer. You can access many HP All-in -One. The HP All-in-One at a glance HP All-in-One overview Label Description 1... tray (also referred to quickly and easily accomplish tasks such as the input tray) 8 Photo tray 9 Ink cartridge door 10 Glass 11 Lid backing 16 HP All-in-One overview NOTE: This guide introduces basic operations and troubleshooting, as well as provides information for contacting...
Basic Guide
Page 22
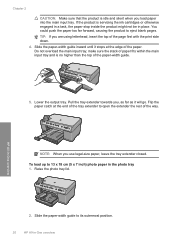
...paper. You could push the paper too far forward, causing the product to its outermost position. 20 HP All-in the photo tray 1. To load up to open the extender the rest of the way. ... is idle and silent when you are using letterhead, insert the top of the page first with the print side down. 4. Slide the paper-width guide inward until it will go. Pull the tray extender towards... paper-width guide. 5. If the product is servicing the ink cartridges or otherwise engaged in a task, the paper stop inside the product might not be in -One overview NOTE: When you , as far as it stops...
...paper. You could push the paper too far forward, causing the product to its outermost position. 20 HP All-in the photo tray 1. To load up to open the extender the rest of the way. ... is idle and silent when you are using letterhead, insert the top of the page first with the print side down. 4. Slide the paper-width guide inward until it will go. Pull the tray extender towards... paper-width guide. 5. If the product is servicing the ink cartridges or otherwise engaged in a task, the paper stop inside the product might not be in -One overview NOTE: When you , as far as it stops...
Basic Guide
Page 26
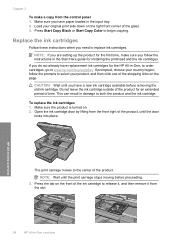
... removing the old ink cartridge. To replace the ink cartridges 1. Do not leave the ink cartridge outside of the product for installing the printhead and the ink cartridges. If prompted, choose your country/region, follow the instructions in damage to begin copying. HP All-in the input tray. 2. Make sure you have paper loaded in -One overview The print carriage moves to...
... removing the old ink cartridge. To replace the ink cartridges 1. Do not leave the ink cartridge outside of the product for installing the printhead and the ink cartridges. If prompted, choose your country/region, follow the instructions in damage to begin copying. HP All-in the input tray. 2. Make sure you have paper loaded in -One overview The print carriage moves to...
Basic Guide
Page 27
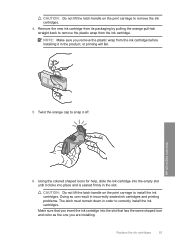
...HP All-in order to correctly install the ink cartridges. NOTE: Make sure you are installing. Make sure that you insert the ink cartridge into the slot that has the same shaped icon and color as the one you remove the plastic wrap from the ink cartridge. CAUTION: Do not lift the latch handle on the print... carriage to remove the ink cartridges. 4. Remove the new ink cartridge from its packaging by pulling the orange pull-tab ...
...HP All-in order to correctly install the ink cartridges. NOTE: Make sure you are installing. Make sure that you insert the ink cartridge into the slot that has the same shaped icon and color as the one you remove the plastic wrap from the ink cartridge. CAUTION: Do not lift the latch handle on the print... carriage to remove the ink cartridges. 4. Remove the new ink cartridge from its packaging by pulling the orange pull-tab ...

Basic Guide
Page 28
Repeat steps 3 through 6 for each ink cartridge you are replacing. 8. Close the ink cartridge door. Chapter 2 7. HP All-in-One overview 26 HP All-in-One overview
Repeat steps 3 through 6 for each ink cartridge you are replacing. 8. Close the ink cartridge door. Chapter 2 7. HP All-in-One overview 26 HP All-in-One overview
Basic Guide
Page 31
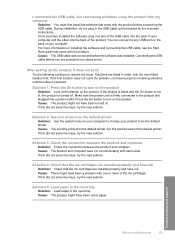
... the issue, try the next solution. Cause: There might have ink Solution: Check that the ink cartridges are listed in order, with each other into the back of the product. After setting up the product, it does not print Try the following solutions to turn on the product. Cause: The... issue is turned off. If this product was installed. Cause: You sent the print job to be the default printer. Solutions are installed properly and have installed the software, plug one or more of the ink cartridges. If this did not solve the issue, try the next solution. Once you ...
... the issue, try the next solution. Cause: There might have ink Solution: Check that the ink cartridges are listed in order, with each other into the back of the product. After setting up the product, it does not print Try the following solutions to turn on the product. Cause: The... issue is turned off. If this product was installed. Cause: You sent the print job to be the default printer. Solutions are installed properly and have installed the software, plug one or more of the ink cartridges. If this did not solve the issue, try the next solution. Once you ...
Basic Guide
Page 36
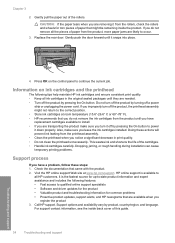
...for up-to-date product information and expert assistance and includes the following tips help maintain HP ink cartridges and ensure consistent print quality. • Keep all HP customers. Call HP support. Replace the rear door. Information on the control panel to occur. 3. Do ...Dropping, jarring, or rough handling during installation can cause temporary printing problems. Support process If you have replacement cartridges available to the correct position. • Store ink cartridges at www.hp.com/support. Visit the HP online support Web site at room temperature (15.6°-26...
...for up-to-date product information and expert assistance and includes the following tips help maintain HP ink cartridges and ensure consistent print quality. • Keep all HP customers. Call HP support. Replace the rear door. Information on the control panel to occur. 3. Do ...Dropping, jarring, or rough handling during installation can cause temporary printing problems. Support process If you have replacement cartridges available to the correct position. • Store ink cartridges at www.hp.com/support. Visit the HP online support Web site at room temperature (15.6°-26...
User Guide
Page 6
... 120 12 Maintain the HP All-in-One Work with ink cartridges...121 Information on ink cartridges and the printhead 121 Check the estimated ink levels 122 Replace the ink cartridges 123 Remove ink from your skin and clothing 126 Advanced printhead maintenance 126 Print a printer status report...128 Print and evaluate a print quality report 129 Clean the HP All-in-One...133 Clean the...
... 120 12 Maintain the HP All-in-One Work with ink cartridges...121 Information on ink cartridges and the printhead 121 Check the estimated ink levels 122 Replace the ink cartridges 123 Remove ink from your skin and clothing 126 Advanced printhead maintenance 126 Print a printer status report...128 Print and evaluate a print quality report 129 Clean the HP All-in-One...133 Clean the...
User Guide
Page 8
... is cropped when I make a borderless copy 202 A borderless copy has white space around the edges 203 Errors...204 Product messages...204 File messages...244 General user messages 246 Paper messages...250 Power and connection messages 255 Ink cartridge and printhead messages 257 15 HP warranty and support Warranty...303 Ink cartridge warranty information 303 Support process...304...
... is cropped when I make a borderless copy 202 A borderless copy has white space around the edges 203 Errors...204 Product messages...204 File messages...244 General user messages 246 Paper messages...250 Power and connection messages 255 Ink cartridge and printhead messages 257 15 HP warranty and support Warranty...303 Ink cartridge warranty information 303 Support process...304...
User Guide
Page 13
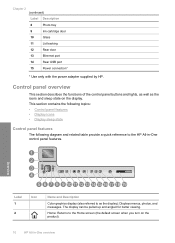
Chapter 2 (continued) Label Description 8 Photo tray 9 Ink cartridge door 10 Glass 11 Lid backing 12 Rear door 13 Ethernet port 14 Rear USB port 15 Power connection* * Use only with the power adapter supplied by HP. The display can be pulled up and angled for better viewing. This section...Color graphics display (also referred to as the icons and sleep state on the product). 10 HP All-in -One control panel features. Home: Returns to the HP All-in -One overview Control panel overview This section describes the functions of the control panel buttons and lights, as...
Chapter 2 (continued) Label Description 8 Photo tray 9 Ink cartridge door 10 Glass 11 Lid backing 12 Rear door 13 Ethernet port 14 Rear USB port 15 Power connection* * Use only with the power adapter supplied by HP. The display can be pulled up and angled for better viewing. This section...Color graphics display (also referred to as the icons and sleep state on the product). 10 HP All-in -One control panel features. Home: Returns to the HP All-in -One overview Control panel overview This section describes the functions of the control panel buttons and lights, as...
User Guide
Page 15
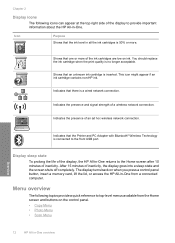
... the lid, or access the HP All-in-One from a connected computer. You should replace the ink cartridge when the print quality is a wired network connection. Shows that the ink level in all the ink cartridges is 50% or more of ...ink cartridges are low on ink. This icon might appear if an ink cartridge contains non-HP ink. Indicates the presence and signal strength of an ad hoc wireless network connection. Overview Indicates that there is no longer acceptable. The display turns back on the control panel. • Copy Menu • Photo Menu • Scan Menu 12 HP All-in -One...
... the lid, or access the HP All-in-One from a connected computer. You should replace the ink cartridge when the print quality is a wired network connection. Shows that the ink level in all the ink cartridges is 50% or more of ...ink cartridges are low on ink. This icon might appear if an ink cartridge contains non-HP ink. Indicates the presence and signal strength of an ad hoc wireless network connection. Overview Indicates that there is no longer acceptable. The display turns back on the control panel. • Copy Menu • Photo Menu • Scan Menu 12 HP All-in -One...
User Guide
Page 17
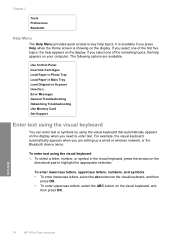
...using the visual keyboard 1. Use Control Panel Insert Ink Cartridges Load Paper in Photo Tray Load Paper in Main Tray Load Original on... the display when you are available. Overview 14 HP All-in the visual keyboard, press the arrows on your ...If you press Help when the Home screen is available if you select one of the remaining topics, the help appears on the directional pad to highlight... the appropriate selection. The following options are setting up a wired or wireless network, or the Bluetooth device name. To enter text using the visual keyboard ...
...using the visual keyboard 1. Use Control Panel Insert Ink Cartridges Load Paper in Photo Tray Load Paper in Main Tray Load Original on... the display when you are available. Overview 14 HP All-in the visual keyboard, press the arrows on your ...If you press Help when the Home screen is available if you select one of the remaining topics, the help appears on the directional pad to highlight... the appropriate selection. The following options are setting up a wired or wireless network, or the Bluetooth device name. To enter text using the visual keyboard ...
User Guide
Page 20
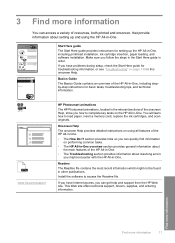
... access the Readme file. Onscreen Help The onscreen Help provides detailed instructions on the HP All-in-One. Install the software to load paper, insert a memory card, replace the ink cartridges, and scan originals. 3 Find more information 17 Basics Guide The Basics Guide contains an overview ... of resources, both printed and onscreen, that provide information about the main features of the HP All-in this onscreen Help. If you have Internet access, you how to complete key tasks on using the HP All-in -One, including printhead installation, ink cartridge insertion, paper loading,...
... access the Readme file. Onscreen Help The onscreen Help provides detailed instructions on the HP All-in-One. Install the software to load paper, insert a memory card, replace the ink cartridges, and scan originals. 3 Find more information 17 Basics Guide The Basics Guide contains an overview ... of resources, both printed and onscreen, that provide information about the main features of the HP All-in this onscreen Help. If you have Internet access, you how to complete key tasks on using the HP All-in -One, including printhead installation, ink cartridge insertion, paper loading,...
User Guide
Page 53
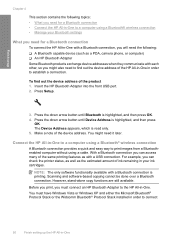
... a USB connection. However, stand-alone copy functions are still available. The Device Address appears, which is printing. Connect the HP All-in-One to a computer using a Bluetooth® wireless connection A Bluetooth connection provides a quick and easy way to print images from a Bluetoothenabled computer without using a Bluetooth® wireless connection • Manage your ink cartridges. With a Bluetooth connection you can...
... a USB connection. However, stand-alone copy functions are still available. The Device Address appears, which is printing. Connect the HP All-in-One to a computer using a Bluetooth® wireless connection A Bluetooth connection provides a quick and easy way to print images from a Bluetoothenabled computer without using a Bluetooth® wireless connection • Manage your ink cartridges. With a Bluetooth connection you can...
User Guide
Page 67
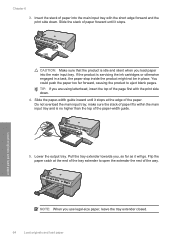
... it stops. Pull the tray extender towards you load paper into the main input tray with the print side down . Flip the paper catch at the edge of the way. If the product is no... higher than the top of the page first with the short edge forward and the print side down . 4. Load originals and load paper 5. CAUTION: Make sure that the product is idle and...the output tray. Slide the stack of paper fits within the main input tray and is servicing the ink cartridges or otherwise engaged in a task, the paper stop inside the product might not be in place. make...
... it stops. Pull the tray extender towards you load paper into the main input tray with the print side down . Flip the paper catch at the edge of the way. If the product is no... higher than the top of the page first with the short edge forward and the print side down . 4. Load originals and load paper 5. CAUTION: Make sure that the product is idle and...the output tray. Slide the stack of paper fits within the main input tray and is servicing the ink cartridges or otherwise engaged in a task, the paper stop inside the product might not be in place. make...
User Guide
Page 114
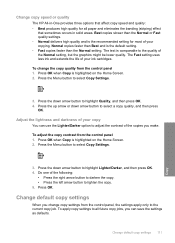
... lightness and darkness of your ink cartridges. Do one of the following: • Press the right arrow button to darken the copy. • Press the left arrow button to select Copy Settings. 3. Press OK when Copy is highlighted on the Home Screen. 2. Press OK. Change copy speed or quality The HP All-in-One provides three options that sometimes...
... lightness and darkness of your ink cartridges. Do one of the following: • Press the right arrow button to darken the copy. • Press the left arrow button to select Copy Settings. 3. Press OK when Copy is highlighted on the Home Screen. 2. Press OK. Change copy speed or quality The HP All-in-One provides three options that sometimes...
User Guide
Page 124
...; Information on ink cartridges and the printhead • Check the estimated ink levels • Replace the ink cartridges • Remove ink from your copies and scans remain clear. The instructions in the Start Here guide for installing the printhead and the ink cartridges for the first time. This section contains the following tips help maintain HP ink cartridges and ensure consistent print quality. •...
...; Information on ink cartridges and the printhead • Check the estimated ink levels • Replace the ink cartridges • Remove ink from your copies and scans remain clear. The instructions in the Start Here guide for installing the printhead and the ink cartridges for the first time. This section contains the following tips help maintain HP ink cartridges and ensure consistent print quality. •...


