
Full User Guide
Page 9
...memory card is still used. OK: Confirms the copy or photo settings. When a memory card is inserted, this button advances to the HP All-in -One overview Name and Description On: Turns the product on the memory card when pressed. When a memory card is inserted, this button opens the.... Cancel: Stops a task (such as scanning or copying) or resets settings (such as a previous image button. Chapter 2 (continued) Label 11 12 Description Rear USB port Power connection* * Use only with the power adapter supplied by HP. When the product is off, a minimal amount of power is inserted...
...memory card is still used. OK: Confirms the copy or photo settings. When a memory card is inserted, this button advances to the HP All-in -One overview Name and Description On: Turns the product on the memory card when pressed. When a memory card is inserted, this button opens the.... Cancel: Stops a task (such as scanning or copying) or resets settings (such as a previous image button. Chapter 2 (continued) Label 11 12 Description Rear USB port Power connection* * Use only with the power adapter supplied by HP. When the product is off, a minimal amount of power is inserted...
Full User Guide
Page 91
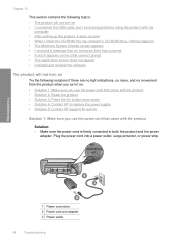
...movement from the product when you use the power cord that came with the product • Solution 2: Reset the product • Solution 3: Press the On button more slowly • Solution 4: Contact HP to both the product and the power adapter. Plug the power cord into my computer's CD-ROM drive,... cord that came with the product Solution: • Make sure the power cord is firmly connected to replace the power supply • Solution 5: Contact HP support for service Solution 1: Make sure you turn it on • I connected the USB cable, but I am having problems using the product with ...
...movement from the product when you use the power cord that came with the product • Solution 2: Reset the product • Solution 3: Press the On button more slowly • Solution 4: Contact HP to both the product and the power adapter. Plug the power cord into my computer's CD-ROM drive,... cord that came with the product Solution: • Make sure the power cord is firmly connected to replace the power supply • Solution 5: Contact HP support for service Solution 1: Make sure you turn it on • I connected the USB cable, but I am having problems using the product with ...
Full User Guide
Page 92
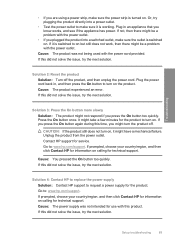
... 2: Reset the product Solution: Turn off . Solution 3: Press the On button more slowly Solution: The product might not respond if you know works, and see if the appliance has power. Contact HP support for technical support. If prompted, choose your country/region, and then click Contact HP for ... power outlet. Cause: The product experienced an error. Plug in , and then press the On button to turn on . Go to : www.hp.com/support. Or, try plugging the product directly into a switched outlet, make sure it might have a mechanical failure. If prompted, choose your ...
... 2: Reset the product Solution: Turn off . Solution 3: Press the On button more slowly Solution: The product might not respond if you know works, and see if the appliance has power. Contact HP support for technical support. If prompted, choose your country/region, and then click Contact HP for ... power outlet. Cause: The product experienced an error. Plug in , and then press the On button to turn on . Go to : www.hp.com/support. Or, try plugging the product directly into a switched outlet, make sure it might have a mechanical failure. If prompted, choose your ...
Full User Guide
Page 95
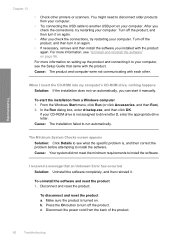
...connecting the USB cable to another USB port on setting up the product and connecting it to install the software. To uninstall the software and reset the product 1. Cause: The installation failed to see "Uninstall and reinstall the software" on again. • If necessary, remove and ... the product, and then turn it on . Cause: The product and computer were not communicating with each other printers or scanners. Disconnect and reset the product. Make sure the product is not assigned to disconnect older products from a Windows computer 1. You might need to drive letter D,...
...connecting the USB cable to another USB port on setting up the product and connecting it to install the software. To uninstall the software and reset the product 1. Cause: The installation failed to see "Uninstall and reinstall the software" on again. • If necessary, remove and ... the product, and then turn it on . Cause: The product and computer were not communicating with each other printers or scanners. Disconnect and reset the product. Make sure the product is not assigned to disconnect older products from a Windows computer 1. You might need to drive letter D,...
Full User Guide
Page 120
...order, with the product. Cause: The product was loaded. Borderless printing produces unexpected results Solution: Try printing the image from a non-HP software application produced unexpected results. If the first solution does not solve the problem, continue trying the remaining solutions until the product completes... Make sure the print carriage can move freely • Solution 9: Check the connection from the product to your computer • Solution 10: Reset the product Solution 1: Turn on the product Solution: Look at the On light located on the product. If it is not lit, the ...
...order, with the product. Cause: The product was loaded. Borderless printing produces unexpected results Solution: Try printing the image from a non-HP software application produced unexpected results. If the first solution does not solve the problem, continue trying the remaining solutions until the product completes... Make sure the print carriage can move freely • Solution 9: Check the connection from the product to your computer • Solution 10: Reset the product Solution 1: Turn on the product Solution: Look at the On light located on the product. If it is not lit, the ...
Full User Guide
Page 123
...solve the problem, continue trying the remaining solutions until the issue is resolved. • Solution 1: Reset the product • Solution 2: Print a previously saved version of the document Solution 1: Reset the product Solution: Turn off the product and then on the product. After the cable is connected ... communicating with the most likely solution first. The product prints meaningless characters Try the following solutions to resolve the issue. Solution 10: Reset the product Solution: Turn off the product, and then unplug the power cord. Chapter 13 sure the other end of the USB ...
...solve the problem, continue trying the remaining solutions until the issue is resolved. • Solution 1: Reset the product • Solution 2: Print a previously saved version of the document Solution 1: Reset the product Solution: Turn off the product and then on the product. After the cable is connected ... communicating with the most likely solution first. The product prints meaningless characters Try the following solutions to resolve the issue. Solution 10: Reset the product Solution: Turn off the product, and then unplug the power cord. Chapter 13 sure the other end of the USB ...
Full User Guide
Page 124
... the product. Cause: The product was out of paper. Solution 2: Load paper in the input tray Solution: Load paper in your computer • Solution 10: Reset the product Solution 1: Turn on the product Solution: Look at the On light located on the product • Solution 2: Load paper in order, with the...
... the product. Cause: The product was out of paper. Solution 2: Load paper in the input tray Solution: Load paper in your computer • Solution 10: Reset the product Solution 1: Turn on the product Solution: Look at the On light located on the product • Solution 2: Load paper in order, with the...
Full User Guide
Page 127
... stack of paper correctly • Solution 4: Load a stack of your document first. If this did not solve the issue, try the next solution. Solution 10: Reset the product Solution: Turn off the product, and then unplug the power cord. The margins are listed in correct order. The pages in my document...
... stack of paper correctly • Solution 4: Load a stack of your document first. If this did not solve the issue, try the next solution. Solution 10: Reset the product Solution: Turn off the product, and then unplug the power cord. The margins are listed in correct order. The pages in my document...

Full User Guide
Page 147
... solution. 144 Troubleshooting Solutions are listed in order, with the product • Missing HP Photosmart Software Carriage jam Try the following solutions to a power source • Solution 5: Print a self-test report • Solution 6: Reset the product • Solution 7: Contact HP support for service Solution 1: Clear the paper jam from the rear door Solution: Clear...
... solution. 144 Troubleshooting Solutions are listed in order, with the product • Missing HP Photosmart Software Carriage jam Try the following solutions to a power source • Solution 5: Print a self-test report • Solution 6: Reset the product • Solution 7: Contact HP support for service Solution 1: Clear the paper jam from the rear door Solution: Clear...
Full User Guide
Page 150
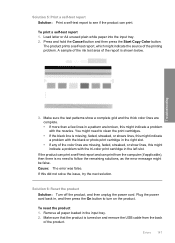
... area of the report is missing, faded, streaked, or shows lines, this might indicate a problem with the tri-color print cartridge in the left slot. Cause: The error was false. To reset the product 1. Make sure that the product is turned on the product. The product prints a self-test report, ...to clean the print cartridges. • If the black line is shown below. 3. Press and hold the Cancel button and then press the Start Copy Color button. Errors 147 To print a self-test report 1. If this might indicate a problem with the black or photo print cartridge in the right slot. ...
... area of the report is missing, faded, streaked, or shows lines, this might indicate a problem with the tri-color print cartridge in the left slot. Cause: The error was false. To reset the product 1. Make sure that the product is turned on the product. The product prints a self-test report, ...to clean the print cartridges. • If the black line is shown below. 3. Press and hold the Cancel button and then press the Start Copy Color button. Errors 147 To print a self-test report 1. If this might indicate a problem with the black or photo print cartridge in the right slot. ...
Full User Guide
Page 151
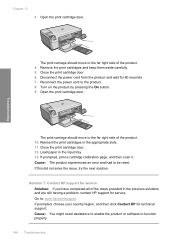
Reconnect the power cord to be reset. Load paper in the appropriate slots. 11. If this did not solve the issue,... to the far right side of the steps provided in the previous solutions and are still having a problem, contact HP support for service Solution: If you have completed all of the product. 10. Cause: You might need assistance to... enable the product or software to : www.hp.com/support. Go to function properly. 148 Troubleshooting Reinsert the print cartridges in the input tray. 13. If prompted, ...
Reconnect the power cord to be reset. Load paper in the appropriate slots. 11. If this did not solve the issue,... to the far right side of the steps provided in the previous solutions and are still having a problem, contact HP support for service Solution: If you have completed all of the product. 10. Cause: You might need assistance to... enable the product or software to : www.hp.com/support. Go to function properly. 148 Troubleshooting Reinsert the print cartridges in the input tray. 13. If prompted, ...

Full User Guide
Page 157
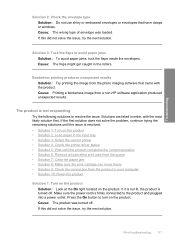
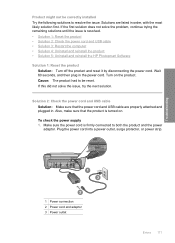
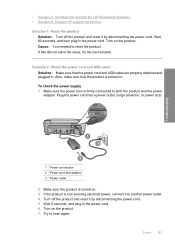
... power supply. If the product is firmly connected to scan again. Wait 5 seconds, and plug in the power cord. 6. Turn off the product and reset it to be reset. Plug the power cord into a power outlet, surge protector, or power strip. 1 Power connection 2 Power cord and adaptor 3 Power outlet 2. Try to both...
... power supply. If the product is firmly connected to scan again. Wait 5 seconds, and plug in the power cord. 6. Turn off the product and reset it to be reset. Plug the power cord into a power outlet, surge protector, or power strip. 1 Power connection 2 Power cord and adaptor 3 Power outlet 2. Try to both...

Full User Guide
Page 166
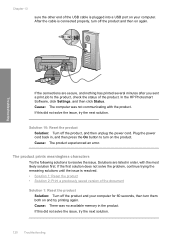
...• HP Imaging device functions • HP Document Viewer • HP Photosmart Essential • HP Image Zone • HP Photo and imaging gallery • HP Photosmart, Officejet, Deskjet (with the product name and software version number) • HP Software update • HP Share to the HP Photosmart Software. ... program). b. e. c. CAUTION: If the computer is turned on the product. 2. e. Errors 163 Disconnect and reset the product. Remove all the items that you have removed the software completely from the back of the product. Uninstall the software completely...
...• HP Imaging device functions • HP Document Viewer • HP Photosmart Essential • HP Image Zone • HP Photo and imaging gallery • HP Photosmart, Officejet, Deskjet (with the product name and software version number) • HP Software update • HP Share to the HP Photosmart Software. ... program). b. e. c. CAUTION: If the computer is turned on the product. 2. e. Errors 163 Disconnect and reset the product. Remove all the items that you have removed the software completely from the back of the product. Uninstall the software completely...
Full User Guide
Page 174
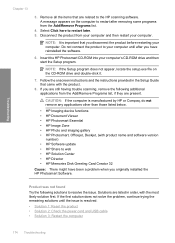
... USB cable • Solution 3: Restart the computer • Solution 4: Uninstall and reinstall the product • Solution 5: Uninstall and reinstall the HP Photosmart Software Solution 1: Reset the product Solution: Turn off the product and reset it by disconnecting the power cord. Troubleshooting 1 Power connection 2 Power cord and adaptor 3 Power outlet Errors 171 To check the...
... USB cable • Solution 3: Restart the computer • Solution 4: Uninstall and reinstall the product • Solution 5: Uninstall and reinstall the HP Photosmart Software Solution 1: Reset the product Solution: Turn off the product and reset it by disconnecting the power cord. Troubleshooting 1 Power connection 2 Power cord and adaptor 3 Power outlet Errors 171 To check the...

Full User Guide
Page 175
... 1. Turn on . 3. Verify that does not work, try disconnecting the cable from the docking station and connect it into the hub. Do one of the product. 2. Finally, try turning off the product and reset it directly to the computer. • If the USB cable is connected to another USB port on again.
... 1. Turn on . 3. Verify that does not work, try disconnecting the cable from the docking station and connect it into the hub. Do one of the product. 2. Finally, try turning off the product and reset it directly to the computer. • If the USB cable is connected to another USB port on again.
Full User Guide
Page 177
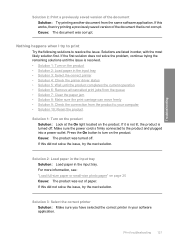
... your computer's CD-ROM drive and then start the Setup program. CAUTION: If the computer is resolved. • Solution 1: Reset the product • Solution 2: Check the power cord and USB cable • Solution 3: Restart the computer 174 Troubleshooting Troubleshooting Chapter 13 3. NOTE: It is important that you originally installed the HP Photosmart Software.
... your computer's CD-ROM drive and then start the Setup program. CAUTION: If the computer is resolved. • Solution 1: Reset the product • Solution 2: Check the power cord and USB cable • Solution 3: Restart the computer 174 Troubleshooting Troubleshooting Chapter 13 3. NOTE: It is important that you originally installed the HP Photosmart Software.

Full User Guide
Page 178
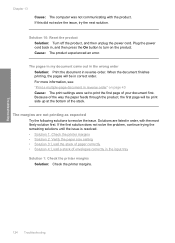
Troubleshooting • Solution 4: Uninstall and reinstall the product • Solution 5: Uninstall and reinstall the HP Photosmart Software Solution 1: Reset the product Solution: Turn off the product and reset it to another power outlet. 4. Plug the power cord into a power outlet, surge protector, or power strip. 1 ...Power connection 2 Power cord and adaptor 3 Power outlet 2. Turn off the product and reset it by disconnecting the power cord. 5. If this did not solve the issue, try the next solution. If the product is turned on ....
Troubleshooting • Solution 4: Uninstall and reinstall the product • Solution 5: Uninstall and reinstall the HP Photosmart Software Solution 1: Reset the product Solution: Turn off the product and reset it to another power outlet. 4. Plug the power cord into a power outlet, surge protector, or power strip. 1 ...Power connection 2 Power cord and adaptor 3 Power outlet 2. Turn off the product and reset it by disconnecting the power cord. 5. If this did not solve the issue, try the next solution. If the product is turned on ....

Full User Guide
Page 183
...Try the following additional applications from your computer and then restart your computer until the issue is resolved. • Solution 1: Reset the product • Solution 2: Check the power cord and USB cable • Solution 3: Restart the computer • Solution... other than those listed below. • HP Imaging device functions • HP Document Viewer • HP Photosmart Essential • HP Image Zone • HP Photo and imaging gallery • HP Photosmart, Officejet, Deskjet, (with the product. 8. Insert the HP Photosmart CD-ROM into your computer. NOTE: If...
...Try the following additional applications from your computer and then restart your computer until the issue is resolved. • Solution 1: Reset the product • Solution 2: Check the power cord and USB cable • Solution 3: Restart the computer • Solution... other than those listed below. • HP Imaging device functions • HP Document Viewer • HP Photosmart Essential • HP Image Zone • HP Photo and imaging gallery • HP Photosmart, Officejet, Deskjet, (with the product. 8. Insert the HP Photosmart CD-ROM into your computer. NOTE: If...
Full User Guide
Page 184
.... 1 Power connection 2 Power cord and adaptor 3 Power outlet 2. Turn on . 3. Try to reset the product. Troubleshooting • Solution 5: Uninstall and reinstall the HP Photosmart Software • Solution 6: Contact HP support for service Solution 1: Reset the product Solution: Turn off the product and reset it by disconnecting the power cord. 5. Turn on . Make sure the power cord...
.... 1 Power connection 2 Power cord and adaptor 3 Power outlet 2. Turn on . 3. Try to reset the product. Troubleshooting • Solution 5: Uninstall and reinstall the HP Photosmart Software • Solution 6: Contact HP support for service Solution 1: Reset the product Solution: Turn off the product and reset it by disconnecting the power cord. 5. Turn on . Make sure the power cord...
Full User Guide
Page 203
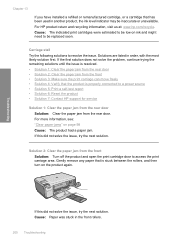
... had a paper jam. Gently remove any paper that is properly connected to a power source • Solution 5: Print a self-test report • Solution 6: Reset the product • Solution 7: Contact HP support for service Solution 1: Clear the paper jam from the rear door Solution: Clear the paper jam from the front Solution: Turn off... you have installed a refilled or remanufactured cartridge, or a cartridge that has been used in another product, the ink level indicator may be replaced soon. For HP product return and recycling information, visit us at: www...
... had a paper jam. Gently remove any paper that is properly connected to a power source • Solution 5: Print a self-test report • Solution 6: Reset the product • Solution 7: Contact HP support for service Solution 1: Clear the paper jam from the rear door Solution: Clear the paper jam from the front Solution: Turn off... you have installed a refilled or remanufactured cartridge, or a cartridge that has been used in another product, the ink level indicator may be replaced soon. For HP product return and recycling information, visit us at: www...


