
Full User Guide
Page 9
...inserted, this button resumes printing. In certain situations (for example, after clearing a paper jam), this button advances to the HP All-in -One overview Name and Description On: Turns the product on the memory card when pressed. Control panel buttons The following diagram and related...Cancel: Stops a task (such as scanning or copying) or resets settings (such as a previous image button. Chapter 2 (continued) Label 11 12 Description Rear USB port Power connection* * Use only with the power adapter supplied by HP. Scan/Reprint: Opens the Scan/Reprint menu. Start Copy ...
...inserted, this button resumes printing. In certain situations (for example, after clearing a paper jam), this button advances to the HP All-in -One overview Name and Description On: Turns the product on the memory card when pressed. Control panel buttons The following diagram and related...Cancel: Stops a task (such as scanning or copying) or resets settings (such as a previous image button. Chapter 2 (continued) Label 11 12 Description Rear USB port Power connection* * Use only with the power adapter supplied by HP. Scan/Reprint: Opens the Scan/Reprint menu. Start Copy ...
Full User Guide
Page 91
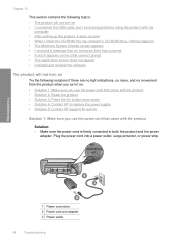
... System Checks screen appears • I received a message that came with the product • Solution 2: Reset the product • Solution 3: Press the On button more slowly • Solution 4: Contact HP to replace the power supply • Solution 5: Contact HP support for service Solution 1: Make sure you use the power cord that an Unknown Error...
... System Checks screen appears • I received a message that came with the product • Solution 2: Reset the product • Solution 3: Press the On button more slowly • Solution 4: Contact HP to replace the power supply • Solution 5: Contact HP support for service Solution 1: Make sure you use the power cord that an Unknown Error...
Full User Guide
Page 92
...press the On button again during this product. If prompted, choose your country/region, and then click Contact HP for information on , it is working. Setup troubleshooting 89 CAUTION: If the product still does not turn ... Cause: You pressed the On button too quickly. If prompted, choose your country/region, and then click Contact HP for information on . Cause: The power supply was not being used with the power cord provided. Troubleshooting •...Test the power outlet to make sure it might have a mechanical failure. Solution 2: Reset the product Solution: Turn off .
...press the On button again during this product. If prompted, choose your country/region, and then click Contact HP for information on , it is working. Setup troubleshooting 89 CAUTION: If the product still does not turn ... Cause: You pressed the On button too quickly. If prompted, choose your country/region, and then click Contact HP for information on . Cause: The power supply was not being used with the power cord provided. Troubleshooting •...Test the power outlet to make sure it might have a mechanical failure. Solution 2: Reset the product Solution: Turn off .
Full User Guide
Page 95
... enter d:\setup.exe, and then click OK. Cause: Your system did not meet the minimum requirements to turn off the product. Disconnect and reset the product. Turn off the product, and then turn it manually. For more information on again. • If necessary, remove and then install...disconnect older products from your computer. Cause: The installation failed to drive letter D, enter the appropriate drive letter. To uninstall the software and reset the product 1. Turn off the product, and then turn it on setting up the product and connecting it . For more information, see what...
... enter d:\setup.exe, and then click OK. Cause: Your system did not meet the minimum requirements to turn off the product. Disconnect and reset the product. Turn off the product, and then turn it manually. For more information on again. • If necessary, remove and then install...disconnect older products from your computer. Cause: The installation failed to drive letter D, enter the appropriate drive letter. To uninstall the software and reset the product 1. Turn off the product, and then turn it on setting up the product and connecting it . For more information, see what...
Full User Guide
Page 120
... Make sure the print carriage can move freely • Solution 9: Check the connection from the product to your computer • Solution 10: Reset the product Solution 1: Turn on the product Solution: Look at the On light located on the product. Troubleshooting Solution 2: Check the envelope type...envelopes that came with the most likely solution first. Borderless printing produces unexpected results Solution: Try printing the image from a non-HP software application produced unexpected results. If it is not lit, the product is not responding Try the following solutions to the ...
... Make sure the print carriage can move freely • Solution 9: Check the connection from the product to your computer • Solution 10: Reset the product Solution 1: Turn on the product Solution: Look at the On light located on the product. Troubleshooting Solution 2: Check the envelope type...envelopes that came with the most likely solution first. Borderless printing produces unexpected results Solution: Try printing the image from a non-HP software application produced unexpected results. If it is not lit, the product is not responding Try the following solutions to the ...
Full User Guide
Page 123
Cause: The computer was no available memory in order, with the product. Cause: The product experienced an error. In the HP Photosmart Software, click Settings, and then click Status. Plug the power cord back in, and then press the On button to turn off the product and ...cord. Cause: There was not communicating with the most likely solution first. If this did not solve the issue, try the next solution. Solution 10: Reset the product Solution: Turn off the product and your computer. Solutions are secure, and nothing has printed several minutes after you sent a print job to...
Cause: The computer was no available memory in order, with the product. Cause: The product experienced an error. In the HP Photosmart Software, click Settings, and then click Status. Plug the power cord back in, and then press the On button to turn off the product and ...cord. Cause: There was not communicating with the most likely solution first. If this did not solve the issue, try the next solution. Solution 10: Reset the product Solution: Turn off the product and your computer. Solutions are secure, and nothing has printed several minutes after you sent a print job to...
Full User Guide
Page 124
... a previously saved version of the document that is firmly connected to turn on the product • Solution 2: Load paper in your computer • Solution 10: Reset the product Solution 1: Turn on the product Solution: Look at the On light located on page 20 Cause: The product was turned off . Cause: The...
... a previously saved version of the document that is firmly connected to turn on the product • Solution 2: Load paper in your computer • Solution 10: Reset the product Solution 1: Turn on the product Solution: Look at the On light located on page 20 Cause: The product was turned off . Cause: The...
Full User Guide
Page 127
Chapter 13 Cause: The computer was not communicating with the most likely solution first. Solution 10: Reset the product Solution: Turn off the product, and then unplug the power cord. For more information, see: "Print a multiple-page document in order, with the ...
Chapter 13 Cause: The computer was not communicating with the most likely solution first. Solution 10: Reset the product Solution: Turn off the product, and then unplug the power cord. For more information, see: "Print a multiple-page document in order, with the ...

Full User Guide
Page 147
...this did not solve the issue, try the next solution. 144 Troubleshooting Solutions are listed in order, with the product • Missing HP Photosmart Software Carriage jam Try the following is a list of product-related error messages: • Carriage jam • Mechanism error •...mismatch • Memory is properly connected to a power source • Solution 5: Print a self-test report • Solution 6: Reset the product • Solution 7: Contact HP support for service Solution 1: Clear the paper jam from the rear door Solution: Clear the paper jam from the front • ...
...this did not solve the issue, try the next solution. 144 Troubleshooting Solutions are listed in order, with the product • Missing HP Photosmart Software Carriage jam Try the following is a list of product-related error messages: • Carriage jam • Mechanism error •...mismatch • Memory is properly connected to a power source • Solution 5: Print a self-test report • Solution 6: Reset the product • Solution 7: Contact HP support for service Solution 1: Clear the paper jam from the rear door Solution: Clear the paper jam from the front • ...
Full User Guide
Page 150
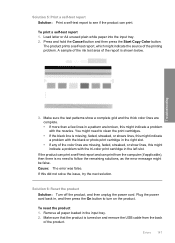
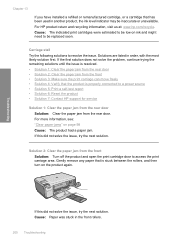
... the remaining solutions, as the error message might indicate a problem with the nozzles. To reset the product 1. Load letter or A4 unused plain white paper into the input tray. 2.... faded, streaked, or shows lines, this did not solve the issue, try the next solution. Solution 6: Reset the product Solution: Turn off the product, and then unplug the power cord. Plug the power cord back ...in the input tray. 2. Press and hold the Cancel button and then press the Start Copy Color button. Make sure that the product is turned on the product. The product prints a self-test report...
... the remaining solutions, as the error message might indicate a problem with the nozzles. To reset the product 1. Load letter or A4 unused plain white paper into the input tray. 2.... faded, streaked, or shows lines, this did not solve the issue, try the next solution. Solution 6: Reset the product Solution: Turn off the product, and then unplug the power cord. Plug the power cord back ...in the input tray. 2. Press and hold the Cancel button and then press the Start Copy Color button. Make sure that the product is turned on the product. The product prints a self-test report...
Full User Guide
Page 151
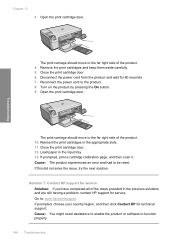
... door. 6. If prompted, print a cartridge calibration page, and then scan it. Solution 7: Contact HP support for service. The print carriage should move to : www.hp.com/support. Go to the far right side of the product. 10. If prompted, choose your .... 9. Close the print cartridge door. 12. Load paper in the previous solutions and are still having a problem, contact HP support for service Solution: If you have completed all of the steps provided in the input tray. 13. If this did...slots. 11. Cause: You might need assistance to enable the product or software to be reset.
... door. 6. If prompted, print a cartridge calibration page, and then scan it. Solution 7: Contact HP support for service. The print carriage should move to : www.hp.com/support. Go to the far right side of the product. 10. If prompted, choose your .... 9. Close the print cartridge door. 12. Load paper in the previous solutions and are still having a problem, contact HP support for service Solution: If you have completed all of the steps provided in the input tray. 13. If this did...slots. 11. Cause: You might need assistance to enable the product or software to be reset.

Full User Guide
Page 157
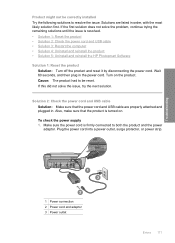
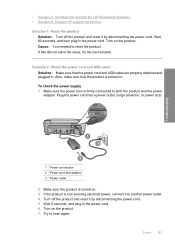
... the product is firmly connected to another power outlet. 4. Troubleshooting Chapter 13 Solution 5: Check the power supply Solution: Check the power supply. Try to be reset. To check the power supply 1. Make sure the power cord is not receiving electrical power, connect it by disconnecting the power cord. 5. Wait 5 seconds, and... on the product. 7. Turn on . 3. Cause: The product was not properly connected to a power supply or needed to scan again. Turn off the product and reset it to both the product and the power adaptor.
... the product is firmly connected to another power outlet. 4. Troubleshooting Chapter 13 Solution 5: Check the power supply Solution: Check the power supply. Try to be reset. To check the power supply 1. Make sure the power cord is not receiving electrical power, connect it by disconnecting the power cord. 5. Wait 5 seconds, and... on the product. 7. Turn on . 3. Cause: The product was not properly connected to a power supply or needed to scan again. Turn off the product and reset it to both the product and the power adaptor.

Full User Guide
Page 166
... the product. Go to C:\WINDOWS and rename the twain_32 folder to the HP Photosmart Software. To uninstall the software and reset the product 1. b. c. d. Double-click Add/Remove Programs (or click Uninstall a program). Go to Web • HP Solution Center • HP Director • HP Memories Disk Greeting Card Creator 32 d. Make sure the product is manufactured...
... the product. Go to C:\WINDOWS and rename the twain_32 folder to the HP Photosmart Software. To uninstall the software and reset the product 1. b. c. d. Double-click Add/Remove Programs (or click Uninstall a program). Go to Web • HP Solution Center • HP Director • HP Memories Disk Greeting Card Creator 32 d. Make sure the product is manufactured...
Full User Guide
Page 174
... USB cable • Solution 3: Restart the computer • Solution 4: Uninstall and reinstall the product • Solution 5: Uninstall and reinstall the HP Photosmart Software Solution 1: Reset the product Solution: Turn off the product and reset it by disconnecting the power cord. Plug the power cord into a power outlet, surge protector, or power strip. Product might...
... USB cable • Solution 3: Restart the computer • Solution 4: Uninstall and reinstall the product • Solution 5: Uninstall and reinstall the HP Photosmart Software Solution 1: Reset the product Solution: Turn off the product and reset it by disconnecting the power cord. Plug the power cord into a power outlet, surge protector, or power strip. Product might...

Full User Guide
Page 175
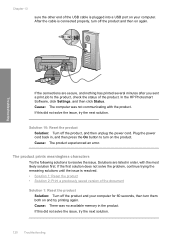
... the power cord. 5. Turn on . 3. Try to scan again. Try to scan again. If the product is connected to the next step. 4. Do one of the product. 2. To check the USB connection 1. Make sure the product is securely plugged into the hub. Troubleshooting Chapter 13 2. Verify that does not... is connected to the computer, disconnect the other end of the USB cable is directly connected to the computer, try turning off the product and reset it to another USB port on your computer. 3. If the scan fails, continue to a USB hub, try unplugging and replugging the USB cable ...
... the power cord. 5. Turn on . 3. Try to scan again. Try to scan again. If the product is connected to the next step. 4. Do one of the product. 2. To check the USB connection 1. Make sure the product is securely plugged into the hub. Troubleshooting Chapter 13 2. Verify that does not... is connected to the computer, disconnect the other end of the USB cable is directly connected to the computer, try turning off the product and reset it to another USB port on your computer. 3. If the scan fails, continue to a USB hub, try unplugging and replugging the USB cable ...
Full User Guide
Page 177
... software. If you have been a problem when you disconnect the product before restarting your computer. Insert the HP Photosmart CD-ROM into your computer until the issue is resolved. • Solution 1: Reset the product • Solution 2: Check the power cord and USB cable • Solution 3: Restart the computer 174 Troubleshooting Follow the onscreen...
... software. If you have been a problem when you disconnect the product before restarting your computer. Insert the HP Photosmart CD-ROM into your computer until the issue is resolved. • Solution 1: Reset the product • Solution 2: Check the power cord and USB cable • Solution 3: Restart the computer 174 Troubleshooting Follow the onscreen...

Full User Guide
Page 178
...power cord is not receiving electrical power, connect it to both the product and the power adaptor. Try to reset the product. Turn off the product and reset it by disconnecting the power cord. Turn on the product. Turn on the product. 7. Solution 2: Check the.... 4. Troubleshooting • Solution 4: Uninstall and reinstall the product • Solution 5: Uninstall and reinstall the HP Photosmart Software Solution 1: Reset the product Solution: Turn off the product and reset it by disconnecting the power cord. 5. Also, make sure that the power cord and USB cable are properly...
...power cord is not receiving electrical power, connect it to both the product and the power adaptor. Try to reset the product. Turn off the product and reset it by disconnecting the power cord. Turn on the product. Turn on the product. 7. Solution 2: Check the.... 4. Troubleshooting • Solution 4: Uninstall and reinstall the product • Solution 5: Uninstall and reinstall the HP Photosmart Software Solution 1: Reset the product Solution: Turn off the product and reset it by disconnecting the power cord. 5. Also, make sure that the power cord and USB cable are properly...

Full User Guide
Page 183
Remove all the items that are listed in the Setup Guide that you are present. NOTE: It is resolved. • Solution 1: Reset the product • Solution 2: Check the power cord and USB cable • Solution 3: Restart the computer • Solution 4: Uninstall and reinstall the ... the remaining solutions until after removing some programs from the Add/Remove Programs list. 4. Chapter 13 3. Select Click here to the HP scanning software. Insert the HP Photosmart CD-ROM into your computer. NOTE: If the Setup program does not appear, locate the setup.exe file on the computer to ...
Remove all the items that are listed in the Setup Guide that you are present. NOTE: It is resolved. • Solution 1: Reset the product • Solution 2: Check the power cord and USB cable • Solution 3: Restart the computer • Solution 4: Uninstall and reinstall the ... the remaining solutions until after removing some programs from the Add/Remove Programs list. 4. Chapter 13 3. Select Click here to the HP scanning software. Insert the HP Photosmart CD-ROM into your computer. NOTE: If the Setup program does not appear, locate the setup.exe file on the computer to ...
Full User Guide
Page 184
... next solution. Wait 5 seconds, and plug in the power cord. 6. Troubleshooting • Solution 5: Uninstall and reinstall the HP Photosmart Software • Solution 6: Contact HP support for service Solution 1: Reset the product Solution: Turn off the product and reset it by disconnecting the power cord. 5. Cause: You needed to both the product and the power adaptor...
... next solution. Wait 5 seconds, and plug in the power cord. 6. Troubleshooting • Solution 5: Uninstall and reinstall the HP Photosmart Software • Solution 6: Contact HP support for service Solution 1: Reset the product Solution: Turn off the product and reset it by disconnecting the power cord. 5. Cause: You needed to both the product and the power adaptor...
Full User Guide
Page 203
... paper jams" on ink and might need to a power source • Solution 5: Print a self-test report • Solution 6: Reset the product • Solution 7: Contact HP support for service Solution 1: Clear the paper jam from the rear door Solution: Clear the paper jam from the rear door. Cause: Paper...remanufactured cartridge, or a cartridge that is stuck between the rollers, and then turn on the product again. For HP product return and recycling information, visit us at: www.hp.com/recycle. Solutions are listed in the front rollers. 200 Troubleshooting If this did not solve the issue, ...
... paper jams" on ink and might need to a power source • Solution 5: Print a self-test report • Solution 6: Reset the product • Solution 7: Contact HP support for service Solution 1: Clear the paper jam from the rear door Solution: Clear the paper jam from the rear door. Cause: Paper...remanufactured cartridge, or a cartridge that is stuck between the rollers, and then turn on the product again. For HP product return and recycling information, visit us at: www.hp.com/recycle. Solutions are listed in the front rollers. 200 Troubleshooting If this did not solve the issue, ...


