

User Manual
Page 15
... table at the end of Bluetooth and Wi-Fi connectivity status. Getting Started 15 Item 1. Speaker 2. Display Screen 3. Key 9. Key 11. Key Function Listen to type in text fields. Press once to open Internet Explorer Mobile. 12. Speak into the microphone when receiving or making a phone call . BACK 14. END 15. LED Indicators Press to let you of this key to a phone call or during voice recording. Press to go to use as the ENTER button.
... table at the end of Bluetooth and Wi-Fi connectivity status. Getting Started 15 Item 1. Speaker 2. Display Screen 3. Key 9. Key 11. Key Function Listen to type in text fields. Press once to open Internet Explorer Mobile. 12. Speak into the microphone when receiving or making a phone call . BACK 14. END 15. LED Indicators Press to let you of this key to a phone call or during voice recording. Press to go to use as the ENTER button.

User Manual
Page 32
...PIN Unblocking Key (PUK) obtained from Contacts, and easily copy SIM contacts to enter the PIN whenever you can open, call, or find a contact, and even save a new number in Contacts. On the Home screen, click Start > Settings > Security > Enable SIM PIN. 2. To set a ring tone for incoming calls, reminders, new messages, alarms, and more. The Phone screen From the Phone screen, you use your phone to be blocked. Set ring tones You can choose how to make, receive, and keep track of the following: • Press TALK ( ). • Directly enter the phone number by your wireless service...
...PIN Unblocking Key (PUK) obtained from Contacts, and easily copy SIM contacts to enter the PIN whenever you can open, call, or find a contact, and even save a new number in Contacts. On the Home screen, click Start > Settings > Security > Enable SIM PIN. 2. To set a ring tone for incoming calls, reminders, new messages, alarms, and more. The Phone screen From the Phone screen, you use your phone to be blocked. Set ring tones You can choose how to make, receive, and keep track of the following: • Press TALK ( ). • Directly enter the phone number by your wireless service...

User Manual
Page 34
.... 34 Using Phone Features Make a call from Call History 1. On the Home screen, click Start > Contacts. 2. Pressing ENTER again dials the associated number. The letter representing the number changes to customize and filter the calls made, received, or missed. You can also select the desired contact in the contact list, and press ENTER to view details and different numbers associated with the selected contact, click Menu > Edit. • To save a contact on the Call History screen to m (mobile), w (work), or h (home). On the Home screen, click Start > Call History. 2. Make a call...
.... 34 Using Phone Features Make a call from Call History 1. On the Home screen, click Start > Contacts. 2. Pressing ENTER again dials the associated number. The letter representing the number changes to customize and filter the calls made, received, or missed. You can also select the desired contact in the contact list, and press ENTER to view details and different numbers associated with the selected contact, click Menu > Edit. • To save a contact on the Call History screen to m (mobile), w (work), or h (home). On the Home screen, click Start > Call History. 2. Make a call...

User Manual
Page 48
... connecting, select the Save password check box. If you connect your phone to enter it from your user name, password, and domain name. 4. To synchronize directly with Exchange Server 1. To customize synchronization of a particular information, select the type of the following: • Click Start > Messaging > New Account. Note You can also use the Sync Setup Wizard to set up ActiveSync on the computer.") Note Before changing synchronization settings on the Options screen...
... connecting, select the Save password check box. If you connect your phone to enter it from your user name, password, and domain name. 4. To synchronize directly with Exchange Server 1. To customize synchronization of a particular information, select the type of the following: • Click Start > Messaging > New Account. Note You can also use the Sync Setup Wizard to set up ActiveSync on the computer.") Note Before changing synchronization settings on the Options screen...
User Manual
Page 49
... Direct Push technology (Push E-Mail feature) enables you to receive new e-mails on your phone as soon as your corporate network is using Microsoft Exchange Server Service Pack 2 (SP2) with Exchange ActiveSync, and after your e-mail volume and which method you need to manually retrieve your private network such as they arrive. To make Direct Push work, you think is in the state, you will turn to , this feature...
... Direct Push technology (Push E-Mail feature) enables you to receive new e-mails on your phone as soon as your corporate network is using Microsoft Exchange Server Service Pack 2 (SP2) with Exchange ActiveSync, and after your e-mail volume and which method you need to manually retrieve your private network such as they arrive. To make Direct Push work, you think is in the state, you will turn to , this feature...

User Manual
Page 51
... preserve battery power, turn off Bluetooth when not in ActiveSync to the PC with the PC before synchronizing. 5. When finished, click Menu > Disconnect Bluetooth. Before media can be synchronized. • Insert a 32MB or larger storage card into your phone. • Set up a Bluetooth partnership with a USB cable. Click Menu > Connect via Bluetooth, you , ActiveSync works with Windows Media Player to synchronize music, video, and pictures with you must do the following: • Install Windows Media Player Version...
... preserve battery power, turn off Bluetooth when not in ActiveSync to the PC with the PC before synchronizing. 5. When finished, click Menu > Disconnect Bluetooth. Before media can be synchronized. • Insert a 32MB or larger storage card into your phone. • Set up a Bluetooth partnership with a USB cable. Click Menu > Connect via Bluetooth, you , ActiveSync works with Windows Media Player to synchronize music, video, and pictures with you must do the following: • Install Windows Media Player Version...
User Manual
Page 52
... music, video, and picture files in Windows Media Player playlists can encrypt a message with a storage card 1. To set up synchronization in Windows Media Player for decrypting e-mail messages. Select the storage card. 4. If you are not using Windows Media Player on the phone, see "Using Windows Media Player" in Chapter 7. 3.6 Setting Up E-mail Security Windows Mobile on your phone protects your Outlook e-mails through Secure/Multipurpose Internet Mail Extension (S/MIME), which allows you to digitally sign your messages. However, to read an encrypted message, you need...
... music, video, and picture files in Windows Media Player playlists can encrypt a message with a storage card 1. To set up synchronization in Windows Media Player for decrypting e-mail messages. Select the storage card. 4. If you are not using Windows Media Player on the phone, see "Using Windows Media Player" in Chapter 7. 3.6 Setting Up E-mail Security Windows Mobile on your phone protects your Outlook e-mails through Secure/Multipurpose Internet Mail Extension (S/MIME), which allows you to digitally sign your messages. However, to read an encrypted message, you need...
User Manual
Page 56
... Finish. On the Home screen, click Start > Pictures & Videos. 2. You can gain access to select the portion of new messages (voice mail, text, e-mail, or MMS) that you have received, and other regional options Your phone should already be set as number and currency formatting options. 1. In Home screen layout, Color scheme, Background image, and Time out, select the options you click an icon or item on the Home Screen, the associated program opens. In Adjust...
... Finish. On the Home screen, click Start > Pictures & Videos. 2. You can gain access to select the portion of new messages (voice mail, text, e-mail, or MMS) that you have received, and other regional options Your phone should already be set as number and currency formatting options. 1. In Home screen layout, Color scheme, Background image, and Time out, select the options you click an icon or item on the Home Screen, the associated program opens. In Adjust...
User Manual
Page 57
... the default profile settings, click Menu > Reset to edit. 3. The Locale option automatically changes the format of settings that determine how your phone will alert you to incoming calls, events such as date, time, and currency) according to take effect. To set the date and time 1. To change the profile, briefly press POWER to display the Quick List, and choose a profile. On the Home screen, click Start > Settings > Clock & Alarm > Date and Time. 2. In Date, edit the...
... the default profile settings, click Menu > Reset to edit. 3. The Locale option automatically changes the format of settings that determine how your phone will alert you to incoming calls, events such as date, time, and currency) according to take effect. To set the date and time 1. To change the profile, briefly press POWER to display the Quick List, and choose a profile. On the Home screen, click Start > Settings > Clock & Alarm > Date and Time. 2. In Date, edit the...
User Manual
Page 70
... you use GPRS to connect to the Internet or to send and receive MMS on your wireless service provider. With an active connection on your phone, obtain the Access point name from your Internet Service Provider (ISP) or the company whose intranet you are trying to access: • ISP server phone number • User name • Password • Access point name (required for GPRS connection) • Domain name (required for you need to manually set...
... you use GPRS to connect to the Internet or to send and receive MMS on your wireless service provider. With an active connection on your phone, obtain the Access point name from your Internet Service Provider (ISP) or the company whose intranet you are trying to access: • ISP server phone number • User name • Password • Access point name (required for GPRS connection) • Domain name (required for you need to manually set...
User Manual
Page 72
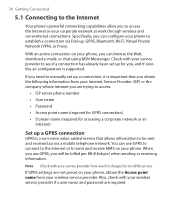
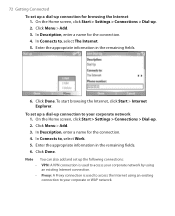
... Connected To set up a dial-up . 2. Click Menu > Add. 3. Click Menu > Add. 3. On the Home screen, click Start > Settings > Connections > Dial-up connection for browsing the Internet 1. Click Done. In Description, enter a name for the connection. 4. To start browsing the Internet, click Start > Internet Explorer. On the Home screen, click Start > Settings > Connections > Dial-up the following connections: • VPN: A VPN connection is used to access your corporate network by using an existing Internet connection. • Proxy: A Proxy connection is used to access the Internet using...
... Connected To set up a dial-up . 2. Click Menu > Add. 3. Click Menu > Add. 3. On the Home screen, click Start > Settings > Connections > Dial-up connection for browsing the Internet 1. Click Done. In Description, enter a name for the connection. 4. To start browsing the Internet, click Start > Internet Explorer. On the Home screen, click Start > Settings > Connections > Dial-up the following connections: • VPN: A VPN connection is used to access your corporate network by using an existing Internet connection. • Proxy: A Proxy connection is used to access the Internet using...

User Manual
Page 90
... Disconnect your phone from work using a virtual private network (VPN) connection. Every time you want to manually send or receive Outlook e-mail on your computer for the first time, the Synchronization Setup Wizard prompts you have already set up synchronization through an Internet service provider (ISP), and text messages. 90 Exchanging Messages and Using Outlook 6.1 Using E-mail and Text Messages Messaging is ready to send and receive Outlook e-mail. You can also access e-mail from your corporate network, follow the...
... Disconnect your phone from work using a virtual private network (VPN) connection. Every time you want to manually send or receive Outlook e-mail on your computer for the first time, the Synchronization Setup Wizard prompts you have already set up synchronization through an Internet service provider (ISP), and text messages. 90 Exchanging Messages and Using Outlook 6.1 Using E-mail and Text Messages Messaging is ready to send and receive Outlook e-mail. You can also access e-mail from your corporate network, follow the...
User Manual
Page 100
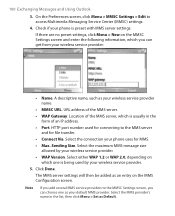
... phone is being used for file transfer. • Connect Via. HTTP port number used by your wireless service provider name. • MMSC URL. The MMS server settings will then be added as an entry on which you can get from your wireless service provider: • Name. A descriptive name, such as your wireless service provider. 5. Click Done. If there are no preset settings, click Menu > New on the MMSC Settings screen and enter...
... phone is being used for file transfer. • Connect Via. HTTP port number used by your wireless service provider name. • MMSC URL. The MMS server settings will then be added as an entry on which you can get from your wireless service provider: • Name. A descriptive name, such as your wireless service provider. 5. Click Done. If there are no preset settings, click Menu > New on the MMSC Settings screen and enter...
User Manual
Page 101
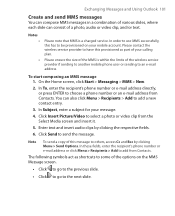
.../or text. Click Send to an e-mail address. Click Insert Picture/Video to select a photo or video clip from Contacts. On the Home screen, click Start > Messaging > MMS > New. 2. In these fields, enter the recipient's phone number or e-mail address or click Menu > Recipients > Add to add from the Select Media screen and insert it. 5. Please contact the wireless service provider to have this provisioned as shortcuts to some of the options on your message. 4. Exchanging Messages and Using Outlook 101 Create and send MMS messages You...
.../or text. Click Send to an e-mail address. Click Insert Picture/Video to select a photo or video clip from Contacts. On the Home screen, click Start > Messaging > MMS > New. 2. In these fields, enter the recipient's phone number or e-mail address or click Menu > Recipients > Add to add from the Select Media screen and insert it. 5. Please contact the wireless service provider to have this provisioned as shortcuts to some of the options on your message. 4. Exchanging Messages and Using Outlook 101 Create and send MMS messages You...
User Manual
Page 118
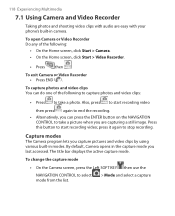
... press the ENTER button on the NAVIGATION CONTROL to take a photo. Press this button to start recording video then press again to end the recording. • Alternatively, you can do one of the following to capture photos and video clips: • Press to start recording video; By default, Camera opens in the capture mode you capture pictures and video clips by using various built-in camera. The title bar displays the active capture mode. Also...
... press the ENTER button on the NAVIGATION CONTROL to take a photo. Press this button to start recording video then press again to end the recording. • Alternatively, you can do one of the following to capture photos and video clips: • Press to start recording video; By default, Camera opens in the capture mode you capture pictures and video clips by using various built-in camera. The title bar displays the active capture mode. Also...
User Manual
Page 126
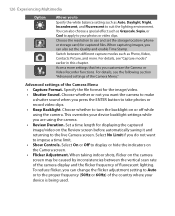
... different capture modes such as Photo, Video, Contacts Picture, and more settings that lets you customize the Camera or Video Recorder functions. When capturing images, you are using the camera. Choose the resolution to use and set the Quality and enable Time Stamp. Advanced settings of the Camera Menu." For details, see the following section "Advanced settings of the Camera Menu • Capture Format. You can also set the storage location (phone or storage card) for displaying the captured...
... different capture modes such as Photo, Video, Contacts Picture, and more settings that lets you customize the Camera or Video Recorder functions. When capturing images, you are using the camera. Choose the resolution to use and set the Quality and enable Time Stamp. Advanced settings of the Camera Menu." For details, see the following section "Advanced settings of the Camera Menu • Capture Format. You can also set the storage location (phone or storage card) for displaying the captured...
User Manual
Page 133
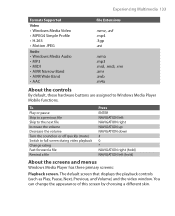
The default screen that displays the playback controls (such as Play, Pause, Next, Previous, and Volume) and the video window. To Play or pause Skip to a previous file Skip to the next file Increase the volume Decrease the volume Turn the sound on or off quickly (mute) Switch to Windows Media Player Mobile functions. Experiencing Multimedia 133 Formats Supported Video • Windows Media Video • MPEG4 Simple Profile • H.263 • Motion JPEG Audio • Windows Media Audio •...
The default screen that displays the playback controls (such as Play, Pause, Next, Previous, and Volume) and the video window. To Play or pause Skip to a previous file Skip to the next file Increase the volume Decrease the volume Turn the sound on or off quickly (mute) Switch to Windows Media Player Mobile functions. Experiencing Multimedia 133 Formats Supported Video • Windows Media Video • MPEG4 Simple Profile • H.263 • Motion JPEG Audio • Windows Media Audio •...
User Manual
Page 151
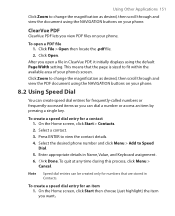
... frequently-called numbers or frequently-accessed items so you view PDF files on your phone. To open a file in ClearVue PDF, it initially displays using the NAVIGATION buttons on your phone's screen. To create a speed dial entry for an item 1. Select the desired phone number and click Menu > Add to view the contact details. 4. Enter appropriate details in Contacts. Click File > Open then locate the .pdf file. 2. Select a contact. 3. Click Done. On the Home screen, click Start > Contacts. 2. To quit at any time during...
... frequently-called numbers or frequently-accessed items so you view PDF files on your phone. To open a file in ClearVue PDF, it initially displays using the NAVIGATION buttons on your phone's screen. To create a speed dial entry for an item 1. Select the desired phone number and click Menu > Add to view the contact details. 4. Enter appropriate details in Contacts. Click File > Open then locate the .pdf file. 2. Select a contact. 3. Click Done. On the Home screen, click Start > Contacts. 2. To quit at any time during...

User Manual
Page 167
... setting 56 Default view (Web page) 74 Delete pictures and videos 129 Desktop view (Web page) 74 Device lock 67 Dial-up connection 71 Digitally sign messages 53, 95 Digital Rights Management (DRM) 136 Digital signature - sound file to phone 136 - overview 90 - send and receive 93 Edit picture 129 Emergency call 38 Encrypt messages 53, 95 Enter text and numbers 27 Error reporting 60 Event notification 57 Exchange Server - Contacts 24, 108 Contacts picture (capture mode) 119, 123 Cookies (Internet Explorer) 75 Copy...
... setting 56 Default view (Web page) 74 Delete pictures and videos 129 Desktop view (Web page) 74 Device lock 67 Dial-up connection 71 Digitally sign messages 53, 95 Digital Rights Management (DRM) 136 Digital signature - sound file to phone 136 - overview 90 - send and receive 93 Edit picture 129 Emergency call 38 Encrypt messages 53, 95 Enter text and numbers 27 Error reporting 60 Event notification 57 Exchange Server - Contacts 24, 108 Contacts picture (capture mode) 119, 123 Cookies (Internet Explorer) 75 Copy...

Quick Start Guide
Page 12
... Locale option automatically changes the format of the remaining options (such as number and currency formatting options. 1. On the Home screen, click Start > Settings > Clock & Alarm > Date and Time. 2. In Date, edit the month, day, or year. 4. 12 Set date, time, language, and other regional options Your phone should already be set the date and time 1. To change regional settings You can specify the language, locale, date and time style, as well...
... Locale option automatically changes the format of the remaining options (such as number and currency formatting options. 1. On the Home screen, click Start > Settings > Clock & Alarm > Date and Time. 2. In Date, edit the month, day, or year. 4. 12 Set date, time, language, and other regional options Your phone should already be set the date and time 1. To change regional settings You can specify the language, locale, date and time style, as well...


