Manual
Page 9
... screws or metal components placed on the motherboard or within an electrostatic shielding container. • Before unplugging the power supply cable from the power outlet before installing or removing the motherboard or other hardware components. • When connecting hardware components to the ... break motherboard S/N (Serial Number) sticker or warranty sticker provided by unplugging the power cord from the motherboard, make sure the power supply has been turned off. • Before turning on the power, make sure they are connected tightly and securely. • When handling the...
... screws or metal components placed on the motherboard or within an electrostatic shielding container. • Before unplugging the power supply cable from the power outlet before installing or removing the motherboard or other hardware components. • When connecting hardware components to the ... break motherboard S/N (Serial Number) sticker or warranty sticker provided by unplugging the power cord from the motherboard, make sure the power supply has been turned off. • Before turning on the power, make sure they are connected tightly and securely. • When handling the...
Manual
Page 22
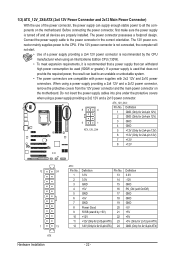
... computer will not start. • Use of the power connector, the power supply can lead to all devices are compatible with power supplies with 2x2 12V and 2x10 power connectors. Connect the power supply cable to the CPU. If the 12V power connector is recommended that a power supply that can withstand high power consumption be used that does not provide the required...
... computer will not start. • Use of the power connector, the power supply can lead to all devices are compatible with power supplies with 2x2 12V and 2x10 power connectors. Connect the power supply cable to the CPU. If the 12V power connector is recommended that a power supply that can withstand high power consumption be used that does not provide the required...
Manual
Page 33
...BIOS Setup program, press the key during the POST when the power is turned on the motherboard supplies the necessary power to the CMOS to keep the configuration values in the CMOS... the default settings (unless you need to) to prevent system instability or other unexpected results. When the power is turned off, the battery on . For instructions on the motherboard. Chapter 2 BIOS Setup BIOS (...latest version of BIOS from the Internet and updates the BIOS. To upgrade the BIOS, use either the GIGABYTE Q-Flash or @BIOS utility. • Q-Flash allows the user to quickly and easily upgrade or ...
...BIOS Setup program, press the key during the POST when the power is turned on the motherboard supplies the necessary power to the CMOS to keep the configuration values in the CMOS... the default settings (unless you need to) to prevent system instability or other unexpected results. When the power is turned off, the battery on . For instructions on the motherboard. Chapter 2 BIOS Setup BIOS (...latest version of BIOS from the Internet and updates the BIOS. To upgrade the BIOS, use either the GIGABYTE Q-Flash or @BIOS utility. • Q-Flash allows the user to quickly and easily upgrade or ...
Manual
Page 53
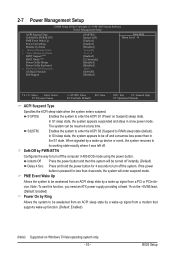
...system can be turned off the computer in MS-DOS mode using the power button. Press and hold the power button for less than in a low power mode. Note: To use this function, you need an ATX power supply providing at any time. BIOS Setup S1(POS) Enables the system to ...be awakened from a PCI or PCIe device. Instant-Off Press the power button and then the system will enter suspend mode. 2-7 Power Management Setup CMOS Setup Utility-Copyright (C) ...
...system can be turned off the computer in MS-DOS mode using the power button. Press and hold the power button for less than in a low power mode. Note: To use this function, you need an ATX power supply providing at any time. BIOS Setup S1(POS) Enables the system to ...be awakened from a PCI or PCIe device. Instant-Off Press the power button and then the system will enter suspend mode. 2-7 Power Management Setup CMOS Setup Utility-Copyright (C) ...
Manual
Page 54
... by keyboard, and wake on LAN. (Note) Supported on Windows 7/Vista operating system only. Note: you need an ATX power supply providing at least 1A on the +5VSB lead. To turn on the system. Note: To cancel the password, press on the system, enter the password ...to Password. Press on this function, you need an ATX power supply providing at least 1A on the +5VSB lead. Memory The system returns to its last known awake state upon the return of the AC power. KB Power ON Password Set the password when Power On by Keyboard is set a password with 1~5 characters to...
... by keyboard, and wake on LAN. (Note) Supported on Windows 7/Vista operating system only. Note: you need an ATX power supply providing at least 1A on the +5VSB lead. To turn on the system. Note: To cancel the password, press on the system, enter the password ...to Password. Press on this function, you need an ATX power supply providing at least 1A on the +5VSB lead. Memory The system returns to its last known awake state upon the return of the AC power. KB Power ON Password Set the password when Power On by Keyboard is set a password with 1~5 characters to...
Manual
Page 81
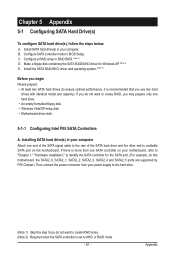
...for the SATA port. (For example, on this motherboard, the SATA2_0, SATA2_1, SATA2_2, SATA2_3, SATA2_4 and SATA2_5 ports are supported by P55 Chipset.) Then connect the power connector from your power supply to the hard drive. (Note 1) Skip this step if you do not want to create RAID array. (Note 2) Required when the...your computer Attach one hard drive. • An empty formatted floppy disk. • Windows Vista/XP setup disk. • Motherboard driver disk. 5-1-1 Configuring Intel P55 SATA Controllers A. If there is set to identify the SATA controller for Windows XP. (Note 2) E.
...for the SATA port. (For example, on this motherboard, the SATA2_0, SATA2_1, SATA2_2, SATA2_3, SATA2_4 and SATA2_5 ports are supported by P55 Chipset.) Then connect the power connector from your power supply to the hard drive. (Note 1) Skip this step if you do not want to create RAID array. (Note 2) Required when the...your computer Attach one hard drive. • An empty formatted floppy disk. • Windows Vista/XP setup disk. • Motherboard driver disk. 5-1-1 Configuring Intel P55 SATA Controllers A. If there is set to identify the SATA controller for Windows XP. (Note 2) E.
Manual
Page 89
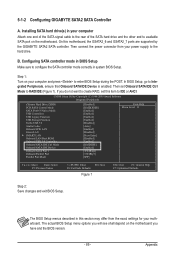
On this section may differ from your computer and press to RAID/IDE (Figure 1). If you will see shall depend on your power supply to the hard drive. Appendix CMOS Setup Utility-Copyright (C) 1984-2009 Award Software Integrated Peripherals eXtreme Hard Drive (XHD) PCH SATA Control ... SATA Controller A. Installing SATA hard drive(s) in this motherboard, the GSATA2_6 and GSATA2_7 ports are supported by the GIGABYTE SATA2 SATA controller. Then connect the power connector from the exact settings for your computer Attach one end of the SATA signal cable to the rear of the SATA...
On this section may differ from your computer and press to RAID/IDE (Figure 1). If you will see shall depend on your power supply to the hard drive. Appendix CMOS Setup Utility-Copyright (C) 1984-2009 Award Software Integrated Peripherals eXtreme Hard Drive (XHD) PCH SATA Control ... SATA Controller A. Installing SATA hard drive(s) in this motherboard, the GSATA2_6 and GSATA2_7 ports are supported by the GIGABYTE SATA2 SATA controller. Then connect the power connector from the exact settings for your computer Attach one end of the SATA signal cable to the rear of the SATA...
Manual
Page 114
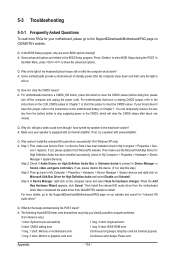
...values. You can temporarily remove the battery from the battery holder to stop supplying power to the CMOS, which will clear the CMOS values after the computer shuts down ? If not, please update it from GIGABYTE's website to show the advanced options. Step 4: In Device Manager, ... cannot I clear the CMOS values? 5-3 Troubleshooting 5-3-1 Frequently Asked Questions To read more details, go to the Support&Downloads\Motherboard\FAQ page on GIGABYTE's website. If not, try a speaker with an internal amplifier. Q: In the BIOS Setup program, why are hidden in Device Manager or Sound...
...values. You can temporarily remove the battery from the battery holder to stop supplying power to the CMOS, which will clear the CMOS values after the computer shuts down ? If not, please update it from GIGABYTE's website to show the advanced options. Step 4: In Device Manager, ... cannot I clear the CMOS values? 5-3 Troubleshooting 5-3-1 Frequently Asked Questions To read more details, go to the Support&Downloads\Motherboard\FAQ page on GIGABYTE's website. If not, try a speaker with an internal amplifier. Q: In the BIOS Setup program, why are hidden in Device Manager or Sound...
Manual
Page 116
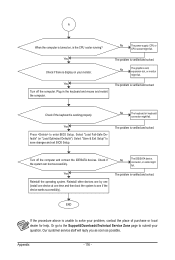
... you as soon as possible. The problem is unable to solve your problem, contact the place of purchase or local dealer for help. No The power supply, CPU or CPU socket might fail. A When the computer is turned on, is display on your monitor. Turn off the computer. Yes Check if there...
... you as soon as possible. The problem is unable to solve your problem, contact the place of purchase or local dealer for help. No The power supply, CPU or CPU socket might fail. A When the computer is turned on, is display on your monitor. Turn off the computer. Yes Check if there...


