Manual
Page 1
GA-P55-USB3 LGA1156 socket motherboard for Intel® Core™ i7 processor family/ Intel® Core™ i5 processor family User's Manual Rev. 1001 12ME-P55USB3-1001R
GA-P55-USB3 LGA1156 socket motherboard for Intel® Core™ i7 processor family/ Intel® Core™ i5 processor family User's Manual Rev. 1001 12ME-P55USB3-1001R
Manual
Page 5
...Share...75 4-6 Smart 6™ ...76 4-7 Auto Green...79 4-8 eXtreme Hard Drive (X.H.D) j 80 Chapter 5 Appendix...81 5-1 Configuring SATA Hard Drive(s 81 5-1-1 Configuring Intel P55 SATA Controllers 81 5-1-2 Configuring GIGABYTE SATA2 SATA Controller 89 5-1-3 Making a SATA RAID/AHCI Driver Diskette 95 5-1-4 Installing the SATA RAID/AHCI Driver and Operating System 96 5-2 Configuring Audio... 111 5-2-4 Using the Sound Recorder 113 5-3 Troubleshooting 114 5-3-1 Frequently Asked Questions 114 5-3-2 Troubleshooting Procedure 115 5-4 Regulatory Statements 117 j Only for P55 Chipset. - 5 -
...Share...75 4-6 Smart 6™ ...76 4-7 Auto Green...79 4-8 eXtreme Hard Drive (X.H.D) j 80 Chapter 5 Appendix...81 5-1 Configuring SATA Hard Drive(s 81 5-1-1 Configuring Intel P55 SATA Controllers 81 5-1-2 Configuring GIGABYTE SATA2 SATA Controller 89 5-1-3 Making a SATA RAID/AHCI Driver Diskette 95 5-1-4 Installing the SATA RAID/AHCI Driver and Operating System 96 5-2 Configuring Audio... 111 5-2-4 Using the Sound Recorder 113 5-3 Troubleshooting 114 5-3-1 Frequently Asked Questions 114 5-3-2 Troubleshooting Procedure 115 5-4 Regulatory Statements 117 j Only for P55 Chipset. - 5 -

Manual
Page 7
... R_SPDIF CPU_FAN ATX_12V_2X4 R_USB_2 R_USB_1 R_USB30 LGA1156 PWR_FAN PHASE LED ATX USB_LAN NEC AUDIO F_AUDIO RTL8111D PCIEX16 GA-P55-USB3 PCIEX1_1 (Note) SYS_FAN1 IDE SYS_FAN2 DDR3_2 DDR3_1 DDR3_4 DDR3_3 PCIEX1_2 BAT CODEC PCI1 PCIEX4_X1 GIGABYTE SATA2 Intel® P55/H55 GSATA2_6 GSATA2_7 CD_IN SPDIF_I SPDIF_O IT8720 PCI2 PCI3 LPT COMA B_BIOS FDD F_USB2 M_BIOS CLR_CMOS F_USB1...
... R_SPDIF CPU_FAN ATX_12V_2X4 R_USB_2 R_USB_1 R_USB30 LGA1156 PWR_FAN PHASE LED ATX USB_LAN NEC AUDIO F_AUDIO RTL8111D PCIEX16 GA-P55-USB3 PCIEX1_1 (Note) SYS_FAN1 IDE SYS_FAN2 DDR3_2 DDR3_1 DDR3_4 DDR3_3 PCIEX1_2 BAT CODEC PCI1 PCIEX4_X1 GIGABYTE SATA2 Intel® P55/H55 GSATA2_6 GSATA2_7 CD_IN SPDIF_I SPDIF_O IT8720 PCI2 PCI3 LPT COMA B_BIOS FDD F_USB2 M_BIOS CLR_CMOS F_USB1...

Manual
Page 8
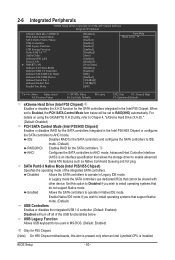
k Only for P55 Chipset. GA-P55-USB3 Motherboard Block Diagram PCIe CLK (100 MHz) 1 PCI Express x16 LGA1156 CPU CPU CLK+/- (133 MHz) DDR3 2200/1333/1066/800 MHz Dual Channel Memory ... x4 PCI Express x1 (PCIEX1_2) 2 USB 3.0 x1 x4j/X1k Switchj NEC PCI Express Bus Dual BIOS Intel® P55/H55 6 SATA 3Gb/s x1 14 USB 2.0/1.1j (Note) 2 SATA 3Gb/s ATA-133/100/66/33 IDE Channel GIGABYTE SATA2 12 USB 2.0/1.1k (Note) PCI Bus LPC Bus Floppy CODEC IT8720 COM Port PS/2 KB...
k Only for P55 Chipset. GA-P55-USB3 Motherboard Block Diagram PCIe CLK (100 MHz) 1 PCI Express x16 LGA1156 CPU CPU CLK+/- (133 MHz) DDR3 2200/1333/1066/800 MHz Dual Channel Memory ... x4 PCI Express x1 (PCIEX1_2) 2 USB 3.0 x1 x4j/X1k Switchj NEC PCI Express Bus Dual BIOS Intel® P55/H55 6 SATA 3Gb/s x1 14 USB 2.0/1.1j (Note) 2 SATA 3Gb/s ATA-133/100/66/33 IDE Channel GIGABYTE SATA2 12 USB 2.0/1.1k (Note) PCI Bus LPC Bus Floppy CODEC IT8720 COM Port PS/2 KB...

Manual
Page 10
...1 x floppy disk drive connector supporting up to 2 SATA 3Gb/s devices - Support for SATA RAID 0, RAID 1, RAID 5, and RAID 10 j GIGABYTE SATA2 chip: - 1 x IDE connector supporting ATA-133/100/66/33 and up to 2 IDE devices - 2 x SATA 3Gb/s connectors (GSATA2_6, GSATA2_7)... CPU Support for an Intel® Core™ i7 series processor/Intel® Core™ i5 series processor in the LGA1156 package (Go to GIGABYTE's website for the latest CPU support list.) L3 cache varies with CPU Chipset Intel® P55/H55 Express Chipset Memory...
...1 x floppy disk drive connector supporting up to 2 SATA 3Gb/s devices - Support for SATA RAID 0, RAID 1, RAID 5, and RAID 10 j GIGABYTE SATA2 chip: - 1 x IDE connector supporting ATA-133/100/66/33 and up to 2 IDE devices - 2 x SATA 3Gb/s connectors (GSATA2_6, GSATA2_7)... CPU Support for an Intel® Core™ i7 series processor/Intel® Core™ i5 series processor in the LGA1156 package (Go to GIGABYTE's website for the latest CPU support list.) L3 cache varies with CPU Chipset Intel® P55/H55 Express Chipset Memory...
Manual
Page 50
... of the integrated SATA controllers. Enabled Allows the SATA controllers to AHCI mode. For details on using the GIGABYTE X.H.D utility, refer to Chaper 4, "eXtreme Hard Drive (X.H.D)." (Default: Disabled) PCH SATA Control Mode (Intel P55/H55 Chipset) Enables or disables RAID for the SATA controllers and configures the SATA controllers to be used in...
... of the integrated SATA controllers. Enabled Allows the SATA controllers to AHCI mode. For details on using the GIGABYTE X.H.D utility, refer to Chaper 4, "eXtreme Hard Drive (X.H.D)." (Default: Disabled) PCH SATA Control Mode (Intel P55/H55 Chipset) Enables or disables RAID for the SATA controllers and configures the SATA controllers to be used in...

Manual
Page 80
...utility: Click Cancel to enable RAID for complex and time-consuming configurations. 4-8 eXtreme Hard Drive (X.H.D) j With GIGABYTE eXtreme Hard Drive (X.H.D)(Note 1), users can quickly configure a RAIDready system for P55 Chipset. (Note 1) The X.H.D utility only supports the SATA controllers integrated in the array. ) 1. The ...RAID 0, RAID 1, or other supported RAID array depending on your hard drive read/write performance without the need for the Intel SATA controllers. Without the driver, the hard drive may not be able to automatically set eXtreme Hard Drive (X.H.D) under the ...
...utility: Click Cancel to enable RAID for complex and time-consuming configurations. 4-8 eXtreme Hard Drive (X.H.D) j With GIGABYTE eXtreme Hard Drive (X.H.D)(Note 1), users can quickly configure a RAIDready system for P55 Chipset. (Note 1) The X.H.D utility only supports the SATA controllers integrated in the array. ) 1. The ...RAID 0, RAID 1, or other supported RAID array depending on your hard drive read/write performance without the need for the Intel SATA controllers. Without the driver, the hard drive may not be able to automatically set eXtreme Hard Drive (X.H.D) under the ...
Manual
Page 81
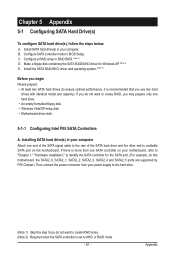
...for the SATA port. (For example, on this motherboard, the SATA2_0, SATA2_1, SATA2_2, SATA2_3, SATA2_4 and SATA2_5 ports are supported by P55 Chipset.) Then connect the power connector from your power supply to the hard drive. (Note 1) Skip this step if you use two ... only one hard drive. • An empty formatted floppy disk. • Windows Vista/XP setup disk. • Motherboard driver disk. 5-1-1 Configuring Intel P55 SATA Controllers A. Install SATA hard drive(s) in RAID BIOS. (Note 1) D. Configure SATA controller mode in your computer Attach one SATA controller on the motherboard. ...
...for the SATA port. (For example, on this motherboard, the SATA2_0, SATA2_1, SATA2_2, SATA2_3, SATA2_4 and SATA2_5 ports are supported by P55 Chipset.) Then connect the power connector from your power supply to the hard drive. (Note 1) Skip this step if you use two ... only one hard drive. • An empty formatted floppy disk. • Windows Vista/XP setup disk. • Motherboard driver disk. 5-1-1 Configuring Intel P55 SATA Controllers A. Install SATA hard drive(s) in RAID BIOS. (Note 1) D. Configure SATA controller mode in your computer Attach one SATA controller on the motherboard. ...
Manual
Page 83
Press + to Non-RAID 4. option ROM - 9.5.0.1037 Copyright(C) 2003-09 Intel Corporation. Intel(R) Rapid Storage Technology - option ROM - 9.5.0.1037 Copyright(C) 2003-09 Intel Corporation. Exit 3. Figure 2 Step 2: After you want to configure a RAID array. All Rights Reserved. [ MAIN MENU ] 1. Reset Disks to enter the P55 RAID Configuration Utility. All Rights Reserved. Appendix Step 1: After the...
Press + to Non-RAID 4. option ROM - 9.5.0.1037 Copyright(C) 2003-09 Intel Corporation. Intel(R) Rapid Storage Technology - option ROM - 9.5.0.1037 Copyright(C) 2003-09 Intel Corporation. Exit 3. Figure 2 Step 2: After you want to configure a RAID array. All Rights Reserved. [ MAIN MENU ] 1. Reset Disks to enter the P55 RAID Configuration Utility. All Rights Reserved. Appendix Step 1: After the...
Manual
Page 95
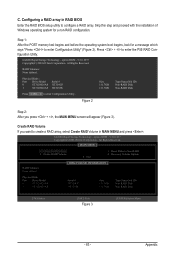
For installing Windows Vista, you need to a floppy disk. Press after the command: • For the Intel P55, type (Figure 1): (Note) A:\>copy d:\bootdrv\irst\32bit\*.* • For the GIGABYTE SATA2, type (Figure 2): (Note) A:\>copy d:\bootdrv\gsata\32bit\*.* Figure 1 Figure 2 In Windows mode: Steps: 1: Use ... disk. A Command Prompt window will then automatically copy the driver files to that in Figure 4, • For the Intel P55, select 7) Intel Rapid Storage driver for 32bit system for Windows XP operating sys- For example, from the startup disk. 2: Remove the ...
For installing Windows Vista, you need to a floppy disk. Press after the command: • For the Intel P55, type (Figure 1): (Note) A:\>copy d:\bootdrv\irst\32bit\*.* • For the GIGABYTE SATA2, type (Figure 2): (Note) A:\>copy d:\bootdrv\gsata\32bit\*.* Figure 1 Figure 2 In Windows mode: Steps: 1: Use ... disk. A Command Prompt window will then automatically copy the driver files to that in Figure 4, • For the Intel P55, select 7) Intel Rapid Storage driver for 32bit system for Windows XP operating sys- For example, from the startup disk. 2: Remove the ...
Manual
Page 96
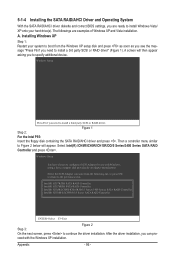
...Press F6 if you to specify additional device. Appendix - 96 - A. Intel(R) ICH7R/DH SATA RAID Controller Intel(R) ICH7MDH SATA RAID Controller Intel(R) ICH8R/ICH9R/ICH10R/DO/5 Series/3400 Serues SATA RAID Controller Intel(R) ICH8M-E/ICH9M-E/5 Series SATA RAID Controller ENTER=Select F3=Exit Figure 2 ... disk provided by an adapter manufacturer. Then a controller menu similar to continue the driver installation. Figure 1 Step 2: For the Intel P55: Insert the floppy disk containing the SATA RAID/AHCI driver and press . Windows Setup You have chosen to configure a SCSI Adapter...
...Press F6 if you to specify additional device. Appendix - 96 - A. Intel(R) ICH7R/DH SATA RAID Controller Intel(R) ICH7MDH SATA RAID Controller Intel(R) ICH8R/ICH9R/ICH10R/DO/5 Series/3400 Serues SATA RAID Controller Intel(R) ICH8M-E/ICH9M-E/5 Series SATA RAID Controller ENTER=Select F3=Exit Figure 2 ... disk provided by an adapter manufacturer. Then a controller menu similar to continue the driver installation. Figure 1 Step 2: For the Intel P55: Insert the floppy disk containing the SATA RAID/AHCI driver and press . Windows Setup You have chosen to configure a SCSI Adapter...
Manual
Page 98
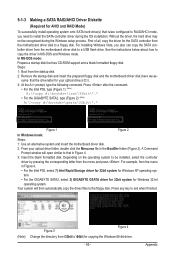
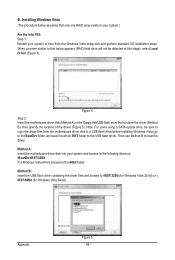
... motherboard driver disk (Method A) or the floppy disk/USB flash drive that below assumes that only one RAID array exists in your system.) For the Intel P55: Step 1: Restart your system and browse to the following directory: \BootDrv\iRST\32Bit For Windows Vista 64-bit, browse to the USB flash drive). Note...
... motherboard driver disk (Method A) or the floppy disk/USB flash drive that below assumes that only one RAID array exists in your system.) For the Intel P55: Step 1: Restart your system and browse to the following directory: \BootDrv\iRST\32Bit For Windows Vista 64-bit, browse to the USB flash drive). Note...
Manual
Page 102
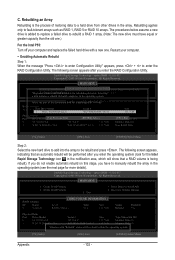
... for more details). Restart your computer and replace the failed hard drive with a new one. option ROM - 9.5.0.1037 Copyright(C) 2003-09 Intel Corporation. Intel(R) Rapid Storage Technology - All Rights Reserved. [ MAIN MENU ] 1. Delete RAID Volume 5. The procedures below assume a new drive is being...If you do not enable automatic rebuild on this stage, you have equal or greater capacity than the old one.) For the Intel P55: Turn off your computer. • Enabling Automatic Rebuild Step 1: When the message "Press to enter Configuration Utility" appears, press...
... for more details). Restart your computer and replace the failed hard drive with a new one. option ROM - 9.5.0.1037 Copyright(C) 2003-09 Intel Corporation. Intel(R) Rapid Storage Technology - All Rights Reserved. [ MAIN MENU ] 1. Delete RAID Volume 5. The procedures below assume a new drive is being...If you do not enable automatic rebuild on this stage, you have equal or greater capacity than the old one.) For the Intel P55: Turn off your computer. • Enabling Automatic Rebuild Step 1: When the message "Press to enter Configuration Utility" appears, press...


