
Manual
Page 26
... below. When connecting your system using the power switch (refer to Chapter 2, "BIOS Setup," "Power Management Setup," for information about beep codes. • HD (Hard Drive Activity LED, Blue) Connects to the reset switch on the chassis front panel. RESRES+ CICI+ PWR+ PWR- The LED ... SPEAK (Speaker, Orange): Connects to the speaker on the chassis front panel. 11) F_PANEL (Front Panel Header) Connect the power switch, reset switch, speaker, chassis intrusion switch/sensor and system status indicator on the chassis to this header, make sure the wire assignments and the pin ...
... below. When connecting your system using the power switch (refer to Chapter 2, "BIOS Setup," "Power Management Setup," for information about beep codes. • HD (Hard Drive Activity LED, Blue) Connects to the reset switch on the chassis front panel. RESRES+ CICI+ PWR+ PWR- The LED ... SPEAK (Speaker, Orange): Connects to the speaker on the chassis front panel. 11) F_PANEL (Front Panel Header) Connect the power switch, reset switch, speaker, chassis intrusion switch/sensor and system status indicator on the chassis to this header, make sure the wire assignments and the pin ...
Manual
Page 30
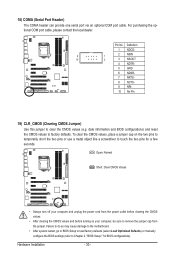
... Hardware Installation - 30 - Pin No. To clear the CMOS values, place a jumper cap on your computer, be sure to touch the two pins for BIOS configurations). Open: Normal Short: Clear CMOS Values • Always turn off your computer and unplug the power cord from the power outlet before clearing the...the jumper. 18) COMA (Serial Port Header) The COMA header can provide one serial port via an optional COM port cable. date information and BIOS configurations) and reset the CMOS values to factory defaults. For purchasing the optional COM port cable, please contact the local dealer.
... Hardware Installation - 30 - Pin No. To clear the CMOS values, place a jumper cap on your computer, be sure to touch the two pins for BIOS configurations). Open: Normal Short: Clear CMOS Values • Always turn off your computer and unplug the power cord from the power outlet before clearing the...the jumper. 18) COMA (Serial Port Header) The COMA header can provide one serial port via an optional COM port cable. date information and BIOS configurations) and reset the CMOS values to factory defaults. For purchasing the optional COM port cable, please contact the local dealer.
Manual
Page 33
... when the power is turned off, the battery on . Inadequate BIOS flashing may result in the CMOS on using the current version of the BIOS Setup program. If this occurs, try to clear the CMOS values and reset the board to default values. (Refer to the "Load Optimized Defaults... how to quickly and easily upgrade or back up BIOS without entering the operating system. • @BIOS is a Windows-based utility that you do it is potentially risky, if you not flash the BIOS. To upgrade the BIOS, use either the GIGABYTE Q-Flash or @BIOS utility. • Q-Flash allows the user to ...
... when the power is turned off, the battery on . Inadequate BIOS flashing may result in the CMOS on using the current version of the BIOS Setup program. If this occurs, try to clear the CMOS values and reset the board to default values. (Refer to the "Load Optimized Defaults... how to quickly and easily upgrade or back up BIOS without entering the operating system. • @BIOS is a Windows-based utility that you do it is potentially risky, if you not flash the BIOS. To upgrade the BIOS, use either the GIGABYTE Q-Flash or @BIOS utility. • Q-Flash allows the user to ...
Manual
Page 37
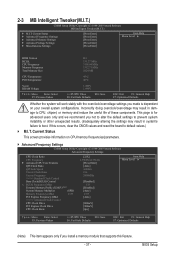
... Frequency Settings } Advanced Memory Settings } Advanced Voltage Settings } Miscellaneous Settings [Press Enter] [Press Enter] [Press Enter] [Press Enter] [Press Enter] Item Help Menu Level BIOS Version BCLK CPU Frequency Memory Frequency Total Memory Size D4 133.27 MHz 3198.64 MHz 1332.71 MHz 1024 MB CPU Temperature PCH Temperature.../overvoltage settings you made is for advanced users only and we recommend you install a memory module that supports this occurs, clear the CMOS values and reset the board to default values.) M.I.T.
... Frequency Settings } Advanced Memory Settings } Advanced Voltage Settings } Miscellaneous Settings [Press Enter] [Press Enter] [Press Enter] [Press Enter] [Press Enter] Item Help Menu Level BIOS Version BCLK CPU Frequency Memory Frequency Total Memory Size D4 133.27 MHz 3198.64 MHz 1332.71 MHz 1024 MB CPU Temperature PCH Temperature.../overvoltage settings you made is for advanced users only and we recommend you install a memory module that supports this occurs, clear the CMOS values and reset the board to default values.) M.I.T.
Manual
Page 39
...QPI Link Speed Displays the current operating QPI link speed. ting. (Default: Auto) Bi-Directional PROCHOT (Note) Auto Enabled Disabled Lets BIOS automatically configure this setting. (Default) When the CPU or chipset detects that supports this set the QPI clock ratio. Note: If your ...system fails to boot after overclocking, please wait for automated system reboot, or clear the CMOS values to reset the board to emit PROCHOT signals. Uncore Frequency This value is occurring to default values. (Default: Disabled) (Note) This item is...
...QPI Link Speed Displays the current operating QPI link speed. ting. (Default: Auto) Bi-Directional PROCHOT (Note) Auto Enabled Disabled Lets BIOS automatically configure this setting. (Default) When the CPU or chipset detects that supports this set the QPI clock ratio. Note: If your ...system fails to boot after overclocking, please wait for automated system reboot, or clear the CMOS values to reset the board to emit PROCHOT signals. Uncore Frequency This value is occurring to default values. (Default: Disabled) (Note) This item is...
Manual
Page 55
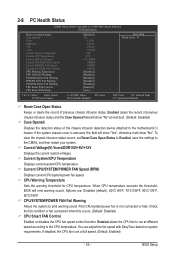
... according to the motherboard CI header. 2-8 PC Health Status CMOS Setup Utility-Copyright (C) 1984-2009 Award Software PC Health Status Reset Case Open Status Case Opened Vcore DDR15V +5V +12V Current System Temperature Current CPU Temperature Current CPU FAN Speed Current SYSTEM FAN2...of previous chassis intrusion status. You can adjust the fan speed with EasyTune based on system requirements. BIOS Setup To clear the chassis intrusion status record, set Reset Case Open Status to Enabled, save the settings to emit warning sound if the CPU/system/power ...
... according to the motherboard CI header. 2-8 PC Health Status CMOS Setup Utility-Copyright (C) 1984-2009 Award Software PC Health Status Reset Case Open Status Case Opened Vcore DDR15V +5V +12V Current System Temperature Current CPU Temperature Current CPU FAN Speed Current SYSTEM FAN2...of previous chassis intrusion status. You can adjust the fan speed with EasyTune based on system requirements. BIOS Setup To clear the chassis intrusion status record, set Reset Case Open Status to Enabled, save the settings to emit warning sound if the CPU/system/power ...
Manual
Page 69
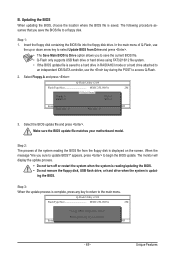
... Flash Type/Size MXIC 25L1605A 2M Keep0 DfilMe(Is)DfaotuandEnable Floppy A Loa d CMO S Default Enable HDD 1-0 Upda te BIOS from Drive Please SparevsesBaInOySketoy Dtoricvoentinue Enter : Run hi:Move ESC:Reset F10:Power Off - 69 - Step 3: When the update process is saved to a hard drive in RAID/AHCI mode ...or a hard drive attached to an independent IDE/SATA controller, use the up or down arrow key to select Update BIOS from the floppy disk ...
... Flash Type/Size MXIC 25L1605A 2M Keep0 DfilMe(Is)DfaotuandEnable Floppy A Loa d CMO S Default Enable HDD 1-0 Upda te BIOS from Drive Please SparevsesBaInOySketoy Dtoricvoentinue Enter : Run hi:Move ESC:Reset F10:Power Off - 69 - Step 3: When the update process is saved to a hard drive in RAID/AHCI mode ...or a hard drive attached to an independent IDE/SATA controller, use the up or down arrow key to select Update BIOS from the floppy disk ...
Manual
Page 74
...(Note 1) Before using the Dynamic Energy Saver™ 2 function, make sure the CPU Enhanced Halt (C1E) and CPU EIST Function items in the BIOS Setup program are able to run in a set to zero. (Note 4) Dynamic Energy Saver Meter will be recorded until re-activated when only the Dynamic...: Off) 2 Current CPU Power Consumption 3 Total Power Savings (Total power saving with the user-defined power saving settings, even after the system is unable to reset to Enabled. (Note 2) 1: Smart FAN/CPU (default); 2: Smart FAN/CPU/VGA/HDD; 3: Smart FAN/CPU/VGA/HDD/Chipset/ Memory. (Note 3) The total...
...(Note 1) Before using the Dynamic Energy Saver™ 2 function, make sure the CPU Enhanced Halt (C1E) and CPU EIST Function items in the BIOS Setup program are able to run in a set to zero. (Note 4) Dynamic Energy Saver Meter will be recorded until re-activated when only the Dynamic...: Off) 2 Current CPU Power Consumption 3 Total Power Savings (Total power saving with the user-defined power saving settings, even after the system is unable to reset to Enabled. (Note 2) 1: Smart FAN/CPU (default); 2: Smart FAN/CPU/VGA/HDD; 3: Smart FAN/CPU/VGA/HDD/Chipset/ Memory. (Note 3) The total...
Manual
Page 83
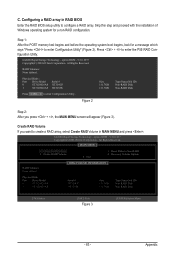
... to enter Configuration Utility.. Figure 2 Step 2: After you want to create a RAID array, select Create RAID Volume in RAID BIOS Enter the RAID BIOS setup utility to configure a RAID array. All Rights Reserved. Physical Disks : Port Drive Model 0 ST3120026AS 1 ST3120026AS Serial #...P55 RAID Configuration Utility. Skip this step and proceed with the installation of Windows operating system for a message which says "Press to Non-RAID 4. option ROM - 9.5.0.1037 Copyright(C) 2003-09 Intel Corporation. All Rights Reserved. [ MAIN MENU ] 1. Create RAID Volume 2. Reset...
... to enter Configuration Utility.. Figure 2 Step 2: After you want to create a RAID array, select Create RAID Volume in RAID BIOS Enter the RAID BIOS setup utility to configure a RAID array. All Rights Reserved. Physical Disks : Port Drive Model 0 ST3120026AS 1 ST3120026AS Serial #...P55 RAID Configuration Utility. Skip this step and proceed with the installation of Windows operating system for a message which says "Press to Non-RAID 4. option ROM - 9.5.0.1037 Copyright(C) 2003-09 Intel Corporation. All Rights Reserved. [ MAIN MENU ] 1. Create RAID Volume 2. Reset...
Manual
Page 85
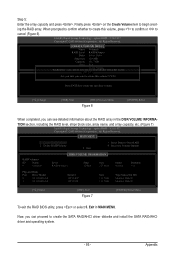
... ALL DATA ON SELECTED DISKS WILL BE LOST. [ HELP ] Are you sure you want to create this volume, press to confirm or to Non-RAID 4. Reset Disks to cancel (Figure 6). All Rights Reserved. [ MAIN MENU ] 1. Exit 3. Recovery Volume Options RAID Volumes : ID Name 0 Volume0 [ DISK/VOLUME ...111.7GB Type/Status(Vol ID) Member Disk(0) Member Disk(0) [hi]-Select [ESC]-Exit Figure 7 [ENTER]-Select Menu To exit the RAID BIOS utility, press or select 5. Now, you can proceed to begin creating the RAID array. option ROM - 9.5.0.1037 Copyright(C) 2003-09 Intel Corporation...
... ALL DATA ON SELECTED DISKS WILL BE LOST. [ HELP ] Are you sure you want to create this volume, press to confirm or to Non-RAID 4. Reset Disks to cancel (Figure 6). All Rights Reserved. [ MAIN MENU ] 1. Exit 3. Recovery Volume Options RAID Volumes : ID Name 0 Volume0 [ DISK/VOLUME ...111.7GB Type/Status(Vol ID) Member Disk(0) Member Disk(0) [hi]-Select [ESC]-Exit Figure 7 [ENTER]-Select Menu To exit the RAID BIOS utility, press or select 5. Now, you can proceed to begin creating the RAID array. option ROM - 9.5.0.1037 Copyright(C) 2003-09 Intel Corporation...


