
Manual
Page 26
.... When connecting your system using the power switch (refer to Chapter 2, "BIOS Setup," "Power Management Setup," for information about beep codes. • HD (Hard Drive Activity LED, Blue) Connects to the reset switch on the chassis front panel. The LED S0 On is reading or ... to Chapter 5, "Troubleshooting," for more information). • SPEAK (Speaker, Orange): Connects to the pin assignments below. Hard Drive Activity LED Reset Switch Power LED Chassis Intrusion Header • MSG/PWR (Message/Power/Sleep LED, Yellow/Purple): System Status LED Connects to this header, make...
.... When connecting your system using the power switch (refer to Chapter 2, "BIOS Setup," "Power Management Setup," for information about beep codes. • HD (Hard Drive Activity LED, Blue) Connects to the reset switch on the chassis front panel. The LED S0 On is reading or ... to Chapter 5, "Troubleshooting," for more information). • SPEAK (Speaker, Orange): Connects to the pin assignments below. Hard Drive Activity LED Reset Switch Power LED Chassis Intrusion Header • MSG/PWR (Message/Power/Sleep LED, Yellow/Purple): System Status LED Connects to this header, make...
Manual
Page 30
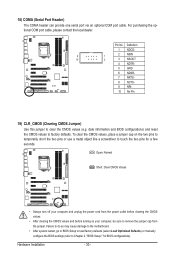
...Failure to do so may cause damage to the motherboard. • After system restart, go to BIOS Setup to load factory defaults (select Load Optimized Defaults) or manually configure the BIOS settings (refer to remove the jumper cap from the power outlet before clearing the CMOS values. &#...No. Open: Normal Short: Clear CMOS Values • Always turn off your computer, be sure to Chapter 2, "BIOS Setup," for a few seconds. date information and BIOS configurations) and reset the CMOS values to factory defaults. 18) COMA (Serial Port Header) The COMA header can provide one serial port ...
...Failure to do so may cause damage to the motherboard. • After system restart, go to BIOS Setup to load factory defaults (select Load Optimized Defaults) or manually configure the BIOS settings (refer to remove the jumper cap from the power outlet before clearing the CMOS values. &#...No. Open: Normal Short: Clear CMOS Values • Always turn off your computer, be sure to Chapter 2, "BIOS Setup," for a few seconds. date information and BIOS configurations) and reset the CMOS values to factory defaults. 18) COMA (Serial Port Header) The COMA header can provide one serial port ...
Manual
Page 33
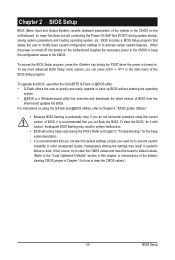
...the configuration values in the CMOS. To flash the BIOS, do not encounter problems using the current version of BIOS, it with caution. For instructions on the motherboard. If this occurs, try to clear the CMOS values and reset the board to default values. (Refer to the ...prevent system instability or other unexpected results. To upgrade the BIOS, use either the GIGABYTE Q-Flash or @BIOS utility. • Q-Flash allows the user to quickly and easily upgrade or back up BIOS without entering the operating system. • @BIOS is a Windows-based utility that allows the user to ...
...the configuration values in the CMOS. To flash the BIOS, do not encounter problems using the current version of BIOS, it with caution. For instructions on the motherboard. If this occurs, try to clear the CMOS values and reset the board to default values. (Refer to the ...prevent system instability or other unexpected results. To upgrade the BIOS, use either the GIGABYTE Q-Flash or @BIOS utility. • Q-Flash allows the user to quickly and easily upgrade or back up BIOS without entering the operating system. • @BIOS is a Windows-based utility that allows the user to ...
Manual
Page 37
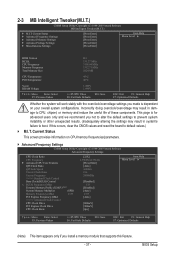
...and reset the board to default values.) M.I .T Current Status } Advanced Frequency Settings } Advanced Memory Settings } Advanced Voltage Settings } Miscellaneous Settings [Press Enter] [Press Enter] [Press Enter] [Press Enter] [Press Enter] Item Help Menu Level BIOS ... This screen provides information on your overall system configurations. Incorrectly doing overclock/overvoltage may result in damage to boot. BIOS Setup This page is dependent on CPU/memory frequencies/parameters. Advanced Frequency Settings CMOS Setup Utility-Copyright ...
...and reset the board to default values.) M.I .T Current Status } Advanced Frequency Settings } Advanced Memory Settings } Advanced Voltage Settings } Miscellaneous Settings [Press Enter] [Press Enter] [Press Enter] [Press Enter] [Press Enter] Item Help Menu Level BIOS ... This screen provides information on your overall system configurations. Incorrectly doing overclock/overvoltage may result in damage to boot. BIOS Setup This page is dependent on CPU/memory frequencies/parameters. Advanced Frequency Settings CMOS Setup Utility-Copyright ...
Manual
Page 39
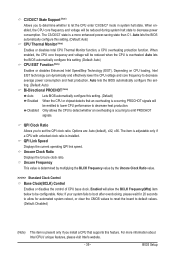
...occurring, PROCHOT signals will allow for 20 seconds to allow the BCLK Frequency(Mhz) item below to emit PROCHOT signals. Auto lets the BIOS automatically configure this setting. (Default: Auto) CPU Thermal Monitor (Note) Enables or disables Intel CPU Thermal Monitor function, a CPU overheating ...please wait for automated system reboot, or clear the CMOS values to reset the board to detect whether an overheating is a more information about Intel CPUs' unique features, please visit Intel's website. - 39 - BIOS Setup QPI Clock Ratio Allows you to let the CPU enter C3...
...occurring, PROCHOT signals will allow for 20 seconds to allow the BCLK Frequency(Mhz) item below to emit PROCHOT signals. Auto lets the BIOS automatically configure this setting. (Default: Auto) CPU Thermal Monitor (Note) Enables or disables Intel CPU Thermal Monitor function, a CPU overheating ...please wait for automated system reboot, or clear the CMOS values to reset the board to detect whether an overheating is a more information about Intel CPUs' unique features, please visit Intel's website. - 39 - BIOS Setup QPI Clock Ratio Allows you to let the CPU enter C3...
Manual
Page 55
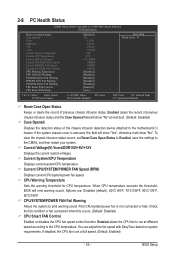
... intrusion status. Options are: Disabled (default), 60oC/140oF, 70oC/158oF, 80oC/176oF, 90oC/194oF. To clear the chassis intrusion status record, set Reset Case Open Status to Enabled, save the settings to run at full speed. (Default: Enabled) - 55 - Current Voltage(V) Vcore/DDR15V/+5V/+12V... Displays current CPU/system/power fan speed. You can adjust the fan speed with EasyTune based on system requirements. BIOS Setup When CPU temperature exceeds the threshold, BIOS will show "Yes", otherwise it will emit warning sound. CPU/SYSTEM/POWER FAN Fail Warning Allows the system to...
... intrusion status. Options are: Disabled (default), 60oC/140oF, 70oC/158oF, 80oC/176oF, 90oC/194oF. To clear the chassis intrusion status record, set Reset Case Open Status to Enabled, save the settings to run at full speed. (Default: Enabled) - 55 - Current Voltage(V) Vcore/DDR15V/+5V/+12V... Displays current CPU/system/power fan speed. You can adjust the fan speed with EasyTune based on system requirements. BIOS Setup When CPU temperature exceeds the threshold, BIOS will show "Yes", otherwise it will emit warning sound. CPU/SYSTEM/POWER FAN Fail Warning Allows the system to...
Manual
Page 69
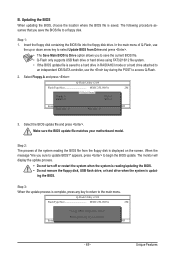
... 25L1605A 2M Keep0 DfilMe(Is)DfaotuandEnable Floppy A Loa d CMO S Default Enable HDD 1-0 Upda te BIOS from Drive Please SparevsesBaInOySketoy Dtoricvoentinue Enter : Run hi:Move ESC:Reset F10:Power Off - 69 - When the message "Are you save the current BIOS file. • Q-Flash only supports USB flash drive or hard drives using FAT32/16...
... 25L1605A 2M Keep0 DfilMe(Is)DfaotuandEnable Floppy A Loa d CMO S Default Enable HDD 1-0 Upda te BIOS from Drive Please SparevsesBaInOySketoy Dtoricvoentinue Enter : Run hi:Move ESC:Reset F10:Power Off - 69 - When the message "Are you save the current BIOS file. • Q-Flash only supports USB flash drive or hard drives using FAT32/16...
Manual
Page 74
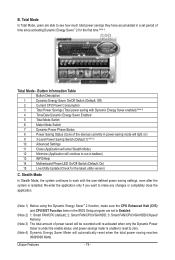
... the user-defined power saving settings, even after the system is unable to reset to see how much total power savings they have accumulated in the BIOS Setup program are able to zero. (Note 4) Dynamic Energy Saver Meter will automatically reset when the total power saving reaches 99999999 Watts. Unique Features - 74 - Re...
... the user-defined power saving settings, even after the system is unable to reset to see how much total power savings they have accumulated in the BIOS Setup program are able to zero. (Note 4) Dynamic Energy Saver Meter will automatically reset when the total power saving reaches 99999999 Watts. Unique Features - 74 - Re...
Manual
Page 83
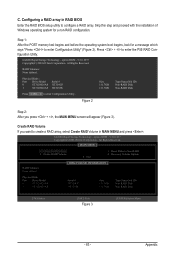
... 111.7GB 111.7GB Type/Status(Vol ID) Non-RAID Disk Non-RAID Disk Press to enter the P55 RAID Configuration Utility. Intel(R) Rapid Storage Technology - Delete RAID Volume 5. Reset Disks to configure a RAID array. Create RAID Volume If you press + , the MAIN MENU screen will... Configuration Utility" (Figure 2). Figure 2 Step 2: After you want to create a RAID array, select Create RAID Volume in RAID BIOS Enter the RAID BIOS setup utility to Non-RAID 4. option ROM - 9.5.0.1037 Copyright(C) 2003-09 Intel Corporation. C. Intel(R) Rapid Storage Technology -
... 111.7GB 111.7GB Type/Status(Vol ID) Non-RAID Disk Non-RAID Disk Press to enter the P55 RAID Configuration Utility. Intel(R) Rapid Storage Technology - Delete RAID Volume 5. Reset Disks to configure a RAID array. Create RAID Volume If you press + , the MAIN MENU screen will... Configuration Utility" (Figure 2). Figure 2 Step 2: After you want to create a RAID array, select Create RAID Volume in RAID BIOS Enter the RAID BIOS setup utility to Non-RAID 4. option ROM - 9.5.0.1037 Copyright(C) 2003-09 Intel Corporation. C. Intel(R) Rapid Storage Technology -
Manual
Page 85
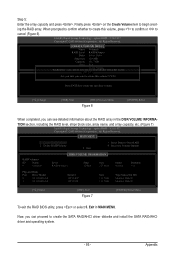
...Next [ESC]-Previous Menu Figure 6 [ENTER]-Select When completed, you can see detailed information about the RAID array in MAIN MENU. Reset Disks to create the SATA RAID/AHCI driver diskette and install the SATA RAID/AHCI driver and operating system. - 85 - Recovery Volume...7GB 111.7GB Type/Status(Vol ID) Member Disk(0) Member Disk(0) [hi]-Select [ESC]-Exit Figure 7 [ENTER]-Select Menu To exit the RAID BIOS utility, press or select 5. Intel(R) Rapid Storage Technology - option ROM - 9.5.0.1037 Copyright(C) 2003-09 Intel Corporation. Exit 3. Appendix option ROM...
...Next [ESC]-Previous Menu Figure 6 [ENTER]-Select When completed, you can see detailed information about the RAID array in MAIN MENU. Reset Disks to create the SATA RAID/AHCI driver diskette and install the SATA RAID/AHCI driver and operating system. - 85 - Recovery Volume...7GB 111.7GB Type/Status(Vol ID) Member Disk(0) Member Disk(0) [hi]-Select [ESC]-Exit Figure 7 [ENTER]-Select Menu To exit the RAID BIOS utility, press or select 5. Intel(R) Rapid Storage Technology - option ROM - 9.5.0.1037 Copyright(C) 2003-09 Intel Corporation. Exit 3. Appendix option ROM...


