Manual
Page 1
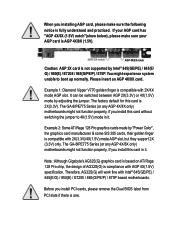
... SiS 305 cards, their golden finger is one. Please insert an AGP 4X/8X card. Before you install PCI cards, please remove the Dual BIOS label from PCI slots if there is compatible with AGP 4X(1.5V) specification. Example 1: Diamond Vipper V770 golden finger is compliance with 2X(3.3V... 2X/4X mode AGP slot. Note : Although Gigabyte's AG32S(G) graphics card is based on ATi Rage 128 Pro chip, the design of AG32S(G) is compatible with Intel® 845(GE/PE) / 845(E/G) / 850(E) / E7205 / 865(G/PE/P) / 875P based motherboards. The GA-8IPE775 Series (or any AGP 4X/8X only) motherboards...
... SiS 305 cards, their golden finger is one. Please insert an AGP 4X/8X card. Before you install PCI cards, please remove the Dual BIOS label from PCI slots if there is compatible with AGP 4X(1.5V) specification. Example 1: Diamond Vipper V770 golden finger is compliance with 2X(3.3V... 2X/4X mode AGP slot. Note : Although Gigabyte's AG32S(G) graphics card is based on ATi Rage 128 Pro chip, the design of AG32S(G) is compatible with Intel® 845(GE/PE) / 845(E/G) / 850(E) / E7205 / 865(G/PE/P) / 875P based motherboards. The GA-8IPE775 Series (or any AGP 4X/8X only) motherboards...
Manual
Page 6
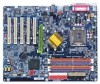
English Table of Content Warning 4 Chapter 1 Introduction 5 Features Summary 5 GA-8IPE775 Series Motherboard Layout 7 Block Diagram 8 Chapter 2 Hardware Installation Process 11 Step 1: Install the Central Processing Unit (CPU 12 Step ... 16 Step 4: Install I/O Peripherals Cables 17 Step 4-1: I/O Back Panel Introduction 17 Step 4-2: Connectors Introduction 19 Chapter 3 BIOS Setup 31 The Main Menu (For example: BIOS Ver. : 8IPE775 Pro.D4 32 Standard CMOS Features 34 Advanced BIOS Features 37 Integrated Peripherals 39 Power Management Setup 43 GA-8IPE775 Series Motherboard - 2 -
English Table of Content Warning 4 Chapter 1 Introduction 5 Features Summary 5 GA-8IPE775 Series Motherboard Layout 7 Block Diagram 8 Chapter 2 Hardware Installation Process 11 Step 1: Install the Central Processing Unit (CPU 12 Step ... 16 Step 4: Install I/O Peripherals Cables 17 Step 4-1: I/O Back Panel Introduction 17 Step 4-2: Connectors Introduction 19 Chapter 3 BIOS Setup 31 The Main Menu (For example: BIOS Ver. : 8IPE775 Pro.D4 32 Standard CMOS Features 34 Advanced BIOS Features 37 Integrated Peripherals 39 Power Management Setup 43 GA-8IPE775 Series Motherboard - 2 -
Manual
Page 7
Channel Audio Function Introduction 67 Jack-Sensing and UAJ Introduction 73 Xpress Recovery2 Introduction 75 Chapter 5 Appendix 79 - 3 - Table of Content English PnP/PCI Configurations 45 PC Health Status 46 Frequency/Voltage Control 48 Load Fail-Safe Defaults 50 Load Optimized Defaults 50 Set Supervisor/User Password 51 Save & Exit Setup 52 Exit Without Saving 52 Chapter 4 Technical Reference 53 Flash BIOS Method Introduction 53 2- / 4- / 6- / 8-
Channel Audio Function Introduction 67 Jack-Sensing and UAJ Introduction 73 Xpress Recovery2 Introduction 75 Chapter 5 Appendix 79 - 3 - Table of Content English PnP/PCI Configurations 45 PC Health Status 46 Frequency/Voltage Control 48 Load Fail-Safe Defaults 50 Load Optimized Defaults 50 Set Supervisor/User Password 51 Save & Exit Setup 52 Exit Without Saving 52 Chapter 4 Technical Reference 53 Flash BIOS Method Introduction 53 2- / 4- / 6- / 8-
Manual
Page 10
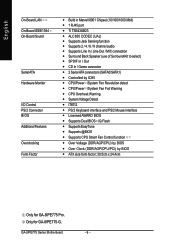
English On-Board LAN On-Board IEEE1394 On-Board Sound Serial ATA Hardware Monitor I/O Control PS/2 Connector BIOS Additional Features Overclocking Form Factor y Build in Marvell 8001 Chipset (10/100/1000 Mbit) y 1 RJ45 port y Ti TSB43AB23 y ...Mouse interface y Licensed AWARD BIOS y Supports Dual BIOS /Q-Flash y Supports EasyTune y Supports @BIOS y Supports CPU Smart Fan Control function y Over Voltage (DDR/AGP/CPU) by BIOS y Over Clock (DDR/AGP/CPU/PCI) by BIOS y ATX size form factor; 30.5cm x 24.4cm Only for GA-8IPE775-G. Only for GA-8IPE775 Pro. GA-8IPE775 Series Motherboard - 6 -
English On-Board LAN On-Board IEEE1394 On-Board Sound Serial ATA Hardware Monitor I/O Control PS/2 Connector BIOS Additional Features Overclocking Form Factor y Build in Marvell 8001 Chipset (10/100/1000 Mbit) y 1 RJ45 port y Ti TSB43AB23 y ...Mouse interface y Licensed AWARD BIOS y Supports Dual BIOS /Q-Flash y Supports EasyTune y Supports @BIOS y Supports CPU Smart Fan Control function y Over Voltage (DDR/AGP/CPU) by BIOS y Over Clock (DDR/AGP/CPU/PCI) by BIOS y ATX size form factor; 30.5cm x 24.4cm Only for GA-8IPE775-G. Only for GA-8IPE775 Pro. GA-8IPE775 Series Motherboard - 6 -
Manual
Page 12
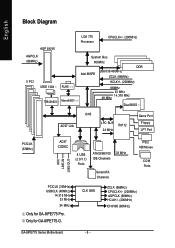
...+/- (200MHz) ICH3V66 (66MHz) GA-8IPE775 Series Motherboard - 8 - English Block Diagram AGP 8X/4X AGPCLK (66MHz) 5 PCI IEEE 1394 RJ45 TSB43AB23 Marvell 8001 LGA 775 Processor CPUCLK+/- (200MHz) System Bus 800MHz DDR 266/333/400MHz Intel 865PE ZCLK (66MHz) HCLK+/- (200MHz) 66MHz 33 MHz 48 MHz 14.318 MHz Dual BIOS AC97 Link ICH5... 33 MHz IDE Channels Serial ATA Channels PS/2 KB/Mouse COM Ports PCICLK (33MHz) USBCLK (48MHz) 14.318 MHz 33 MHz 24 MHz Only for GA-8IPE775-G.
...+/- (200MHz) ICH3V66 (66MHz) GA-8IPE775 Series Motherboard - 8 - English Block Diagram AGP 8X/4X AGPCLK (66MHz) 5 PCI IEEE 1394 RJ45 TSB43AB23 Marvell 8001 LGA 775 Processor CPUCLK+/- (200MHz) System Bus 800MHz DDR 266/333/400MHz Intel 865PE ZCLK (66MHz) HCLK+/- (200MHz) 66MHz 33 MHz 48 MHz 14.318 MHz Dual BIOS AC97 Link ICH5... 33 MHz IDE Channels Serial ATA Channels PS/2 KB/Mouse COM Ports PCICLK (33MHz) USBCLK (48MHz) 14.318 MHz 33 MHz 24 MHz Only for GA-8IPE775-G.
Manual
Page 15
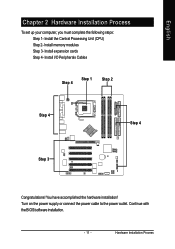
Install memory modules Step 3- Install I/O Peripherals Cables Step 4 Step 1 Step 2 Step 4 Step 4 Step 3 Congratulations! Hardware Installation Process Turn on the power supply or connect the power cable to the power outlet. Install expansion cards Step 4- Continue with the BIOS/software installation. - 11 - Install the Central Processing Unit (CPU) Step 2- You have accomplished the hardware installation! English Chapter 2 Hardware Installation Process To set up your computer, you must complete the following steps: Step 1-
Install memory modules Step 3- Install I/O Peripherals Cables Step 4 Step 1 Step 2 Step 4 Step 4 Step 3 Congratulations! Hardware Installation Process Turn on the power supply or connect the power cable to the power outlet. Install expansion cards Step 4- Continue with the BIOS/software installation. - 11 - Install the Central Processing Unit (CPU) Step 2- You have accomplished the hardware installation! English Chapter 2 Hardware Installation Process To set up your computer, you must complete the following steps: Step 1-
Manual
Page 16
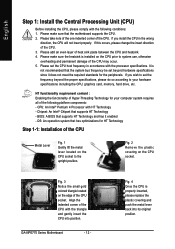
...that supports HT Technology and has it does not meet the required standards for HT Technology Step 1-1: Installation of the following conditions: 1. GA-8IPE775 Series Motherboard - 12 - Please take note of the one indented corner of the CPU may occur. 5. Fig. 3 Notice the small... CPU socket. CPU: An Intel® Pentium 4 Processor with the processor specifications. Align the indented corner of the CPU. 3. BIOS: A BIOS that the motherboard supports the CPU. 2. Please set the frequency beyond hardware specifications since it enabled - Please make sure the heatsink is...
...that supports HT Technology and has it does not meet the required standards for HT Technology Step 1-1: Installation of the following conditions: 1. GA-8IPE775 Series Motherboard - 12 - Please take note of the one indented corner of the CPU may occur. 5. Fig. 3 Notice the small... CPU socket. CPU: An Intel® Pentium 4 Processor with the processor specifications. Align the indented corner of the CPU. 3. BIOS: A BIOS that the motherboard supports the CPU. 2. Please set the frequency beyond hardware specifications since it enabled - Please make sure the heatsink is...
Manual
Page 18
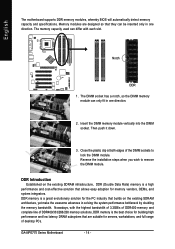
...down. 3. DDR memory is a high performance and cost-effective solution that allows easy adoption for memory vendors, OEMs, and system integrators. GA-8IPE775 Series Motherboard - 14 - The memory capacity used can differ with the highest bandwidth of 3.2GB/s of DDR400 memory and complete line ...memory module vertically into the DIMM socket. Nowadays, with each slot. English The motherboard supports DDR memory modules, whereby BIOS will automatically detect memory capacity and specifications. Memory modules are suitable for the PC industry that they can only fit in one ...
...down. 3. DDR memory is a high performance and cost-effective solution that allows easy adoption for memory vendors, OEMs, and system integrators. GA-8IPE775 Series Motherboard - 14 - The memory capacity used can differ with the highest bandwidth of 3.2GB/s of DDR400 memory and complete line ...memory module vertically into the DIMM socket. Nowadays, with each slot. English The motherboard supports DDR memory modules, whereby BIOS will automatically detect memory capacity and specifications. Memory modules are suitable for the PC industry that they can only fit in one ...
Manual
Page 20
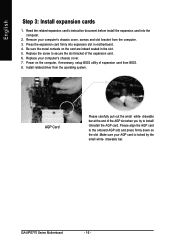
...the AGP card. drawable bar at the end of the AGP slot when you try to secure the slot bracket of expansion card from BIOS. 8. Install related driver from the computer. 3. Please align the AGP card to the onboard AGP slot and press firmly down on the... computer, if necessary, setup BIOS utility of the expansion card. 6. drawable bar. English Step 3: Install expansion cards 1. Press the expansion card firmly into the computer. 2. Replace your AGP card is locked by the small white- GA-8IPE775 Series Motherboard - 16 - Remove your computer's chassis...
...the AGP card. drawable bar at the end of the AGP slot when you try to secure the slot bracket of expansion card from BIOS. 8. Install related driver from the computer. 3. Please align the AGP card to the onboard AGP slot and press firmly down on the... computer, if necessary, setup BIOS utility of the expansion card. 6. drawable bar. English Step 3: Install expansion cards 1. Press the expansion card firmly into the computer. 2. Replace your AGP card is locked by the small white- GA-8IPE775 Series Motherboard - 16 - Remove your computer's chassis...
Manual
Page 33
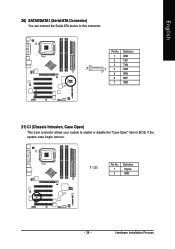
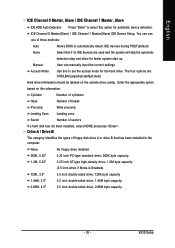
Definition 1 1 Signal 2 GND - 29 - Hardware Installation Process Pin No. English 20) SATA0/SATA1 (Serial ATA Connector) You can connect the Serial ATA device to enable or disable the "Case Open" item in BIOS, if the system case begin remove. Pin No. Definition 1 GND 2 TXP 3 TXN 7 1 4 GND 5 RXN 6 RXP 7 GND 21) CI (Chassis Intrusion, Case Open) This 2-pin connector allows your system to this connector.
Definition 1 1 Signal 2 GND - 29 - Hardware Installation Process Pin No. English 20) SATA0/SATA1 (Serial ATA Connector) You can connect the Serial ATA device to enable or disable the "Case Open" item in BIOS, if the system case begin remove. Pin No. Definition 1 GND 2 TXP 3 TXN 7 1 4 GND 5 RXN 6 RXP 7 GND 21) CI (Chassis Intrusion, Case Open) This 2-pin connector allows your system to this connector.
Manual
Page 35
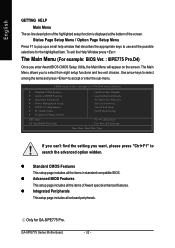
... can be reset to the CMOS SRAM. If you wish to upgrade to a new BIOS, either Gigabyte's Q-Flash or @BIOS utility can enter the BIOS setup screen by pressing "Ctrl + F1". English Chapter 3 BIOS Setup BIOS (Basic Input and Output System) includes a CMOS SETUP utility which allows user to configure... during the BIOS POST (Power-On Self Test) will take you save changes into CMOS Status Page Setup Menu and Option Page Setup Menu - BIOS Setup When the power is recommended that does not require users to boot to the CMOS SETUP screen. When setting up BIOS for GA-8IPE775 Pro. -...
... can be reset to the CMOS SRAM. If you wish to upgrade to a new BIOS, either Gigabyte's Q-Flash or @BIOS utility can enter the BIOS setup screen by pressing "Ctrl + F1". English Chapter 3 BIOS Setup BIOS (Basic Input and Output System) includes a CMOS SETUP utility which allows user to configure... during the BIOS POST (Power-On Self Test) will take you save changes into CMOS Status Page Setup Menu and Option Page Setup Menu - BIOS Setup When the power is recommended that does not require users to boot to the CMOS SETUP screen. When setting up BIOS for GA-8IPE775 Pro. -...
Manual
Page 36
... setup functions and two exit choices. z Standard CMOS Features This setup page includes all onboard peripherals. Only for the highlighted item. GA-8IPE775 Series Motherboard - 32 - The Main Menu (For example: BIOS Ver. : 8IPE775 Pro.D4) Once you want, please press "Ctrl+F1" to accept or enter the sub-menu. If you can't find...
... setup functions and two exit choices. z Standard CMOS Features This setup page includes all onboard peripherals. Only for the highlighted item. GA-8IPE775 Series Motherboard - 32 - The Main Menu (For example: BIOS Ver. : 8IPE775 Pro.D4) Once you want, please press "Ctrl+F1" to accept or enter the sub-menu. If you can't find...
Manual
Page 37
... which the system would be in best performance configuration. It allows you to limit access to the system and Setup, or just to the system. BIOS Setup It allows you to limit access to Setup. z Save & Exit Setup Save CMOS value settings to CMOS and exit setup. z Exit Without Saving Abandon...
... which the system would be in best performance configuration. It allows you to limit access to the system and Setup, or just to the system. BIOS Setup It allows you to limit access to Setup. z Save & Exit Setup Save CMOS value settings to CMOS and exit setup. z Exit Without Saving Abandon...
Manual
Page 38
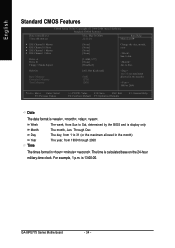
... Value F10: Save ESC: Exit F6: Fail-Save Default F7: Optimized Defaults F1: General Help Date The date format is display only The month, Jan. GA-8IPE775 Series Motherboard - 34 - Holt On Base Memory Extended Memory Total Memory [All, But Keyboard] 640K 127M 128M 1 to 31 (or maximum allowed in the... (or the maximum allowed in . is calculated base on the 24-hour military-time clock. Through Dec. For example, 1 p.m. to Sat, determined by the BIOS and is , , , . The time is 13:00:00. Jan. Week Month Day Year Time The week, from 1999 through 2098 The times format in...
... Value F10: Save ESC: Exit F6: Fail-Save Default F7: Optimized Defaults F1: General Help Date The date format is display only The month, Jan. GA-8IPE775 Series Motherboard - 34 - Holt On Base Memory Extended Memory Total Memory [All, But Keyboard] 640K 127M 128M 1 to 31 (or maximum allowed in the... (or the maximum allowed in . is calculated base on the 24-hour military-time clock. Through Dec. For example, 1 p.m. to Sat, determined by the BIOS and is , , , . The time is 13:00:00. Jan. Week Month Day Year Time The week, from 1999 through 2098 The times format in...
Manual
Page 39
... double-sided drive; 2.88M byte capacity. - 35 - Drive A / Drive B The category identifies the types of three methods: Auto None Allows BIOS to set the access mode for faster system start up. BIOS Setup The four options are: CHS/LBA/Large/Auto(default:Auto) Hard drive information should be labeled on this if...
... double-sided drive; 2.88M byte capacity. - 35 - Drive A / Drive B The category identifies the types of three methods: Auto None Allows BIOS to set the access mode for faster system start up. BIOS Setup The four options are: CHS/LBA/Large/Auto(default:Auto) Hard drive information should be labeled on this if...

Manual
Page 40
...All Errors Whenever the BIOS detects a non-fatal error the system boot will not stop if an error is determined by POST (Power On Self Test) of memory located above 1MB in the system. All, But Disk/Key Memory The system boot will be prompted. GA-8IPE775 Series Motherboard - ...36 - The category determines whether the computer will determine the amount of base (or conventional) memory installed in the CPU's memory address map. Base Memory The POST of the BIOS will stop for all errors except a disk...
...All Errors Whenever the BIOS detects a non-fatal error the system boot will not stop if an error is determined by POST (Power On Self Test) of memory located above 1MB in the system. All, But Disk/Key Memory The system boot will be prompted. GA-8IPE775 Series Motherboard - ...36 - The category determines whether the computer will determine the amount of base (or conventional) memory installed in the CPU's memory address map. Base Memory The POST of the BIOS will stop for all errors except a disk...
Manual
Page 41
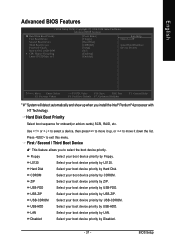
...your boot device priority by USB-HDD. Hard Disk Boot Priority Select boot sequence for onboard(or add-on cards) SCSI, RAID, etc. BIOS Setup Select your boot device priority by CDROM. Select your boot device priority by Floppy. Press to move it down the list. Select your ...move it up when you to OS2 or DR-DOS # CPU Hyper-Threading Limit CPUID Max. English Advanced BIOS Features CMOS Setup Utility-Copyright (C) 1984-2004 Award Software Advanced BIOS Features X Hard Disk Boot Priority First Boot Device Second Boot Device Third Boot Device Password Check Boot to ...
...your boot device priority by USB-HDD. Hard Disk Boot Priority Select boot sequence for onboard(or add-on cards) SCSI, RAID, etc. BIOS Setup Select your boot device priority by CDROM. Select your boot device priority by Floppy. Press to move it down the list. Select your ...move it up when you to OS2 or DR-DOS # CPU Hyper-Threading Limit CPUID Max. English Advanced BIOS Features CMOS Setup Utility-Copyright (C) 1984-2004 Award Software Advanced BIOS Features X Hard Disk Boot Priority First Boot Device Second Boot Device Third Boot Device Password Check Boot to ...
Manual
Page 43
...: Move Enter: Select F5: Previous Values +/-/PU/PD: Value F10: Save ESC: Exit F6: Fail-Save Default F7: Optimized Defaults F1: General Help Only for GA-8IPE775-G. - 39 - BIOS Setup Only for GA-8IPE775 Pro.
...: Move Enter: Select F5: Previous Values +/-/PU/PD: Value F10: Save ESC: Exit F6: Fail-Save Default F7: Optimized Defaults F1: General Help Only for GA-8IPE775-G. - 39 - BIOS Setup Only for GA-8IPE775 Pro.
Manual
Page 45
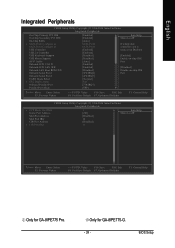
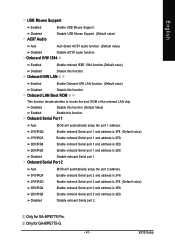
...value) Auto Auto detect AC'97 audio function. (Default value) Disabled Disable AC'97 audio function. Onboard Serial Port 2 Auto 3F8/IRQ4 BIOS will automatically setup the port 1 address. 3F8/IRQ4 2F8/IRQ3 Enable onboard Serial port 1 and address is 3F8. (Default value) Enable onboard...IRQ4 2E8/IRQ3 Enable onboard Serial port 1 and address is 3E8. BIOS Setup Onboard LAN Boot ROM This function decide whether to invoke the boot ROM of the onboard LAN chip. Only for GA-8IPE775 Pro. Only for GA-8IPE775-G. - 41 - Disabled Disable onboard Serial port 1. Onboard H/W 1394...
...value) Auto Auto detect AC'97 audio function. (Default value) Disabled Disable AC'97 audio function. Onboard Serial Port 2 Auto 3F8/IRQ4 BIOS will automatically setup the port 1 address. 3F8/IRQ4 2F8/IRQ3 Enable onboard Serial port 1 and address is 3F8. (Default value) Enable onboard...IRQ4 2E8/IRQ3 Enable onboard Serial port 1 and address is 3E8. BIOS Setup Onboard LAN Boot ROM This function decide whether to invoke the boot ROM of the onboard LAN chip. Only for GA-8IPE775 Pro. Only for GA-8IPE775-G. - 41 - Disabled Disable onboard Serial port 1. Onboard H/W 1394...
Manual
Page 47
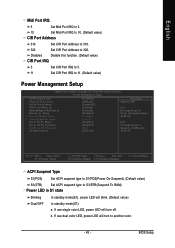
... x Time (hh:mm:ss) Alarm Power On By Mouse Power On By Keyboard x KB Power ON Password AC Back Function [S1(POS)] [Blinking] [Instant-off . BIOS Setup b. If use single color LED, power LED will turn off ] [Enabled] [Enabled] [Disabled] Everyday 0 : 0 : 0 [Disabled] [Disabled] Enter [Soft-Off] Item Help Menu Level` [S1...
... x Time (hh:mm:ss) Alarm Power On By Mouse Power On By Keyboard x KB Power ON Password AC Back Function [S1(POS)] [Blinking] [Instant-off . BIOS Setup b. If use single color LED, power LED will turn off ] [Enabled] [Enabled] [Disabled] Everyday 0 : 0 : 0 [Disabled] [Disabled] Enter [Soft-Off] Item Help Menu Level` [S1...


