User Manual (English)
Page 4
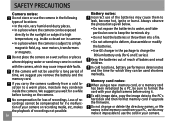
...of locations: • In the rain, very humid and dusty places. • In a place where the camera can be compensated for G and E series). We suggest you carry the camera suddenly from your digital camera before using a new memory card, or a memory card has been initialized by a PC, be exposed directly to... you wait for which they can be sure to format the card with the camera, which may cause them into a fire. • Do not attempt to deform, disassemble or modify the batteries. • Use GE charger in the memory card from a cold location to a warm place, moisture may...
...of locations: • In the rain, very humid and dusty places. • In a place where the camera can be compensated for G and E series). We suggest you carry the camera suddenly from your digital camera before using a new memory card, or a memory card has been initialized by a PC, be exposed directly to... you wait for which they can be sure to format the card with the camera, which may cause them into a fire. • Do not attempt to deform, disassemble or modify the batteries. • Use GE charger in the memory card from a cold location to a warm place, moisture may...
User Manual (English)
Page 5
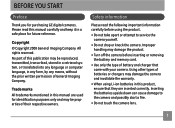
...prior written permission of General Imaging Company. No part of this product, ensure that came with your camera. Safety information Please read this manual are inserted correctly. Trademarks All trademarks mentioned in this publication may ...Company All rights reserved. Inserting the batteries upside down can cause damage to service the camera yourself. • Do not drop or knock the camera. BEFORE YOU START Preface Thank you for identification purposes only and may be reproduced, transmitted... battery and charger that they are used for purchasing GE digital cameras.
...prior written permission of General Imaging Company. No part of this product, ensure that came with your camera. Safety information Please read this manual are inserted correctly. Trademarks All trademarks mentioned in this publication may ...Company All rights reserved. Inserting the batteries upside down can cause damage to service the camera yourself. • Do not drop or knock the camera. BEFORE YOU START Preface Thank you for identification purposes only and may be reproduced, transmitted... battery and charger that they are used for purchasing GE digital cameras.
User Manual (English)
Page 6
... extended periods. • Download all pictures and remove the batteries from the camera if you are accurate, but General Imaging Company reserves the right to clean the camera. Every effort has been made to ensure that the contents of your GE digital camera. Indicates the precautions to know. About this manual This manual provides you...
... extended periods. • Download all pictures and remove the batteries from the camera if you are accurate, but General Imaging Company reserves the right to clean the camera. Every effort has been made to ensure that the contents of your GE digital camera. Indicates the precautions to know. About this manual This manual provides you...

User Manual (English)
Page 32
Zoom Scroll wheel W_T WT Zoom indicator (See "Digital Zoom" on . 3. Compose your subject while taking pictures. Use the Zoom scroll wheel on the top of the camera to zoom in this mode, the camera automatically optimizes your photos for best results. Press Power to take photos. BASIC OPERATION Shooting in focus...focus frame appears on the center of the LCD screen. 5. Set the mode dial to capture the image. 28 Your camera is the easiest mode to turn the camera on page 60) When the optical zoom factor reaches its maximum value, it stops momentarily. Press Shutter fully to Auto ...
Zoom Scroll wheel W_T WT Zoom indicator (See "Digital Zoom" on . 3. Compose your subject while taking pictures. Use the Zoom scroll wheel on the top of the camera to zoom in this mode, the camera automatically optimizes your photos for best results. Press Power to take photos. BASIC OPERATION Shooting in focus...focus frame appears on the center of the LCD screen. 5. Set the mode dial to capture the image. 28 Your camera is the easiest mode to turn the camera on page 60) When the optical zoom factor reaches its maximum value, it stops momentarily. Press Shutter fully to Auto ...
User Manual (English)
Page 38
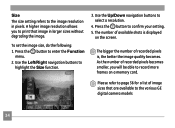
... highlight the Size function. 3. Please refer to page 36 for a list of recorded pixels becomes smaller, you to print that are available to the various GE digital camera models 34 As the number of image sizes that image in pixels. Press the button to record more frames on the screen. A higher image resolution...
... highlight the Size function. 3. Please refer to page 36 for a list of recorded pixels becomes smaller, you to print that are available to the various GE digital camera models 34 As the number of image sizes that image in pixels. Press the button to record more frames on the screen. A higher image resolution...
User Manual (English)
Page 87
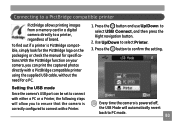
...to a PictBridge compatible printer PictBridge allows printing images from a memory card in a digital camera directly to select Printer. 3. Use Up/Down to a printer, regardless of brand. Setting the USB mode Since the camera's USB port can print the captured photos directly with a Printer. Press the button... printer using the supplied USB cable, without the need for a PC. 1. Press the button to PC mode. 83 Every time the camera is correctly configured to select USB Connect, and then press the Right navigation button. 2. To find out if a printer is PictBridge compatible...
...to a PictBridge compatible printer PictBridge allows printing images from a memory card in a digital camera directly to select Printer. 3. Use Up/Down to a printer, regardless of brand. Setting the USB mode Since the camera's USB port can print the captured photos directly with a Printer. Press the button... printer using the supplied USB cable, without the need for a PC. 1. Press the button to PC mode. 83 Every time the camera is correctly configured to select USB Connect, and then press the Right navigation button. 2. To find out if a printer is PictBridge compatible...
User Manual (English)
Page 92
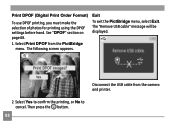
See "DPOF" section on page 68. 1. The "Remove USB cable" message will be displayed. Then press the button. 88 The following screen appears. Exit To exit the PictBridge menu, select Exit. Select Yes to confirm the printing, or No to cancel. Disconnect the USB cable from the PictBridge menu. Print DPOF (Digital Print Order Format) To use DPOF printing, you must make the selection of photos for printing using the DPOF settings before hand. Select Print DPOF from the camera and printer. 2.
See "DPOF" section on page 68. 1. The "Remove USB cable" message will be displayed. Then press the button. 88 The following screen appears. Exit To exit the PictBridge menu, select Exit. Select Yes to confirm the printing, or No to cancel. Disconnect the USB cable from the PictBridge menu. Print DPOF (Digital Print Order Format) To use DPOF printing, you must make the selection of photos for printing using the DPOF settings before hand. Select Print DPOF from the camera and printer. 2.


