
Owner's Manual
Page 2
..., copied, transmitted, disseminated, downloaded, or stored in this manual is strictly prohibited. Garmin®, AutoLocate®, Personal Navigator®, MapSource®, TracBack®, and BlueChart® are registered trademarks and PanTrack™ and Foretrex™ are trademarks of this manual onto a hard drive or other Garmin products. or its products and to make changes in...
..., copied, transmitted, disseminated, downloaded, or stored in this manual is strictly prohibited. Garmin®, AutoLocate®, Personal Navigator®, MapSource®, TracBack®, and BlueChart® are registered trademarks and PanTrack™ and Foretrex™ are trademarks of this manual onto a hard drive or other Garmin products. or its products and to make changes in...
Owner's Manual
Page 3
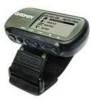
... Table of Contents. The Appendix includes additional information about the Foretrex 201. To get the most from your new Foretrex 201, read through the Quick Start Guide first, then this Owner's Manual to describe each Main Page, Option Menu, and feature in... that your Garmin dealer immediately. Introduction About This Manual Standard Package Contents: 1 Foretrex 201 Unit 1 Strap Extension 1 Wrist Strap 1 Owner's Manual 1 Quick Start Guide 1 Cradle for AC and PC connection 1 AC Charging Cable 1 PC Interface Cable Check to familiarize you for choosing the Garmin Foretrex 201.
... Table of Contents. The Appendix includes additional information about the Foretrex 201. To get the most from your new Foretrex 201, read through the Quick Start Guide first, then this Owner's Manual to describe each Main Page, Option Menu, and feature in... that your Garmin dealer immediately. Introduction About This Manual Standard Package Contents: 1 Foretrex 201 Unit 1 Strap Extension 1 Wrist Strap 1 Owner's Manual 1 Quick Start Guide 1 Cradle for AC and PC connection 1 AC Charging Cable 1 PC Interface Cable Check to familiarize you for choosing the Garmin Foretrex 201.
Owner's Manual
Page 5
...to the left. Product Registration Help us better support you the best possible support from Garmin. Also, be sure to our Web site (www.Garmin.com). Be sure to keep your Foretrex 201 handy and connect to record your purchase ensures you by our new product registration system ...strap Serial Number: NOTE: If you have previously registered a Garmin product purchase, we invite you a limited license to use the software embedded in a safe place or attach a photocopy inside the manual. Software License Agreement BY USING THE Foretrex 201, YOU AGREE TO BE BOUND BY THE TERMS AND CONDITIONS...
...to the left. Product Registration Help us better support you the best possible support from Garmin. Also, be sure to our Web site (www.Garmin.com). Be sure to keep your Foretrex 201 handy and connect to record your purchase ensures you by our new product registration system ...strap Serial Number: NOTE: If you have previously registered a Garmin product purchase, we invite you a limited license to use the software embedded in a safe place or attach a photocopy inside the manual. Software License Agreement BY USING THE Foretrex 201, YOU AGREE TO BE BOUND BY THE TERMS AND CONDITIONS...
Owner's Manual
Page 10
...then air dry. It is constructed of water for external power. Prolonged submersion can withstand immer- Clean the unit using this guide, contact Garmin Product Support in warm or hot water. viii The wrist strap should be certain to wipe and air dry the unit before reuse or... dry. User information, such as permanent damage may damage plastic components. Introduction Care Information Cleaning the Unit and Wrist Strap The Foretrex 201 is always a good practice to back up important user data by manually recording it or downloading it to a PC (transferring it to MapSource).
...then air dry. It is constructed of water for external power. Prolonged submersion can withstand immer- Clean the unit using this guide, contact Garmin Product Support in warm or hot water. viii The wrist strap should be certain to wipe and air dry the unit before reuse or... dry. User information, such as permanent damage may damage plastic components. Introduction Care Information Cleaning the Unit and Wrist Strap The Foretrex 201 is always a good practice to back up important user data by manually recording it or downloading it to a PC (transferring it to MapSource).
Owner's Manual
Page 11
... 1 Using the Buttons 2 Using the Wrist Strap 3 Charging the Battery 5 Connecting the Foretrex 201 to your Computer 5 Turning on the Foretrex 201 6 Using the Main Pages 7 Switching Between the Main Pages.... 7 Main Pages 8-53 Satellite Page 8 Using the Satellite ...21 Editing a new Waypoint 21 Review Waypoint Page 24 Introduction Table of Contents ix viii Storing the Foretrex 201 viii Immersing the Unit in Water.......... Introduction i-x About This Manual i Compliance, License, and Warranty Information ii FCC Compliance ii Software License Agreement iii Product Registration ...
... 1 Using the Buttons 2 Using the Wrist Strap 3 Charging the Battery 5 Connecting the Foretrex 201 to your Computer 5 Turning on the Foretrex 201 6 Using the Main Pages 7 Switching Between the Main Pages.... 7 Main Pages 8-53 Satellite Page 8 Using the Satellite ...21 Editing a new Waypoint 21 Review Waypoint Page 24 Introduction Table of Contents ix viii Storing the Foretrex 201 viii Immersing the Unit in Water.......... Introduction i-x About This Manual i Compliance, License, and Warranty Information ii FCC Compliance ii Software License Agreement iii Product Registration ...
Owner's Manual
Page 23
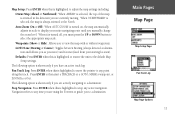
... turned on, the map automatically adjusts its scale to display your starting location). Waypoints (Show or Hide): Allows you manually change the zoom level. Navigation refers to any time you are using the Foretrex to guide you are currently moving. When 'NORTHWARD' is selected, the map is always oriented to the default...
... turned on, the map automatically adjusts its scale to display your starting location). Waypoints (Show or Hide): Allows you manually change the zoom level. Navigation refers to any time you are using the Foretrex to guide you are currently moving. When 'NORTHWARD' is selected, the map is always oriented to the default...
Owner's Manual
Page 28
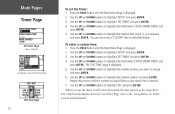
Use the UP and DOWN buttons to count down from is displayed. 2. To enter a custom time: 1. Repeat this manual. For complete information about the 'Set Timer' Page, refer to the "Setup Menu: Set Timer" section in the steps above. When you want to highlight ...
Use the UP and DOWN buttons to count down from is displayed. 2. To enter a custom time: 1. Repeat this manual. For complete information about the 'Set Timer' Page, refer to the "Setup Menu: Set Timer" section in the steps above. When you want to highlight ...
Owner's Manual
Page 47
... route displayed in the Routes List. With the desired Route displayed, use the UP and DOWN buttons to "Editing a Route" on page 38 of this manual for information about editing the elements of all Routes. 3. The Navigation Page automatically opens. Simply follow the route. You can edit the route, delete the...' and press ENTER to display the Route Page. To select a route from the List All page: 1. Using the Route Page Each route saved in your Foretrex 201 is displayed in its own individual Route Page.
... route displayed in the Routes List. With the desired Route displayed, use the UP and DOWN buttons to "Editing a Route" on page 38 of this manual for information about editing the elements of all Routes. 3. The Navigation Page automatically opens. Simply follow the route. You can edit the route, delete the...' and press ENTER to display the Route Page. To select a route from the List All page: 1. Using the Route Page Each route saved in your Foretrex 201 is displayed in its own individual Route Page.
Owner's Manual
Page 57
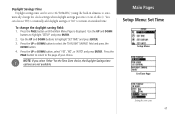
... options are not available. Press the PAGE button until the Main Menu Page is displayed. Daylight Savings Time Daylight savings time can choose 'YES' to manually add daylight savings or 'NO' to remain on standard time.
... options are not available. Press the PAGE button until the Main Menu Page is displayed. Daylight Savings Time Daylight savings time can choose 'YES' to manually add daylight savings or 'NO' to remain on standard time.
Owner's Manual
Page 59
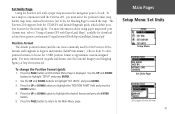
.... 3. Press the PAGE button until the Main Menu Page is latitude and longitude in the Set Heading Page) to "Using a Garmin GPS with the Foretrex 201, you must select the position format, map datum, map units, and north reference (set in degrees and minutes (hdddº ...location for the Foretrex 201 is displayed. Main Pages Setup Menu: Set Units Setup Menu Set Units Page Selecting the Position Format 47 For more information on grids and datum, visit the National Imagery and Mapping Agency at http://www.garmin.com/manuals/UsingaGarmtinGPSwithPaperLandMaps_Manual.pdf. To...
.... 3. Press the PAGE button until the Main Menu Page is latitude and longitude in the Set Heading Page) to "Using a Garmin GPS with the Foretrex 201, you must select the position format, map datum, map units, and north reference (set in degrees and minutes (hdddº ...location for the Foretrex 201 is displayed. Main Pages Setup Menu: Set Units Setup Menu Set Units Page Selecting the Position Format 47 For more information on grids and datum, visit the National Imagery and Mapping Agency at http://www.garmin.com/manuals/UsingaGarmtinGPSwithPaperLandMaps_Manual.pdf. To...

Owner's Manual
Page 62
... onto paper, not all of the grid lines drawn on the map point exactly to display angle units in the Set Heading Page. If necessary, manually correct for the magnetic variation. Maps are using one degree. Main Pages Setup Menu: Set Heading Setup Menu Set Heading Page Selecting the angle setting...
... onto paper, not all of the grid lines drawn on the map point exactly to display angle units in the Set Heading Page. If necessary, manually correct for the magnetic variation. Maps are using one degree. Main Pages Setup Menu: Set Heading Setup Menu Set Heading Page Selecting the angle setting...
Owner's Manual
Page 63
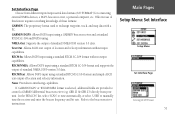
... format and simple ASCII text output of standard NMEA 0183 version 3.0 data. None: Provides no interfacing capabilities. If 'GARMIN DGPS' or 'RTCM/NMEA' format is selected, additional fields are provided to manually tune the receiver and enter the beacon frequency and bit rate. In the 'BEACON' list, select 'SCAN' to tune automatically...
... format and simple ASCII text output of standard NMEA 0183 version 3.0 data. None: Provides no interfacing capabilities. If 'GARMIN DGPS' or 'RTCM/NMEA' format is selected, additional fields are provided to manually tune the receiver and enter the beacon frequency and bit rate. In the 'BEACON' list, select 'SCAN' to tune automatically...

Owner's Manual
Page 66
... 1 meter for 30 minutes) 1.71" H x 3.26" W x .69" D Approx. 2.75 ounces (78g) -4° to 140° F (-20° to 60° C) (operating) Performance Receiver: Acquisition time: Update Rate: Position Accuracy: Velocity Accuracy: Dynamics: Antenna: Differential-ready, 12 parallel channel Approx. 15 seconds (warm start) Approx. 45 seconds (cold start...fications subject to change without notice. 1Extensive use of screen backlighting may reduce battery life. Standard Accessories Optional Accessories Owner's Manual Bicycle Mounting Kit Quick Start Guide Selected MapSource Products
... 1 meter for 30 minutes) 1.71" H x 3.26" W x .69" D Approx. 2.75 ounces (78g) -4° to 140° F (-20° to 60° C) (operating) Performance Receiver: Acquisition time: Update Rate: Position Accuracy: Velocity Accuracy: Dynamics: Antenna: Differential-ready, 12 parallel channel Approx. 15 seconds (warm start) Approx. 45 seconds (cold start...fications subject to change without notice. 1Extensive use of screen backlighting may reduce battery life. Standard Accessories Optional Accessories Owner's Manual Bicycle Mounting Kit Quick Start Guide Selected MapSource Products
Quick Start Guide
Page 1
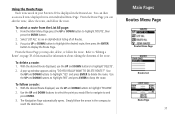
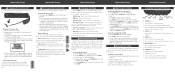
...the Mark Waypoint Page. Press the DOWN button to follow the arrow in the unit manually by -Step Instructions to time. To mark your location as a waypoint, move ... PAGE button until it a name, and then saving the point. As you travel in GPS Antenna Waterproof Case LCD Display (with Backlight) Power Button (Backlight) Up/Down Buttons Step... highlight 'DELETE' and press ENTER to access the Map Page Options. Foretrex 201 Features Foretrex 201 Features Foretrex 201 Features Foretrex 201 Features Foretrex™ 201 Using the Map Page The Map Page shows where you are (the ...
...the Mark Waypoint Page. Press the DOWN button to follow the arrow in the unit manually by -Step Instructions to time. To mark your location as a waypoint, move ... PAGE button until it a name, and then saving the point. As you travel in GPS Antenna Waterproof Case LCD Display (with Backlight) Power Button (Backlight) Up/Down Buttons Step... highlight 'DELETE' and press ENTER to access the Map Page Options. Foretrex 201 Features Foretrex 201 Features Foretrex 201 Features Foretrex 201 Features Foretrex™ 201 Using the Map Page The Map Page shows where you are (the ...
Quick Start Guide
Page 2
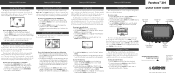
... Page - Provides notice of time. 5. Navigation Page - Provides access to display the Menu Page. 2. When the Foretrex has established a GPS fix, U.S. Press the PAGE button to features and settings. Press and release the ENTER button to fit comfortably... battery before the unit must charge the internal battery. Refer to the Owner's Manual for the backlight timeout. Foretrex 201 Setup Foretrex 201 Setup Foretrex 201 Setup Foretrex 201 Setup Foretrex 201 Buttons 1 Charging the Foretrex 201 The Foretrex operates on a built-in to the connector labeled "5.0V DC" on the ...
... Page - Provides notice of time. 5. Navigation Page - Provides access to display the Menu Page. 2. When the Foretrex has established a GPS fix, U.S. Press the PAGE button to features and settings. Press and release the ENTER button to fit comfortably... battery before the unit must charge the internal battery. Refer to the Owner's Manual for the backlight timeout. Foretrex 201 Setup Foretrex 201 Setup Foretrex 201 Setup Foretrex 201 Setup Foretrex 201 Buttons 1 Charging the Foretrex 201 The Foretrex operates on a built-in to the connector labeled "5.0V DC" on the ...


