Owner's Manual
Page 3
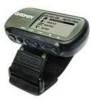
... functions, and step-by-step instructions for AC and PC connection 1 AC Charging Cable 1 PC Interface Cable Check to select and change items, its features. The section for choosing the Garmin Foretrex 201. This manual is to familiarize you for each Page provides an overview that your Garmin dealer immediately. The Main Pages section provides information on the unit. If any parts are missing, contact your...
... functions, and step-by-step instructions for AC and PC connection 1 AC Charging Cable 1 PC Interface Cable Check to select and change items, its features. The section for choosing the Garmin Foretrex 201. This manual is to familiarize you for each Page provides an overview that your Garmin dealer immediately. The Main Pages section provides information on the unit. If any parts are missing, contact your...
Owner's Manual
Page 7
.... 44/1794.519944 Fax. 44/1794.519222 The Garmin Foretrex 201 has no user-serviceable parts. To obtain warranty service, contact your warranty and may result in any way will not replace missing components from the original retailer is required. Should you ever encounter a problem with the tracking number clearly written on the outside of purchase for warranty verification. Tel...
.... 44/1794.519944 Fax. 44/1794.519222 The Garmin Foretrex 201 has no user-serviceable parts. To obtain warranty service, contact your warranty and may result in any way will not replace missing components from the original retailer is required. Should you ever encounter a problem with the tracking number clearly written on the outside of purchase for warranty verification. Tel...
Owner's Manual
Page 10
....1020 or Garmin Europe at 44/1794.519944. Introduction Care Information Cleaning the Unit and Wrist Strap The Foretrex 201 is constructed of a car) as permanent damage may result. To resolve problems that may occur (such as in Water The Foretrex 201 is always a good practice to back up important user data by manually recording it or downloading it to a PC (transferring it to...
....1020 or Garmin Europe at 44/1794.519944. Introduction Care Information Cleaning the Unit and Wrist Strap The Foretrex 201 is constructed of a car) as permanent damage may result. To resolve problems that may occur (such as in Water The Foretrex 201 is always a good practice to back up important user data by manually recording it or downloading it to a PC (transferring it to...
Owner's Manual
Page 11
... Started 1 Foretrex 201 Overview 1 Using the Buttons 2 Using the Wrist Strap 3 Charging the Battery 5 Connecting the Foretrex 201 to your Computer 5 Turning on the Foretrex 201 6 Using the Main Pages 7 Switching Between the Main Pages.... 7 Main Pages 8-53 Satellite Page 8 Using the Satellite Page 8 Using the Satellite Page Options........ 8 Adjusting the Backlighting and Contrast 9 Map Page 10 Using the Map Page 10 Map Page Options 10 Navigation Page 13 Using the Navigation Page 13 Navigation Page Options 13 Trip Computer 14 Using...
... Started 1 Foretrex 201 Overview 1 Using the Buttons 2 Using the Wrist Strap 3 Charging the Battery 5 Connecting the Foretrex 201 to your Computer 5 Turning on the Foretrex 201 6 Using the Main Pages 7 Switching Between the Main Pages.... 7 Main Pages 8-53 Satellite Page 8 Using the Satellite Page 8 Using the Satellite Page Options........ 8 Adjusting the Backlighting and Contrast 9 Map Page 10 Using the Map Page 10 Map Page Options 10 Navigation Page 13 Using the Navigation Page 13 Navigation Page Options 13 Trip Computer 14 Using...
Owner's Manual
Page 12
...31 Track Page Options 33 Routes Menu Page 34 Routes Menu Page 34 Creating a Route 34 Using the Route Page 35 Deleting All Routes 36 Route Setup 37 Route Setup Options 37 Editing a Route 38 Navigating a Route 40 Using the Setup Menu 41 Setup Menu: Set Timer 41 Set Timer Page 41 Setting the Timer 42 Expired and Interval Timer Tones43 Setup Menu: Set Time 44 Set Time Page 44 Time Zone 44 Daylight Savings Time 45 Setup Menu: Set Display 46 Set Display Page 46 Light Timeout 46 Contrast 46 Setup Menu: Set Units 47 Set Units Page 47 Position Format 47 Map Datums 48 Distance...
...31 Track Page Options 33 Routes Menu Page 34 Routes Menu Page 34 Creating a Route 34 Using the Route Page 35 Deleting All Routes 36 Route Setup 37 Route Setup Options 37 Editing a Route 38 Navigating a Route 40 Using the Setup Menu 41 Setup Menu: Set Timer 41 Set Timer Page 41 Setting the Timer 42 Expired and Interval Timer Tones43 Setup Menu: Set Time 44 Set Time Page 44 Time Zone 44 Daylight Savings Time 45 Setup Menu: Set Display 46 Set Display Page 46 Light Timeout 46 Contrast 46 Setup Menu: Set Units 47 Set Units Page 47 Position Format 47 Map Datums 48 Distance...

Owner's Manual
Page 14
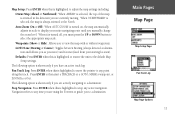
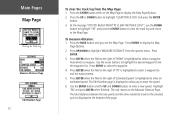
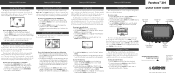
Overview Getting Started 2 foretrex 201 Using the Buttons goto page enter mark POWER GOTO PAGE ENTER/ MARK DOWN UP The POWER button: • Press and hold to turn unit on and off • Press and release to turn display backlight on and off • Press and hold PAGE, then simultaneously press POWER to reset the unit The GOTO button: • Press to initiate a GOTO (navigate to a specific destination/waypoint) The PAGE button: • Press...
Overview Getting Started 2 foretrex 201 Using the Buttons goto page enter mark POWER GOTO PAGE ENTER/ MARK DOWN UP The POWER button: • Press and hold to turn unit on and off • Press and release to turn display backlight on and off • Press and hold PAGE, then simultaneously press POWER to reset the unit The GOTO button: • Press to initiate a GOTO (navigate to a specific destination/waypoint) The PAGE button: • Press...

Owner's Manual
Page 18
... the Foretrex 201. Leave the Foretrex 201 with a clear view of the screen stops flashing. NOTE: If you have not used your Foretrex 201 unit, or you use . Turn to page 5 to learn how to the right. Overview Getting Started Turning on the Satellite Page as well as an image that is acquiring satellites. Estimated GPS accuracy displays underneath the GPS signal bar. Press and hold the POWER button until the Satellite Page is displayed, then...
... the Foretrex 201. Leave the Foretrex 201 with a clear view of the screen stops flashing. NOTE: If you have not used your Foretrex 201 unit, or you use . Turn to page 5 to learn how to the right. Overview Getting Started Turning on the Satellite Page as well as an image that is acquiring satellites. Estimated GPS accuracy displays underneath the GPS signal bar. Press and hold the POWER button until the Satellite Page is displayed, then...

Owner's Manual
Page 20
... unit is set the orientation of each satellite. Refer to display the Advanced Sky View page, you last used your Foretrex 201 unit, or have not used your location and you the satellites being acquired (in animation), satellite signal strength, and the Foretrex 201 unit's estimated location accuracy. The bars on the Satellite Page no longer reads "Acquiring...", the Foretrex 201 has found your Foretrex 201 in more than one month, allow time for information about the Light...
... unit is set the orientation of each satellite. Refer to display the Advanced Sky View page, you last used your Foretrex 201 unit, or have not used your location and you the satellites being acquired (in animation), satellite signal strength, and the Foretrex 201 unit's estimated location accuracy. The bars on the Satellite Page no longer reads "Acquiring...", the Foretrex 201 has found your Foretrex 201 in more than one month, allow time for information about the Light...
Owner's Manual
Page 23
... move the pointer to any point along the track. GOTO Line (Bearing or Course): Toggles between Bearing (always directed at destination and follows you as you are actively navigating to a destination: Stop Navigation: Press ENTER when this is always oriented to the North. Defaults: Press ENTER when this is turned off, you manually change the zoom level. When it is highlighted to restore the unit to the default Map Setup settings. The following...
... move the pointer to any point along the track. GOTO Line (Bearing or Course): Toggles between Bearing (always directed at destination and follows you as you are actively navigating to a destination: Stop Navigation: Press ENTER when this is always oriented to the North. Defaults: Press ENTER when this is turned off, you manually change the zoom level. When it is highlighted to restore the unit to the default Map Setup settings. The following...
Owner's Manual
Page 24
... the measurement. 5. The unit returns to enter a new speed. Press ENTER. 3. Use the ENTER button and the UP and DOWN buttons to the Measure Distance Page. The total distance between the two points and the time needed to travel to the selected point is displayed at the bottom of 'FROM' is displayed to select a waypoint from the waypoint list. At the message "DO YOU REALLY WANT TO CLEAR THE TRACK LOG?", use the DOWN button to...
... the measurement. 5. The unit returns to enter a new speed. Press ENTER. 3. Use the ENTER button and the UP and DOWN buttons to the Measure Distance Page. The total distance between the two points and the time needed to travel to the selected point is displayed at the bottom of 'FROM' is displayed to select a waypoint from the waypoint list. At the message "DO YOU REALLY WANT TO CLEAR THE TRACK LOG?", use the DOWN button to...
Owner's Manual
Page 33
... you have marked a waypoint using the same methods. To mark a waypoint: You may also edit elements of two ways: • Press and hold the ENTER/MARK button. The Mark Waypoint Page displays. Marking a Waypoint The Mark Waypoint Page, shown to the left, allows you to define a location as a Waypoint, works well for geocaching. You can enter a new name, select a new symbol, and enter a new elevation and latitude/longitude. Select 'Create New'. Entering a known location, then saving it as a waypoint and then change elements...
... you have marked a waypoint using the same methods. To mark a waypoint: You may also edit elements of two ways: • Press and hold the ENTER/MARK button. The Mark Waypoint Page displays. Marking a Waypoint The Mark Waypoint Page, shown to the left, allows you to define a location as a Waypoint, works well for geocaching. You can enter a new name, select a new symbol, and enter a new elevation and latitude/longitude. Select 'Create New'. Entering a known location, then saving it as a waypoint and then change elements...

Owner's Manual
Page 43
... unit stop recording tracks when the log is selected, enter a value in the next field. Wrap When Full: Select 'YES' to have made . Main Pages Tracks Menu Page Tracks Menu Page Saving a track Editing the track name 31 If 'DISTANCE' or 'TIME' is selected, the unit will create many points to save and use in the future, save the track log before the "Track Memory Used" reaches 100%. Record Interval: You can set the track recording interval to make the track. To avoid overwriting tracks, save...
... unit stop recording tracks when the log is selected, enter a value in the next field. Wrap When Full: Select 'YES' to have made . Main Pages Tracks Menu Page Tracks Menu Page Saving a track Editing the track name 31 If 'DISTANCE' or 'TIME' is selected, the unit will create many points to save and use in the future, save the track log before the "Track Memory Used" reaches 100%. Record Interval: You can set the track recording interval to make the track. To avoid overwriting tracks, save...

Owner's Manual
Page 52
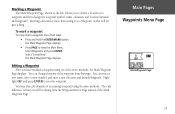
Features Routes Menu Page Route Page Inserting a waypoint Navigating a Route A Route can also watch your progress on the route. The Map Page displays your destination. To follow the arrow in the compass. With the desired Route displayed, use the UP and DOWN buttons to open the Options window. You can be navigated using the pointer in the compass to open the Options window. Use the UP and DOWN buttons to highlight 'STOP NAVIGATION' and press ENTER. • From...
Features Routes Menu Page Route Page Inserting a waypoint Navigating a Route A Route can also watch your progress on the route. The Map Page displays your destination. To follow the arrow in the compass. With the desired Route displayed, use the UP and DOWN buttons to open the Options window. You can be navigated using the pointer in the compass to open the Options window. Use the UP and DOWN buttons to highlight 'STOP NAVIGATION' and press ENTER. • From...
Owner's Manual
Page 63
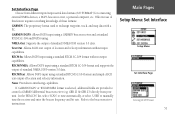
... DGPS tuning. Refer to exchange waypoint, track, and map data with a PC. If 'GARMIN DGPS' or 'RTCM/NMEA' format is selected, additional fields are provided to manually tune the receiver and enter the beacon frequency and bit rate. In the 'BEACON' list, select 'SCAN' to tune automatically, or select 'USER' to control a GARMIN differential beacon receiver (e.g. Main Pages Setup Menu: Set Interface Setup Menu Set Interface Page Selecting the I /O FORMAT') for connecting external NMEA devices, a DGPS beacon receiver, a personal...
... DGPS tuning. Refer to exchange waypoint, track, and map data with a PC. If 'GARMIN DGPS' or 'RTCM/NMEA' format is selected, additional fields are provided to manually tune the receiver and enter the beacon frequency and bit rate. In the 'BEACON' list, select 'SCAN' to tune automatically, or select 'USER' to control a GARMIN differential beacon receiver (e.g. Main Pages Setup Menu: Set Interface Setup Menu Set Interface Page Selecting the I /O FORMAT') for connecting external NMEA devices, a DGPS beacon receiver, a personal...
Owner's Manual
Page 64
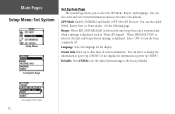
... GPS Signals". You can select to turn the beep completely off. Set System Page Selecting the I/O Format 52 Select 'OFF' to display the information at power up ('SHOW') or not display the information at power up to the factory defaults. You can also enter and view Owner Information and reset the unit to select the GPS Mode, Beeper, and Language. Beeper: When 'KEY AND MESSAGE' is selected the unit beeps then a key is pressed and when a message is displayed. Language: Select the language for the display...
... GPS Signals". You can select to turn the beep completely off. Set System Page Selecting the I/O Format 52 Select 'OFF' to display the information at power up ('SHOW') or not display the information at power up to the factory defaults. You can also enter and view Owner Information and reset the unit to select the GPS Mode, Beeper, and Language. Beeper: When 'KEY AND MESSAGE' is selected the unit beeps then a key is pressed and when a message is displayed. Language: Select the language for the display...

Owner's Manual
Page 65
... satellite near your contact information in the GPS satellite signals and the WAAS satellite numbers (beginning at start up . Owner Info Enter up to sudden turns or change of owner information, such as your location and then receives data for dealers to show the features and functions of the Foretrex 201 to potential customers inside a closed building where satellite reception is more responsive to three lines of speed/acceleration. To learn more accurate position fi...
... satellite near your contact information in the GPS satellite signals and the WAAS satellite numbers (beginning at start up . Owner Info Enter up to sudden turns or change of owner information, such as your location and then receives data for dealers to show the features and functions of the Foretrex 201 to potential customers inside a closed building where satellite reception is more responsive to three lines of speed/acceleration. To learn more accurate position fi...
Owner's Manual
Page 69
... Satellites 6 AC Charging Cable 5 Auto Zoom On/Off 11 B Backlighting 9 Battery 5 Life 5, 54 Battery Save 53 Beacon Receiver Setup 51 Bearing 55 Buttons 2 DOWN 2 ENTER 2 GOTO 2, 25 PAGE 2 POWER 2 UP 2 C Cable 5 Charge the Unit 5 Cleaning viii Clear Track Log 10, 12 Waypoint 20, 36 Computer PC 5, 51 Trip 1, 7, 14, 55 Contrast 9, 46 Count Down 16, 42 Count Up 43 Course 55 Cradle 5, i Create Route 34 Waypoint 19, 21, 34 D Data Fields 13, 14, 55, 56 Daylight Savings Time 45 Defaults Map...
... Satellites 6 AC Charging Cable 5 Auto Zoom On/Off 11 B Backlighting 9 Battery 5 Life 5, 54 Battery Save 53 Beacon Receiver Setup 51 Bearing 55 Buttons 2 DOWN 2 ENTER 2 GOTO 2, 25 PAGE 2 POWER 2 UP 2 C Cable 5 Charge the Unit 5 Cleaning viii Clear Track Log 10, 12 Waypoint 20, 36 Computer PC 5, 51 Trip 1, 7, 14, 55 Contrast 9, 46 Count Down 16, 42 Count Up 43 Course 55 Cradle 5, i Create Route 34 Waypoint 19, 21, 34 D Data Fields 13, 14, 55, 56 Daylight Savings Time 45 Defaults Map...
Owner's Manual
Page 70
... Reset Trip 14 Stop Navigation 13 Nearest Waypoint 20 Next Destination 55 Next Distance 55 Next ETA 56 Next ETE 56 NMEA 51 North Reference 50 O Odometer 56 Off Course 56 Orient Map 11 Overall Speed 56 Overview 1 P Pan Track Log 11, 30 PC 5, 51 PC Interface Cable 5 Position Format 48, 55 Power 2, 5, 6, 54 Project a Waypoint 26 R Recharge 5 Record Tracks Interval 31 Reset Max Speed 14 Reset Trip 14 Review Waypoint Page 24 Route 34, 35, 37, 38, 39 36 Editing...
... Reset Trip 14 Stop Navigation 13 Nearest Waypoint 20 Next Destination 55 Next Distance 55 Next ETA 56 Next ETE 56 NMEA 51 North Reference 50 O Odometer 56 Off Course 56 Orient Map 11 Overall Speed 56 Overview 1 P Pan Track Log 11, 30 PC 5, 51 PC Interface Cable 5 Position Format 48, 55 Power 2, 5, 6, 54 Project a Waypoint 26 R Recharge 5 Record Tracks Interval 31 Reset Max Speed 14 Reset Trip 14 Review Waypoint Page 24 Route 34, 35, 37, 38, 39 36 Editing...
Quick Start Guide
Page 1
... the ENTER button when 'STOP' is displayed along the bottom of waypoints to lead you to your current location as a waypoint and assigned a three-digit number. 2. Press the GOTO button to access the Main Menu. 2. At which time, travel in the direction the Pointer directs until it a name, and then saving the point. Using Routes Route navigation allows you to create a sequence of the page. To stop and start the timer, press the ENTER button when 'START' is displayed...
... the ENTER button when 'STOP' is displayed along the bottom of waypoints to lead you to your current location as a waypoint and assigned a three-digit number. 2. Press the GOTO button to access the Main Menu. 2. At which time, travel in the direction the Pointer directs until it a name, and then saving the point. Using Routes Route navigation allows you to create a sequence of the page. To stop and start the timer, press the ENTER button when 'START' is displayed...
Quick Start Guide
Page 2
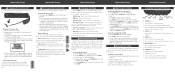
... Satellite Page, Map Page, Navigation Page, Trip Computer, Timer Page (if enabled), and the Menu Page. cally after 30 seconds or whatever time you must be charged again. Refer to select the highlighted length of time. 5. Connect the AC Charging Cable in the upper left-hand corner provide at least two (2) hours. Foretrex 201 Icons Two icons in to turn the backlight On. 2. The time is displayed, and the satellite dish icon in battery. Central Time...
... Satellite Page, Map Page, Navigation Page, Trip Computer, Timer Page (if enabled), and the Menu Page. cally after 30 seconds or whatever time you must be charged again. Refer to select the highlighted length of time. 5. Connect the AC Charging Cable in the upper left-hand corner provide at least two (2) hours. Foretrex 201 Icons Two icons in to turn the backlight On. 2. The time is displayed, and the satellite dish icon in battery. Central Time...


