Owner's Manual
Page 11
...the Buttons 2 Using the Wrist Strap 3 Charging the Battery 5 Connecting the Foretrex 201 to your Computer 5 Turning on the Foretrex 201 6 Using the Main Pages 7 Switching Between the Main Pages.... 7 Main...Review Waypoint Page 24 Introduction Table of Contents ix Introduction i-x About This Manual i Compliance, License, and Warranty Information ii FCC Compliance ii Software License Agreement iii Product Registration iii Limited Warranty iv Safety Information vi Warnings and Precautions vi Care Information viii Cleaning the Unit and Wrist Strap.. viii Storing the Foretrex 201...
...the Buttons 2 Using the Wrist Strap 3 Charging the Battery 5 Connecting the Foretrex 201 to your Computer 5 Turning on the Foretrex 201 6 Using the Main Pages 7 Switching Between the Main Pages.... 7 Main...Review Waypoint Page 24 Introduction Table of Contents ix Introduction i-x About This Manual i Compliance, License, and Warranty Information ii FCC Compliance ii Software License Agreement iii Product Registration iii Limited Warranty iv Safety Information vi Warnings and Precautions vi Care Information viii Cleaning the Unit and Wrist Strap.. viii Storing the Foretrex 201...

Owner's Manual
Page 31
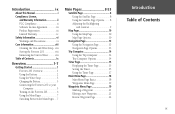
... the ENTER button to highlight 'WAYPOINTS', then press the ENTER button. 2. From the Main Menu Page press the UP or DOWN button to display the Review Waypoint Page. To edit elements of all Waypoints. 3. The Mark Waypoint page is entered as the symbol, name, or location), refer to access the Waypoints...
... the ENTER button to highlight 'WAYPOINTS', then press the ENTER button. 2. From the Main Menu Page press the UP or DOWN button to display the Review Waypoint Page. To edit elements of all Waypoints. 3. The Mark Waypoint page is entered as the symbol, name, or location), refer to access the Waypoints...
Owner's Manual
Page 32
... ALL' and press the ENTER button. 3. Press the UP or DOWN button to highlight the correct choice and press the ENTER button to display the Review Waypoint Page. Press the UP or DOWN button to select the waypoint and press the ENTER button to complete the action.
... ALL' and press the ENTER button. 3. Press the UP or DOWN button to highlight the correct choice and press the ENTER button to display the Review Waypoint Page. Press the UP or DOWN button to select the waypoint and press the ENTER button to complete the action.
Owner's Manual
Page 33
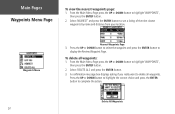
..., the Mark Waypoint Page displays. To mark a waypoint: You may also edit elements of an existing waypoint using on of the waypoint from the Waypoint Review Page instead of two ways: • Press and hold the ENTER/MARK button. You may mark a waypoint one of the Mark Waypoint Page.
..., the Mark Waypoint Page displays. To mark a waypoint: You may also edit elements of an existing waypoint using on of the waypoint from the Waypoint Review Page instead of two ways: • Press and hold the ENTER/MARK button. You may mark a waypoint one of the Mark Waypoint Page.
Owner's Manual
Page 36
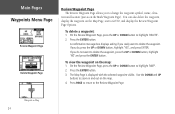
...and UP buttons to change the waypoint symbol, name, eleva- Press the ENTER button. 3. Main Pages Waypoints Menu Page Review Waypoint Page Delete Waypoint Page Review Waypoint Page The Review Waypoint Page allows you to zoom in and out on the map. 4. A confirmation message box displays asking ...if you really want to the Review Waypoint Page Waypoint on the Map Page, start a GOTO, and display the Review Waypoint Page Options. On the Review Waypoint Page, press the UP or DOWN button to delete the waypoint. Press PAGE to ...
...and UP buttons to change the waypoint symbol, name, eleva- Press the ENTER button. 3. Main Pages Waypoints Menu Page Review Waypoint Page Delete Waypoint Page Review Waypoint Page The Review Waypoint Page allows you to zoom in and out on the map. 4. A confirmation message box displays asking ...if you really want to the Review Waypoint Page Waypoint on the Map Page, start a GOTO, and display the Review Waypoint Page Options. On the Review Waypoint Page, press the UP or DOWN button to delete the waypoint. Press PAGE to ...

Owner's Manual
Page 37
...pop-up Options list. 3. Press the ENTER button to highlight 'OPTIONS'. 2. To start a GOTO using the GOTO Button: 1. On the Review Waypoint Page, press the UP or DOWN button to the waypoint destination. The Navigation Page is displayed to navigate you to highlight 'GOTO'. 2.... Main Pages Waypoints Menu Page Review Waypoint Page Review Waypoint Page Options 25 Press the ENTER button to reach your destination. Simply move in the direction the arrow is highlighted. ...
...pop-up Options list. 3. Press the ENTER button to highlight 'OPTIONS'. 2. To start a GOTO using the GOTO Button: 1. On the Review Waypoint Page, press the UP or DOWN button to the waypoint destination. The Navigation Page is displayed to navigate you to highlight 'GOTO'. 2.... Main Pages Waypoints Menu Page Review Waypoint Page Review Waypoint Page Options 25 Press the ENTER button to reach your destination. Simply move in the direction the arrow is highlighted. ...
Owner's Manual
Page 38
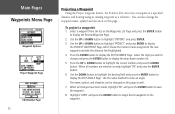
... name, symbol and elevation on this page. When all changes have been made, highlight 'OK' and press the ENTER button to display the Review Waypoint Page. 2. Use the DOWN button to highlight the bearing field and press the ENTER button to display the drop-down number list...the waypoint. Main Pages Waypoints Menu Page Waypoint Options Project Waypoint Page Edit Number Page 26 Projecting a Waypoint Using the Project waypoint feature, the Foretrex 201 can create a waypoint at a specified distance and bearing using an existing waypoint as well. 7. You can also change and press ...
... name, symbol and elevation on this page. When all changes have been made, highlight 'OK' and press the ENTER button to display the Review Waypoint Page. 2. Use the DOWN button to highlight the bearing field and press the ENTER button to display the drop-down number list...the waypoint. Main Pages Waypoints Menu Page Waypoint Options Project Waypoint Page Edit Number Page 26 Projecting a Waypoint Using the Project waypoint feature, the Foretrex 201 can create a waypoint at a specified distance and bearing using an existing waypoint as well. 7. You can also change and press ...

Owner's Manual
Page 39
... Information This feature provides you with state and local game laws which may vary from the list and press the ENTER button to display the Review Waypoint Page. 2. Press the Enter button when 'Waypoints' is your responsibility to location. It is highlighted to display the Waypoint List Page...
... Information This feature provides you with state and local game laws which may vary from the list and press the ENTER button to display the Review Waypoint Page. 2. Press the Enter button when 'Waypoints' is your responsibility to location. It is highlighted to display the Waypoint List Page...
Owner's Manual
Page 40
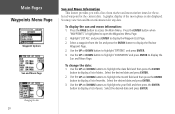
... display a list of dates. Use the UP and DOWN buttons to highlight the month field and then press the ENTER button to display the Review Waypoint Page. 2. Main Pages Waypoints Menu Page Waypoint Options Sun and Moon Page Sun and Moon Information This feature provides you with a list of months...
... display a list of dates. Use the UP and DOWN buttons to highlight the month field and then press the ENTER button to display the Review Waypoint Page. 2. Main Pages Waypoints Menu Page Waypoint Options Sun and Moon Page Sun and Moon Information This feature provides you with a list of months...
Owner's Manual
Page 70
... 5, 51 PC Interface Cable 5 Position Format 48, 55 Power 2, 5, 6, 54 Project a Waypoint 26 R Recharge 5 Record Tracks Interval 31 Reset Max Speed 14 Reset Trip 14 Review Waypoint Page 24 Route 34, 35, 37, 38, 39 36 Editing 38 Leg Transition 37 Routes 40 Setup 37 RTCM 51 S Satellite Page 8, 9 Save Location...
... 5, 51 PC Interface Cable 5 Position Format 48, 55 Power 2, 5, 6, 54 Project a Waypoint 26 R Recharge 5 Record Tracks Interval 31 Reset Max Speed 14 Reset Trip 14 Review Waypoint Page 24 Route 34, 35, 37, 38, 39 36 Editing 38 Leg Transition 37 Routes 40 Setup 37 RTCM 51 S Satellite Page 8, 9 Save Location...
