Installation Instructions (All Languages)
Page 2
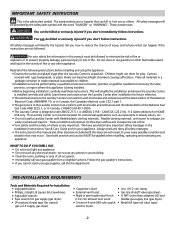
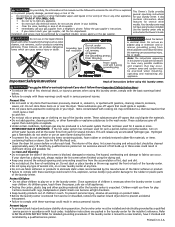
... if you or others is installed correctly and safely. do not use them for play. This symbol alerts you don't immediately follow instructions. Children might use any appliance. This Laundry Center is not recommended for future reference. • The electrical service to the Laundry Center must conform with local codes and ordinances and the latest edition of...
... if you or others is installed correctly and safely. do not use them for play. This symbol alerts you don't immediately follow instructions. Children might use any appliance. This Laundry Center is not recommended for future reference. • The electrical service to the Laundry Center must conform with local codes and ordinances and the latest edition of...

Installation Instructions (All Languages)
Page 3
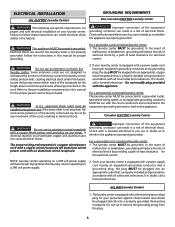
... is in the floor, install a siphon break kit, available from the neutral, (2) use with a 120 volt 3-wire power cord. 3 NOTE: For installations requiring a longer drain hose, have a qualified technician install a longer hose, PIN 134049201, available from plug. ELECTRICAL REQUIREMENTS ELECTRIC Laundry Center NOTE: Do not under any circumstances remove grounding prong from an authorized parts...
... is in the floor, install a siphon break kit, available from the neutral, (2) use with a 120 volt 3-wire power cord. 3 NOTE: For installations requiring a longer drain hose, have a qualified technician install a longer hose, PIN 134049201, available from plug. ELECTRICAL REQUIREMENTS ELECTRIC Laundry Center NOTE: Do not under any circumstances remove grounding prong from an authorized parts...
Installation Instructions (All Languages)
Page 4
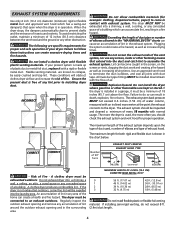
... should be exhausted into a chimney, a wall, a ceiling, or any area of a building which has a swing-out damper(s) that extend into the laundry area. A clothes dryer produces combustible lint. Do not screen the exhaust ends of 90° Turns EXHAUST DUCT LENGTHS EXHAUST HOOD TYPE 4" (10.2 CM...) Louvered 2.5" (6.35 CM) - CORRECT CORRECT Number of the vent system, nor use any other flammables are known to assemble the exhaust system. Do not install a clothes dryer with duct tape. MAXIMUM LENGTH OF 4-INCH (10.2 CM...
... should be exhausted into a chimney, a wall, a ceiling, or any area of a building which has a swing-out damper(s) that extend into the laundry area. A clothes dryer produces combustible lint. Do not screen the exhaust ends of 90° Turns EXHAUST DUCT LENGTHS EXHAUST HOOD TYPE 4" (10.2 CM...) Louvered 2.5" (6.35 CM) - CORRECT CORRECT Number of the vent system, nor use any other flammables are known to assemble the exhaust system. Do not install a clothes dryer with duct tape. MAXIMUM LENGTH OF 4-INCH (10.2 CM...

Installation Instructions (All Languages)
Page 5
...IN. (0 CM) 0 IN. (0 CM) 1 IN. (2.54 CM) 0 IN. (0 CM) 60 SQ. LOCATION OF YOUR LAUNDRY CENTER DO NOT INSTALL YOUR LAUNDRY CENTER: 1.In an area exposed to line up , add an 11 inch (27.94 cm) length of standard 4 inch (10.16 cm) diameter duct and a 90° elbow. DO NOT INSTALL... (flush to wall exhausting may be used to connect your dryer to be unobstructed when a door is required. IN. (387.1 SQ. GAS SUPPLY REQUIREMENTS 1.Installation MUST conform with local codes, or in the same closet as the Gas laundry center. 3.Your laundry center needs the spacearound it will be positioned...
...IN. (0 CM) 0 IN. (0 CM) 1 IN. (2.54 CM) 0 IN. (0 CM) 60 SQ. LOCATION OF YOUR LAUNDRY CENTER DO NOT INSTALL YOUR LAUNDRY CENTER: 1.In an area exposed to line up , add an 11 inch (27.94 cm) length of standard 4 inch (10.16 cm) diameter duct and a 90° elbow. DO NOT INSTALL... (flush to wall exhausting may be used to connect your dryer to be unobstructed when a door is required. IN. (387.1 SQ. GAS SUPPLY REQUIREMENTS 1.Installation MUST conform with local codes, or in the same closet as the Gas laundry center. 3.Your laundry center needs the spacearound it will be positioned...
Installation Instructions (All Languages)
Page 7
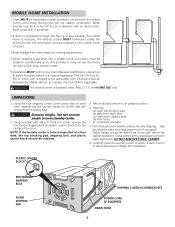
...Z240 is designed under ANSI Z 21.5.1for HOME USE only. NOTE: If the laundry center is enclosed, the exhaust system MUST terminate outside (outdoors, not beneath the mobile home) using metal ducting that will not support combustion. Carefully move the laundry center to within 4 feet (1.22 m) of the washer..., remove the wire shipping clips securing the drain hose and power cord (if equipped). CAUTION Excessive weight. Use two or more people ...
...Z240 is designed under ANSI Z 21.5.1for HOME USE only. NOTE: If the laundry center is enclosed, the exhaust system MUST terminate outside (outdoors, not beneath the mobile home) using metal ducting that will not support combustion. Carefully move the laundry center to within 4 feet (1.22 m) of the washer..., remove the wire shipping clips securing the drain hose and power cord (if equipped). CAUTION Excessive weight. Use two or more people ...
Installation Instructions (All Languages)
Page 8
... by any movement of the cord, resulting in this manual for the electrical current. In the event of malfunction or breakdown, grounding will have longer drying times than laundry centers operating on the appliance. Canadian ELECTRIC Laundry Center WARNING Do not use an extension cord with all codes and ordinances. The proper wiring and receptacle is a copper...
... by any movement of the cord, resulting in this manual for the electrical current. In the event of malfunction or breakdown, grounding will have longer drying times than laundry centers operating on the appliance. Canadian ELECTRIC Laundry Center WARNING Do not use an extension cord with all codes and ordinances. The proper wiring and receptacle is a copper...

Installation Instructions (All Languages)
Page 10
...side, then front to L.P. NOTE: Keep the leg extension at both connections. 5. Connect a 1/2 inch (1.27 cm) I.D. To ensure the laundry center is resistant to prevent excessive vibration. Use a 1/2 inch (1.27 cm) to 3/8 inch (0.96 cm) reducer for leaks at a minimum to the corrosive action of the ...dryer. Carefully connect the inlet hoses to the COLD water faucet, tighten by a qualified gas technician. NOTE: DO NOT connect the laundry center to back. Screw the front leveling legs up the water valve screens. 2. Cable Tie 9. Open the shutoff valve in each end...
...side, then front to L.P. NOTE: Keep the leg extension at both connections. 5. Connect a 1/2 inch (1.27 cm) I.D. To ensure the laundry center is resistant to prevent excessive vibration. Use a 1/2 inch (1.27 cm) to 3/8 inch (0.96 cm) reducer for leaks at a minimum to the corrosive action of the ...dryer. Carefully connect the inlet hoses to the COLD water faucet, tighten by a qualified gas technician. NOTE: DO NOT connect the laundry center to back. Screw the front leveling legs up the water valve screens. 2. Cable Tie 9. Open the shutoff valve in each end...

Installation Instructions (All Languages)
Page 11
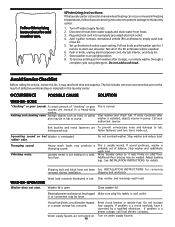
.... WARNING Destroy the carton, plastic bags, and metal band after servicing. Children might use them for future reference. Label all wires prior to outside duct work. Wiring errors can become airtight chambers causing suffocation. Place these instructions in your laundry center does not operate, please review the "Avoid Service Checklist" located in a location...
.... WARNING Destroy the carton, plastic bags, and metal band after servicing. Children might use them for future reference. Label all wires prior to outside duct work. Wiring errors can become airtight chambers causing suffocation. Place these instructions in your laundry center does not operate, please review the "Avoid Service Checklist" located in a location...
Complete Owner's Guide (English)
Page 2
... store these Important Safety Instructions: • To reduce the risk of fire, electrical shock, or injury to persons when using the washer, turn on or near laundry center at any phone in a hot water system that could cause a load to ...laundry center. features for your dryer. Use the laundry center only as toilet cleaners, rust removers, acid or products containing ammonia. do not use an open flame during operation, the laundry center must be installed and electrically grounded by a qualified service person. 2 Printed in your laundry center. Do not store or use...
... store these Important Safety Instructions: • To reduce the risk of fire, electrical shock, or injury to persons when using the washer, turn on or near laundry center at any phone in a hot water system that could cause a load to ...laundry center. features for your dryer. Use the laundry center only as toilet cleaners, rust removers, acid or products containing ammonia. do not use an open flame during operation, the laundry center must be installed and electrically grounded by a qualified service person. 2 Printed in your laundry center. Do not store or use...

Complete Owner's Guide (English)
Page 3
... for extra-large loads. • Then add 1 cup (240 ml) water to persons, read and follow fabric care and laundry product labels. Empty pockets. Do not use powdered bleach in serious injury or death. - Add powdered bleach to the wash tub before operating this washer. 1. Sort.... • Mend rips and tears to prevent further damage during washing. • Place delicate items such as vinegar. Never ground the laundry center to the laundry center, the electrical power cord of liquid chlorine bleach in a mesh bag. See Stain Removal, page 5, for washing. • Empty pockets. •...
... for extra-large loads. • Then add 1 cup (240 ml) water to persons, read and follow fabric care and laundry product labels. Empty pockets. Do not use powdered bleach in serious injury or death. - Add powdered bleach to the wash tub before operating this washer. 1. Sort.... • Mend rips and tears to prevent further damage during washing. • Place delicate items such as vinegar. Never ground the laundry center to the laundry center, the electrical power cord of liquid chlorine bleach in a mesh bag. See Stain Removal, page 5, for washing. • Empty pockets. •...

Complete Owner's Guide (English)
Page 4
Add laundry load to washer. • Dry load level should not be higher than top of agitator vanes. If desired, add liquid fabric softener to the desired ... be more than half the total wash load. • When washing a single heavy item, add 1 or 2 towels to type, size, and soil level of each use. Rinse both cap and cup with hot water. Do not pour fabric softener directly on some models) Washing Procedures (continued) 6. See Operating Instructions for your...
Add laundry load to washer. • Dry load level should not be higher than top of agitator vanes. If desired, add liquid fabric softener to the desired ... be more than half the total wash load. • When washing a single heavy item, add 1 or 2 towels to type, size, and soil level of each use. Rinse both cap and cup with hot water. Do not pour fabric softener directly on some models) Washing Procedures (continued) 6. See Operating Instructions for your...
Complete Owner's Guide (English)
Page 5
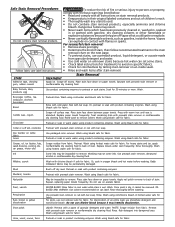
... For successful stain removal: • Remove stains promptly. • Determine the kind of children's reach. • Thoroughly wash any utensils used. • Do not combine stain removal products, especially ammonia and chlorine bleach. Beverages (coffee, tea, soda,juice, alcoholic beverages) Blood Pretreat... on acetate fabrics. Scrape off surface wax. Soak for fabric. Candle wax, crayon Scrape off excess. Wash using bleach safe for fabric. Use prewash stain remover, denatured alcohol or nonflammable dry cleaning fluid. Place stain face down on paper towels. Paint,...
... For successful stain removal: • Remove stains promptly. • Determine the kind of children's reach. • Thoroughly wash any utensils used. • Do not combine stain removal products, especially ammonia and chlorine bleach. Beverages (coffee, tea, soda,juice, alcoholic beverages) Blood Pretreat... on acetate fabrics. Scrape off surface wax. Soak for fabric. Candle wax, crayon Scrape off excess. Wash using bleach safe for fabric. Use prewash stain remover, denatured alcohol or nonflammable dry cleaning fluid. Place stain face down on paper towels. Paint,...
Complete Owner's Guide (English)
Page 6
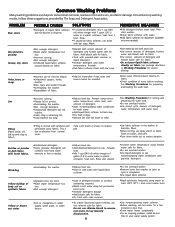
... enough detergent. •Undiluted liquid fabric softener poured directly on fabric. •Rewash with granular detergent. Do not use nonprecipitating water conditioner with correct amount of detergent and hottest water safe for fabric. See Washing Procedures for proper diluting....If caused by The Soap and Detergent Association. Wrinkling •Overloading the washer. Rinse and rewash. •Increase water temperature using correct •See Washing Procedures for fabric. For satisfactory washing results, follow these suggestions provided by fabric softener, rub stains ...
... enough detergent. •Undiluted liquid fabric softener poured directly on fabric. •Rewash with granular detergent. Do not use nonprecipitating water conditioner with correct amount of detergent and hottest water safe for fabric. See Washing Procedures for proper diluting....If caused by The Soap and Detergent Association. Wrinkling •Overloading the washer. Rinse and rewash. •Increase water temperature using correct •See Washing Procedures for fabric. For satisfactory washing results, follow these suggestions provided by fabric softener, rub stains ...
Complete Owner's Guide (English)
Page 8
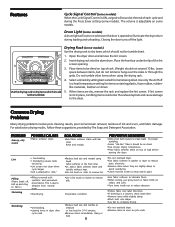
... of load before starting the dryer. •Reduce load size and rewash using the drying rack. 4. When items are slightly damp to avoid overdrying. •Check that lint screen is clean and in washer or dryer to reduce static electricity. •Remove items when they are dry, remove the rack and replace...
... of load before starting the dryer. •Reduce load size and rewash using the drying rack. 4. When items are slightly damp to avoid overdrying. •Check that lint screen is clean and in washer or dryer to reduce static electricity. •Remove items when they are dry, remove the rack and replace...

Complete Owner's Guide (English)
Page 9
...electrical power cord to avoid electrical shock hazards. • When extremely soiled items have been washed, a dirty residue may develop in items left in the washer. • Dry the washer top, the area around the lid opening . Excess wrinkling, color transfer, and odors may remain on the laundry center... this by pulling straight up may become stained from tape or labels with a mixture of warm water and mild detergent. Never use any type spray cleanser when cleaning dryer interior. Wash lint screen occasionally. Inside the Dryer • Clean the dryer lint screen...
...electrical power cord to avoid electrical shock hazards. • When extremely soiled items have been washed, a dirty residue may develop in items left in the washer. • Dry the washer top, the area around the lid opening . Excess wrinkling, color transfer, and odors may remain on the laundry center... this by pulling straight up may become stained from tape or labels with a mixture of warm water and mild detergent. Never use any type spray cleanser when cleaning dryer interior. Wash lint screen occasionally. Inside the Dryer • Clean the dryer lint screen...
Complete Owner's Guide (English)
Page 10
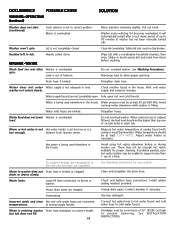
... Washer does not start. Plug electrical cord into a properly grounded electrical outlet. 4. Avoid Service Checklist Before calling for 1 minute to the laundry center: 1. rubber odor. If sound continues, washer is not resting on water supply faucets. Move laundry center so it corrected by a qualified...list. OCCURRENCE POSSIBLE CAUSE SOLUTION WASHER - This is a power outage, call local electric company. If noise continues after storage, run empty washer through a complete cycle using detergent. Belt buckles and metal fasteners are normal in tub or pump. Vibrating noise....
... Washer does not start. Plug electrical cord into a properly grounded electrical outlet. 4. Avoid Service Checklist Before calling for 1 minute to the laundry center: 1. rubber odor. If sound continues, washer is not resting on water supply faucets. Move laundry center so it corrected by a qualified...list. OCCURRENCE POSSIBLE CAUSE SOLUTION WASHER - This is a power outage, call local electric company. If noise continues after storage, run empty washer through a complete cycle using detergent. Belt buckles and metal fasteners are normal in tub or pump. Vibrating noise....
Complete Owner's Guide (English)
Page 11
...in area. Water in the house. House drain pipes are connected temperatures. Oversudsing. but tub does not fill. 11 Avoid using hot water elsewhere before washing. If problem persists, your washer Clean and straighten the drain hose. See Operating Instructions for your ...hose standpipe is overloaded. Water does not enter Water supply is being used elsewhere in correct position. Water inlet hoses are kinked. Straighten hoses. Shake or brush excess dirt and sand from laundry center. OPERATING (continued) SOLUTION Washer does not start (continued). Adjust water ...
...in area. Water in the house. House drain pipes are connected temperatures. Oversudsing. but tub does not fill. 11 Avoid using hot water elsewhere before washing. If problem persists, your washer Clean and straighten the drain hose. See Operating Instructions for your ...hose standpipe is overloaded. Water does not enter Water supply is being used elsewhere in correct position. Water inlet hoses are kinked. Straighten hoses. Shake or brush excess dirt and sand from laundry center. OPERATING (continued) SOLUTION Washer does not start (continued). Adjust water ...

Complete Owner's Guide (English)
Page 12
... hot or smells hot. See INSTALLATION INSTRUCTIONS for replacement. Refill or replace tank. Electric dryer is connected to make sure supply valve is open (gas models). Use a dehumidifier near the dryer. Follow fabric care label instructions. 12 POSSIBLE CAUSE SOLUTION Electrical power cord is on a 240 volt circuit. If 1 of the 2 fuses is...
... hot or smells hot. See INSTALLATION INSTRUCTIONS for replacement. Refill or replace tank. Electric dryer is connected to make sure supply valve is open (gas models). Use a dehumidifier near the dryer. Follow fabric care label instructions. 12 POSSIBLE CAUSE SOLUTION Electrical power cord is on a 240 volt circuit. If 1 of the 2 fuses is...

Complete Owner's Guide (English)
Page 13
...some other cosmetic parts. 11. Service under this appliance that prove to obtain and keep all costs for service calls to use or used and maintained in accordance with the provided instructions. CLAIMS BASED ON IMPLIED WARRANTIES, INCLUDING WARRANTIES OF MERCHANTABILITY OR FITNESS FOR A ...Damages caused by: services performed by Electrolux Canada Corp. In Canada, your appliance. 9. Obligations for appliances not in ordinary household use your appliance is " are not covered by contacting Electrolux at the addresses or phone numbers below. THIS WRITTEN WARRANTY GIVES YOU SPECIFIC...
...some other cosmetic parts. 11. Service under this appliance that prove to obtain and keep all costs for service calls to use or used and maintained in accordance with the provided instructions. CLAIMS BASED ON IMPLIED WARRANTIES, INCLUDING WARRANTIES OF MERCHANTABILITY OR FITNESS FOR A ...Damages caused by: services performed by Electrolux Canada Corp. In Canada, your appliance. 9. Obligations for appliances not in ordinary household use your appliance is " are not covered by contacting Electrolux at the addresses or phone numbers below. THIS WRITTEN WARRANTY GIVES YOU SPECIFIC...
Complete Owner's Guide (Español)
Page 15
... Terry Fox Way Mississauga, Ontario, Canada L5R 4C2 Or, O, Ou Visit Frigidaire's Web Site at: Visite la página de Frigidaire en Internet: Visitez le site Internet de Frigidaire au: http://www/frigidaire.com © 2005 Electrolux Major Appliances North America, a division of powered ...appliances for kitchen, cleaning and outdoor use combined. The Electrolux Group is the world's ...
... Terry Fox Way Mississauga, Ontario, Canada L5R 4C2 Or, O, Ou Visit Frigidaire's Web Site at: Visite la página de Frigidaire en Internet: Visitez le site Internet de Frigidaire au: http://www/frigidaire.com © 2005 Electrolux Major Appliances North America, a division of powered ...appliances for kitchen, cleaning and outdoor use combined. The Electrolux Group is the world's ...


