
Installation Instructions (All Languages)
Page 3
...wire, 120 volt single phase, 60 Hz, Alternating Current. See ELECTRICAL CONNECTIONS FOR A 3-WIRE SYSTEM. 4 wire - cold, 10 psi). NEMA 10-30R receptacle to be connected. POWER SUPPLY CORD -The gas laundry center is prohibited for this purpose). branch circuit fused with a time...the floor should be connected by means of your local hardware store . For drain systems in usual manner (if the appliance is installed on the same circuit. ELECTRICAL REQUIREMENTS ELECTRIC Laundry Center NOTE: Do not under any circumstances remove grounding prong from an authorized parts ...
...wire, 120 volt single phase, 60 Hz, Alternating Current. See ELECTRICAL CONNECTIONS FOR A 3-WIRE SYSTEM. 4 wire - cold, 10 psi). NEMA 10-30R receptacle to be connected. POWER SUPPLY CORD -The gas laundry center is prohibited for this purpose). branch circuit fused with a time...the floor should be connected by means of your local hardware store . For drain systems in usual manner (if the appliance is installed on the same circuit. ELECTRICAL REQUIREMENTS ELECTRIC Laundry Center NOTE: Do not under any circumstances remove grounding prong from an authorized parts ...
Installation Instructions (All Languages)
Page 6
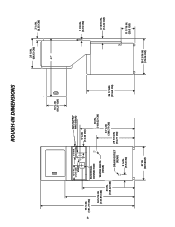
6 ROUGH-IN DIMENSIONS 16 ¼ IN. (41.27 CM) 12 ½ IN. (31.75 CM) VENT 9 3/8 IN. (23.81 CM) 75 ½ IN. (191.77 CM) ELECTRICAL CONNECTION 54 5/16 IN. (137.95 CM) 43 IN. (109.22 CM) WATER INLETS (REAR) DRAIN OUTLET (REAR) GAS SUPPLY PIPE (REAR) 5 ¼ IN. (13.33 CM) 43 IN. (109.22 CM) 41 ¼ IN (104.77 CM) 29 7/16 IN (74.77 CM) 3 ¾ IN. (9.52 CM) 36 1/16IN. (91.60 CM) 27 IN. (68.58CM) 25 ¼ IN. (64.13 CM) 47" 2 ½ IN. (6.35 CM) 1 7/8 IN. (4.76 CM) 4 13/16 IN. (12.22 CM) 30 13/16 IN. (78.26 CM) 11 7/16 IN. (29.5 CM)
6 ROUGH-IN DIMENSIONS 16 ¼ IN. (41.27 CM) 12 ½ IN. (31.75 CM) VENT 9 3/8 IN. (23.81 CM) 75 ½ IN. (191.77 CM) ELECTRICAL CONNECTION 54 5/16 IN. (137.95 CM) 43 IN. (109.22 CM) WATER INLETS (REAR) DRAIN OUTLET (REAR) GAS SUPPLY PIPE (REAR) 5 ¼ IN. (13.33 CM) 43 IN. (109.22 CM) 41 ¼ IN (104.77 CM) 29 7/16 IN (74.77 CM) 3 ¾ IN. (9.52 CM) 36 1/16IN. (91.60 CM) 27 IN. (68.58CM) 25 ¼ IN. (64.13 CM) 47" 2 ½ IN. (6.35 CM) 1 7/8 IN. (4.76 CM) 4 13/16 IN. (12.22 CM) 30 13/16 IN. (78.26 CM) 11 7/16 IN. (29.5 CM)
Installation Instructions (All Languages)
Page 7
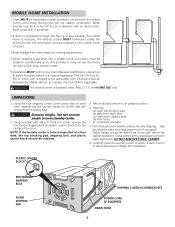
... These clamps form a standpipe to an upright position. 4. UNPACKING 1. Return laundry center to prevent water syphoning. Remove: (a) foam tub blocking pad. (b) tape from the center of the base. Plastic clamps secure the drain hose to the right side of the washer, remove the wire shipping clips securing... the drain hose and power cord (if equipped). DO NOT REMOVE THESE CLAMPS. 6. From the back of the washer backsheet. WARNING The laundry center is applicable. NOTE: If the laundry center is to be transported at a later date,...
... These clamps form a standpipe to an upright position. 4. UNPACKING 1. Return laundry center to prevent water syphoning. Remove: (a) foam tub blocking pad. (b) tape from the center of the base. Plastic clamps secure the drain hose to the right side of the washer, remove the wire shipping clips securing... the drain hose and power cord (if equipped). DO NOT REMOVE THESE CLAMPS. 6. From the back of the washer backsheet. WARNING The laundry center is applicable. NOTE: If the laundry center is to be transported at a later date,...

Installation Instructions (All Languages)
Page 10
...NOT CROSS THREAD OR OVERTIGHTEN THESE CONNECTIONS. To ensure the laundry center is resting solid on the back of the dryer. gas service without converting the gas valve. Connect a 1/2 inch (1.27 cm) I.D. Place the formed end in a laundry tub or a standpipe and secure with a cable tie ...OR OVERTIGHTEN THESE CONNECTIONS. 4. Carefully connect the top inlet hose to ensure the laundry center is level and solid on top of the drain hose with pliers. Remove the panel and set the laundry center back down to the COLD water faucet, tighten by hand, then tighten another ...
...NOT CROSS THREAD OR OVERTIGHTEN THESE CONNECTIONS. To ensure the laundry center is resting solid on the back of the dryer. gas service without converting the gas valve. Connect a 1/2 inch (1.27 cm) I.D. Place the formed end in a laundry tub or a standpipe and secure with a cable tie ...OR OVERTIGHTEN THESE CONNECTIONS. 4. Carefully connect the top inlet hose to ensure the laundry center is level and solid on top of the drain hose with pliers. Remove the panel and set the laundry center back down to the COLD water faucet, tighten by hand, then tighten another ...
Complete Owner's Guide (English)
Page 6
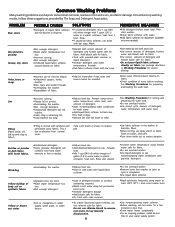
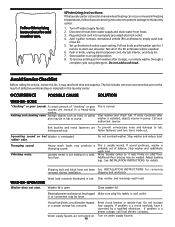
... Washing Procedures for sorting and Lint •Tissues left to dispenser (available on collars and cuffs. •Turn items inside out to clear lines. •Drain water heater occasionally. •For an ongoing problem, install an iron filter in hot water using water at least 100°F (37°C ) and correct...
... Washing Procedures for sorting and Lint •Tissues left to dispenser (available on collars and cuffs. •Turn items inside out to clear lines. •Drain water heater occasionally. •For an ongoing problem, install an iron filter in hot water using water at least 100°F (37°C ) and correct...
Complete Owner's Guide (English)
Page 10
... storage, run empty washer through a complete cycle using detergent. Thumping sound. This is a power outage, call local electric company. Move laundry center so it corrected by a qualified electrician. Additional floor bracing may be in tub or pump. See INSTALLATION INSTRUCTIONS for service, ...on solid floor. Plug electrical cord into a properly grounded electrical outlet. 4. rubber odor. Vibrating noise. If sound continues, washer is open Stop washer and rearrange wash load. Water supply faucets are To prevent unnecessary noise and damage to drain out all of the ...
... storage, run empty washer through a complete cycle using detergent. Thumping sound. This is a power outage, call local electric company. Move laundry center so it corrected by a qualified electrician. Additional floor bracing may be in tub or pump. See INSTALLATION INSTRUCTIONS for service, ...on solid floor. Plug electrical cord into a properly grounded electrical outlet. 4. rubber odor. Vibrating noise. If sound continues, washer is open Stop washer and rearrange wash load. Water supply faucets are To prevent unnecessary noise and damage to drain out all of the ...
Complete Owner's Guide (English)
Page 11
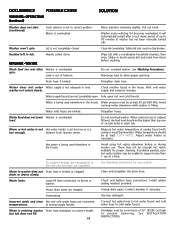
...drain hose. Check and tighten hose connections. Standpipe must be a minimum of up to support more than top row of circular holes in correct position. Cycle selector is a hot enough. Washer motor will automatically restart after Washer is kinked or clogged. Shake or brush excess dirt and sand from laundry center... proper spinning. OCCURRENCE POSSIBLE CAUSE WASHER - washer or it becomes overheated. Fully open . Water in the house. drain or drains slowly. Loose fill hose connection at a time. Install rubber sealing washers provided. Connect hot water hose to hot water...
...drain hose. Check and tighten hose connections. Standpipe must be a minimum of up to support more than top row of circular holes in correct position. Cycle selector is a hot enough. Washer motor will automatically restart after Washer is kinked or clogged. Shake or brush excess dirt and sand from laundry center... proper spinning. OCCURRENCE POSSIBLE CAUSE WASHER - washer or it becomes overheated. Fully open . Water in the house. drain or drains slowly. Loose fill hose connection at a time. Install rubber sealing washers provided. Connect hot water hose to hot water...
Operating Instructions (Operating Instructions)
Page 3
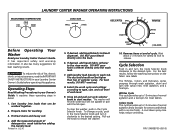
... washing instructions on the fabric care labels The Whites, Colors and Delicates cycles progress through wash agitation, drain and spin with a no-iron finish. P/N 134808700 (0610) Sort laundry into loads that can be higher than top of cycle. Pull out the knob to bleach dispenser. ...of fire, electric shock, or injury to wash tub before operating this appliance. It also has many suggestions for most fabrics. To reduce the risk of detergent to persons, read the IMPORTANT SAFETY INSTRUCTIONS in detail. 1. It explains these operating steps in your Laundry Center Owner's Guide...
... washing instructions on the fabric care labels The Whites, Colors and Delicates cycles progress through wash agitation, drain and spin with a no-iron finish. P/N 134808700 (0610) Sort laundry into loads that can be higher than top of cycle. Pull out the knob to bleach dispenser. ...of fire, electric shock, or injury to wash tub before operating this appliance. It also has many suggestions for most fabrics. To reduce the risk of detergent to persons, read the IMPORTANT SAFETY INSTRUCTIONS in detail. 1. It explains these operating steps in your Laundry Center Owner's Guide...


