
Installation Instructions (All Languages)
Page 3
...Laundry Center CIRCUIT - NOTE: For installations requiring a longer drain hose, have a qualified technician install a longer hose, PIN 134049201, available from plug. POWER SUPPLY CORD -The gas laundry center is installed on the same circuit. CIRCUIT - POWER SUPPLY - 3 wire or 4-wire, 240 volt, single phase, 60 Hz, Alternating Current. See ELECTRICAL...: 33 inches (83.82 cm) Maximum height: 96 inches (244 cm) OUTLET RECEPTACLE - ELECTRICAL REQUIREMENTS ELECTRIC Laundry Center NOTE: Do not under any circumstances remove grounding prong from an authorized parts distributor. branch circuit...
...Laundry Center CIRCUIT - NOTE: For installations requiring a longer drain hose, have a qualified technician install a longer hose, PIN 134049201, available from plug. POWER SUPPLY CORD -The gas laundry center is installed on the same circuit. CIRCUIT - POWER SUPPLY - 3 wire or 4-wire, 240 volt, single phase, 60 Hz, Alternating Current. See ELECTRICAL...: 33 inches (83.82 cm) Maximum height: 96 inches (244 cm) OUTLET RECEPTACLE - ELECTRICAL REQUIREMENTS ELECTRIC Laundry Center NOTE: Do not under any circumstances remove grounding prong from an authorized parts distributor. branch circuit...
Installation Instructions (All Languages)
Page 6
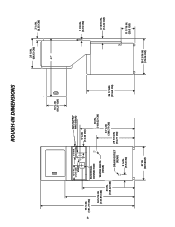
6 ROUGH-IN DIMENSIONS 16 ¼ IN. (41.27 CM) 12 ½ IN. (31.75 CM) VENT 9 3/8 IN. (23.81 CM) 75 ½ IN. (191.77 CM) ELECTRICAL CONNECTION 54 5/16 IN. (137.95 CM) 43 IN. (109.22 CM) WATER INLETS (REAR) DRAIN OUTLET (REAR) GAS SUPPLY PIPE (REAR) 5 ¼ IN. (13.33 CM) 43 IN. (109.22 CM) 41 ¼ IN (104.77 CM) 29 7/16 IN (74.77 CM) 3 ¾ IN. (9.52 CM) 36 1/16IN. (91.60 CM) 27 IN. (68.58CM) 25 ¼ IN. (64.13 CM) 47" 2 ½ IN. (6.35 CM) 1 7/8 IN. (4.76 CM) 4 13/16 IN. (12.22 CM) 30 13/16 IN. (78.26 CM) 11 7/16 IN. (29.5 CM)
6 ROUGH-IN DIMENSIONS 16 ¼ IN. (41.27 CM) 12 ½ IN. (31.75 CM) VENT 9 3/8 IN. (23.81 CM) 75 ½ IN. (191.77 CM) ELECTRICAL CONNECTION 54 5/16 IN. (137.95 CM) 43 IN. (109.22 CM) WATER INLETS (REAR) DRAIN OUTLET (REAR) GAS SUPPLY PIPE (REAR) 5 ¼ IN. (13.33 CM) 43 IN. (109.22 CM) 41 ¼ IN (104.77 CM) 29 7/16 IN (74.77 CM) 3 ¾ IN. (9.52 CM) 36 1/16IN. (91.60 CM) 27 IN. (68.58CM) 25 ¼ IN. (64.13 CM) 47" 2 ½ IN. (6.35 CM) 1 7/8 IN. (4.76 CM) 4 13/16 IN. (12.22 CM) 30 13/16 IN. (78.26 CM) 11 7/16 IN. (29.5 CM)
Installation Instructions (All Languages)
Page 7
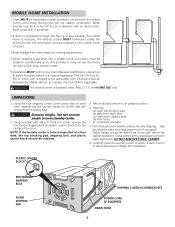
.... (d) inlet hoses. (e ) enclosure package. 5. Plastic clamps secure the drain hose to the right side of the dryer exhaust outlet. 5.Installation MUST conform to within 4 feet (1.22 m) of the base. WARNING The laundry center is applicable. Using a ratchet with American National Standard for outside (outdoors, ...wire shipping clips securing the drain hose and power cord (if equipped). Using the four shipping carton corner posts (two on each side), carefully lay the laundry center on its left side and remove foam shipping base. NOTE: If the laundry center is enclosed, the exhaust...
.... (d) inlet hoses. (e ) enclosure package. 5. Plastic clamps secure the drain hose to the right side of the dryer exhaust outlet. 5.Installation MUST conform to within 4 feet (1.22 m) of the base. WARNING The laundry center is applicable. Using a ratchet with American National Standard for outside (outdoors, ...wire shipping clips securing the drain hose and power cord (if equipped). Using the four shipping carton corner posts (two on each side), carefully lay the laundry center on its left side and remove foam shipping base. NOTE: If the laundry center is enclosed, the exhaust...

Installation Instructions (All Languages)
Page 10
CAUTION DO NOT CROSS THREAD OR OVERTIGHTEN THESE CONNECTIONS. 4. Remove the shipping cap from the cabinet. Connect a 1/2 inch (1.27 cm) I.D. Use a 1/2 inch (1.27 cm) to 3/8 inch (0.96 cm) reducer for leaks at a minimum to prevent excessive vibration. Carefully connect the inlet hoses to the HOT ... and solid on all four legs (no rocking of the dryer. To ensure the laundry center is the HOT water faucet and carefully connect the bottom inlet hose to the water valve (on top of the drain hose with pliers. Place a level on the left side of the washer cabinet),...
CAUTION DO NOT CROSS THREAD OR OVERTIGHTEN THESE CONNECTIONS. 4. Remove the shipping cap from the cabinet. Connect a 1/2 inch (1.27 cm) I.D. Use a 1/2 inch (1.27 cm) to 3/8 inch (0.96 cm) reducer for leaks at a minimum to prevent excessive vibration. Carefully connect the inlet hoses to the HOT ... and solid on all four legs (no rocking of the dryer. To ensure the laundry center is the HOT water faucet and carefully connect the bottom inlet hose to the water valve (on top of the drain hose with pliers. Place a level on the left side of the washer cabinet),...
Complete Owner's Guide (English)
Page 6
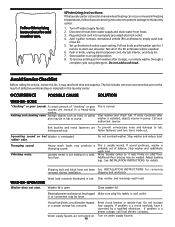
... of detergent and hottest water safe for fabric. •Do not overload washer. •Use liquid detergent or use chlorine bleach to clear lines. •Drain water heater occasionally. •For an ongoing problem, install an iron filter in your water supply system. This is due to abrasion from washer as...
... of detergent and hottest water safe for fabric. •Do not overload washer. •Use liquid detergent or use chlorine bleach to clear lines. •Drain water heater occasionally. •For an ongoing problem, install an iron filter in your water supply system. This is due to abrasion from washer as...
Complete Owner's Guide (English)
Page 10
.... in knob, unplug electrical power cord, dry tub interior, and close lid. 7. If problem is not resting on solid floor. Add 1 gallon nontoxic recreational vehicle (RV) antifreeze to drain out all of defective workmanship or materials in tub or pump. It may produce a thumping sound. Stop washer and reduce load. Laundry center is a circuit...
.... in knob, unplug electrical power cord, dry tub interior, and close lid. 7. If problem is not resting on solid floor. Add 1 gallon nontoxic recreational vehicle (RV) antifreeze to drain out all of defective workmanship or materials in tub or pump. It may produce a thumping sound. Stop washer and reduce load. Laundry center is a circuit...
Complete Owner's Guide (English)
Page 11
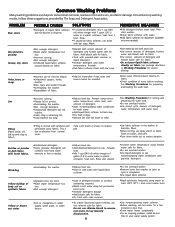
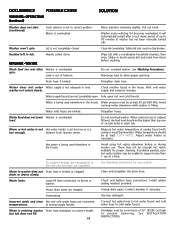
...or clogged. Water inlet hoses are clogged. distance from items before or during washer use at faucet or washer. drain or drains slowly. Water leaks. House drain pipes are kinked. Incorrect wash and rinse Hot and cold water hoses are not completely open hot and cold faucets.... supply and pressure increase. Water is entering washer Drain hose standpipe is not in wash tub. See Washing Procedures. Pull out knob. Water is a hot enough. Do not overload washer. Shake or brush excess dirt and sand from laundry center. Use less detergent. WATER Heavily soiled items. ...
...or clogged. Water inlet hoses are clogged. distance from items before or during washer use at faucet or washer. drain or drains slowly. Water leaks. House drain pipes are kinked. Incorrect wash and rinse Hot and cold water hoses are not completely open hot and cold faucets.... supply and pressure increase. Water is entering washer Drain hose standpipe is not in wash tub. See Washing Procedures. Pull out knob. Water is a hot enough. Do not overload washer. Shake or brush excess dirt and sand from laundry center. Use less detergent. WATER Heavily soiled items. ...
Operating Instructions (Operating Instructions)
Page 3
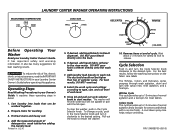
...overload. 8. Select the wash cycle and settings according to type, size, and soil level of fire, electric shock, or injury to persons, read the IMPORTANT SAFETY INSTRUCTIONS in your Laundry Center Owner's Guide before adding the laundry load. Close lid and pull out cycle selector knob to bleach dispenser. To change a cycle, push in... knob. For the best results, follow the washing instructions on the fabric care labels The Whites, Colors and Delicates cycles progress through wash agitation, drain and spin with water but will fill with spray rinse, rinse agitation, and a final spin.
...overload. 8. Select the wash cycle and settings according to type, size, and soil level of fire, electric shock, or injury to persons, read the IMPORTANT SAFETY INSTRUCTIONS in your Laundry Center Owner's Guide before adding the laundry load. Close lid and pull out cycle selector knob to bleach dispenser. To change a cycle, push in... knob. For the best results, follow the washing instructions on the fabric care labels The Whites, Colors and Delicates cycles progress through wash agitation, drain and spin with water but will fill with spray rinse, rinse agitation, and a final spin.


