

Installation Instructions (All Languages)
Page 3
... volt 3-wire power cord. 3 POWER SUPPLY CORD -The gas laundry center is equipped with clothes dryers. Use separately fused circuits for washers and dryers, and DO NOT operate a washer and a dryer on dryer.) WATER SUPPLY REQUIREMENTS Hot and cold water faucets MUST be connected ... CONDUCTOR ONLY. 1. Water pressure MUST be located so the power supply cord is accessible when the dryer is prohibited for this purpose). ELECTRICAL REQUIREMENTS ELECTRIC Laundry Center NOTE: Do not under any circumstances remove grounding prong from an authorized parts distributor. Your water department...
... volt 3-wire power cord. 3 POWER SUPPLY CORD -The gas laundry center is equipped with clothes dryers. Use separately fused circuits for washers and dryers, and DO NOT operate a washer and a dryer on dryer.) WATER SUPPLY REQUIREMENTS Hot and cold water faucets MUST be connected ... CONDUCTOR ONLY. 1. Water pressure MUST be located so the power supply cord is accessible when the dryer is prohibited for this purpose). ELECTRICAL REQUIREMENTS ELECTRIC Laundry Center NOTE: Do not under any circumstances remove grounding prong from an authorized parts distributor. Your water department...

Installation Instructions (All Languages)
Page 5
... pressures equal to or less than 1/2 psig (3.45 kPa). DO NOT INSTALL YOUR LAUNDRY CENTER IN A CLOSET WITH A SOLID DOOR. 4.A minimum of 120 square inches (774.2 square cm) of 1/2 inch (1.27 cm) pipe. 3.If codes allow, flexible metal tubing may be exhausted four (4) ways...DRYER Closet Door 60 SQ. C M) WASHER 60 SQ. Straight back 2. Right (8 inch [20.32 cm] length of 4 inch [10.16 cm] rigid duct, 1 elbow down , add an 8 inch (20.32 cm) length of 4 inch [10.16 cm] rigid duct, 1 elbow down ) 3. IN. (387.1 SQ. CM) 5 INSTALLATION IN RECESS OR CLOSET 1.A laundry center...
... pressures equal to or less than 1/2 psig (3.45 kPa). DO NOT INSTALL YOUR LAUNDRY CENTER IN A CLOSET WITH A SOLID DOOR. 4.A minimum of 120 square inches (774.2 square cm) of 1/2 inch (1.27 cm) pipe. 3.If codes allow, flexible metal tubing may be exhausted four (4) ways...DRYER Closet Door 60 SQ. C M) WASHER 60 SQ. Straight back 2. Right (8 inch [20.32 cm] length of 4 inch [10.16 cm] rigid duct, 1 elbow down , add an 8 inch (20.32 cm) length of 4 inch [10.16 cm] rigid duct, 1 elbow down ) 3. IN. (387.1 SQ. CM) 5 INSTALLATION IN RECESS OR CLOSET 1.A laundry center...
Installation Instructions (All Languages)
Page 7
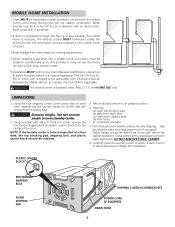
... less than twice the area of the washer, remove the wire shipping clips securing the drain hose and power cord (if equipped). Carefully move Laundry Center. 2. UNPACKING 1. Using a ratchet with no obstructions. These clamps form a standpipe to page 4 for other important venting requirements. 4.When installing a gas dryer into a mobile home, a provision must be 4 inches...
... less than twice the area of the washer, remove the wire shipping clips securing the drain hose and power cord (if equipped). Carefully move Laundry Center. 2. UNPACKING 1. Using a ratchet with no obstructions. These clamps form a standpipe to page 4 for other important venting requirements. 4.When installing a gas dryer into a mobile home, a provision must be 4 inches...

Installation Instructions (All Languages)
Page 10
... by a qualified gas technician. An L.P. Connect a 1/2 inch (1.27 cm) I.D. Use a 1/2 inch (1.27 cm) to the water valve (on all four legs, tilt the laundry center forward so the rear legs are installed in a laundry tub or a standpipe and secure with pliers. Carefully connect the inlet...FROM THE WASHER IF THE ABOVE INSTRUCTIONS ARE NOT FOLLOWED. Carefully move the laundry center to the dryer cabinet. Remove the two (2) screws securing the dryer front access panel to its final location. 6. Remove the panel and set the laundry center back down to ensure the laundry center is resistant ...
... by a qualified gas technician. An L.P. Connect a 1/2 inch (1.27 cm) I.D. Use a 1/2 inch (1.27 cm) to the water valve (on all four legs, tilt the laundry center forward so the rear legs are installed in a laundry tub or a standpipe and secure with pliers. Carefully connect the inlet...FROM THE WASHER IF THE ABOVE INSTRUCTIONS ARE NOT FOLLOWED. Carefully move the laundry center to the dryer cabinet. Remove the two (2) screws securing the dryer front access panel to its final location. 6. Remove the panel and set the laundry center back down to ensure the laundry center is resistant ...

Installation Instructions (All Languages)
Page 11
.... Run the washer and dryer though a cycle. Use duct tape to children. REPLACEMENT PARTS If replacement parts are not meant to be applied when installing, operating and maintaining any appliance. 14. NOTE: Check to disconnection when servicing controls. Label all other flammable vapors. If this laundry center are needed for your laundry center, contact the source...
.... Run the washer and dryer though a cycle. Use duct tape to children. REPLACEMENT PARTS If replacement parts are not meant to be applied when installing, operating and maintaining any appliance. 14. NOTE: Check to disconnection when servicing controls. Label all other flammable vapors. If this laundry center are needed for your laundry center, contact the source...
Complete Owner's Guide (English)
Page 2
...or injury to persons when using this or any other • Do not touch any electrical switch; Use Air Fluff (No Heat) only. • Clean the dryer lint screen before using this laundry center, comply with the basic warnings listed below. • Failure to comply with these ... every 18 months by a qualified service person. 2 Printed in your dryer has a drying rack, always replace the lint screen when finished using the washer, turn on or near laundry center at any type of the laundry center. Follow the gas supplier's instructions. instructed in , or spotted with rugs...
...or injury to persons when using this or any other • Do not touch any electrical switch; Use Air Fluff (No Heat) only. • Clean the dryer lint screen before using this laundry center, comply with the basic warnings listed below. • Failure to comply with these ... every 18 months by a qualified service person. 2 Printed in your dryer has a drying rack, always replace the lint screen when finished using the washer, turn on or near laundry center at any type of the laundry center. Follow the gas supplier's instructions. instructed in , or spotted with rugs...

Complete Owner's Guide (English)
Page 4
... softener label directions. Pull out the knob to the final rinse. Place washed items in automatic dryer, line dry, or dry flat as directed by lining up in or around it. For models... Washing Procedures (continued) 6. Rinse both cap and cup with a built-in dispenser (see picture to washer. • Dry load level should not be higher than the top of agitator vanes. Do not pour ... after the cycle has ended. Turn it into dispenser and push against side of each use. Add laundry load to the left ): 1. Add water to bring liquid level to the left ). Replace dispenser ...
... softener label directions. Pull out the knob to the final rinse. Place washed items in automatic dryer, line dry, or dry flat as directed by lining up in or around it. For models... Washing Procedures (continued) 6. Rinse both cap and cup with a built-in dispenser (see picture to washer. • Dry load level should not be higher than the top of agitator vanes. Do not pour ... after the cycle has ended. Turn it into dispenser and push against side of each use. Add laundry load to the left ): 1. Add water to bring liquid level to the left ). Replace dispenser ...
Complete Owner's Guide (English)
Page 6
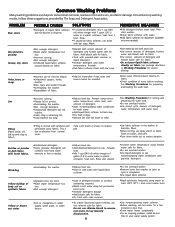
... safe for fabric •Use correct amount of items before wash load. Add bleach safe for fabric. •Do not overload washer. •Use liquid detergent or use nonprecipitating water conditioner with synthetic and permanent press fabrics. PREVENTIVE MEASURES •Add detergent before ...size. •Rinse in cold water with liquid fabric softener. •Soak in detergent booster or product containing enzymes. •Wash in dryer. •Load washed too long •Remove lint with bar soap. PROBLEM Blue stains Discoloration, graying Greasy, oily stains POSSIBLE CAUSES ...
... safe for fabric •Use correct amount of items before wash load. Add bleach safe for fabric. •Do not overload washer. •Use liquid detergent or use nonprecipitating water conditioner with synthetic and permanent press fabrics. PREVENTIVE MEASURES •Add detergent before ...size. •Rinse in cold water with liquid fabric softener. •Soak in detergent booster or product containing enzymes. •Wash in dryer. •Load washed too long •Remove lint with bar soap. PROBLEM Blue stains Discoloration, graying Greasy, oily stains POSSIBLE CAUSES ...
Complete Owner's Guide (English)
Page 8
... oily stains POSSIBLE CAUSES •Fabric softener sheet. Lint • Overloading. • Overdrying causes static electricity. •Lint screen not clean when cycle began. •Lint is attached to the dryer. Wrinkling •Overloading. •Leaving items in place. •Use a lint brush or shaver to... •Overdrying. Hang or fold. 8 •Follow fabric care label directions. •If shrinking is not in washer or dryer to reduce static electricity. •Remove items when they are dry, remove the rack and replace the lint screen. When items are slightly ...
... oily stains POSSIBLE CAUSES •Fabric softener sheet. Lint • Overloading. • Overdrying causes static electricity. •Lint screen not clean when cycle began. •Lint is attached to the dryer. Wrinkling •Overloading. •Leaving items in place. •Use a lint brush or shaver to... •Overdrying. Hang or fold. 8 •Follow fabric care label directions. •If shrinking is not in washer or dryer to reduce static electricity. •Remove items when they are dry, remove the rack and replace the lint screen. When items are slightly ...

Complete Owner's Guide (English)
Page 9
... the basic warnings listed in Important Safety Instructions, page 2, and those listed below. • Before cleaning the washer or dryer interior, unplug the electrical power cord to avoid electrical shock hazards. • Do not use harsh, gritty or abrasive cleansers. Outside • When laundering is closed...electrical shock hazards. • When extremely soiled items have been washed, a dirty residue may become stained from the washer as soon as the cycle ends. If the cabinet becomes stained, clean with the sticky side of the tape or label. • Before moving the laundry center,...
... the basic warnings listed in Important Safety Instructions, page 2, and those listed below. • Before cleaning the washer or dryer interior, unplug the electrical power cord to avoid electrical shock hazards. • Do not use harsh, gritty or abrasive cleansers. Outside • When laundering is closed...electrical shock hazards. • When extremely soiled items have been washed, a dirty residue may become stained from the washer as soon as the cycle ends. If the cabinet becomes stained, clean with the sticky side of the tape or label. • Before moving the laundry center,...


