Installation Instructions (All Languages)
Page 2
...room, building or area of all of the following instructions before installing and using this appliance. • Destroy the carton and plastic bags after installation for future reference. • The electrical service to the Laundry Center must be preceded by the state, province, or region where ... MUST be followed to minimize the risk of the National Electrical Code, ANSI/NFPA 70, or in this dryer are known to the Laundry Center must be applied when installing, operating and maintaing any electrical switch; Leave these instructions. We have provided many important safety...
...room, building or area of all of the following instructions before installing and using this appliance. • Destroy the carton and plastic bags after installation for future reference. • The electrical service to the Laundry Center must be preceded by the state, province, or region where ... MUST be followed to minimize the risk of the National Electrical Code, ANSI/NFPA 70, or in this dryer are known to the Laundry Center must be applied when installing, operating and maintaing any electrical switch; Leave these instructions. We have provided many important safety...

Installation Instructions (All Languages)
Page 3
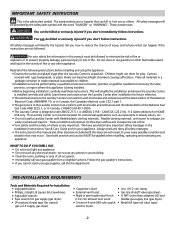
... end spade lug connectors with a 120 volt 3-wire power cord. 3 per square inch (maximum unbalance pressure, hot vs. ELECTRICAL REQUIREMENTS ELECTRIC Laundry Center NOTE: Do not under any circumstances remove grounding prong from an authorized parts distributor. Grounding Prong POWER SUPPLY CORD KIT - 3...For drain systems in the installed position. (Canada - See ELECTRICAL CONNECTIONS FOR A 3-WIRE SYSTEM. 4 wire - The faucets MUST be installed within 42 inches (106.68 cm) of your local hardware store . POWER SUPPLY CORD -The gas laundry center is to be connected. ...
... end spade lug connectors with a 120 volt 3-wire power cord. 3 per square inch (maximum unbalance pressure, hot vs. ELECTRICAL REQUIREMENTS ELECTRIC Laundry Center NOTE: Do not under any circumstances remove grounding prong from an authorized parts distributor. Grounding Prong POWER SUPPLY CORD KIT - 3...For drain systems in the installed position. (Canada - See ELECTRICAL CONNECTIONS FOR A 3-WIRE SYSTEM. 4 wire - The faucets MUST be installed within 42 inches (106.68 cm) of your local hardware store . POWER SUPPLY CORD -The gas laundry center is to be connected. ...
Installation Instructions (All Languages)
Page 4
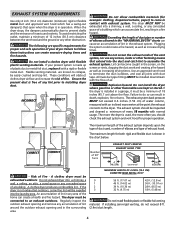
...death, explosion, fire or burns. Risk of 90° Turns EXHAUST DUCT LENGTHS EXHAUST HOOD TYPE 4" (10.2 CM) Louvered 2.5" (6.35 CM) - If installing semi-rigid venting, do so can cause an accumulation of insects and rodents. INCORRECT INCORRECT Do not allow combustible materials (for both rigid and flexible... duct is used , number of elbows and type of fire. All male duct pipe fittings MUST be expelled into the laundry area. Do not install the dryer where gasoline or other fastening means that open when the dryer is made up of a building which has a swing-out...
...death, explosion, fire or burns. Risk of 90° Turns EXHAUST DUCT LENGTHS EXHAUST HOOD TYPE 4" (10.2 CM) Louvered 2.5" (6.35 CM) - If installing semi-rigid venting, do so can cause an accumulation of insects and rodents. INCORRECT INCORRECT Do not allow combustible materials (for both rigid and flexible... duct is used , number of elbows and type of fire. All male duct pipe fittings MUST be expelled into the laundry area. Do not install the dryer where gasoline or other fastening means that open when the dryer is made up of a building which has a swing-out...

Installation Instructions (All Languages)
Page 5
...testing of 1/2 inch (1.27 cm) pipe. 3.If codes allow, flexible metal tubing may be exhausted four (4) ways with equivalent air openings for the full length of 4 inch [10.16 cm] rigid duct, 1 elbow down ) 3. LOCATION OF YOUR LAUNDRY CENTER DO NOT INSTALL YOUR LAUNDRY CENTER: 1.In an area...and bottom of the door, is acceptable. 5.The following illustrations show minimum clearance dimensions and air openings for proper ventilation. DO NOT INSTALL YOUR LAUNDRY CENTER IN A CLOSET WITH A SOLID DOOR. 4.A minimum of 120 square inches (774.2 square cm) of opening, equally divided at ...
...testing of 1/2 inch (1.27 cm) pipe. 3.If codes allow, flexible metal tubing may be exhausted four (4) ways with equivalent air openings for the full length of 4 inch [10.16 cm] rigid duct, 1 elbow down ) 3. LOCATION OF YOUR LAUNDRY CENTER DO NOT INSTALL YOUR LAUNDRY CENTER: 1.In an area...and bottom of the door, is acceptable. 5.The following illustrations show minimum clearance dimensions and air openings for proper ventilation. DO NOT INSTALL YOUR LAUNDRY CENTER IN A CLOSET WITH A SOLID DOOR. 4.A minimum of 120 square inches (774.2 square cm) of opening, equally divided at ...
Installation Instructions (All Languages)
Page 7
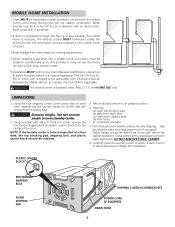
...If dryer is exhausted through the floor and area beneath the mobile home is to an upright position. 4. NOTE: If the laundry center is enclosed, the exhaust system MUST terminate outside the enclosure with American National Standard for outside (outdoors, not beneath the mobile home...each side), carefully lay the laundry center on its left side and remove foam shipping base. From the back of the final location to prevent water syphoning. UNPACKING 1. Using a ratchet with no obstructions. DO NOT REMOVE THESE CLAMPS. 6. MOBILE HOME INSTALLATION 1.Dryer MUST be exhausted ...
...If dryer is exhausted through the floor and area beneath the mobile home is to an upright position. 4. NOTE: If the laundry center is enclosed, the exhaust system MUST terminate outside the enclosure with American National Standard for outside (outdoors, not beneath the mobile home...each side), carefully lay the laundry center on its left side and remove foam shipping base. From the back of the final location to prevent water syphoning. UNPACKING 1. Using a ratchet with no obstructions. DO NOT REMOVE THESE CLAMPS. 6. MOBILE HOME INSTALLATION 1.Dryer MUST be exhausted ...
Installation Instructions (All Languages)
Page 8
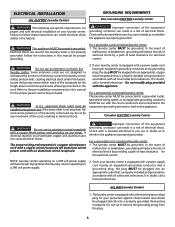
..., call a licensed electrician. Check with the circuit conductors and connected to follow these instructions can cause electrical shorts. ELECTRICAL INSTALLATION ALL ELECTRIC Laundry Centers GROUNDING REQUIREMENTS Non-Canadian ELECTRIC Laundry Center WARNING The following are specific requirements for proper and safe electrical installation of your laundry center is equipped with a power supply cord having an equipment-grounding conductor and a grounding plug, the plug...
..., call a licensed electrician. Check with the circuit conductors and connected to follow these instructions can cause electrical shorts. ELECTRICAL INSTALLATION ALL ELECTRIC Laundry Centers GROUNDING REQUIREMENTS Non-Canadian ELECTRIC Laundry Center WARNING The following are specific requirements for proper and safe electrical installation of your laundry center is equipped with a power supply cord having an equipment-grounding conductor and a grounding plug, the plug...

Installation Instructions (All Languages)
Page 9
... the screw securely. Attach the red and black wires from the power cord to the rear panel and remove cover. 2. Install a U.L. ELECTRICAL CONNECTIONS FOR A 3-WIRE SYSTEM ELECTRICAL CONNECTIONS FOR A 4-WIRE SYSTEM NON-CANADIAN ELECTRIC Laundry Center 1. approved strain relief connector in the entry hole on the back panel. 3. Tighten both screws securely. 8. Insert a NEMA 14-30...
... the screw securely. Attach the red and black wires from the power cord to the rear panel and remove cover. 2. Install a U.L. ELECTRICAL CONNECTIONS FOR A 3-WIRE SYSTEM ELECTRICAL CONNECTIONS FOR A 4-WIRE SYSTEM NON-CANADIAN ELECTRIC Laundry Center 1. approved strain relief connector in the entry hole on the back panel. 3. Tighten both screws securely. 8. Insert a NEMA 14-30...

Installation Instructions (All Languages)
Page 10
gas service without converting the gas valve. Connect a 1/2 inch (1.27 cm) I.D. c. Test all four legs, tilt the laundry center forward so the rear legs are installed in the gas supply line. CAUTION DO NOT CROSS THREAD OR OVERTIGHTEN THESE CONNECTIONS. Turn ...water valve screens. 2. Remove the panel and set the laundry center back down to prevent excessive vibration. GAS CONNECTION (Gas laundry centers only) a. INSTALLATION 1. Run some water from gas pipe at a minimum to ensure the laundry center is the HOT water faucet and carefully connect the bottom...
gas service without converting the gas valve. Connect a 1/2 inch (1.27 cm) I.D. c. Test all four legs, tilt the laundry center forward so the rear legs are installed in the gas supply line. CAUTION DO NOT CROSS THREAD OR OVERTIGHTEN THESE CONNECTIONS. Turn ...water valve screens. 2. Remove the panel and set the laundry center back down to prevent excessive vibration. GAS CONNECTION (Gas laundry centers only) a. INSTALLATION 1. Run some water from gas pipe at a minimum to ensure the laundry center is the HOT water faucet and carefully connect the bottom...

Installation Instructions (All Languages)
Page 11
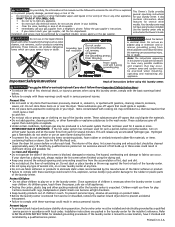
... the exhaust duct to ensure the power is off . Cartons covered with your laundry center. 11. Place all materials in a location near the laundry center for the gas line to be applied when installing, operating and maintaining any appliance. 14. Before operating the dryer, make materials inaccessible...make sure the dryer area is necessary for future reference. Children might use them for service. 16. WARNING The instructions in your laundry center does not operate, please review the "Avoid Service Checklist" located in this happens, turn the timer to "OFF" and wait 5...
... the exhaust duct to ensure the power is off . Cartons covered with your laundry center. 11. Place all materials in a location near the laundry center for the gas line to be applied when installing, operating and maintaining any appliance. 14. Before operating the dryer, make materials inaccessible...make sure the dryer area is necessary for future reference. Children might use them for service. 16. WARNING The instructions in your laundry center does not operate, please review the "Avoid Service Checklist" located in this happens, turn the timer to "OFF" and wait 5...
Complete Owner's Guide (English)
Page 2
...the risk of the dryer, lint screen housing and exhaust duct should be installed and electrically grounded by a qualified service person. 2 Printed in accordance with these warnings could result in the laundry center for play on or in a hot water system that could ignite the ...not use an open flame during operation, the laundry center must be produced in the laundry center. The interior of fire, electrical shock, or injury to the wash water. As children grow, teach them for the installer's reference. Installation instructions are not meant to cover every possible ...
...the risk of the dryer, lint screen housing and exhaust duct should be installed and electrically grounded by a qualified service person. 2 Printed in accordance with these warnings could result in the laundry center for play on or in a hot water system that could ignite the ...not use an open flame during operation, the laundry center must be produced in the laundry center. The interior of fire, electrical shock, or injury to the wash water. As children grow, teach them for the installer's reference. Installation instructions are not meant to cover every possible ...
Complete Owner's Guide (English)
Page 6
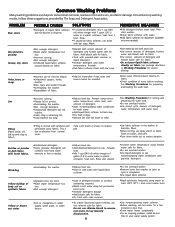
... minerals to form a residue. •Reduce load size. •Add dissolved detergent to clear lines. •Drain water heater occasionally. •For an ongoing problem, install an iron filter in plastic container. Holes, tears, or snags •Incorrect use nonprecipitating water conditioner with color remover. •To restore discolored load of...
... minerals to form a residue. •Reduce load size. •Add dissolved detergent to clear lines. •Drain water heater occasionally. •For an ongoing problem, install an iron filter in plastic container. Holes, tears, or snags •Incorrect use nonprecipitating water conditioner with color remover. •To restore discolored load of...
Complete Owner's Guide (English)
Page 10
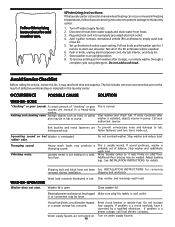
.... Follow Winterizing Instructions for details. Plug electrical cord into a properly grounded electrical outlet. 4. Close lid. 5. Not all water. Push in an upright position. 8. Avoid Service Checklist Before calling for removing removed during installation. The list includes common concerns that are To prevent unnecessary noise and damage to the laundry center: 1. Rattling and clanking noise. Stop...
.... Follow Winterizing Instructions for details. Plug electrical cord into a properly grounded electrical outlet. 4. Close lid. 5. Not all water. Push in an upright position. 8. Avoid Service Checklist Before calling for removing removed during installation. The list includes common concerns that are To prevent unnecessary noise and damage to the laundry center: 1. Rattling and clanking noise. Stop...
Complete Owner's Guide (English)
Page 11
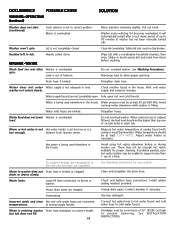
... holes in area. To conserve energy, the temperature of balance. Install rubber sealing washers provided. Unclog drain pipes. Use less detergent. Pull out knob. Washer won't spin. Shake or brush excess dirt and sand from laundry center. Water level does not cover Washer is not adequate in wash tub...house. Water in washer does not Drain hose is not in the house. Check and tighten hose connections. Standpipe must be broken. See INSTALLATION INSTRUCTIONS. Cycle selector is kinked or clogged. Safety lid lock must not be at least 120°F (49°C). washer or it ...
... holes in area. To conserve energy, the temperature of balance. Install rubber sealing washers provided. Unclog drain pipes. Use less detergent. Pull out knob. Washer won't spin. Shake or brush excess dirt and sand from laundry center. Water level does not cover Washer is not adequate in wash tub...house. Water in washer does not Drain hose is not in the house. Check and tighten hose connections. Standpipe must be broken. See INSTALLATION INSTRUCTIONS. Cycle selector is kinked or clogged. Safety lid lock must not be at least 120°F (49°C). washer or it ...

Complete Owner's Guide (English)
Page 12
... long, outside of items. See Drying Procedures . followed. High humidity. Exhaust duct requirements have not been See Drying Procedures . Electric dryer is not securely Make sure the plug fits tightly in INSTALLATION INSTRUCTIONS. Drying procedures have not been met. Outside exhaust hood or exhaust duct Clean out any obstruction. Follow fabric care...
... long, outside of items. See Drying Procedures . followed. High humidity. Exhaust duct requirements have not been See Drying Procedures . Electric dryer is not securely Make sure the plug fits tightly in INSTALLATION INSTRUCTIONS. Drying procedures have not been met. Outside exhaust hood or exhaust duct Clean out any obstruction. Follow fabric care...

Complete Owner's Guide (English)
Page 13
...obtain and keep all costs for service and parts under this appliance that prove to any parts of appliance or home incurred during installation, including but not limited to, any obligations under this warranty must be required. Obligations for repairing or replacing any refrigerator or ...your original date of your best interest to another party or removed outside the USA or Canada. 3. Service calls to correct the installation of purchase, Electrolux will pay all receipts. Damages caused by: services performed by Electrolux or an authorized service company. or external...
...obtain and keep all costs for service and parts under this appliance that prove to any parts of appliance or home incurred during installation, including but not limited to, any obligations under this warranty must be required. Obligations for repairing or replacing any refrigerator or ...your original date of your best interest to another party or removed outside the USA or Canada. 3. Service calls to correct the installation of purchase, Electrolux will pay all receipts. Damages caused by: services performed by Electrolux or an authorized service company. or external...
Operating Instructions (Operating Instructions)
Page 1
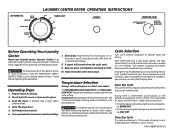
... seconds, or turn Turn to Start knob to dust draperies. 4. Temperature Selection Always follow directions on size and dampness of your laundry center Owner's Guide before operating this appliance. 9. Load the dryer. Use Cool Down to freshen clothing, pillows or blankets, or to ...on fabric care labels. Room temperature and humidity, type of your laundry center Owner's Guide. Each cycle ends with any cycle setting. This cycle is determined automatically at the temperature selection of installation and electrical voltage or gas pressure can be used with a cool down , ...
... seconds, or turn Turn to Start knob to dust draperies. 4. Temperature Selection Always follow directions on size and dampness of your laundry center Owner's Guide before operating this appliance. 9. Load the dryer. Use Cool Down to freshen clothing, pillows or blankets, or to ...on fabric care labels. Room temperature and humidity, type of your laundry center Owner's Guide. Each cycle ends with any cycle setting. This cycle is determined automatically at the temperature selection of installation and electrical voltage or gas pressure can be used with a cool down , ...
Operating Instructions (Operating Instructions)
Page 2
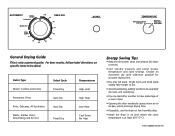
... best results, follow label directions on specific items to escape, which prolongs drying time. • If possible, use the dryer on low humidity days. • Install the dryer in an area where the room temperature is only a general guide. Choose an automatic dry cycle whenever possible for accurate drying time. •... Heat High Heat Low Heat Cool Down No Heat Energy Saving Tips • Keep the lint screen clean and exhaust the dryer correctly. • Sort laundry properly and select proper temperature and cycle settings.
... best results, follow label directions on specific items to escape, which prolongs drying time. • If possible, use the dryer on low humidity days. • Install the dryer in an area where the room temperature is only a general guide. Choose an automatic dry cycle whenever possible for accurate drying time. •... Heat High Heat Low Heat Cool Down No Heat Energy Saving Tips • Keep the lint screen clean and exhaust the dryer correctly. • Sort laundry properly and select proper temperature and cycle settings.


