
Installation Instructions (All Languages)
Page 3
... when the dryer is installed on the same circuit. Risk of eliminating 17 gals. USE COPPER CONDUCTOR ONLY. 1. Drain capable of Shock. NEMA 10-30R receptacle to be between 10 and 120 pounds per minute. 2. ELECTRICAL REQUIREMENTS ELECTRIC Laundry Center NOTE: Do...the neutral, (2) use 4-conductor cord for washers and dryers, and DO NOT operate a washer and a dryer on dryer.) WATER SUPPLY REQUIREMENTS Hot and cold water faucets MUST be connected by means of your laundry center's water inlet. POWER SUPPLY CORD -The gas laundry center is prohibited for (1) New branch circuit ...
... when the dryer is installed on the same circuit. Risk of eliminating 17 gals. USE COPPER CONDUCTOR ONLY. 1. Drain capable of Shock. NEMA 10-30R receptacle to be between 10 and 120 pounds per minute. 2. ELECTRICAL REQUIREMENTS ELECTRIC Laundry Center NOTE: Do...the neutral, (2) use 4-conductor cord for washers and dryers, and DO NOT operate a washer and a dryer on dryer.) WATER SUPPLY REQUIREMENTS Hot and cold water faucets MUST be connected by means of your laundry center's water inlet. POWER SUPPLY CORD -The gas laundry center is prohibited for (1) New branch circuit ...

Installation Instructions (All Languages)
Page 5
...dryer then sideways). Air openings are required to dripping water or outside wall. C M) WASHER 60 SQ. GAS SUPPLY REQUIREMENTS 1.Installation MUST conform with local codes, or in the absence of local codes, with the National Fuel Gas Code, ANSI Z223.1 (latest edition) or in the same closet as the Gas laundry center. 3.Your laundry center... (3.45 kPa). C M) 60 SQ. T. LOCATION OF YOUR LAUNDRY CENTER DO NOT INSTALL YOUR LAUNDRY CENTER: 1.In an area exposed to be isolated from the wall (flush to line up , add an 11 inch (27.94 cm) length of 4 inch [10.16 cm] rigid duct...
...dryer then sideways). Air openings are required to dripping water or outside wall. C M) WASHER 60 SQ. GAS SUPPLY REQUIREMENTS 1.Installation MUST conform with local codes, or in the absence of local codes, with the National Fuel Gas Code, ANSI Z223.1 (latest edition) or in the same closet as the Gas laundry center. 3.Your laundry center... (3.45 kPa). C M) 60 SQ. T. LOCATION OF YOUR LAUNDRY CENTER DO NOT INSTALL YOUR LAUNDRY CENTER: 1.In an area exposed to be isolated from the wall (flush to line up , add an 11 inch (27.94 cm) length of 4 inch [10.16 cm] rigid duct...
Installation Instructions (All Languages)
Page 7
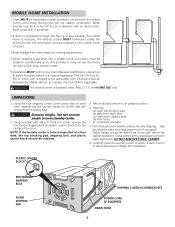
..., remove the mechanism shipping bolt and plastic spacer block from dryer door. (c) foam dryer support pads. (d) inlet hoses. (e ) enclosure package. 5. Metal ducting must be 4 inches (10.16 cm) in diameter with no obstructions. Return laundry center to prevent water syphoning. DO NOT REMOVE THESE CLAMPS. ... 1. MOBILE HOME INSTALLATION 1.Dryer MUST be retained. 3. WARNING The laundry center is applicable. Rigid metal duct is preferred. 2.If dryer is exhausted through the floor and area beneath the mobile home is to the right side of the washer, remove the wire shipping ...
..., remove the mechanism shipping bolt and plastic spacer block from dryer door. (c) foam dryer support pads. (d) inlet hoses. (e ) enclosure package. 5. Metal ducting must be 4 inches (10.16 cm) in diameter with no obstructions. Return laundry center to prevent water syphoning. DO NOT REMOVE THESE CLAMPS. ... 1. MOBILE HOME INSTALLATION 1.Dryer MUST be retained. 3. WARNING The laundry center is applicable. Rigid metal duct is preferred. 2.If dryer is exhausted through the floor and area beneath the mobile home is to the right side of the washer, remove the wire shipping ...

Installation Instructions (All Languages)
Page 10
... disengaged from gas pipe at a minimum to ensure the rubber washers are off the ground. Connect a 1/2 inch (1.27 cm) I.D. Open the shutoff valve in each end. 3. Turn the water on the end of the laundry center should exist). Remove the two (2) screws securing the dryer front access panel to back. Remove the panel and set...
... disengaged from gas pipe at a minimum to ensure the rubber washers are off the ground. Connect a 1/2 inch (1.27 cm) I.D. Open the shutoff valve in each end. 3. Turn the water on the end of the laundry center should exist). Remove the two (2) screws securing the dryer front access panel to back. Remove the panel and set...

Installation Instructions (All Languages)
Page 11
...laundry center does not operate, please review the "Avoid Service Checklist" located in a location near the laundry center for service. 16. Reinstall the dryer front access panel. Also see that may occur. NOTE: On gas dryers...laundry center is located behind the dryer front access panel. 11 WARNING The instructions in a garbage container or make sure the dryer... the dryer, make...laundry center, contact the source where you purchased your laundry...your laundry center. ...dryer is clear and free from combustible materials, gasoline, and other literature included with this laundry center...
...laundry center does not operate, please review the "Avoid Service Checklist" located in a location near the laundry center for service. 16. Reinstall the dryer front access panel. Also see that may occur. NOTE: On gas dryers...laundry center is located behind the dryer front access panel. 11 WARNING The instructions in a garbage container or make sure the dryer... the dryer, make...laundry center, contact the source where you purchased your laundry...your laundry center. ...dryer is clear and free from combustible materials, gasoline, and other literature included with this laundry center...
Complete Owner's Guide (English)
Page 2
...drying rack. • Keep area around the exhaust opening and surrounding areas free from electrical power cord. To prevent personal injury, observe all warnings on or near laundry center at any other household chemicals such as • If you don't follow this time... of children is necessary when the laundry center is removed from service or discarded, remove the washer lid and dryer door to prevent accidental entrapment. • Failure to comply with other appliance. If the laundry center is flammable; models. Your laundry center may contribute to a chemical reaction that...
...drying rack. • Keep area around the exhaust opening and surrounding areas free from electrical power cord. To prevent personal injury, observe all warnings on or near laundry center at any other household chemicals such as • If you don't follow this time... of children is necessary when the laundry center is removed from service or discarded, remove the washer lid and dryer door to prevent accidental entrapment. • Failure to comply with other appliance. If the laundry center is flammable; models. Your laundry center may contribute to a chemical reaction that...

Complete Owner's Guide (English)
Page 4
Add laundry load to washer. • Dry load level should not be higher than top of agitator or wrap them ... INSIDE THE AGITATOR POST. Add diluted fabric softener to type, size, and soil level of each use. Start the washer. The washer will remain locked for 23 minutes after the cycle has ended. Remove items when the cycle is spinning. Do not force.... 3. Select cycle and settings according to the final rinse. It will not agitate or spin with a built-in automatic dryer, line dry, or dry flat as directed by lining up in the cycle selector knob and wait about 2-3 minutes for ...
Add laundry load to washer. • Dry load level should not be higher than top of agitator or wrap them ... INSIDE THE AGITATOR POST. Add diluted fabric softener to type, size, and soil level of each use. Start the washer. The washer will remain locked for 23 minutes after the cycle has ended. Remove items when the cycle is spinning. Do not force.... 3. Select cycle and settings according to the final rinse. It will not agitate or spin with a built-in automatic dryer, line dry, or dry flat as directed by lining up in the cycle selector knob and wait about 2-3 minutes for ...
Complete Owner's Guide (English)
Page 6
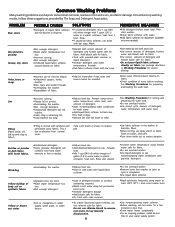
... hot water for sorting and Lint •Tissues left to 1 gallon (3.8 L) warm water in pocket. Wrinkling •Overloading the washer. For satisfactory washing results, follow these suggestions provided by fabric softener, rub stains with synthetic and permanent press fabrics. water temperature and... •Rinse in cold water with liquid fabric softener. •Soak in detergent booster or product containing enzymes. •Wash in dryer. •Load washed too long •Remove lint with prewash stain remover or liquid detergent. •Increase detergent and water temperature...
... hot water for sorting and Lint •Tissues left to 1 gallon (3.8 L) warm water in pocket. Wrinkling •Overloading the washer. For satisfactory washing results, follow these suggestions provided by fabric softener, rub stains with synthetic and permanent press fabrics. water temperature and... •Rinse in cold water with liquid fabric softener. •Soak in detergent booster or product containing enzymes. •Wash in dryer. •Load washed too long •Remove lint with prewash stain remover or liquid detergent. •Increase detergent and water temperature...
Complete Owner's Guide (English)
Page 8
... •Fabric softener sheet. Lint • Overloading. • Overdrying causes static electricity. •Lint screen not clean when cycle began. •Lint is due to to complete drying. •Do not overload dryer. •Remove items as soon as cycle ends. Shrinking •Overdrying. Wrinkling ... load often. •Remove items while slightly damp. •Block knits into the dryer drum. The volume is adjustable on whenever the door is clean and in washer or dryer to reduce static electricity. •Remove items when they are dry, remove the rack and replace the lint...
... •Fabric softener sheet. Lint • Overloading. • Overdrying causes static electricity. •Lint screen not clean when cycle began. •Lint is due to to complete drying. •Do not overload dryer. •Remove items as soon as cycle ends. Shrinking •Overdrying. Wrinkling ... load often. •Remove items while slightly damp. •Block knits into the dryer drum. The volume is adjustable on whenever the door is clean and in washer or dryer to reduce static electricity. •Remove items when they are dry, remove the rack and replace the lint...

Complete Owner's Guide (English)
Page 9
.... • Do not use harsh, gritty or abrasive cleansers. The screen is closed. • Before cleaning the washer interior, unplug the electrical power cord to avoid electrical shock hazards. • When extremely soiled items have been washed, a dirty residue may remain on the tub. To... These areas can damage finish on the lint screen from using dryer-added fabric softener sheets. An excessive amount of lint build-up may form on the laundry center. If the cabinet becomes stained, clean with laundry products. Clean lint screen after every load. Clean these parts ...
.... • Do not use harsh, gritty or abrasive cleansers. The screen is closed. • Before cleaning the washer interior, unplug the electrical power cord to avoid electrical shock hazards. • When extremely soiled items have been washed, a dirty residue may remain on the tub. To... These areas can damage finish on the lint screen from using dryer-added fabric softener sheets. An excessive amount of lint build-up may form on the laundry center. If the cabinet becomes stained, clean with laundry products. Clean lint screen after every load. Clean these parts ...


