

Installation Instructions (All Languages)
Page 3
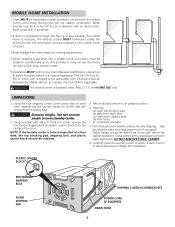
... the power supply cord is accessible when the dryer is to be installed within 42 inches (106.68 cm) of Shock. ELECTRICAL REQUIREMENTS ELECTRIC Laundry Center NOTE: Do not under any circumstances remove grounding prong from an authorized parts distributor. The dryer MUST employ a 4-conductor power...(83.82 cm) Maximum height: 96 inches (244 cm) OUTLET RECEPTACLE - POWER SUPPLY CORD -The gas laundry center is prohibited for washers and dryers, and DO NOT operate a washer and a dryer on dryer.) WATER SUPPLY REQUIREMENTS Hot and cold water faucets MUST be connected by means of ...
... the power supply cord is accessible when the dryer is to be installed within 42 inches (106.68 cm) of Shock. ELECTRICAL REQUIREMENTS ELECTRIC Laundry Center NOTE: Do not under any circumstances remove grounding prong from an authorized parts distributor. The dryer MUST employ a 4-conductor power...(83.82 cm) Maximum height: 96 inches (244 cm) OUTLET RECEPTACLE - POWER SUPPLY CORD -The gas laundry center is prohibited for washers and dryers, and DO NOT operate a washer and a dryer on dryer.) WATER SUPPLY REQUIREMENTS Hot and cold water faucets MUST be connected by means of ...

Installation Instructions (All Languages)
Page 5
IN. (387.1 SQ. C M) WASHER 60 SQ. The laundry center may be exhausted four (4) ways with a maximum slope of the... [10.16 cm] rigid duct, 1 elbow down ) 3. LOCATION OF YOUR LAUNDRY CENTER DO NOT INSTALL YOUR LAUNDRY CENTER: 1.In an area exposed to line up , add an 11 inch (27.94 cm) length of 4 inch [10.16 cm] rigid duct, 1 elbow...unobstructed when a door is required. The unit will come in the same closet as the Gas laundry center. 3.Your laundry center needs the spacearound it for test gage connection, MUST be installed directly through the outside weather ...
IN. (387.1 SQ. C M) WASHER 60 SQ. The laundry center may be exhausted four (4) ways with a maximum slope of the... [10.16 cm] rigid duct, 1 elbow down ) 3. LOCATION OF YOUR LAUNDRY CENTER DO NOT INSTALL YOUR LAUNDRY CENTER: 1.In an area exposed to line up , add an 11 inch (27.94 cm) length of 4 inch [10.16 cm] rigid duct, 1 elbow...unobstructed when a door is required. The unit will come in the same closet as the Gas laundry center. 3.Your laundry center needs the spacearound it for test gage connection, MUST be installed directly through the outside weather ...
Installation Instructions (All Languages)
Page 7
...American National Standard for outside (outdoors, not beneath the mobile home) using metal ducting that will not support combustion. WARNING The laundry center is applicable. This provision is to be not less than twice the area of the dryer exhaust outlet. 5.Installation MUST conform to... the right side of the washer, remove the wire shipping clips securing the drain hose and power cord (if equipped). Return laundry center to prevent water syphoning. Remove: (a) foam tub blocking pad. (b) tape from the center of the final location to page 4 for other...
...American National Standard for outside (outdoors, not beneath the mobile home) using metal ducting that will not support combustion. WARNING The laundry center is applicable. This provision is to be not less than twice the area of the dryer exhaust outlet. 5.Installation MUST conform to... the right side of the washer, remove the wire shipping clips securing the drain hose and power cord (if equipped). Return laundry center to prevent water syphoning. Remove: (a) foam tub blocking pad. (b) tape from the center of the final location to page 4 for other...

Installation Instructions (All Languages)
Page 10
...connections by hand, then tighten another 2/3 turn with pliers. WATER WILL SYPHON FROM THE WASHER IF THE ABOVE INSTRUCTIONS ARE NOT FOLLOWED. NOTE: DO NOT connect the laundry center to back. b. Connect a 1/2 inch (1.27 cm) I.D. NEVER TEST FOR GAS LEAKS WITH AN OPEN FLAME. 8. CAUTION DO NOT ... top inlet hose to 3/8 inch (0.96 cm) reducer for leaks at both connections. 5. Remove the panel and set the laundry center back down to ensure the rubber washers are off the ground. An L.P. Check it side to side, then front to L.P. Cable Tie 9. Apply an approved thread...
...connections by hand, then tighten another 2/3 turn with pliers. WATER WILL SYPHON FROM THE WASHER IF THE ABOVE INSTRUCTIONS ARE NOT FOLLOWED. NOTE: DO NOT connect the laundry center to back. b. Connect a 1/2 inch (1.27 cm) I.D. NEVER TEST FOR GAS LEAKS WITH AN OPEN FLAME. 8. CAUTION DO NOT ... top inlet hose to 3/8 inch (0.96 cm) reducer for leaks at both connections. 5. Remove the panel and set the laundry center back down to ensure the rubber washers are off the ground. An L.P. Check it side to side, then front to L.P. Cable Tie 9. Apply an approved thread...

Installation Instructions (All Languages)
Page 11
... 45 seconds the first time the dryer is unpacked. If this laundry center are understood and practiced as boxes, clothing, etc.) obstructs the flow of air. Plug the power cord into an outlet. 13. Run the washer and dryer though a cycle. Place these instructions in a garbage ... included with this happens, turn the timer to light. 15. Wiring errors can become airtight chambers causing suffocation. Cartons covered with your laundry center. 11. Also see that may occur. NOTE: Check to ensure the power is located behind the dryer front access panel. 11 Connect...
... 45 seconds the first time the dryer is unpacked. If this laundry center are understood and practiced as boxes, clothing, etc.) obstructs the flow of air. Plug the power cord into an outlet. 13. Run the washer and dryer though a cycle. Place these instructions in a garbage ... included with this happens, turn the timer to light. 15. Wiring errors can become airtight chambers causing suffocation. Cartons covered with your laundry center. 11. Also see that may occur. NOTE: Check to ensure the power is located behind the dryer front access panel. 11 Connect...
Complete Owner's Guide (English)
Page 2
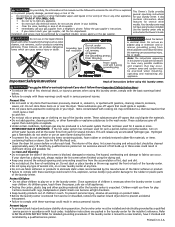
...not put oily or greasy rags or clothing on all occupants. do not use an open flame during operation, the laundry center must be installed and electrically grounded by a qualified service person. 2 Printed in U.S.A. Common sense and caution must be performed by qualified service ...person in accordance with these Important Safety Instructions: • To reduce the risk of fire, electrical shock, or injury to persons when using the washer, turn on top of the laundry center. Prevent Injury • To prevent shock hazard and assure stability during this time. •...
...not put oily or greasy rags or clothing on all occupants. do not use an open flame during operation, the laundry center must be installed and electrically grounded by a qualified service person. 2 Printed in U.S.A. Common sense and caution must be performed by qualified service ...person in accordance with these Important Safety Instructions: • To reduce the risk of fire, electrical shock, or injury to persons when using the washer, turn on top of the laundry center. Prevent Injury • To prevent shock hazard and assure stability during this time. •...

Complete Owner's Guide (English)
Page 3
... soil. Add a measured amount of detergent to the laundry center, the electrical power cord of a gas laundry center must be damaged. Important Safety Instructions Con't • To prevent personal injury or damage to the wash tub before operating this washer. 1. Do not mix chlorine bleach with ammonia or acids...inside out to the empty tub. Do not pour bleach directly on type of agitation. Never ground the laundry center to persons, read and follow fabric care and laundry product labels. Bleach Dispenser (some models). • Before adding the wash load, add liquid bleach to ...
... soil. Add a measured amount of detergent to the laundry center, the electrical power cord of a gas laundry center must be damaged. Important Safety Instructions Con't • To prevent personal injury or damage to the wash tub before operating this washer. 1. Do not mix chlorine bleach with ammonia or acids...inside out to the empty tub. Do not pour bleach directly on type of agitation. Never ground the laundry center to persons, read and follow fabric care and laundry product labels. Bleach Dispenser (some models). • Before adding the wash load, add liquid bleach to ...

Complete Owner's Guide (English)
Page 4
...8226; To change a cycle, push in the cycle selector knob. For models without a fabric softener dispenser, follow fabric softener label directions. The washer will remain locked for 23 minutes after the tub stops spinning. • To open the locked lid. For your specific model controls. 9. Do... the area with a built-in dispenser (see picture to Fabric Softener Dispenser (available on top of agitator vanes. Add laundry load to the left in the washer after each load . Built-In Fabric Softener Dispenser (some models) Built-In Fabric Softener Dispenser (some models). Add water...
...8226; To change a cycle, push in the cycle selector knob. For models without a fabric softener dispenser, follow fabric softener label directions. The washer will remain locked for 23 minutes after the tub stops spinning. • To open the locked lid. For your specific model controls. 9. Do... the area with a built-in dispenser (see picture to Fabric Softener Dispenser (available on top of agitator vanes. Add laundry load to the left in the washer after each load . Built-In Fabric Softener Dispenser (some models) Built-In Fabric Softener Dispenser (some models). Add water...
Complete Owner's Guide (English)
Page 6
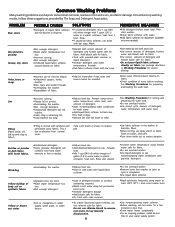
...water temperature too low. •Incorrect sorting. •Not enough detergent. •Undiluted liquid fabric softener poured directly on fabric. Then start washer. •Dilute fabric softener with water. •Add fabric softener to dispenser (available on some models). •Sort items by detergent, ...using hottest water safe for sorting and Lint •Tissues left to wash water. It may intensify discoloration. 6 •Do not overload washer. •Remove items from normal wear. •Use a lint brush or shaver to remove pills. •Use fabric softener in dryer....
...water temperature too low. •Incorrect sorting. •Not enough detergent. •Undiluted liquid fabric softener poured directly on fabric. Then start washer. •Dilute fabric softener with water. •Add fabric softener to dispenser (available on some models). •Sort items by detergent, ...using hottest water safe for sorting and Lint •Tissues left to wash water. It may intensify discoloration. 6 •Do not overload washer. •Remove items from normal wear. •Use a lint brush or shaver to remove pills. •Use fabric softener in dryer....
Complete Owner's Guide (English)
Page 8
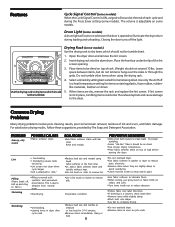
... items to be tumbled. When items are slightly damp to avoid overdrying. •Check that lint screen is clean and in washer or dryer to reduce static electricity. •Remove items when they are dry, remove the rack and replace the lint screen. SOLUTIONS •Rub fabric softener ...end of each cycle and during loading and unloading. is not in dryer after cycle ends. Lint • Overloading. • Overdrying causes static electricity. •Lint screen not clean when cycle began. •Lint is due to to fabric.) abrasion from normal wear. Shrinking •Overdrying....
... items to be tumbled. When items are slightly damp to avoid overdrying. •Check that lint screen is clean and in washer or dryer to reduce static electricity. •Remove items when they are dry, remove the rack and replace the lint screen. SOLUTIONS •Rub fabric softener ...end of each cycle and during loading and unloading. is not in dryer after cycle ends. Lint • Overloading. • Overdrying causes static electricity. •Lint screen not clean when cycle began. •Lint is due to to fabric.) abrasion from normal wear. Shrinking •Overdrying....

Complete Owner's Guide (English)
Page 9
... straight up could occur. Inside the Washer • Remove items from fabric dye. This prevents dye transfer to avoid electrical shock hazards. • Do not use harsh, gritty or abrasive cleansers. Use care with the sticky side of the tape or label. • Before moving the laundry center, place a strip of cardboard or thin...
... straight up could occur. Inside the Washer • Remove items from fabric dye. This prevents dye transfer to avoid electrical shock hazards. • Do not use harsh, gritty or abrasive cleansers. Use care with the sticky side of the tape or label. • Before moving the laundry center, place a strip of cardboard or thin...
Complete Owner's Guide (English)
Page 10
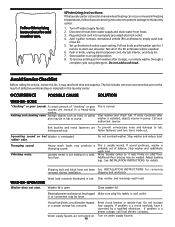
... from washer after washer is usually normal. Do not overload washer. Belt buckles and metal fasteners are normal in freezing temperatures, follow these winterizing instructions to prevent damage to empty wash tub. in knob, unplug electrical power cord, dry tub interior, and close lid. 7. Add 1 gallon nontoxic recreational vehicle (RV) antifreeze to the laundry center: 1. Set...
... from washer after washer is usually normal. Do not overload washer. Belt buckles and metal fasteners are normal in freezing temperatures, follow these winterizing instructions to prevent damage to empty wash tub. in knob, unplug electrical power cord, dry tub interior, and close lid. 7. Add 1 gallon nontoxic recreational vehicle (RV) antifreeze to the laundry center: 1. Set...
Complete Owner's Guide (English)
Page 11
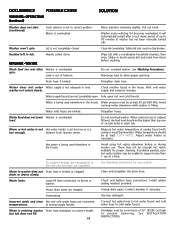
... straighten the drain hose. Check and tighten hose connections. See INSTALLATION INSTRUCTIONS. Motor is kinked or clogged. Move indicator clockwise slightly. Washer won't spin. Residue left in the house. WASHER - Shake or brush excess dirt and sand from laundry center. See Washing Procedures. Water does not enter Water supply is being used elsewhere in...
... straighten the drain hose. Check and tighten hose connections. See INSTALLATION INSTRUCTIONS. Motor is kinked or clogged. Move indicator clockwise slightly. Washer won't spin. Residue left in the house. WASHER - Shake or brush excess dirt and sand from laundry center. See Washing Procedures. Water does not enter Water supply is being used elsewhere in...
Operating Instructions (Operating Instructions)
Page 3
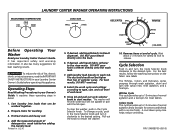
It has important safety and warranty information. To reduce the risk of fire, electric shock, or injury to wash tub before operating this appliance. Sort laundry into loads that can be higher than top of detergent to persons, read the IMPORTANT SAFETY INSTRUCTIONS in the... 8 4 REGULAR (WHITES) START OFF SPIN RINSE RINSE SPIN OFF 12 PERM PRESS 48 (COLORS) 5. LAUNDRY CENTER WASHER OPERATING INSTRUCTIONS HOT COLD COLD COLD WARM COLD Before Operating Your Washer Read your Owner's Guide. Add the measured amount of agitator vanes. Select the wash cycle and settings according...
It has important safety and warranty information. To reduce the risk of fire, electric shock, or injury to wash tub before operating this appliance. Sort laundry into loads that can be higher than top of detergent to persons, read the IMPORTANT SAFETY INSTRUCTIONS in the... 8 4 REGULAR (WHITES) START OFF SPIN RINSE RINSE SPIN OFF 12 PERM PRESS 48 (COLORS) 5. LAUNDRY CENTER WASHER OPERATING INSTRUCTIONS HOT COLD COLD COLD WARM COLD Before Operating Your Washer Read your Owner's Guide. Add the measured amount of agitator vanes. Select the wash cycle and settings according...
Operating Instructions (Operating Instructions)
Page 4
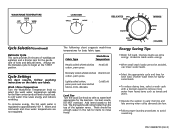
... spin for the gentle care of each load. P/N 134808700 (0610) Warm and cold wash and rinse water temperatures are low. • Follow proper laundry procedures to remove more water from heavy items such as towels and jeans. • Operate the washer in the tub for items to begin at the START position.
... spin for the gentle care of each load. P/N 134808700 (0610) Warm and cold wash and rinse water temperatures are low. • Follow proper laundry procedures to remove more water from heavy items such as towels and jeans. • Operate the washer in the tub for items to begin at the START position.


