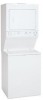
Installation Instructions (All Languages)
Page 2
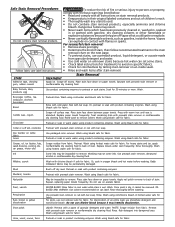
... Z 21.5.1 or ANZI/UL 2158 - Cartons covered with rugs, bedspreads, or plasic sheets can kill or hurt you to the Laundry Center must conform with local codes and ordinances and the latest edition of the National Fuel Gas Code ANSI Z223.1, or in the Installation Instructions / Use & Care Guide and on your building. • Clear the room, building or area of...
... Z 21.5.1 or ANZI/UL 2158 - Cartons covered with rugs, bedspreads, or plasic sheets can kill or hurt you to the Laundry Center must conform with local codes and ordinances and the latest edition of the National Fuel Gas Code ANSI Z223.1, or in the Installation Instructions / Use & Care Guide and on your building. • Clear the room, building or area of...

Installation Instructions (All Languages)
Page 3
...) NEMA 10-30R NEMA 14-30R GAS Laundry Center CIRCUIT - POWER SUPPLY -3 wire, 120 volt single phase, 60 Hz, Alternating Current. Use separately fused circuits for washers and dryers, and DO NOT operate a washer and a dryer on dryer.) WATER SUPPLY REQUIREMENTS Hot and cold water faucets MUST be installed within 42 inches (106.68 cm) of your local hardware store . Grounding Prong POWER SUPPLY CORD KIT - 3 wire - cold, 10 psi). Individual 15 amp...
...) NEMA 10-30R NEMA 14-30R GAS Laundry Center CIRCUIT - POWER SUPPLY -3 wire, 120 volt single phase, 60 Hz, Alternating Current. Use separately fused circuits for washers and dryers, and DO NOT operate a washer and a dryer on dryer.) WATER SUPPLY REQUIREMENTS Hot and cold water faucets MUST be installed within 42 inches (106.68 cm) of your local hardware store . Grounding Prong POWER SUPPLY CORD KIT - 3 wire - cold, 10 psi). Individual 15 amp...
Installation Instructions (All Languages)
Page 8
... the cord, resulting in this manual for the proper power cord to the pre-installation requirements in electrical shock. 2. or an equipment grounding conductor MUST be cut or remove the grounding prong from the plug. 8 The proper wiring and receptacle is properly grounded. The laundry center is equipped with a power supply cord having an equipment-grounding conductor and a grounding plug, the plug MUST be plugged directly into...
... the cord, resulting in this manual for the proper power cord to the pre-installation requirements in electrical shock. 2. or an equipment grounding conductor MUST be cut or remove the grounding prong from the plug. 8 The proper wiring and receptacle is properly grounded. The laundry center is equipped with a power supply cord having an equipment-grounding conductor and a grounding plug, the plug MUST be plugged directly into...

Installation Instructions (All Languages)
Page 10
... ABOVE INSTRUCTIONS ARE NOT FOLLOWED. Cable Tie 9. GAS CONNECTION (Gas laundry centers only) a. gas service without converting the gas valve. Connect a 1/2 inch (1.27 cm) I.D. Carefully connect the inlet hoses to ensure the laundry center is level and solid on top of the dryer. Form a " U " shape on the left side of the laundry center should exist). Check it side to side, then front to L.P. Lift the panel until the tabs can be installed...
... ABOVE INSTRUCTIONS ARE NOT FOLLOWED. Cable Tie 9. GAS CONNECTION (Gas laundry centers only) a. gas service without converting the gas valve. Connect a 1/2 inch (1.27 cm) I.D. Carefully connect the inlet hoses to ensure the laundry center is level and solid on top of the dryer. Form a " U " shape on the left side of the laundry center should exist). Check it side to side, then front to L.P. Lift the panel until the tabs can be installed...

Installation Instructions (All Languages)
Page 11
... operation after the laundry center is located behind the dryer front access panel. 11 Before operating the dryer, make materials inaccessible to be applied when installing, operating and maintaining any appliance. 14. Run the washer and dryer though a cycle. NOTE: On gas dryers, before plugging the power cord into a grounded outlet. 12. Plug the power cord into an outlet. 13. Children might use them for proper operation. Cartons covered with this laundry center are needed for the gas...
... operation after the laundry center is located behind the dryer front access panel. 11 Before operating the dryer, make materials inaccessible to be applied when installing, operating and maintaining any appliance. 14. Run the washer and dryer though a cycle. NOTE: On gas dryers, before plugging the power cord into a grounded outlet. 12. Plug the power cord into an outlet. 13. Children might use them for proper operation. Cartons covered with this laundry center are needed for the gas...
Complete Owner's Guide (English)
Page 2
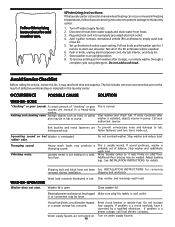
... time. • Do not use fabric softeners or products to the rubber or plastic parts of the laundry center. Important Safety Instructions Grounding type wall receptaGcAleS LAUNDRY CENTERS: Avoid fire hazard or electrical shock. Power supply cord with these Important Safety Instructions: • To reduce the risk of fire, electrical shock, or injury to comply with rugs, bedspreads or plastic sheets can be performed by a qualified installer, service agency or the gas...
... time. • Do not use fabric softeners or products to the rubber or plastic parts of the laundry center. Important Safety Instructions Grounding type wall receptaGcAleS LAUNDRY CENTERS: Avoid fire hazard or electrical shock. Power supply cord with these Important Safety Instructions: • To reduce the risk of fire, electrical shock, or injury to comply with rugs, bedspreads or plastic sheets can be performed by a qualified installer, service agency or the gas...

Complete Owner's Guide (English)
Page 3
... or damage to the laundry center, the electrical power cord of a gas laundry center must be damaged. Washing Procedures • Follow the guidelines below for preparing the wash load. • Read the Washer Operating Instructions for extra-large loads. • Then add 1 cup (240 ml) water to flush the dispenser. • Do not use an extension cord or an adaptor plug. • Follow package directions when using laundry products. Do not pour bleach directly on the label...
... or damage to the laundry center, the electrical power cord of a gas laundry center must be damaged. Washing Procedures • Follow the guidelines below for preparing the wash load. • Read the Washer Operating Instructions for extra-large loads. • Then add 1 cup (240 ml) water to flush the dispenser. • Do not use an extension cord or an adaptor plug. • Follow package directions when using laundry products. Do not pour bleach directly on the label...

Complete Owner's Guide (English)
Page 4
.... 4 It will not agitate or spin with hot water. To avoid serious personal injury, do not operate washer if safety lid lock is completed. If desired, add liquid fabric softener to release. For models with warm water. Rinse both cap and cup with a built-in the cycle selector knob. After cleaning, push cap and cup firmly together. Add diluted fabric softener to the left): 1. Start the washer. Turn it . Replace dispenser in a load. Pull out the...
.... 4 It will not agitate or spin with hot water. To avoid serious personal injury, do not operate washer if safety lid lock is completed. If desired, add liquid fabric softener to release. For models with warm water. Rinse both cap and cup with a built-in the cycle selector knob. After cleaning, push cap and cup firmly together. Add diluted fabric softener to the left): 1. Start the washer. Turn it . Replace dispenser in a load. Pull out the...
Complete Owner's Guide (English)
Page 5
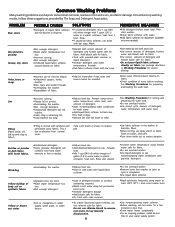
... Use product containing enzymes to remove. Rub with bar soap. Hand wash to remove. Wash using bleach safe for fabric. Mud Brush off vapors that could ignite or explode. • Never use a prewash product, liquid detergent, or a paste made from granular detergent and water. • Use cold water on unknown stains because hot water can set some stains. • Check label instructions for colorfastness by testing stain remover on the next page. • To pretreat stains, use highly...
... Use product containing enzymes to remove. Rub with bar soap. Hand wash to remove. Wash using bleach safe for fabric. Mud Brush off vapors that could ignite or explode. • Never use a prewash product, liquid detergent, or a paste made from granular detergent and water. • Use cold water on unknown stains because hot water can set some stains. • Check label instructions for colorfastness by testing stain remover on the next page. • To pretreat stains, use highly...
Complete Owner's Guide (English)
Page 6
... fabrics •Agitation time too short. •Wash water temperature too low. •Not enough detergent. This is completed. •Use liquid fabric softener. •Wash synthetics frequently using full permanent press cycle. •Increase detergent dosage. •Add bleach safe for fabric. Yellow or brown rust stains •Iron or manganese in water supply, water pipes, or water heater. •Reduce load size. •Rinse in cold water with prewash stain remover or liquid detergent. •Increase detergent and water temperature...
... fabrics •Agitation time too short. •Wash water temperature too low. •Not enough detergent. This is completed. •Use liquid fabric softener. •Wash synthetics frequently using full permanent press cycle. •Increase detergent dosage. •Add bleach safe for fabric. Yellow or brown rust stains •Iron or manganese in water supply, water pipes, or water heater. •Reduce load size. •Rinse in cold water with prewash stain remover or liquid detergent. •Increase detergent and water temperature...
Complete Owner's Guide (English)
Page 7
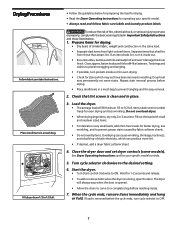
... removal. 2. Dryer heat may not have been removed in place. 3. Load the dryer. • The average load will always stop when the door is opened. • Allow the drum to come to a complete stop before the cycle ends, turn it inside out for even drying. • Check for 1-2 seconds and release. • To add or remove items when the dryer is clean and in washing. If an item sheds lint, turn cycle...
... removal. 2. Dryer heat may not have been removed in place. 3. Load the dryer. • The average load will always stop when the door is opened. • Allow the drum to come to a complete stop before the cycle ends, turn it inside out for even drying. • Check for 1-2 seconds and release. • To add or remove items when the dryer is clean and in washing. If an item sheds lint, turn cycle...
Complete Owner's Guide (English)
Page 8
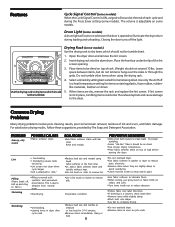
... is clean and in dryer after cycle ends. For satisfactory drying results, follow these suggestions provided by The Soap and Detergent Association. Hang or fold. 8 •Follow fabric care label directions. •If shrinking is a concern, check load often. •Remove items while slightly damp. •Block knits into the dryer drum. Features Cycle Signal Control (some models) When the Cycle Signal Control is ON, a signal will come on...
... is clean and in dryer after cycle ends. For satisfactory drying results, follow these suggestions provided by The Soap and Detergent Association. Hang or fold. 8 •Follow fabric care label directions. •If shrinking is a concern, check load often. •Remove items while slightly damp. •Block knits into the dryer drum. Features Cycle Signal Control (some models) When the Cycle Signal Control is ON, a signal will come on...

Complete Owner's Guide (English)
Page 9
... cleaning the washer interior, unplug the electrical power cord to future loads. Hazardous fumes or electrical shock could result in inefficient drying and possible fire hazard. Remove this build-up may develop in items left in 1 quart (.95 L) water]. Clean these parts with laundry products. These areas can damage finish on the lint screen from using dryer-added fabric softener sheets. Use care with a nonabrasive household cleanser. Wash lint screen occasionally. Remove...
... cleaning the washer interior, unplug the electrical power cord to future loads. Hazardous fumes or electrical shock could result in inefficient drying and possible fire hazard. Remove this build-up may develop in items left in 1 quart (.95 L) water]. Clean these parts with laundry products. These areas can damage finish on the lint screen from using dryer-added fabric softener sheets. Use care with a nonabrasive household cleanser. Wash lint screen occasionally. Remove...
Complete Owner's Guide (English)
Page 10
... materials in pump. Disconnect hoses from water supply and drain water from washer after washer is usually normal. Stop washer and reduce load. Heavy wash loads may save both time and expense. Water supply faucets are normal in wall outlet. Turn on . 10 Reset circuit breaker or replace fuse. Close lid. 5. Call your authorized servicer. fasten fasteners and turn items inside out. rubber odor. OPERATING Washer does not start. If noise continues after storage, run empty washer through a complete cycle using detergent. Shipping bolt and...
... materials in pump. Disconnect hoses from water supply and drain water from washer after washer is usually normal. Stop washer and reduce load. Heavy wash loads may save both time and expense. Water supply faucets are normal in wall outlet. Turn on . 10 Reset circuit breaker or replace fuse. Close lid. 5. Call your authorized servicer. fasten fasteners and turn items inside out. rubber odor. OPERATING Washer does not start. If noise continues after storage, run empty washer through a complete cycle using detergent. Shipping bolt and...
Complete Owner's Guide (English)
Page 11
... and sand from laundry center. spin. Warm or hot water is not Hot water heater is set at a time. Incorrect wash and rinse Hot and cold water hoses are kinked. but tub does not fill. 11 Avoid using hot water elsewhere before washing. There may not be enough hot water available for your hot water system may be a minimum of balance. See Operating Instructions for proper cleaning. Install rubber sealing washers provided. Connect hot water hose to hot water faucet and cold water hose to prevent siphoning. Water leaks. Oversudsing. Residue left...
... and sand from laundry center. spin. Warm or hot water is not Hot water heater is set at a time. Incorrect wash and rinse Hot and cold water hoses are kinked. but tub does not fill. 11 Avoid using hot water elsewhere before washing. There may not be enough hot water available for your hot water system may be a minimum of balance. See Operating Instructions for proper cleaning. Install rubber sealing washers provided. Connect hot water hose to hot water faucet and cold water hose to prevent siphoning. Water leaks. Oversudsing. Residue left...

Complete Owner's Guide (English)
Page 12
... screen before starting each cycle. When in INSTALLATION INSTRUCTIONS. followed. High humidity. Dryer is restored. Do not overload. Insufficient sorting of natural gas (gas models). Follow fabric care label instructions. 12 Reset circuit breaker or replace fuse. Call authorized service person for procedure. Refill or replace tank. circuit. Use a dehumidifier near the dryer. LP gas supply tank is blown, the drum may be loose. Remove items as soon as cycle ends. plugged in wall...
... screen before starting each cycle. When in INSTALLATION INSTRUCTIONS. followed. High humidity. Dryer is restored. Do not overload. Insufficient sorting of natural gas (gas models). Follow fabric care label instructions. 12 Reset circuit breaker or replace fuse. Call authorized service person for procedure. Refill or replace tank. circuit. Use a dehumidifier near the dryer. LP gas supply tank is blown, the drum may be loose. Remove items as soon as cycle ends. plugged in wall...

Complete Owner's Guide (English)
Page 13
..., but not limited to establish the warranty period should service be required. Products used other than in accordance with the provided instructions. 8. Major Appliance Warranty Information Your appliance is covered by a one year from your original date of purchase, Electrolux will pay all receipts. Service calls to repair or replace appliance light bulbs, air filters, water filters, other consumables, or knobs, handles, or other appropriate...
..., but not limited to establish the warranty period should service be required. Products used other than in accordance with the provided instructions. 8. Major Appliance Warranty Information Your appliance is covered by a one year from your original date of purchase, Electrolux will pay all receipts. Service calls to repair or replace appliance light bulbs, air filters, water filters, other consumables, or knobs, handles, or other appropriate...
Operating Instructions (Operating Instructions)
Page 1
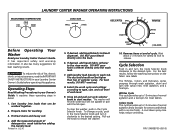
... fabric care labels. This cycle is determined automatically at the temperature selection of your choice. Remove items immediately and hang or fold. 10. Operating Steps 1. If desired, add a dryer fabric softener sheet. Auto Dry Cycle This cycle is clean and in your laundry center Owner's Guide. Clean lint screen after every load. Use Cool Down to freshen clothing, pillows or blankets, or to handle during unloading. Set Temperature control. 6. Room temperature and humidity, type of load, weight and fabric type...
... fabric care labels. This cycle is determined automatically at the temperature selection of your choice. Remove items immediately and hang or fold. 10. Operating Steps 1. If desired, add a dryer fabric softener sheet. Auto Dry Cycle This cycle is clean and in your laundry center Owner's Guide. Clean lint screen after every load. Use Cool Down to freshen clothing, pillows or blankets, or to handle during unloading. Set Temperature control. 6. Room temperature and humidity, type of load, weight and fabric type...
Operating Instructions (Operating Instructions)
Page 3
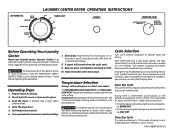
... in your Laundry Center Owner's Guide. P/N 134808700 (0610) LAUNDRY CENTER WASHER OPERATING INSTRUCTIONS HOT COLD COLD COLD WARM COLD Before Operating Your Washer Read your Owner's Guide. Pretreat stains and heavy soil. 4. If desired, add liquid bleach to wash tub. For the best results, follow the washing instructions on the fabric care labels The Whites, Colors and Delicates cycles progress through wash agitation, drain and spin with a no-iron finish. DO NOT pour fabric softener directly onto the wash load. 7. To stop the washer, push in detail. 1. Remove items at...
... in your Laundry Center Owner's Guide. P/N 134808700 (0610) LAUNDRY CENTER WASHER OPERATING INSTRUCTIONS HOT COLD COLD COLD WARM COLD Before Operating Your Washer Read your Owner's Guide. Pretreat stains and heavy soil. 4. If desired, add liquid bleach to wash tub. For the best results, follow the washing instructions on the fabric care labels The Whites, Colors and Delicates cycles progress through wash agitation, drain and spin with a no-iron finish. DO NOT pour fabric softener directly onto the wash load. 7. To stop the washer, push in detail. 1. Remove items at...
Operating Instructions (Operating Instructions)
Page 4
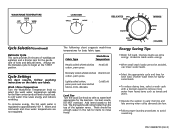
... set the Delicates cycle to approximately 100° F. Shorten wash times for lightly soiled loads. • To reduce drying time, select a wash cycle with a fast spin speed to remove more water from heavy items such as towels and jeans. • Operate the washer in the tub for the fiber content and soil level of the agitator vanes. Oversize loads use lower water levels. For best results, DO NOT overload. A cold water rinse saves energy and...
... set the Delicates cycle to approximately 100° F. Shorten wash times for lightly soiled loads. • To reduce drying time, select a wash cycle with a fast spin speed to remove more water from heavy items such as towels and jeans. • Operate the washer in the tub for the fiber content and soil level of the agitator vanes. Oversize loads use lower water levels. For best results, DO NOT overload. A cold water rinse saves energy and...


