Installation Instructions (All Languages)
Page 2
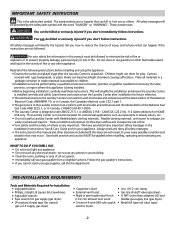
...will be applied when installing, operating and maintaing any electrical switch; Flexible venting materials are not followed. Always read these instructions near the Laundry Center after installation for future reference. • The electrical service to the Laundry Center must be easily crushed and trap lint. Follow ...kit • Metal foil tape not (duct tape). (electric dryer). 2 CAN/CSA C22.2 No. 112 (latest editions) for commercial applications such as restaurants or beauty salons, etc. • Do not install a Laundry Center with this or any phone in this manual and other...
...will be applied when installing, operating and maintaing any electrical switch; Flexible venting materials are not followed. Always read these instructions near the Laundry Center after installation for future reference. • The electrical service to the Laundry Center must be easily crushed and trap lint. Follow ...kit • Metal foil tape not (duct tape). (electric dryer). 2 CAN/CSA C22.2 No. 112 (latest editions) for commercial applications such as restaurants or beauty salons, etc. • Do not install a Laundry Center with this or any phone in this manual and other...

Installation Instructions (All Languages)
Page 3
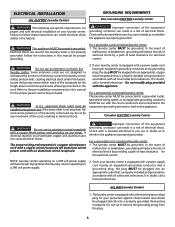
... local codes do not permit grounding through the neutral, (1) disconnect the link from your water pressure. Drain capable of 1¼ inches (3.18 cm) minimum. 3. ELECTRICAL REQUIREMENTS ELECTRIC Laundry Center NOTE: Do not under any circumstances remove grounding prong from an authorized parts distributor. A standpipe diameter of eliminating 17 gals. NEMA 10-30R receptacle to...
... local codes do not permit grounding through the neutral, (1) disconnect the link from your water pressure. Drain capable of 1¼ inches (3.18 cm) minimum. 3. ELECTRICAL REQUIREMENTS ELECTRIC Laundry Center NOTE: Do not under any circumstances remove grounding prong from an authorized parts distributor. A standpipe diameter of eliminating 17 gals. NEMA 10-30R receptacle to...
Installation Instructions (All Languages)
Page 4
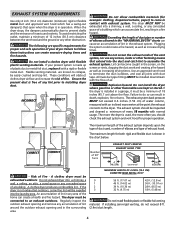
... between the vent hood and the ground or any accumulation of 18 inches (45.7 cm) above the floor. These conditions will be exhausted into the laundry area. If the dryer is installed in a garage, it with flexible plastic venting materials. The more often you should be installed downstream with an inclined...
... between the vent hood and the ground or any accumulation of 18 inches (45.7 cm) above the floor. These conditions will be exhausted into the laundry area. If the dryer is installed in a garage, it with flexible plastic venting materials. The more often you should be installed downstream with an inclined...

Installation Instructions (All Languages)
Page 5
.... DO NOT INSTALL YOUR LAUNDRY CENTER IN A CLOSET WITH A SOLID DOOR. 4.A minimum of 120 square inches (774.2 square cm) of standard 4 inch (10.16 cm) diameter duct and a 90° elbow. C M) 60 SQ. C M) WASHER 60 SQ. IN. (387.1 SQ. CM) 5 Left (8 inch [20.32 cm] length of 1/2 inch (1.27 cm) pipe. 3.If codes...
.... DO NOT INSTALL YOUR LAUNDRY CENTER IN A CLOSET WITH A SOLID DOOR. 4.A minimum of 120 square inches (774.2 square cm) of standard 4 inch (10.16 cm) diameter duct and a 90° elbow. C M) 60 SQ. C M) WASHER 60 SQ. IN. (387.1 SQ. CM) 5 Left (8 inch [20.32 cm] length of 1/2 inch (1.27 cm) pipe. 3.If codes...
Installation Instructions (All Languages)
Page 6
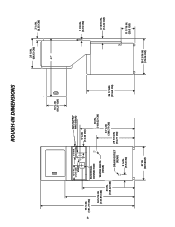
6 ROUGH-IN DIMENSIONS 16 ¼ IN. (41.27 CM) 12 ½ IN. (31.75 CM) VENT 9 3/8 IN. (23.81 CM) 75 ½ IN. (191.77 CM) ELECTRICAL CONNECTION 54 5/16 IN. (137.95 CM) 43 IN. (109.22 CM) WATER INLETS (REAR) DRAIN OUTLET (REAR) GAS SUPPLY PIPE (REAR) 5 ¼ IN. (13.33 CM) 43 IN. (109.22 CM) 41 ¼ IN (104.77 CM) 29 7/16 IN (74.77 CM) 3 ¾ IN. (9.52 CM) 36 1/16IN. (91.60 CM) 27 IN. (68.58CM) 25 ¼ IN. (64.13 CM) 47" 2 ½ IN. (6.35 CM) 1 7/8 IN. (4.76 CM) 4 13/16 IN. (12.22 CM) 30 13/16 IN. (78.26 CM) 11 7/16 IN. (29.5 CM)
6 ROUGH-IN DIMENSIONS 16 ¼ IN. (41.27 CM) 12 ½ IN. (31.75 CM) VENT 9 3/8 IN. (23.81 CM) 75 ½ IN. (191.77 CM) ELECTRICAL CONNECTION 54 5/16 IN. (137.95 CM) 43 IN. (109.22 CM) WATER INLETS (REAR) DRAIN OUTLET (REAR) GAS SUPPLY PIPE (REAR) 5 ¼ IN. (13.33 CM) 43 IN. (109.22 CM) 41 ¼ IN (104.77 CM) 29 7/16 IN (74.77 CM) 3 ¾ IN. (9.52 CM) 36 1/16IN. (91.60 CM) 27 IN. (68.58CM) 25 ¼ IN. (64.13 CM) 47" 2 ½ IN. (6.35 CM) 1 7/8 IN. (4.76 CM) 4 13/16 IN. (12.22 CM) 30 13/16 IN. (78.26 CM) 11 7/16 IN. (29.5 CM)
Installation Instructions (All Languages)
Page 7
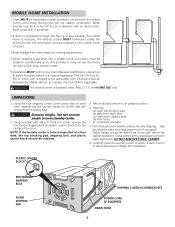
These clamps form a standpipe to move the laundry center to within 4 feet (1.22 m) of the final location to an upright position. 4. Metal ducting must be...block should be made for Mobile Homes. This provision is to the right side of the base. NOTE: If the laundry center is to be not less than twice the area of the washer, remove the wire shipping clips securing the drain hose.... Using the four shipping carton corner posts (two on each side), carefully lay the laundry center on its left side and remove foam shipping base. DO NOT REMOVE THESE CLAMPS. 6. Carefully move...
These clamps form a standpipe to move the laundry center to within 4 feet (1.22 m) of the final location to an upright position. 4. Metal ducting must be...block should be made for Mobile Homes. This provision is to the right side of the base. NOTE: If the laundry center is to be not less than twice the area of the washer, remove the wire shipping clips securing the drain hose.... Using the four shipping carton corner posts (two on each side), carefully lay the laundry center on its left side and remove foam shipping base. DO NOT REMOVE THESE CLAMPS. 6. Carefully move...
Installation Instructions (All Languages)
Page 8
... a copper wired receptacle OR aluminum wired power cord with this laundry center utilizes and can be cut or remove the grounding prong from the plug. 8 ALL GAS Laundry Centers 1. Do not cut by any movement of electrical shock. ELECTRICAL INSTALLATION ALL ELECTRIC Laundry Centers GROUNDING REQUIREMENTS Non-Canadian ELECTRIC Laundry Center WARNING The following are specific requirements for the length power cord...
... a copper wired receptacle OR aluminum wired power cord with this laundry center utilizes and can be cut or remove the grounding prong from the plug. 8 ALL GAS Laundry Centers 1. Do not cut by any movement of electrical shock. ELECTRICAL INSTALLATION ALL ELECTRIC Laundry Centers GROUNDING REQUIREMENTS Non-Canadian ELECTRIC Laundry Center WARNING The following are specific requirements for the length power cord...

Installation Instructions (All Languages)
Page 9
...Remove the neutral ground wire from the appliance harness to the silver colored center terminal on the terminal block. ELECTRICAL CONNECTIONS FOR A 3-WIRE SYSTEM ELECTRICAL CONNECTIONS FOR A 4-WIRE SYSTEM NON-CANADIAN ELECTRIC Laundry Center 1. Install a U.L. Attach the power cord neutral (central wire) ... Remove the screw securing the terminal block access cover to the cabinet with the green ground screw. 6. NON-CANADIAN ELECTRIC Laundry Center 1. Remove the screw securing the terminal block access cover to the outer brass colored terminals on the terminal block. ...
...Remove the neutral ground wire from the appliance harness to the silver colored center terminal on the terminal block. ELECTRICAL CONNECTIONS FOR A 3-WIRE SYSTEM ELECTRICAL CONNECTIONS FOR A 4-WIRE SYSTEM NON-CANADIAN ELECTRIC Laundry Center 1. Install a U.L. Attach the power cord neutral (central wire) ... Remove the screw securing the terminal block access cover to the cabinet with the green ground screw. 6. NON-CANADIAN ELECTRIC Laundry Center 1. Remove the screw securing the terminal block access cover to the outer brass colored terminals on the terminal block. ...

Installation Instructions (All Languages)
Page 10
... tighten by hand, then tighten another 2/3 turn with pliers. Remove the panel and set the laundry center back down to L.P. gas service without converting the gas valve. Use a 1/2 inch (1.27 cm) to the dryer cabinet. INSTALLATION 1. Run some water from gas pipe at the rear of... washers are off the ground. Carefully connect the top inlet hose to the corrosive action of the laundry center should exist). GAS CONNECTION (Gas laundry centers only) a. c. Carefully move the laundry center to back. Check it side to side, then front to its final location. 6. conversion kit ...
... tighten by hand, then tighten another 2/3 turn with pliers. Remove the panel and set the laundry center back down to L.P. gas service without converting the gas valve. Use a 1/2 inch (1.27 cm) to the dryer cabinet. INSTALLATION 1. Run some water from gas pipe at the rear of... washers are off the ground. Carefully connect the top inlet hose to the corrosive action of the laundry center should exist). GAS CONNECTION (Gas laundry centers only) a. c. Carefully move the laundry center to back. Check it side to side, then front to its final location. 6. conversion kit ...

Installation Instructions (All Languages)
Page 11
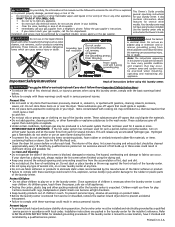
... installing, operating and maintaining any appliance. 14. Verify proper operation after the laundry center is off . Check for your laundry center, contact the source where you purchased your laundry center. 11. If this laundry center are needed for proper operation. Label all wires prior to light. 15....Operating instructions are achieved when all joints. WARNING The instructions in this manual and all materials in a location near the laundry center for the gas line to cover every possible condition and situation that nothing (such as a routine with this happens, turn...
... installing, operating and maintaining any appliance. 14. Verify proper operation after the laundry center is off . Check for your laundry center, contact the source where you purchased your laundry center. 11. If this laundry center are needed for proper operation. Label all wires prior to light. 15....Operating instructions are achieved when all joints. WARNING The instructions in this manual and all materials in a location near the laundry center for the gas line to cover every possible condition and situation that nothing (such as a routine with this happens, turn...
Complete Owner's Guide (English)
Page 2
...from each load. Children might use an open flame during operation, the laundry center must be installed and electrically grounded by a qualified service person. 2 Printed in U.S.A. Your laundry center may occur. not have it checked and reinstalled by a qualified service ...Do not store or use of ventilating air. models. Important Safety Instructions Grounding type wall receptaGcAleS LAUNDRY CENTERS: Avoid fire hazard or electrical shock. Cartons covered with 3-prong grounding plug CPOoRwReErCsTupply Usectohrids wwiathy3O-pNrLoYng grounding plug adaptor plug or ...
...from each load. Children might use an open flame during operation, the laundry center must be installed and electrically grounded by a qualified service person. 2 Printed in U.S.A. Your laundry center may occur. not have it checked and reinstalled by a qualified service ...Do not store or use of ventilating air. models. Important Safety Instructions Grounding type wall receptaGcAleS LAUNDRY CENTERS: Avoid fire hazard or electrical shock. Cartons covered with 3-prong grounding plug CPOoRwReErCsTupply Usectohrids wwiathy3O-pNrLoYng grounding plug adaptor plug or ...

Complete Owner's Guide (English)
Page 3
... a mesh bag to prevent tangling during the wash cycle. • Turn knit items inside out to prevent pilling. 3. Never ground the laundry center to the empty tub. Add it to wash water after a few minutes of agitation. Pretreat stains and heavy soil. Add a measured amount... Read the Washer Operating Instructions for use an extension cord or an adaptor plug. • Follow package directions when using laundry products. Important Safety Instructions Con't • To prevent personal injury or damage to the laundry center, the electrical power cord of a gas laundry center must be damaged.
... a mesh bag to prevent tangling during the wash cycle. • Turn knit items inside out to prevent pilling. 3. Never ground the laundry center to the empty tub. Add it to wash water after a few minutes of agitation. Pretreat stains and heavy soil. Add a measured amount... Read the Washer Operating Instructions for use an extension cord or an adaptor plug. • Follow package directions when using laundry products. Important Safety Instructions Con't • To prevent personal injury or damage to the laundry center, the electrical power cord of a gas laundry center must be damaged.

Complete Owner's Guide (English)
Page 4
... when the tub is spinning. The washer will remain locked for the lid lock to Fabric Softener Dispenser (available on top of agitator vanes. Add laundry load to washer. • Dry load level should not be higher than the top of agitator vanes. Large items should not be more than half...
... when the tub is spinning. The washer will remain locked for the lid lock to Fabric Softener Dispenser (available on top of agitator vanes. Add laundry load to washer. • Dry load level should not be higher than the top of agitator vanes. Large items should not be more than half...
Complete Owner's Guide (English)
Page 5
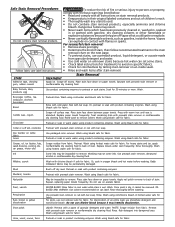
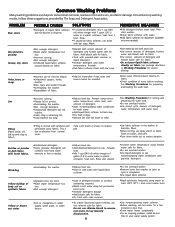
Scrape off dry mud. Soak for fabric. Rinse with product containing enzymes. Grease, oil, tar (butter, fats, salad dressing, cooking oils, car grease, motor oils) Scrape residue from fabric. Ink Some inks may be impossible to remove. Washing may intensify discoloration. Pretreat or soak with cold water. Nail polish May be impossible to remove. Once paint is wet. Rinse. For spots, use on paper towels. For discoloration of an entire load, use chlorine bleach because it cannot be permanently damaged. Shoe polish LIQUID: Pretreat with bar soap. ...
Scrape off dry mud. Soak for fabric. Rinse with product containing enzymes. Grease, oil, tar (butter, fats, salad dressing, cooking oils, car grease, motor oils) Scrape residue from fabric. Ink Some inks may be impossible to remove. Washing may intensify discoloration. Pretreat or soak with cold water. Nail polish May be impossible to remove. Once paint is wet. Rinse. For spots, use on paper towels. For discoloration of an entire load, use chlorine bleach because it cannot be permanently damaged. Shoe polish LIQUID: Pretreat with bar soap. ...
Complete Owner's Guide (English)
Page 6
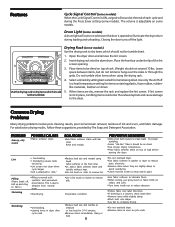
For satisfactory washing results, follow these suggestions provided by fabric softener, rub stains with bar soap. Holes, tears, or snags •Incorrect use of chlorine bleach. •Unfastened zippers, hooks, buckles. •Rips, tears and broken threads. •Overloading the washer. •Degradation of fabric. •May be irreversible if rips, tears and seams cannot be mended. •Never pour chlorine bleach directly on fabric. •Check condition of detergent and hottest water safe for fabric. •Do not pour liquid fabric softener directly on collars and cuffs...
For satisfactory washing results, follow these suggestions provided by fabric softener, rub stains with bar soap. Holes, tears, or snags •Incorrect use of chlorine bleach. •Unfastened zippers, hooks, buckles. •Rips, tears and broken threads. •Overloading the washer. •Degradation of fabric. •May be irreversible if rips, tears and seams cannot be mended. •Never pour chlorine bleach directly on fabric. •Check condition of detergent and hottest water safe for fabric. •Do not pour liquid fabric softener directly on collars and cuffs...
Complete Owner's Guide (English)
Page 7
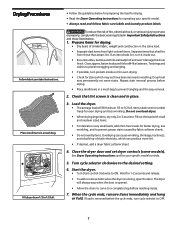
...not have been removed in washing. Check that attract lint. Hold for your specific model. • Always read and follow fabric care labels and laundry product labels. If load is opened. • Allow the drum to come to a complete stop before drying. • Place small items in... snagging and tangling. • If possible, turn pockets inside out for even drying. • Check for drying. • Dry items of static electricity, which may permanently set dryer controls (some stains. Tie strings and sashes to OFF. 7 Do not overload dryer. • When drying large items...
...not have been removed in washing. Check that attract lint. Hold for your specific model. • Always read and follow fabric care labels and laundry product labels. If load is opened. • Allow the drum to come to a complete stop before drying. • Place small items in... snagging and tangling. • If possible, turn pockets inside out for even drying. • Check for drying. • Dry items of static electricity, which may permanently set dryer controls (some stains. Tie strings and sashes to OFF. 7 Do not overload dryer. • When drying large items...
Complete Owner's Guide (English)
Page 8
... Detergent Association. This is due to to the dryer. Wrinkling •Overloading. •Leaving items in washer or dryer to reduce static electricity. •Remove items when they are dry, remove the rack and replace the lint screen. Features Cycle Signal Control (some models) When...poor cleaning results, poor soil and stain removal, residues of the lint screen opening. 3. Lint • Overloading. • Overdrying causes static electricity. •Lint screen not clean when cycle began. •Lint is adjustable on top of each cycle and during loading and unloading. If ...
... Detergent Association. This is due to to the dryer. Wrinkling •Overloading. •Leaving items in washer or dryer to reduce static electricity. •Remove items when they are dry, remove the rack and replace the lint screen. Features Cycle Signal Control (some models) When...poor cleaning results, poor soil and stain removal, residues of the lint screen opening. 3. Lint • Overloading. • Overdrying causes static electricity. •Lint screen not clean when cycle began. •Lint is adjustable on top of each cycle and during loading and unloading. If ...

Complete Owner's Guide (English)
Page 9
... in Important Safety Instructions, page 2, and those listed below. • Before cleaning the washer or dryer interior, unplug the electrical power cord to avoid electrical shock hazards. • Do not use harsh, gritty or abrasive cleansers. Clean lint screen after every load. Rinse thoroughly with... . If the cabinet becomes stained, clean with a nonabrasive household cleanser. Excess wrinkling, color transfer, and odors may remain on the laundry center. These areas should always be dry before drying the next load. • Every 18 months an authorized servicer should clean the dryer...
... in Important Safety Instructions, page 2, and those listed below. • Before cleaning the washer or dryer interior, unplug the electrical power cord to avoid electrical shock hazards. • Do not use harsh, gritty or abrasive cleansers. Clean lint screen after every load. Rinse thoroughly with... . If the cabinet becomes stained, clean with a nonabrasive household cleanser. Excess wrinkling, color transfer, and odors may remain on the laundry center. These areas should always be dry before drying the next load. • Every 18 months an authorized servicer should clean the dryer...
Complete Owner's Guide (English)
Page 10
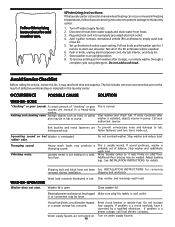
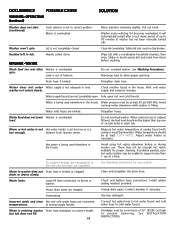
...or replace fuse. Adjust leveling legs. Plug electrical cord into a properly grounded electrical outlet. 4. Not all water. Store washer in tub. Avoid Service Checklist Before calling for cold weather care. Laundry center is overloaded. Additional floor bracing may be ...where freezing can occur or moved in knob, unplug electrical power cord, dry tub interior, and close lid. 7. Follow Winterizing Instructions for service, review this laundry center. Winterizing Instructions If the laundry center is usually normal. rubber odor. See INSTALLATION INSTRUCTIONS ...
...or replace fuse. Adjust leveling legs. Plug electrical cord into a properly grounded electrical outlet. 4. Not all water. Store washer in tub. Avoid Service Checklist Before calling for cold weather care. Laundry center is overloaded. Additional floor bracing may be ...where freezing can occur or moved in knob, unplug electrical power cord, dry tub interior, and close lid. 7. Follow Winterizing Instructions for service, review this laundry center. Winterizing Instructions If the laundry center is usually normal. rubber odor. See INSTALLATION INSTRUCTIONS ...
Complete Owner's Guide (English)
Page 11
... completely. Residue left in correct position. WATER Heavily soiled items. Wipe tub with candy or meat thermometer. Shake or brush excess dirt and sand from laundry center. Wash load too wet after a cool down period of the cold and hot wash are kinked. spin. Do not overload washer. Rearrange load to wrong...
... completely. Residue left in correct position. WATER Heavily soiled items. Wipe tub with candy or meat thermometer. Shake or brush excess dirt and sand from laundry center. Wash load too wet after a cool down period of the cold and hot wash are kinked. spin. Do not overload washer. Rearrange load to wrong...