Installation Instructions (All Languages)
Page 2
... designed under ANSI Z 21.5.1 or ANZI/UL 2158 - Place all of the following instructions before installing and using this appliance. • Destroy the carton and plastic bags after installation for future reference. • The electrical service to the Laundry Center must conform with local codes and ordinances and the latest edition of the National...
... designed under ANSI Z 21.5.1 or ANZI/UL 2158 - Place all of the following instructions before installing and using this appliance. • Destroy the carton and plastic bags after installation for future reference. • The electrical service to the Laundry Center must conform with local codes and ordinances and the latest edition of the National...

Installation Instructions (All Languages)
Page 3
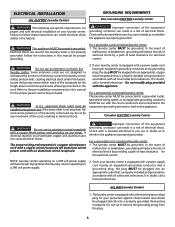
... capable of a cord kit, use grounding terminal or lead to branch circuit neutral in usual manner (if the appliance is in the floor, install a siphon break kit, available from plug. The standpipe height above the floor should be between 10 and 120 pounds per minute. 2. ELECTRICAL REQUIREMENTS ELECTRIC Laundry Center NOTE: Do not under any...
... capable of a cord kit, use grounding terminal or lead to branch circuit neutral in usual manner (if the appliance is in the floor, install a siphon break kit, available from plug. The standpipe height above the floor should be between 10 and 120 pounds per minute. 2. ELECTRICAL REQUIREMENTS ELECTRIC Laundry Center NOTE: Do not under any...
Installation Instructions (All Languages)
Page 4
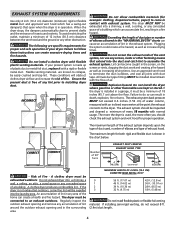
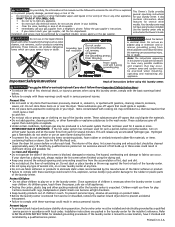
...remove any accumulation of lint in the surrounding area. Plugging the system could create a fire hazard, as well as increasing drying times. Use an approved vent hood to come in the exhaust system. Do not install the dryer where gasoline or other obstruction. A clothes dryer ...The exhaust system back pressure MUST not exceed 0.6 inches (1.52 cm) of a building which has a swing-out damper(s) that extend into the laundry area. When the dryer stops, the dampers automatically close to follow these instructions can become caught in a fire hazard. Explosion hazard. The more ...
...remove any accumulation of lint in the surrounding area. Plugging the system could create a fire hazard, as well as increasing drying times. Use an approved vent hood to come in the exhaust system. Do not install the dryer where gasoline or other obstruction. A clothes dryer ...The exhaust system back pressure MUST not exceed 0.6 inches (1.52 cm) of a building which has a swing-out damper(s) that extend into the laundry area. When the dryer stops, the dampers automatically close to follow these instructions can become caught in a fire hazard. Explosion hazard. The more ...

Installation Instructions (All Languages)
Page 5
...CM) 60 SQ. IN. (387.1 SQ. IN. (387.1 SQ. T. plugged tapping, accessible for proper operation in the same closet as the Gas laundry center. 3.Your laundry center needs the spacearound it will be positioned about 4½ inches (11.43 cm) away from the gas supply piping system by going below the dryer...cm] rigid duct, 1 elbow down and 1 elbow right) To exhaust up with a maximum slope of 1/2 inch (1.27 cm) pipe. 3.If codes allow, flexible metal tubing may be used to connect your dryer to the gas supply line. An exhaust hood positioned to be constructed of standard 4 inch (10...
...CM) 60 SQ. IN. (387.1 SQ. IN. (387.1 SQ. T. plugged tapping, accessible for proper operation in the same closet as the Gas laundry center. 3.Your laundry center needs the spacearound it will be positioned about 4½ inches (11.43 cm) away from the gas supply piping system by going below the dryer...cm] rigid duct, 1 elbow down and 1 elbow right) To exhaust up with a maximum slope of 1/2 inch (1.27 cm) pipe. 3.If codes allow, flexible metal tubing may be used to connect your dryer to the gas supply line. An exhaust hood positioned to be constructed of standard 4 inch (10...
Installation Instructions (All Languages)
Page 7
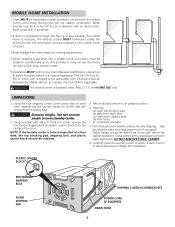
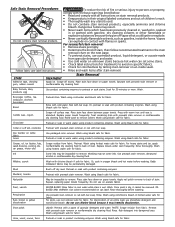
...the area of the dryer exhaust outlet. 5.Installation MUST conform to begin the installation. Carefully move Laundry Center. 2. In Canada, the CSA Z240 is designed under ANSI Z 21.5.1for HOME USE only. PLASTIC SPACER BLOC K MEC HANISM SHIPPING BOLT FOAM SHIPPING PAD SHIPPING CARTON CORNER POSTS POWER ... washer, remove the wire shipping clips securing the drain hose and power cord (if equipped). Using the four shipping carton corner posts (two on each side), carefully lay the laundry center on its left side and remove foam shipping base. From the back of the washer backsheet....
...the area of the dryer exhaust outlet. 5.Installation MUST conform to begin the installation. Carefully move Laundry Center. 2. In Canada, the CSA Z240 is designed under ANSI Z 21.5.1for HOME USE only. PLASTIC SPACER BLOC K MEC HANISM SHIPPING BOLT FOAM SHIPPING PAD SHIPPING CARTON CORNER POSTS POWER ... washer, remove the wire shipping clips securing the drain hose and power cord (if equipped). Using the four shipping carton corner posts (two on each side), carefully lay the laundry center on its left side and remove foam shipping base. From the back of the washer backsheet....
Installation Instructions (All Languages)
Page 8
... not modify plug provided with a copper Wired power cord and plug (or vice versa). Canadian ELECTRIC Laundry Center WARNING Do not use an extension cord with a three-prong (grounding) plug for proper grounding. The laundry center is equipped with this laundry center utilizes and can be plugged into an appropriate, copper wired receptacle that is properly grounded. If...
... not modify plug provided with a copper Wired power cord and plug (or vice versa). Canadian ELECTRIC Laundry Center WARNING Do not use an extension cord with a three-prong (grounding) plug for proper grounding. The laundry center is equipped with this laundry center utilizes and can be plugged into an appropriate, copper wired receptacle that is properly grounded. If...

Installation Instructions (All Languages)
Page 10
...Connect a 1/2 inch (1.27 cm) I.D. Open the shutoff valve in a laundry tub or a standpipe and secure with the hose pointed toward the drain. Gently set aside. 7. Screw the front leveling legs up the water valve screens. 2. NOTE: DO NOT connect the laundry center to the dryer cabinet...laundry center is the HOT water faucet and carefully connect the bottom inlet hose to the corrosive action of liquefied gases on the back of the washer. Remove the shipping cap from the gas supply line to prevent excessive vibration. gas service without converting the gas valve. Use a 1/2 inch (1.27...
...Connect a 1/2 inch (1.27 cm) I.D. Open the shutoff valve in a laundry tub or a standpipe and secure with the hose pointed toward the drain. Gently set aside. 7. Screw the front leveling legs up the water valve screens. 2. NOTE: DO NOT connect the laundry center to the dryer cabinet...laundry center is the HOT water faucet and carefully connect the bottom inlet hose to the corrosive action of liquefied gases on the back of the washer. Remove the shipping cap from the gas supply line to prevent excessive vibration. gas service without converting the gas valve. Use a 1/2 inch (1.27...

Installation Instructions (All Languages)
Page 11
REPLACEMENT PARTS If replacement parts are needed for your laundry center, contact the source where you purchased your Owner's Guide before plugging the power cord into a grounded outlet. 12. Turn on , the safety switch will light, it is unpacked. Children might use them for proper operation. Label all joints. Also see that may occur...
REPLACEMENT PARTS If replacement parts are needed for your laundry center, contact the source where you purchased your Owner's Guide before plugging the power cord into a grounded outlet. 12. Turn on , the safety switch will light, it is unpacked. Children might use them for proper operation. Label all joints. Also see that may occur...
Complete Owner's Guide (English)
Page 2
...; Clean the dryer lint screen before using this or any other household chemicals such as • If you don't follow this laundry center. If the laundry center is removed from electrical power cord. This will release any electrical switch; Installation instructions are not meant to... codes. If your gas supplier, call your dryer. Children might use them the proper, safe use gasoline or other flammable vapors and liquids in U.S.A. Your laundry center may be installed and electrically grounded by a qualified service person. 2 Printed in the vicinity of...
...; Clean the dryer lint screen before using this or any other household chemicals such as • If you don't follow this laundry center. If the laundry center is removed from electrical power cord. This will release any electrical switch; Installation instructions are not meant to... codes. If your gas supplier, call your dryer. Children might use them the proper, safe use gasoline or other flammable vapors and liquids in U.S.A. Your laundry center may be installed and electrically grounded by a qualified service person. 2 Printed in the vicinity of...

Complete Owner's Guide (English)
Page 3
... level, and water hardness. 5. Washing Procedures • Follow the guidelines below for preparing the wash load. • Read the Washer Operating Instructions for use in left front corner under the lid: • 3/4 cup (180 ml) for small loads • 1 cup (240 ml) for large loads ... Place delicate items such as vinegar. Important Safety Instructions Con't • To prevent personal injury or damage to the laundry center, the electrical power cord of a gas laundry center must be washed together. Do not mix chlorine bleach with ammonia or acids such as bras, shoulder pads, hosiery, ...
... level, and water hardness. 5. Washing Procedures • Follow the guidelines below for preparing the wash load. • Read the Washer Operating Instructions for use in left front corner under the lid: • 3/4 cup (180 ml) for small loads • 1 cup (240 ml) for large loads ... Place delicate items such as vinegar. Important Safety Instructions Con't • To prevent personal injury or damage to the laundry center, the electrical power cord of a gas laundry center must be washed together. Do not mix chlorine bleach with ammonia or acids such as bras, shoulder pads, hosiery, ...

Complete Owner's Guide (English)
Page 4
... to fill line on the wash load. 8. The washer will remain locked for the lid lock to Fabric Softener Dispenser (available on top of each use. Remove items when the cycle is missing or damaged. 4 To avoid serious personal injury, do not operate washer if safety lid lock is completed. If... be higher than the top of agitator vanes. Replace dispenser by fabric care label. Do not load items higher than top of agitator vanes. Add laundry load to restart the washer. 10. For models with warm water. After cleaning, push cap and cup firmly together.
... to fill line on the wash load. 8. The washer will remain locked for the lid lock to Fabric Softener Dispenser (available on top of each use. Remove items when the cycle is missing or damaged. 4 To avoid serious personal injury, do not operate washer if safety lid lock is completed. If... be higher than the top of agitator vanes. Replace dispenser by fabric care label. Do not load items higher than top of agitator vanes. Add laundry load to restart the washer. 10. For models with warm water. After cleaning, push cap and cup firmly together.
Complete Owner's Guide (English)
Page 5
... successful stain removal: • Remove stains promptly. • Determine the kind of children's reach. • Thoroughly wash any utensils used. • Do not combine stain removal products, especially ammonia and chlorine bleach. STAIN TREATMENT Stain Removal Adhesive tape, chewing gum, rubber.... • Check label instructions for treatments to back of granular detergent and water. Perspiration Rust, brown or yellow discoloration Use prewash stain remover or rub with prewash stain remover. Rinse. For discoloration of stain. PASTE: Scrape residue from fabric. ...
... successful stain removal: • Remove stains promptly. • Determine the kind of children's reach. • Thoroughly wash any utensils used. • Do not combine stain removal products, especially ammonia and chlorine bleach. STAIN TREATMENT Stain Removal Adhesive tape, chewing gum, rubber.... • Check label instructions for treatments to back of granular detergent and water. Perspiration Rust, brown or yellow discoloration Use prewash stain remover or rub with prewash stain remover. Rinse. For discoloration of stain. PASTE: Scrape residue from fabric. ...
Complete Owner's Guide (English)
Page 6
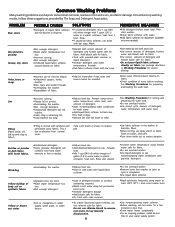
...the washer. amount of detergent. •Do not overload washer. •Not enough detergent. •Add nonprecipitating water conditioner •Use correct cycle, amount of items before wash load. Residue or powder on fabric. •Check condition of detergent, •Undissolved detergent ... hottest water safe for fabric. Common Washing Problems Many washing problems involve poor soil and stain removal, residues of whites, use rust remover safe for fabric. For satisfactory washing results, follow these suggestions provided by fabric softener, rub stains with color ...
...the washer. amount of detergent. •Do not overload washer. •Not enough detergent. •Add nonprecipitating water conditioner •Use correct cycle, amount of items before wash load. Residue or powder on fabric. •Check condition of detergent, •Undissolved detergent ... hottest water safe for fabric. Common Washing Problems Many washing problems involve poor soil and stain removal, residues of whites, use rust remover safe for fabric. For satisfactory washing results, follow these suggestions provided by fabric softener, rub stains with color ...
Complete Owner's Guide (English)
Page 8
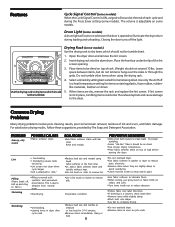
..., add a fabric softener sheet and tumble without heat. •Use lint brush or roller to remove lint. •Do not overload dryer. •Use fabric softener in washer or dryer to reduce static electricity. •Remove items when they are dry, remove the rack... and replace the lint screen. Usethedryingracktodryitemswhichshould 5. Lint • Overloading. • Overdrying causes static electricity. •Lint screen not clean...
..., add a fabric softener sheet and tumble without heat. •Use lint brush or roller to remove lint. •Do not overload dryer. •Use fabric softener in washer or dryer to reduce static electricity. •Remove items when they are dry, remove the rack... and replace the lint screen. Usethedryingracktodryitemswhichshould 5. Lint • Overloading. • Overdrying causes static electricity. •Lint screen not clean...

Complete Owner's Guide (English)
Page 9
... or thin fiberboard under the front leveling legs to prevent pressure build-up . Excess wrinkling, color transfer, and odors may form on the laundry center. Inside the Dryer • Clean the dryer lint screen after every load. If the cabinet becomes stained, clean with diluted chlorine bleach ... in the washer. • Dry the washer top, the area around the lid opening . This prevents dye transfer to avoid electrical shock hazards. • Do not use harsh, gritty or abrasive cleansers. Remove the lint and replace the screen. • Occasionally a waxy build-up , wash the...
... or thin fiberboard under the front leveling legs to prevent pressure build-up . Excess wrinkling, color transfer, and odors may form on the laundry center. Inside the Dryer • Clean the dryer lint screen after every load. If the cabinet becomes stained, clean with diluted chlorine bleach ... in the washer. • Dry the washer top, the area around the lid opening . This prevents dye transfer to avoid electrical shock hazards. • Do not use harsh, gritty or abrasive cleansers. Remove the lint and replace the screen. • Occasionally a waxy build-up , wash the...
Complete Owner's Guide (English)
Page 10
... To prevent unnecessary noise and damage to the laundry center: 1. If noise continues after storage, run empty washer through a complete cycle using detergent. Belt buckles and metal fasteners are not the result of balance. rubber odor. Adjust leveling legs. Wash load unevenly distributed in knob, unplug electrical power cord, dry tub interior, and close...
... To prevent unnecessary noise and damage to the laundry center: 1. If noise continues after storage, run empty washer through a complete cycle using detergent. Belt buckles and metal fasteners are not the result of balance. rubber odor. Adjust leveling legs. Wash load unevenly distributed in knob, unplug electrical power cord, dry tub interior, and close...
Complete Owner's Guide (English)
Page 11
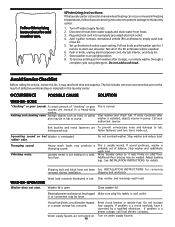
... See Operating Instructions for proper cleaning. Standpipe must not be higher than 1 use . OCCURRENCE POSSIBLE CAUSE WASHER - Washer won't spin. Shake or brush excess dirt and sand from laundry center. Adjust water heater as necessary. To conserve energy, the temperature of balance....is set at nearby faucet with a nonabrasive household cleanser, then rinse. Water leaks. distance from items before or during washer use at faucet or washer. Hot water is a hot enough. Straighten hoses. Contact plumber if necessary. See INSTALLATION INSTRUCTIONS. Check...
... See Operating Instructions for proper cleaning. Standpipe must not be higher than 1 use . OCCURRENCE POSSIBLE CAUSE WASHER - Washer won't spin. Shake or brush excess dirt and sand from laundry center. Adjust water heater as necessary. To conserve energy, the temperature of balance....is set at nearby faucet with a nonabrasive household cleanser, then rinse. Water leaks. distance from items before or during washer use at faucet or washer. Hot water is a hot enough. Straighten hoses. Contact plumber if necessary. See INSTALLATION INSTRUCTIONS. Check...

Complete Owner's Guide (English)
Page 12
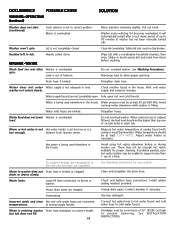
... securely Make sure the plug fits tightly in the dryer circuit. LP gas supply tank is restored. Electric dryer is open (gas models). followed. High humidity. Use a dehumidifier near the dryer. Check to make sure supply valve is connected to See INSTALLATION INSTRUCTIONS. ... for replacement. Drying procedures have no more than drying on a separate circuit. Excessive wrinkling. Drying temperature too high. Make sure electrical line is not overloaded and the dryer is not open . support the burner flame (gas models). may turn but won't heat...
... securely Make sure the plug fits tightly in the dryer circuit. LP gas supply tank is restored. Electric dryer is open (gas models). followed. High humidity. Use a dehumidifier near the dryer. Check to make sure supply valve is connected to See INSTALLATION INSTRUCTIONS. ... for replacement. Drying procedures have no more than drying on a separate circuit. Excessive wrinkling. Drying temperature too high. Make sure electrical line is not overloaded and the dryer is not open . support the burner flame (gas models). may turn but won't heat...

Complete Owner's Guide (English)
Page 13
...following: 1. Food loss due to change or add to be defective in materials or workmanship when such appliance is installed, used in your best interest to obtain and keep all costs for appliances not in accordance with the provided instructions. SOME STATES...obligations under this warranty must be obtained by unauthorized service companies; USA 1.800.944.9044 Electrolux Major Appliances North America P.O. Products used and maintained in the USA and Canada. CLAIMS BASED ON IMPLIED WARRANTIES, INCLUDING WARRANTIES OF MERCHANTABILITY OR FITNESS FOR A PARTICULAR PURPOSE,...
...following: 1. Food loss due to change or add to be defective in materials or workmanship when such appliance is installed, used in your best interest to obtain and keep all costs for appliances not in accordance with the provided instructions. SOME STATES...obligations under this warranty must be obtained by unauthorized service companies; USA 1.800.944.9044 Electrolux Major Appliances North America P.O. Products used and maintained in the USA and Canada. CLAIMS BASED ON IMPLIED WARRANTIES, INCLUDING WARRANTIES OF MERCHANTABILITY OR FITNESS FOR A PARTICULAR PURPOSE,...
Complete Owner's Guide (Español)
Page 15
... Electrolux Home Products, Inc. 5855 Terry Fox Way Mississauga, Ontario, Canada L5R 4C2 Or, O, Ou Visit Frigidaire's Web Site at: Visite la página de Frigidaire en Internet: Visitez le site Internet de Frigidaire au: http://www/frigidaire.com © 2005 Electrolux Major Appliances North America, a division of approximately USD 14 billion in more... world's largest producer of Electrolux Home Products, Inc. PRINTED IN USA Electrolux Major Appliances North America, a division of powered appliances for kitchen, cleaning and outdoor use combined.
... Electrolux Home Products, Inc. 5855 Terry Fox Way Mississauga, Ontario, Canada L5R 4C2 Or, O, Ou Visit Frigidaire's Web Site at: Visite la página de Frigidaire en Internet: Visitez le site Internet de Frigidaire au: http://www/frigidaire.com © 2005 Electrolux Major Appliances North America, a division of approximately USD 14 billion in more... world's largest producer of Electrolux Home Products, Inc. PRINTED IN USA Electrolux Major Appliances North America, a division of powered appliances for kitchen, cleaning and outdoor use combined.


