Product Information Guide
Page 15
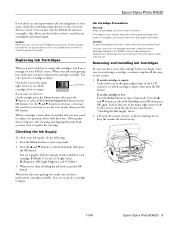
.... Caution: To avoid damaging the printer, never move the print head by hand. Removing and Installing Ink Cartridges Be sure you have replacement cartridges available. You can 't print if an ink cartridge is empty. When your ink starts...print if a cartridge is low or empty: Ink levels If you can decline. If the quality doesn't improve after cleaning three or four times, check the troubleshooting solutions in one session. 1. Once you start replacing a cartridge, you must complete all the steps in the on top. 11/04 Epson Stylus Photo RX620 - 15 Epson Stylus Photo RX620...
.... Caution: To avoid damaging the printer, never move the print head by hand. Removing and Installing Ink Cartridges Be sure you have replacement cartridges available. You can 't print if an ink cartridge is empty. When your ink starts...print if a cartridge is low or empty: Ink levels If you can decline. If the quality doesn't improve after cleaning three or four times, check the troubleshooting solutions in one session. 1. Once you start replacing a cartridge, you must complete all the steps in the on top. 11/04 Epson Stylus Photo RX620 - 15 Epson Stylus Photo RX620...
Product Information Guide
Page 16
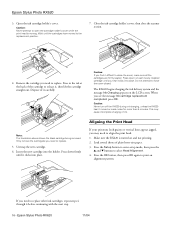
...If you need to the replacement position. 7. Epson Stylus Photo RX620 11/04 Close the ink cartridge holder's cover, then close the cover, make sure all the cartridges are firmly seated. Unwrap the new cartridge. 6. Aligning the Print Head If your printouts look grainy or vertical lines ...you need to open the cartridge holder's cover while the print head is turned on the LCD screen. Caution: Never attempt to align the print head. 1. Dispose of the cartridge to close the scanner section. 4. Only remove the cartridge(s) you may cause incomplete charging of plain letter...
...If you need to the replacement position. 7. Epson Stylus Photo RX620 11/04 Close the ink cartridge holder's cover, then close the cover, make sure all the cartridges are firmly seated. Unwrap the new cartridge. 6. Aligning the Print Head If your printouts look grainy or vertical lines ...you need to open the cartridge holder's cover while the print head is turned on the LCD screen. Caution: Never attempt to align the print head. 1. Dispose of the cartridge to close the scanner section. 4. Only remove the cartridge(s) you may cause incomplete charging of plain letter...
Product Information Guide
Page 17
... its side or in each row with the two vertical lines most precisely printed on the RX620. Unplug the cord from the sheet feeder and output tray, then remove the paper support. 7. Remove the orange print head lock from its new location. 11/04 Epson Stylus Photo RX620 - 17 Press the P On button to the unlocked position after installing the...
... its side or in each row with the two vertical lines most precisely printed on the RX620. Unplug the cord from the sheet feeder and output tray, then remove the paper support. 7. Remove the orange print head lock from its new location. 11/04 Epson Stylus Photo RX620 - 17 Press the P On button to the unlocked position after installing the...

Product Information Guide
Page 18
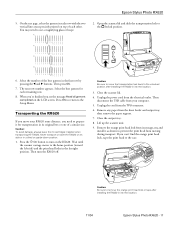
Epson Stylus Photo RX620 10. After transporting the RX620, remove the orange print head lock or tape securing the print head, unlock the transportation lock securing the scanner carriage, and print a test copy. If you transport it clicks back into place. 11. Epson Stylus Photo RX620 11/04 Related Documentation CPD-15868 CPD-15867 CPD-15866 Epson Stylus Photo RX620 Start Here sheet Epson Stylus Photo RX620 Quick Guide Epson Stylus Photo RX620 CD-ROM (includes on-screen...
Epson Stylus Photo RX620 10. After transporting the RX620, remove the orange print head lock or tape securing the print head, unlock the transportation lock securing the scanner carriage, and print a test copy. If you transport it clicks back into place. 11. Epson Stylus Photo RX620 11/04 Related Documentation CPD-15868 CPD-15867 CPD-15866 Epson Stylus Photo RX620 Start Here sheet Epson Stylus Photo RX620 Quick Guide Epson Stylus Photo RX620 CD-ROM (includes on-screen...
Quick Reference Guide
Page 4
... Configuring PhotoStarter 48 Copying Photos to a USB Drive 50 Printing Your Stored Photos 51 Removing a Memory Card 52 Maintaining Your RX620 53 Replacing Ink Cartridges 53 Checking the Ink Supply 53 Purchasing Ink Cartridges 54 Removing and Installing Ink Cartridges 55 Checking and Cleaning and Print Head 58 Checking the Print Head 58 Cleaning the Print Head 59 Aligning the Print Head 59 4 Contents
... Configuring PhotoStarter 48 Copying Photos to a USB Drive 50 Printing Your Stored Photos 51 Removing a Memory Card 52 Maintaining Your RX620 53 Replacing Ink Cartridges 53 Checking the Ink Supply 53 Purchasing Ink Cartridges 54 Removing and Installing Ink Cartridges 55 Checking and Cleaning and Print Head 58 Checking the Print Head 58 Cleaning the Print Head 59 Aligning the Print Head 59 4 Contents

Quick Reference Guide
Page 55
...the cartridge holder's cover while the print head is empty, then press the OK button. Wait until the cartridges have a new ink cartridge before you must complete all the steps in the upper right corner of the RX620 screen to see which cartridge is moving. Removing and Installing Ink Cartridges Be sure... you have moved to find out which cartridge is low: Look at the message the RX620 screen to the replacement position. If an ink cartridge ...
...the cartridge holder's cover while the print head is empty, then press the OK button. Wait until the cartridges have a new ink cartridge before you must complete all the steps in the upper right corner of the RX620 screen to see which cartridge is moving. Removing and Installing Ink Cartridges Be sure... you have moved to find out which cartridge is low: Look at the message the RX620 screen to the replacement position. If an ink cartridge ...

Quick Reference Guide
Page 64
... connecting the Stylus Photo RX620 directly to the computer's USB port. ■ If you're scanning film, make the lamp come on . ■ The lamp turns off automatically to your computer and plugged into a working power outlet. it comes on when you 've removed the white ...Stylus Photo RX620 is positioned correctly. 64 Solving Problems You may need to preview your copy. Scanning Problems Your system doesn't recognize the Stylus Photo RX620. Do not load too many sheets of your scan to copy a document with the left edge guide). ■ If you 've loaded. ■ The print head...
... connecting the Stylus Photo RX620 directly to the computer's USB port. ■ If you're scanning film, make the lamp come on . ■ The lamp turns off automatically to your computer and plugged into a working power outlet. it comes on when you 've removed the white ...Stylus Photo RX620 is positioned correctly. 64 Solving Problems You may need to preview your copy. Scanning Problems Your system doesn't recognize the Stylus Photo RX620. Do not load too many sheets of your scan to copy a document with the left edge guide). ■ If you 've loaded. ■ The print head...

Quick Reference Guide
Page 66
...up. 66 Solving Problems Turn the Stylus Photo RX620 off and carefully remove the paper. see banding (light lines) in the direction that may also have torn off. If you loaded. The stack should never be above the arrow on , and press the x Color button. Some paper types require ...the printer in your printouts or copies. ■ Clean the print head; Also, try loading fewer sheets of paper. Then reload the paper. ■ If paper jams, turn off your Stylus Photo RX620, lift open the scanner section, and remove any paper that's inside of the left edge guide isn't pushed...
...up. 66 Solving Problems Turn the Stylus Photo RX620 off and carefully remove the paper. see banding (light lines) in the direction that may also have torn off. If you loaded. The stack should never be above the arrow on , and press the x Color button. Some paper types require ...the printer in your printouts or copies. ■ Clean the print head; Also, try loading fewer sheets of paper. Then reload the paper. ■ If paper jams, turn off your Stylus Photo RX620, lift open the scanner section, and remove any paper that's inside of the left edge guide isn't pushed...

Quick Reference Guide
Page 76
... documentation, do not attempt to service the Stylus Photo RX620 yourself. ■ Unplug the Stylus Photo RX620 and refer servicing to use may result in reduced print quality. 76 Notices Adjust only those controls that contains mercury. Removing the cartridges can dehydrate the print head and may leak from the cartridges. ■ The Stylus Photo RX620 includes a lamp component that are covered by...
... documentation, do not attempt to service the Stylus Photo RX620 yourself. ■ Unplug the Stylus Photo RX620 and refer servicing to use may result in reduced print quality. 76 Notices Adjust only those controls that contains mercury. Removing the cartridges can dehydrate the print head and may leak from the cartridges. ■ The Stylus Photo RX620 includes a lamp component that are covered by...

Quick Reference Guide
Page 77
...thoroughly with the limits for a Class B digital device, pursuant to provide reasonable protection against harmful interference in the same environment as the Stylus Photo RX620. Store each ink cartridge so that the bottom of its package faces down. ■ After bringing an ink cartridge inside from a...9632; Do not remove or tear the label on an ink cartridge; However, there is needed to warm up the ink cartridges within six months of installing them immediately with the instructions, may affect normal operation and printing. ■ If you could damage the print head. ■ Do...
...thoroughly with the limits for a Class B digital device, pursuant to provide reasonable protection against harmful interference in the same environment as the Stylus Photo RX620. Store each ink cartridge so that the bottom of its package faces down. ■ After bringing an ink cartridge inside from a...9632; Do not remove or tear the label on an ink cartridge; However, there is needed to warm up the ink cartridges within six months of installing them immediately with the instructions, may affect normal operation and printing. ■ If you could damage the print head. ■ Do...
Quick Reference Guide
Page 85
...Photo Info setting, 30 Photos cropping, 36 to 37 placing on glass, 9 position problems, 70 restoring color in, 20 to 21 scanning to memory card, 40 to 46 supported file types, 23 transferring to computer, 47 to 49 PhotoStarter, 48 to 49 PictBridge, 34 Print head aligning, 59 to 60 cleaning, 59 Print head noise, 61, 62 Print...69 to 71 scanning, 64 to 65 screen, RX620, 71 setup, 61 to 62 solving, 61 to 73 Proof sheet, 32 to 34 R Reduce copy, 10, 11 Removing ink cartridges, 55 to 57 Replacing ink cartridges, 53 to 57 Resizing copies, 10, 11 Restoring color, 20 to 21 Restoring default settings, 31 ...
...Photo Info setting, 30 Photos cropping, 36 to 37 placing on glass, 9 position problems, 70 restoring color in, 20 to 21 scanning to memory card, 40 to 46 supported file types, 23 transferring to computer, 47 to 49 PhotoStarter, 48 to 49 PictBridge, 34 Print head aligning, 59 to 60 cleaning, 59 Print head noise, 61, 62 Print...69 to 71 scanning, 64 to 65 screen, RX620, 71 setup, 61 to 62 solving, 61 to 73 Proof sheet, 32 to 34 R Reduce copy, 10, 11 Removing ink cartridges, 55 to 57 Replacing ink cartridges, 53 to 57 Resizing copies, 10, 11 Restoring color, 20 to 21 Restoring default settings, 31 ...
Start Here Card
Page 2
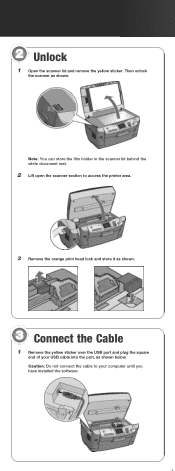
Note: You can store the film holder in the scanner lid behind the white document mat. 2 Lift open the scanner section to your USB cable into the port, as shown below. Then unlock the scanner as shown. 3 Connect the Cable 1 Remove the yellow sticker over the USB port and plug the square end of your computer until you have installed the software. 2 Unlock 1 Open the scanner lid and remove the yellow sticker. Caution: Do not connect the cable to access the printer area. 3 Remove the orange print head lock and store it as shown.
Note: You can store the film holder in the scanner lid behind the white document mat. 2 Lift open the scanner section to your USB cable into the port, as shown below. Then unlock the scanner as shown. 3 Connect the Cable 1 Remove the yellow sticker over the USB port and plug the square end of your computer until you have installed the software. 2 Unlock 1 Open the scanner lid and remove the yellow sticker. Caution: Do not connect the cable to access the printer area. 3 Remove the orange print head lock and store it as shown.


