
Technical Brief (Ink Jet Printers)
Page 3
... ink cartridge to the page, based on the content, selected output quality, and paper type. Whether the customer is most efficient pattern for the job. Specifications subject to meet every printing need. Epson papers are designed in conjunction with stellar image quality and durability, or is achieved. • The Epson printer driver optimizes ink density based on the resolution and type of documents...
... ink cartridge to the page, based on the content, selected output quality, and paper type. Whether the customer is most efficient pattern for the job. Specifications subject to meet every printing need. Epson papers are designed in conjunction with stellar image quality and durability, or is achieved. • The Epson printer driver optimizes ink density based on the resolution and type of documents...
Product Brochure
Page 2
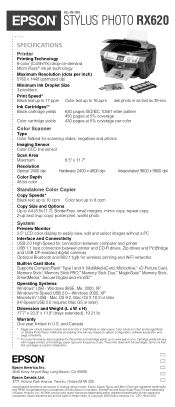
... Image Mode on system configuration, software application and page complexity. ** For more information about supplies for this printer and cartridge yields, go to change without a PC Interface and Connectivity USB 2.0 High-Speed for connection between computer and printer USB 1.1 host connection between printer and CD-R drives, Zip drives and PictBridge and USB DP-enabled digital cameras Optional Bluetooth and 802.11g/b for initialization. Epson disclaims any and all rights in U.S. Color photo is used for wireless printing...
... Image Mode on system configuration, software application and page complexity. ** For more information about supplies for this printer and cartridge yields, go to change without a PC Interface and Connectivity USB 2.0 High-Speed for connection between computer and printer USB 1.1 host connection between printer and CD-R drives, Zip drives and PictBridge and USB DP-enabled digital cameras Optional Bluetooth and 802.11g/b for initialization. Epson disclaims any and all rights in U.S. Color photo is used for wireless printing...

Product Information Guide
Page 3
... unit MCBF); reading area is selectable with software 2400 dpi (main), 4800 dpi (sub) 50 to 6400 dpi (adjustable in one-dpi increments) RGB color filters on CCD 16 bits per pixel per color output User defined 2 level White cold cathode fluorescent lamp USB 2.0 High Speed 30,000 cycles of the print, or these areas may deteriorate in power-off mode 11/04 Epson Stylus Photo RX620 - 3 Epson Stylus Photo RX620...
... unit MCBF); reading area is selectable with software 2400 dpi (main), 4800 dpi (sub) 50 to 6400 dpi (adjustable in one-dpi increments) RGB color filters on CCD 16 bits per pixel per color output User defined 2 level White cold cathode fluorescent lamp USB 2.0 High Speed 30,000 cycles of the print, or these areas may deteriorate in power-off mode 11/04 Epson Stylus Photo RX620 - 3 Epson Stylus Photo RX620...

Product Information Guide
Page 6
... 3. Epson Stylus Photo RX620 11/04 Epson Stylus Photo RX620 Envelopes 1. Place your photo or document against the envelopes (but not too tightly). To scan or copy a thick document, you place your photo or document face-down the original to turn off the RX620, and open the scanner lid completely. Avoid envelopes that are too thin; Select the following settings when printing on envelopes: ❏ Plain paper as the Type (Windows) or Media Type (Macintosh) setting ❏ The correct envelope size as...
... 3. Epson Stylus Photo RX620 11/04 Epson Stylus Photo RX620 Envelopes 1. Place your photo or document against the envelopes (but not too tightly). To scan or copy a thick document, you place your photo or document face-down the original to turn off the RX620, and open the scanner lid completely. Avoid envelopes that are too thin; Select the following settings when printing on envelopes: ❏ Plain paper as the Type (Windows) or Media Type (Macintosh) setting ❏ The correct envelope size as...

Product Information Guide
Page 7
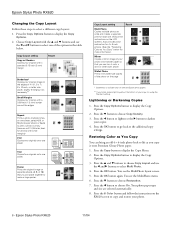
... copy size (to select a different setting, such as a photo with no borders, press the Copy Options button, then see the on page 8. 6. Select a percentage to change settings. ❏ Copies: Choose the number of the arrow). To cancel a copy job in the sheet feeder. (Not all sizes are available for black and white copies). Use the l and r buttons to reduce or enlarge your copied image size may not look right. Place your original. 11/04 Epson Stylus Photo RX620 - 7 Note: Never open...
... copy size (to select a different setting, such as a photo with no borders, press the Copy Options button, then see the on page 8. 6. Select a percentage to change settings. ❏ Copies: Choose the number of the arrow). To cancel a copy job in the sheet feeder. (Not all sizes are available for black and white copies). Use the l and r buttons to reduce or enlarge your copied image size may not look right. Place your original. 11/04 Epson Stylus Photo RX620 - 7 Note: Never open...
Product Information Guide
Page 8
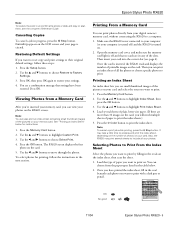
... MultiPhoto menu. 6. Press the d button to display the Copy Options. 2. Press the x Color button and follow the instructions on separate sheets (4, 9, or 16) that you can paste together to the edges of your original with small margins) 2-up Copies two originals onto one sheet 4-up Copies four originals onto one sheet Poster Prints the original image on the RX620 screen to darken your photo. 8 - Epson Stylus Photo RX620 11/04 Press the Copy Options button...
... MultiPhoto menu. 6. Press the d button to display the Copy Options. 2. Press the x Color button and follow the instructions on separate sheets (4, 9, or 16) that you can paste together to the edges of your original with small margins) 2-up Copies two originals onto one sheet 4-up Copies four originals onto one sheet Poster Prints the original image on the RX620 screen to darken your photo. 8 - Epson Stylus Photo RX620 11/04 Press the Copy Options button...
Product Information Guide
Page 9
... the Setup button. 2. Press OK, then press OK again to highlight Custom Print. 3. The RX620 screen displays the first photo on your page is inserted, the RX620 reads and displays the number of paper you want to their original default settings, follow the instructions in an old film strip photo or slide and copy or scan them, see page 4). Use the u and d buttons to highlight Print Index Sheet. 4. Canceling appears on . 2. Canceling Copies To cancel a job in the...
... the Setup button. 2. Press OK, then press OK again to highlight Custom Print. 3. The RX620 screen displays the first photo on your page is inserted, the RX620 reads and displays the number of paper you want to their original default settings, follow the instructions in an old film strip photo or slide and copy or scan them, see page 4). Use the u and d buttons to highlight Print Index Sheet. 4. Canceling appears on . 2. Canceling Copies To cancel a job in the...
Product Information Guide
Page 12
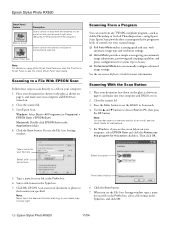
... button. For Windows, if you manually configure advanced image settings. Epson Stylus Photo RX620 11/04 Place your document face-down on the glass as shown on page 6, and make sure your computer and RX620 are turned on -screen Reference Guide for instructions. 5. Place your document face-down on the glass as shown on page 6, and make sure your computer and RX620 are on using Epson Scan. Use the u and d buttons to choose Scan to Scan mode. 4. Type a name for your scans...
... button. For Windows, if you manually configure advanced image settings. Epson Stylus Photo RX620 11/04 Place your document face-down on the glass as shown on page 6, and make sure your computer and RX620 are turned on -screen Reference Guide for instructions. 5. Place your document face-down on the glass as shown on page 6, and make sure your computer and RX620 are on using Epson Scan. Use the u and d buttons to choose Scan to Scan mode. 4. Type a name for your scans...
Product Information Guide
Page 14
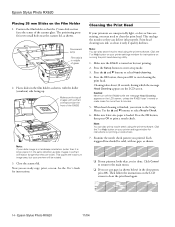
... glass 2. Press the Setup button to select Nozzle Check. 6. When head cleaning is turned on the LCD screen to start cleaning the print head. Click Cancel to return to the Setup Menu. Note: You can also clean the print head using the printer software. Make sure the RX620 is finished, you 're done. Click the ? Epson Stylus Photo RX620 11/04 Click the ? Use the u and d buttons to enter setup mode. 3. Then follow the instructions on but your preview...
... glass 2. Press the Setup button to select Nozzle Check. 6. When head cleaning is turned on the LCD screen to start cleaning the print head. Click Cancel to return to the Setup Menu. Note: You can also clean the print head using the printer software. Make sure the RX620 is finished, you 're done. Click the ? Epson Stylus Photo RX620 11/04 Click the ? Use the u and d buttons to enter setup mode. 3. Then follow the instructions on but your preview...
Product Information Guide
Page 15
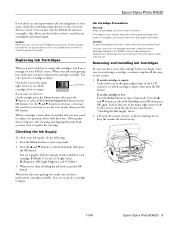
...'t turn the RX620 off and wait overnight-this allows any improvement after cleaning and aligning the print head, you 're done checking the ink levels, press the OK button. Press the u and d buttons to enter setup mode. When you may dry out. Leave the empty cartridge installed in the on top. 11/04 Epson Stylus Photo RX620 - 15 If the quality doesn't improve after cleaning three or four times, check the troubleshooting...
...'t turn the RX620 off and wait overnight-this allows any improvement after cleaning and aligning the print head, you 're done checking the ink levels, press the OK button. Press the u and d buttons to enter setup mode. When you may dry out. Leave the empty cartridge installed in the on top. 11/04 Epson Stylus Photo RX620 - 15 If the quality doesn't improve after cleaning three or four times, check the troubleshooting...

Quick Reference Guide
Page 7
... ink. See the inside back cover for some useful tips, or check online at www.epson.com. If you expect. 1. Output tray 7 Copying You can even bring them back to life with Color Restoration. If you use different brands, you may not get the results you need help making a selection, see the Start Here sheet for a complete list of specialty papers that work with Epson printers and ink. If you have photos...
... ink. See the inside back cover for some useful tips, or check online at www.epson.com. If you expect. 1. Output tray 7 Copying You can even bring them back to life with Color Restoration. If you use different brands, you may not get the results you need help making a selection, see the Start Here sheet for a complete list of specialty papers that work with Epson printers and ink. If you have photos...
Quick Reference Guide
Page 10
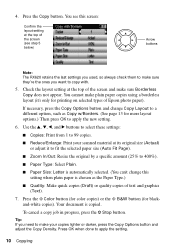
... the Paper Type.) ■ Quality: Make quick copies (Draft) or quality copies of Epson photo paper). Press the x Color button (for color copies) or the x B&W button (for printing on selected types of text and graphics (Text). 7. Press the Copy button. If necessary, press the Copy Options button and change Copy Layout to a different option, such as Copy w/Borders. (See page 13 for more layout options.) Then press OK to 400%). ■ Paper Type: Select Plain. ■ Paper Size: Letter is copied. To cancel a copy job...
... the Paper Type.) ■ Quality: Make quick copies (Draft) or quality copies of Epson photo paper). Press the x Color button (for color copies) or the x B&W button (for printing on selected types of text and graphics (Text). 7. Press the Copy button. If necessary, press the Copy Options button and change Copy Layout to a different option, such as Copy w/Borders. (See page 13 for more layout options.) Then press OK to 400%). ■ Paper Type: Select Plain. ■ Paper Size: Letter is copied. To cancel a copy job...
Quick Reference Guide
Page 63
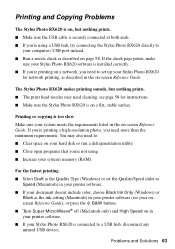
... printing on -screen Reference Guide. You may need to set the Quality/Speed slider to a USB hub, disconnect any unused USB devices. Problems and Solutions 63 Printing and Copying Problems The Stylus Photo RX620 is on, but nothing prints. ■ Make sure the USB cable is on page 58. Printing or copying is connected to Speed (Macintosh) in the on-screen Reference Guide. Make sure your system meets the requirements listed in your document doesn't include color, choose Black Ink Only (Windows) or Black...
... printing on -screen Reference Guide. You may need to set the Quality/Speed slider to a USB hub, disconnect any unused USB devices. Problems and Solutions 63 Printing and Copying Problems The Stylus Photo RX620 is on, but nothing prints. ■ Make sure the USB cable is on page 58. Printing or copying is connected to Speed (Macintosh) in the on-screen Reference Guide. Make sure your system meets the requirements listed in your document doesn't include color, choose Black Ink Only (Windows) or Black...

Quick Reference Guide
Page 68
... RX620 screen. ■ Try turning off (Windows) or Color ink is selected (Macintosh), even when you can never exactly match your printer software. Also check if you're using a special effect that the USB cable is securely connected to select Best Photo as possible. However, you 're printing black and white photographs. ■ Clean the print head; You see page 59 for details. See your software documentation. Miscellaneous Printing Problems You see page 53. ■ Make...
... RX620 screen. ■ Try turning off (Windows) or Color ink is selected (Macintosh), even when you can never exactly match your printer software. Also check if you're using a special effect that the USB cable is securely connected to select Best Photo as possible. However, you 're printing black and white photographs. ■ Clean the print head; You see page 59 for details. See your software documentation. Miscellaneous Printing Problems You see page 53. ■ Make...
Quick Reference Guide
Page 71
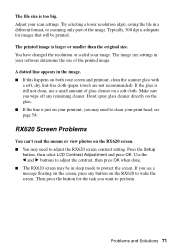
... than the original size. RX620 Screen Problems You can't read the menus or view photos on both your printout, you may be printed. Make sure you wipe off any button on your screen and printout, clean the scanner glass with a soft, dry, lint-free cloth (paper towels are not recommended). Adjust your image. The image size settings in a different format, or scanning only part of the printed image. The file size is adequate for...
... than the original size. RX620 Screen Problems You can't read the menus or view photos on both your printout, you may be printed. Make sure you wipe off any button on your screen and printout, clean the scanner glass with a soft, dry, lint-free cloth (paper towels are not recommended). Adjust your image. The image size settings in a different format, or scanning only part of the printed image. The file size is adequate for...

Quick Reference Guide
Page 80
... the United States and Canada. This warranty does not cover ribbons, ink cartridges or third party parts, components, or peripheral devices added to and from Epson, e.g., dealer or user-added boards or components. This warranty does not cover any color change or fading of prints or reimbursement of materials or services required for replacement of the covered printer will be properly maintained or fail to Epson within five (5) working...
... the United States and Canada. This warranty does not cover ribbons, ink cartridges or third party parts, components, or peripheral devices added to and from Epson, e.g., dealer or user-added boards or components. This warranty does not cover any color change or fading of prints or reimbursement of materials or services required for replacement of the covered printer will be properly maintained or fail to Epson within five (5) working...
Quick Reference Guide
Page 84
... 34 Ink cartridges checking levels, 53 to 54 empty, 55 low, 55 ordering, 73 part numbers, 54 purchasing, 54 replacing, 53 to 57 safety instructions, 54, 76 to 77 Ink levels, 53 Ink nozzle check, 58 Installing ink cartridges, 55 to 57 Inverted image, 69 J Jammed paper, 65 to 66 JPEG file requirements, 23, 34 L Lamp, fluorescent, 16, 17, 43, 44, 64 Layout copy, 13 to 14 print, 29 Layout problems...
... 34 Ink cartridges checking levels, 53 to 54 empty, 55 low, 55 ordering, 73 part numbers, 54 purchasing, 54 replacing, 53 to 57 safety instructions, 54, 76 to 77 Ink levels, 53 Ink nozzle check, 58 Installing ink cartridges, 55 to 57 Inverted image, 69 J Jammed paper, 65 to 66 JPEG file requirements, 23, 34 L Lamp, fluorescent, 16, 17, 43, 44, 64 Layout copy, 13 to 14 print, 29 Layout problems...
Quick Reference Guide
Page 85
... Mirror images, 69 N Negatives loading, 17, 44 printing from, 15 to 19 scanning to memory card, 41 to 46 Network printing, 62 Noise, 61, 62 Nozzle check, 58 P Paper jams, 65 to 66 loading, 7 to 8 ordering, 73 Paper Type setting, 10, 12, 19, 27 Photo Info setting, 30 Photos cropping, 36 to 37 placing on glass, 9 position problems, 70 restoring color in, 20 to 21 scanning to memory card, 40 to 46 supported file types, 23...
... Mirror images, 69 N Negatives loading, 17, 44 printing from, 15 to 19 scanning to memory card, 41 to 46 Network printing, 62 Noise, 61, 62 Nozzle check, 58 P Paper jams, 65 to 66 loading, 7 to 8 ordering, 73 Paper Type setting, 10, 12, 19, 27 Photo Info setting, 30 Photos cropping, 36 to 37 placing on glass, 9 position problems, 70 restoring color in, 20 to 21 scanning to memory card, 40 to 46 supported file types, 23...

Start Here Card
Page 6
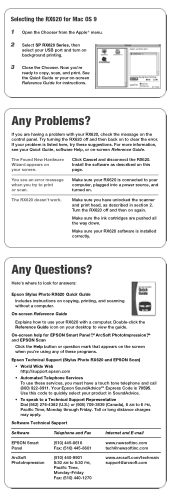
... RX620 doesn't appear, make sure it is complete, you see this screen, click Add. 2 On the Printer List screen, click the Add button. 3 On the next screen, select EPSON USB from the pull-down menu. 4 Click Stylus Photo RX620. Then double-click the Epson installer icon. If you see the Stylus Photo RX620 in the Printer List. 6 Quit Print Center or the Printer Setup Utility. Follow the instructions below to add the RX620 to your Macintosh. Selecting the RX620 for Mac® OS X 1 Open...
... RX620 doesn't appear, make sure it is complete, you see this screen, click Add. 2 On the Printer List screen, click the Add button. 3 On the next screen, select EPSON USB from the pull-down menu. 4 Click Stylus Photo RX620. Then double-click the Epson installer icon. If you see the Stylus Photo RX620 in the Printer List. 6 Quit Print Center or the Printer Setup Utility. Follow the instructions below to add the RX620 to your Macintosh. Selecting the RX620 for Mac® OS X 1 Open...
Start Here Card
Page 7
... connected to your computer, plugged into a power source, and turned on the control panel. You see your Quick Guide, software Help, or on this code to quickly select your desktop to 5:30 PM, Pacific Time, Monday-Friday Fax: (510) 440-1270 www.arcsoft.com/techmain support@arcsoft.com Double-click the Reference Guide icon on to copy, scan, and print. The RX620 doesn't work. Software Technical Support Software Telephone and Fax Internet and E-mail EPSON Smart Panel...
... connected to your computer, plugged into a power source, and turned on the control panel. You see your Quick Guide, software Help, or on this code to quickly select your desktop to 5:30 PM, Pacific Time, Monday-Friday Fax: (510) 440-1270 www.arcsoft.com/techmain support@arcsoft.com Double-click the Reference Guide icon on to copy, scan, and print. The RX620 doesn't work. Software Technical Support Software Telephone and Fax Internet and E-mail EPSON Smart Panel...


