Printer Basics
Page 5
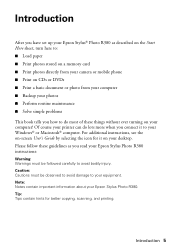
.... Introduction 5 Introduction After you have set up your Epson Stylus® Photo R380 as you read your Epson Stylus Photo R380 instructions: Warning: Warnings must be followed carefully to avoid bodily injury. For additional instructions, see the on your Epson Stylus Photo R380. Tip: Tips contain hints for it to : ■... ■ Print a basic document or photo from your computer ■ Backup your photos ■ Perform routine maintenance ■ Solve simple problems This book tells you connect it on your desktop. Of course your printer can do lots more when you how...
.... Introduction 5 Introduction After you have set up your Epson Stylus® Photo R380 as you read your Epson Stylus Photo R380 instructions: Warning: Warnings must be followed carefully to avoid bodily injury. For additional instructions, see the on your Epson Stylus Photo R380. Tip: Tips contain hints for it to : ■... ■ Print a basic document or photo from your computer ■ Backup your photos ■ Perform routine maintenance ■ Solve simple problems This book tells you connect it on your desktop. Of course your printer can do lots more when you how...
Printer Basics
Page 11
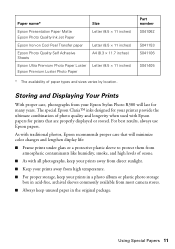
... for prints that will last for your Epson Stylus Photo R380 will minimize color changes and lengthen display life: ■ Frame prints under glass or a protective plastic sleeve to protect them from your printer provide the ultimate combination of photo quality and longevity when used with traditional photos, Epson recommends proper care that are properly displayed or stored. Part...
... for prints that will last for your Epson Stylus Photo R380 will minimize color changes and lengthen display life: ■ Frame prints under glass or a protective plastic sleeve to protect them from your printer provide the ultimate combination of photo quality and longevity when used with traditional photos, Epson recommends proper care that are properly displayed or stored. Part...

Printer Basics
Page 38
...(see a window like this one: Select EPSON Stylus Photo R380 Series Click here to open your printer software 38 Printing From Your Computer Open the photo or document in Windows 1. Before you start, make sure you've installed your printer software and connected the printer to load the right paper and select the... correct paper type setting in the printer driver. (See page 44 for printing a photo or document stored on your computer as described on the Start...
...(see a window like this one: Select EPSON Stylus Photo R380 Series Click here to open your printer software 38 Printing From Your Computer Open the photo or document in Windows 1. Before you start, make sure you've installed your printer software and connected the printer to load the right paper and select the... correct paper type setting in the printer driver. (See page 44 for printing a photo or document stored on your computer as described on the Start...
Printer Basics
Page 39
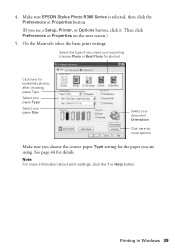
or Help button. Make sure EPSON Stylus Photo R380 Series is selected, then click the Preferences or Properties button. (If you choose the correct paper Type setting for details. See page 44 for the paper you 're printing (choose Photo or Best Photo for photos) Click here for borderless photos, after choosing paper Type Select your paper Type Select... the Main tab, select the basic print settings: Select the type of document you are using. Note: For more options Make sure you see a Setup, Printer, or Options button, click it.
or Help button. Make sure EPSON Stylus Photo R380 Series is selected, then click the Preferences or Properties button. (If you choose the correct paper Type setting for details. See page 44 for the paper you 're printing (choose Photo or Best Photo for photos) Click here for borderless photos, after choosing paper Type Select your paper Type Select... the Main tab, select the basic print settings: Select the type of document you are using. Note: For more options Make sure you see a Setup, Printer, or Options button, click it.
Printer Basics
Page 42
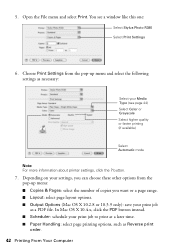
....2.8 or 10.3.9 only): save your Media Type (see a window like this one: Select Stylus Photo R380 Select Print Settings 6. button. 7. You see page 44) Select Color or Grayscale Select higher quality or faster printing (if available) Select Automatic mode Note: For more information about printer settings, click the ? Open the File menu and select Print. 5.
....2.8 or 10.3.9 only): save your Media Type (see a window like this one: Select Stylus Photo R380 Select Print Settings 6. button. 7. You see page 44) Select Color or Grayscale Select higher quality or faster printing (if available) Select Automatic mode Note: For more information about printer settings, click the ? Open the File menu and select Print. 5.
Printer Basics
Page 43
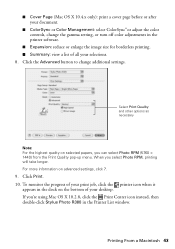
... For the highest quality on selected papers, you 're using Mac OS X 10.2.8, click the Print Center icon instead, then double-click Stylus Photo R380 in the dock on advanced settings, click ?. 9. For more information on the bottom of your selections. 8. To monitor the progress of all... your desktop. Printing From a Macintosh 43 When you select Photo RPM, printing will take longer. Click the Advanced button to change the gamma setting, or turn off color adjustments in the printer software. ■ Expansion: reduce or enlarge the image size for borderless printing. ...
... For the highest quality on selected papers, you 're using Mac OS X 10.2.8, click the Print Center icon instead, then double-click Stylus Photo R380 in the dock on advanced settings, click ?. 9. For more information on the bottom of your selections. 8. To monitor the progress of all... your desktop. Printing From a Macintosh 43 When you select Photo RPM, printing will take longer. Click the Advanced button to change the gamma setting, or turn off color adjustments in the printer software. ■ Expansion: reduce or enlarge the image size for borderless printing. ...
Product Information Guide
Page 1
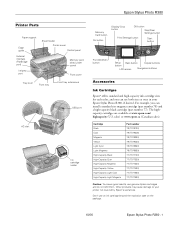
...Other products may cause damage to your Epson Stylus Photo R380, if desired. Don't use genuine Epson cartridges and do not refill them. Epson Stylus Photo R380 Printer Parts Paper support Edge guide External interface (PictBridge port) Infrared port Sheet feeder Printer cover Control panel Memory card slots (under... Copies buttons LCD screen Navigation buttons Accessories Ink Cartridges Epson® offers standard and high-capacity ink cartridge sizes for each color, and you can use both sizes at www.epson.com/ highcapacity (U.S. Cartridge Black Cyan Magenta Yellow Light...
...Other products may cause damage to your Epson Stylus Photo R380, if desired. Don't use genuine Epson cartridges and do not refill them. Epson Stylus Photo R380 Printer Parts Paper support Edge guide External interface (PictBridge port) Infrared port Sheet feeder Printer cover Control panel Memory card slots (under... Copies buttons LCD screen Navigation buttons Accessories Ink Cartridges Epson® offers standard and high-capacity ink cartridge sizes for each color, and you can use both sizes at www.epson.com/ highcapacity (U.S. Cartridge Black Cyan Magenta Yellow Light...
Product Information Guide
Page 3
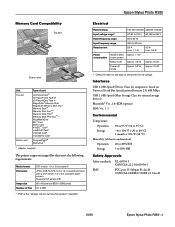
... Approx. 17 W Approx. 4.5 W Approx. 0.2 W Approx. 5.0 W Approx. 0.4 W * Check the label on the back of the printer for Camera File system" standard. Epson Stylus Photo R380 Memory Card Compatibility Top slot Bottom slot Slot Top slot Bottom slot Type of files DCF version 1.0 or 2.0 compliant* JPEG, DOS FAT (FAT...× 9200 pixels Up to 999 * DCF is the "Design rule for its voltage. The printer supports image files that meet the following requirements: Media format File format Image size Number of card ...CAN/CSA-CEI/IEC CISPR 22 Class B 10/06 Epson Stylus Photo R380 - 3
... Approx. 17 W Approx. 4.5 W Approx. 0.2 W Approx. 5.0 W Approx. 0.4 W * Check the label on the back of the printer for Camera File system" standard. Epson Stylus Photo R380 Memory Card Compatibility Top slot Bottom slot Slot Top slot Bottom slot Type of files DCF version 1.0 or 2.0 compliant* JPEG, DOS FAT (FAT...× 9200 pixels Up to 999 * DCF is the "Design rule for its voltage. The printer supports image files that meet the following requirements: Media format File format Image size Number of card ...CAN/CSA-CEI/IEC CISPR 22 Class B 10/06 Epson Stylus Photo R380 - 3
Product Information Guide
Page 4
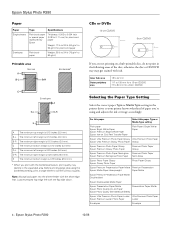
...edge left margin is 0.12 inches (3.0 mm). Selecting the Paper Type Setting Select the correct paper Type or Media Type setting in the printer driver so your printer knows what kind of the disc; otherwise the disc or CD/DVD tray may get stained with the borderless feature, print quality may ... (3.0 mm). Inner hub area Outer periphery area 18 to 42 mm 117 to 120 mm for a 12-cm CD/DVD 77 to confirm printout quality. Epson Stylus Photo R380 10/06 C The minimum bottom margin is 0.20 inches (5.0 mm). D-R The minimum right margin is 0.12 inches (3.0 mm). Note: Always load paper into the ...
...edge left margin is 0.12 inches (3.0 mm). Selecting the Paper Type Setting Select the correct paper Type or Media Type setting in the printer driver so your printer knows what kind of the disc; otherwise the disc or CD/DVD tray may get stained with the borderless feature, print quality may ... (3.0 mm). Inner hub area Outer periphery area 18 to 42 mm 117 to 120 mm for a 12-cm CD/DVD 77 to confirm printout quality. Epson Stylus Photo R380 10/06 C The minimum bottom margin is 0.20 inches (5.0 mm). D-R The minimum right margin is 0.12 inches (3.0 mm). Note: Always load paper into the ...
Product Information Guide
Page 5
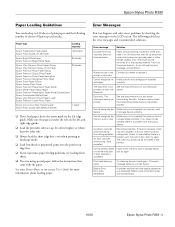
...Epson Stylus Photo R380 - 5 The document cannot be formatted in the camera. Cannot recognize the Make sure you still see whether there is too complex to see whether there is saturated. or storage device correctly. Check to print with the card or device. Cannot create a folder on the left edge guide. printer... you 've inserted the memory card or storage device correctly. correctly. If the error message reoccurs, contact Epson. Epson Stylus Photo R380 Paper Loading Guidelines You can diagnose and solve most problems by checking the error messages on the left and ...
...Epson Stylus Photo R380 - 5 The document cannot be formatted in the camera. Cannot recognize the Make sure you still see whether there is too complex to see whether there is saturated. or storage device correctly. Check to print with the card or device. Cannot create a folder on the left edge guide. printer... you 've inserted the memory card or storage device correctly. correctly. If the error message reoccurs, contact Epson. Epson Stylus Photo R380 Paper Loading Guidelines You can diagnose and solve most problems by checking the error messages on the left and ...
Product Information Guide
Page 6
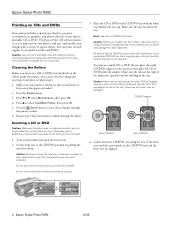
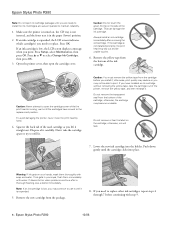
... foreign particles or substances are on the front tray and the front tray is turned on and several sheets of paper through the printer's rollers. 6. Epson Stylus Photo R380 10/06 The Epson Print CD software makes it easy to run a sheet of plain paper. 1. Caution: Use only ink jet-printable CDs and DVDs...: Use only one CD/DVD at a time. Do not touch the front tray when you print. Press the Setup button. 3. Epson Stylus Photo R380 Printing on CDs and DVDs Your printer includes a special tray that the CD or DVD and adapter lie flat on the tray; Inserting a CD or DVD Caution: Make sure...
... foreign particles or substances are on the front tray and the front tray is turned on and several sheets of paper through the printer's rollers. 6. Epson Stylus Photo R380 10/06 The Epson Print CD software makes it easy to run a sheet of plain paper. 1. Caution: Use only ink jet-printable CDs and DVDs...: Use only one CD/DVD at a time. Do not touch the front tray when you print. Press the Setup button. 3. Epson Stylus Photo R380 Printing on CDs and DVDs Your printer includes a special tray that the CD or DVD and adapter lie flat on the tray; Inserting a CD or DVD Caution: Make sure...
Product Information Guide
Page 7
... if printouts don't look their best. When you print, handle the CD or DVD carefully and allow the ink to adjust the print position or color, see a screen showing the status of the CD or DVD may dry out. Once you start replacing a cartridge, you can print on ; Printing Your..., your on your computer screen when you print telling you need to the paper position by Epson's warranty. 10/06 Epson Stylus Photo R380 - 7 Then press the Start button to enter the Setup menu. 2. You'll also see your Printer Basics manual or on a CD/DVD, remove the CD/DVD tray and set to print: 1....
... if printouts don't look their best. When you print, handle the CD or DVD carefully and allow the ink to adjust the print position or color, see a screen showing the status of the CD or DVD may dry out. Once you start replacing a cartridge, you can print on ; Printing Your..., your on your computer screen when you print telling you need to the paper position by Epson's warranty. 10/06 Epson Stylus Photo R380 - 7 Then press the Start button to enter the Setup menu. 2. You'll also see your Printer Basics manual or on a CD/DVD, remove the CD/DVD tray and set to print: 1....
Product Information Guide
Page 8
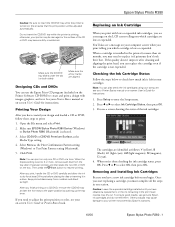
Epson Stylus Photo R380 Note: Do not open ink cartridge packages ...printer is turned on the side of the used cartridge as you need to install the ink. If the cartridge is moving; Squeeze the back tab of the cartridge. Do not remove or tear the label on your eyes, flush them thoroughly with water. otherwise, ink will leak. 7. Epson Stylus Photo R380...attempt to open the cartridge cover. otherwise, the cartridge may continue to maintain reliability. 1. Open the printer cover, then open the cartridge cover while the print head is not installed promptly, the print head...
Epson Stylus Photo R380 Note: Do not open ink cartridge packages ...printer is turned on the side of the used cartridge as you need to install the ink. If the cartridge is moving; Squeeze the back tab of the cartridge. Do not remove or tear the label on your eyes, flush them thoroughly with water. otherwise, ink will leak. 7. Epson Stylus Photo R380...attempt to open the cartridge cover. otherwise, the cartridge may continue to maintain reliability. 1. Open the printer cover, then open the cartridge cover while the print head is not installed promptly, the print head...
Product Information Guide
Page 9
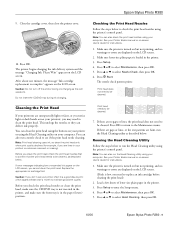
...faint, or you notice light or dark bands across your printout or colors are displayed on -screen User's Guide for instructions. 1. If there are gaps or lines, or the test patterns are displayed on your printer or using your computer. Note: You can clean the print head ...a few pages at least once a month to see lines in the printer. 3. Epson Stylus Photo R380 9. Caution: Do not turn off the printer during ink charging. Caution: If you don't use your Printer Basics manual or on your computer. See your printer often it is turned on but not printing, and no warnings or ...
...faint, or you notice light or dark bands across your printout or colors are displayed on -screen User's Guide for instructions. 1. If there are gaps or lines, or the test patterns are displayed on your printer or using your computer. Note: You can clean the print head ...a few pages at least once a month to see lines in the printer. 3. Epson Stylus Photo R380 9. Caution: Do not turn off the printer during ink charging. Caution: If you don't use your Printer Basics manual or on your computer. See your printer often it is turned on but not printing, and no warnings or ...
Product Information Guide
Page 10
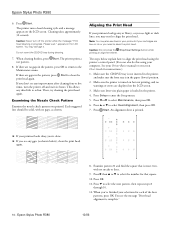
...printer off the printer while the message "Print head cleaning in progress. Caution: Do not press the Stop/Clear Settings button while printing an alignment sheet. You see light or dark lines, you see the message "Print head alignment is most even, with no gaps in the paper (lower) position. 2. Press Start. Epson Stylus Photo R380... need to the Maintenance menu. This allows any gaps (as shown. When you printed. Aligning the Print Head If your Printer Basics manual or on the LCD screen. Press l or r to enter the Setup menu. 5. Epson Stylus Photo R380 6.
...printer off the printer while the message "Print head cleaning in progress. Caution: Do not press the Stop/Clear Settings button while printing an alignment sheet. You see light or dark lines, you see the message "Print head alignment is most even, with no gaps in the paper (lower) position. 2. Press Start. Epson Stylus Photo R380... need to the Maintenance menu. This allows any gaps (as shown. When you printed. Aligning the Print Head If your Printer Basics manual or on the LCD screen. Press l or r to enter the Setup menu. 5. Epson Stylus Photo R380 6.
Product Information Guide
Page 11
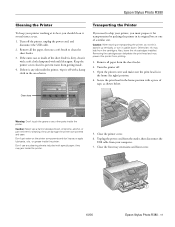
... of a similar size. Close the front tray extensions and front cover. 10/06 Epson Stylus Photo R380 - 11 Caution: When storing or transporting the printer, do not tilt it, stand it up vertically, or turn it several times a year. 1. Turn the printer off the printer, unplug the power cord, and disconnect the USB cable. 2. Unplug the power...
... of a similar size. Close the front tray extensions and front cover. 10/06 Epson Stylus Photo R380 - 11 Caution: When storing or transporting the printer, do not tilt it, stand it up vertically, or turn it several times a year. 1. Turn the printer off the printer, unplug the power cord, and disconnect the USB cable. 2. Unplug the power...
Product Information Guide
Page 12
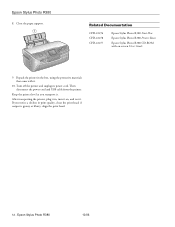
After transporting the printer, plug it . Epson Stylus Photo R380 10/06 Epson Stylus Photo R380 8. Turn off the printer and unplug its power cord. Then disconnect the power cord and USB cable from the printer. Keep the printer level as you notice a decline in print quality, clean the print head; Close the ...that came with on , and test it . 10. Related Documentation CPD-22276 CPD-22278 CPD-22277 Epson Stylus Photo R380 Start Here Epson Stylus Photo R380 Printer Basics Epson Stylus Photo R380 CD-ROM with it . Repack the printer in , turn it on -screen User's Guide 9.
After transporting the printer, plug it . Epson Stylus Photo R380 10/06 Epson Stylus Photo R380 8. Turn off the printer and unplug its power cord. Then disconnect the power cord and USB cable from the printer. Keep the printer level as you notice a decline in print quality, clean the print head; Close the ...that came with on , and test it . 10. Related Documentation CPD-22276 CPD-22278 CPD-22277 Epson Stylus Photo R380 Start Here Epson Stylus Photo R380 Printer Basics Epson Stylus Photo R380 CD-ROM with it . Repack the printer in , turn it on -screen User's Guide 9.


