
Technical Brief (Ink Jet Printers)
Page 1
.... Detailed information on each component is on the core technologies used in solid areas Crisp text Epson Sales Training 5/07 This combination of core technologies used in Epson ink jet printers work together to produce brilliant Photo Quality color, sharp text, and incredible print speeds Small Ink Droplet Size Small ink droplets produce smoother gradations...
.... Detailed information on each component is on the core technologies used in solid areas Crisp text Epson Sales Training 5/07 This combination of core technologies used in Epson ink jet printers work together to produce brilliant Photo Quality color, sharp text, and incredible print speeds Small Ink Droplet Size Small ink droplets produce smoother gradations...

Technical Brief (Ink Jet Printers)
Page 2
...thermal ink jet technology, used in photos and laser sharp text. Small ink droplet size: Most Epson printers produce ink droplets so small you cannot see them with high resolutions to precisely print crisp details in other ink jet printers: Epson MicroPiezo Technology Mechanical method: Precise electrical...2 High Print Resolution: Resolution, which expands and is ejected through the nozzle. A smaller ink droplet allows the printer to produce a greater number of different colored "printed dots" because a wider range of tiny droplets can be used in the low-density or highlight areas...
...thermal ink jet technology, used in photos and laser sharp text. Small ink droplet size: Most Epson printers produce ink droplets so small you cannot see them with high resolutions to precisely print crisp details in other ink jet printers: Epson MicroPiezo Technology Mechanical method: Precise electrical...2 High Print Resolution: Resolution, which expands and is ejected through the nozzle. A smaller ink droplet allows the printer to produce a greater number of different colored "printed dots" because a wider range of tiny droplets can be used in the low-density or highlight areas...

Technical Brief (Ink Jet Printers)
Page 3
... with Epson papers. Epson printers use an advanced error diffusion technology to receive Epson inks. Ink System: Epson offers a variety of documents and the occasional photo, is an amateur photographer looking to change. ©2006 Epson America, Inc. Whether the customer is most efficient pattern for optional cartridges, and you see continuous tone color. The Epson printer drivers...
... with Epson papers. Epson printers use an advanced error diffusion technology to receive Epson inks. Ink System: Epson offers a variety of documents and the occasional photo, is an amateur photographer looking to change. ©2006 Epson America, Inc. Whether the customer is most efficient pattern for optional cartridges, and you see continuous tone color. The Epson printer drivers...
Printer Basics
Page 2
... Copyrighted Materials Digital cameras or scanners, and ink jet printers, like photocopiers and conventional cameras, can be as broad as a result of: accident, misuse, or abuse of Sony Corporation. The ENERGY STAR emblem does not represent EPA endorsement of Seiko Epson Corporation. Trademarks Epson, Epson Stylus, Epson Photo Stickers, MicroWeave, PRINT Image Matching, and the PRINT Image...
... Copyrighted Materials Digital cameras or scanners, and ink jet printers, like photocopiers and conventional cameras, can be as broad as a result of: accident, misuse, or abuse of Sony Corporation. The ENERGY STAR emblem does not represent EPA endorsement of Seiko Epson Corporation. Trademarks Epson, Epson Stylus, Epson Photo Stickers, MicroWeave, PRINT Image Matching, and the PRINT Image...
Printer Basics
Page 4
... 29 Basic Printing in Windows 29 Selecting Default Settings 31 Basic Printing in Mac OS X 31 Selecting the Correct Paper Type 34 Printing Borderless Photos 35 Windows 36 Mac OS X 37 Printing on CDs or DVDs 38 Cleaning the Roller 38 Inserting a CD or DVD 39 Printing Your... Design 41 Adjusting the Print Position 41 Adjusting the Print Density 43 Maintaining Your Printer 45 Cleaning the Print Head 45 Replacing an Ink Cartridge 47 Removing and Installing Ink Cartridges 48 Aligning the Print Head 50 Cleaning the...
... 29 Basic Printing in Windows 29 Selecting Default Settings 31 Basic Printing in Mac OS X 31 Selecting the Correct Paper Type 34 Printing Borderless Photos 35 Windows 36 Mac OS X 37 Printing on CDs or DVDs 38 Cleaning the Roller 38 Inserting a CD or DVD 39 Printing Your... Design 41 Adjusting the Print Position 41 Adjusting the Print Density 43 Maintaining Your Printer 45 Cleaning the Print Head 45 Replacing an Ink Cartridge 47 Removing and Installing Ink Cartridges 48 Aligning the Print Head 50 Cleaning the...

Printer Basics
Page 5
... Installation Problems Printer Problems Print Quality Problems Problems With Paper Feeding CD/DVD Printing Problems Miscellaneous Printout Problems Uninstalling Printer Software Windows Mac OS X Where To Get Help Notices Windows System Requirements Macintosh System Requirements Important Safety Instructions Ink Cartridge Safety Instructions Energy Star Compliance FCC Compliance Statement Declaration of Conformity Epson America...
... Installation Problems Printer Problems Print Quality Problems Problems With Paper Feeding CD/DVD Printing Problems Miscellaneous Printout Problems Uninstalling Printer Software Windows Mac OS X Where To Get Help Notices Windows System Requirements Macintosh System Requirements Important Safety Instructions Ink Cartridge Safety Instructions Energy Star Compliance FCC Compliance Statement Declaration of Conformity Epson America...
Printer Basics
Page 7
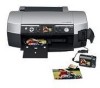
...port on the back of the printer is for placing in albums, framing, or sharing with manageable print file sizes. ■ Three built-in a variety of papers for sending prints wirelessly from your PC. Your Epson Stylus® Photo R340 can transfer them immediately to ...computer.) ■ A color LCD preview panel helps you achieve fine shadow detail, dazzling highlights, and excellent fill across a wide range of the printer's outstanding features: ■ Epson's exclusive 6-color ink technology lets you select photos for printing. ■ Your printer also supports Bluetooth®...
...port on the back of the printer is for placing in albums, framing, or sharing with manageable print file sizes. ■ Three built-in a variety of papers for sending prints wirelessly from your PC. Your Epson Stylus® Photo R340 can transfer them immediately to ...computer.) ■ A color LCD preview panel helps you achieve fine shadow detail, dazzling highlights, and excellent fill across a wide range of the printer's outstanding features: ■ Epson's exclusive 6-color ink technology lets you select photos for printing. ■ Your printer also supports Bluetooth®...

Printer Basics
Page 8
...blue links to view it. Cautions must be observed to avoid damage to your equipment. Viewing Your On-Screen User's Guide Your printer CD-ROM includes an on your desktop. This book contains system requirements, important safety information, your warranty, and instructions on: ■...; Viewing your on-screen User's Guide ■ Printing all types of photos without a computer, see the Quick Reference card. For basic printing without a computer ■ Printing with , maintaining, or troubleshooting your printer, see the Start Here sheet. You need a browser-such as described below...
...blue links to view it. Cautions must be observed to avoid damage to your equipment. Viewing Your On-Screen User's Guide Your printer CD-ROM includes an on your desktop. This book contains system requirements, important safety information, your warranty, and instructions on: ■...; Viewing your on-screen User's Guide ■ Printing all types of photos without a computer, see the Quick Reference card. For basic printing without a computer ■ Printing with , maintaining, or troubleshooting your printer, see the Start Here sheet. You need a browser-such as described below...
Printer Basics
Page 10
...photographs, keep your prints away from your on-screen User's Guide. The special Epson inks designed for your printer are formulated to achieve improved lightfastness when used with traditional photos, proper care will last for prints that prints be framed under glass or a .... ■ When using a support sheet included in the printer, see your Epson Stylus Photo R340 will minimize color changes and lengthen display life: ■ For display, Epson recommends that are properly displayed or stored. As with Epson papers for many years. 4. Some papers require using special papers...
...photographs, keep your prints away from your on-screen User's Guide. The special Epson inks designed for your printer are formulated to achieve improved lightfastness when used with traditional photos, proper care will last for prints that prints be framed under glass or a .... ■ When using a support sheet included in the printer, see your Epson Stylus Photo R340 will minimize color changes and lengthen display life: ■ For display, Epson recommends that are properly displayed or stored. As with Epson papers for many years. 4. Some papers require using special papers...

Printer Basics
Page 12
... a Macintosh-formatted Zip disk or thumb drive, you can try connecting it must be formatted as the MicroTech™ ZiO!™) Note: Epson cannot guarantee the compatibility of the following devices, you see a screen saying that the inserted card cannot be used with a commercially available USB...list of compatible drives) ■ 100 or 250MB Iomega Zip drive, AC or USB powered ■ Memory cards with the printer. 12 Accessing Photos After a moment, the printer reads and counts the number of the slot. If it 's done, your camera or drive, you have been removed before ...
... a Macintosh-formatted Zip disk or thumb drive, you can try connecting it must be formatted as the MicroTech™ ZiO!™) Note: Epson cannot guarantee the compatibility of the following devices, you see a screen saying that the inserted card cannot be used with a commercially available USB...list of compatible drives) ■ 100 or 250MB Iomega Zip drive, AC or USB powered ■ Memory cards with the printer. 12 Accessing Photos After a moment, the printer reads and counts the number of the slot. If it 's done, your camera or drive, you have been removed before ...
Printer Basics
Page 13
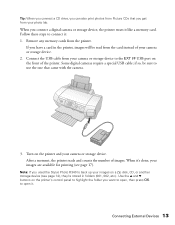
...be read from the card instead of images. Note: If you used the Stylus Photo R340 to the EXT I/F USB port on the printer and your images are available for printing (see page 14), they're stored in the printer, images will be sure to use the one that you get from your ...on a Zip disk, CD, or another storage device (see page 17). Connecting External Devices 13 When you connect a digital camera or storage device, the printer treats it 's done, your camera or storage device. Connect the USB cable from your photo lab. Tip: When you connect a CD drive, you can also print...
...be read from the card instead of images. Note: If you used the Stylus Photo R340 to the EXT I/F USB port on the printer and your images are available for printing (see page 14), they're stored in the printer, images will be sure to use the one that you get from your ...on a Zip disk, CD, or another storage device (see page 17). Connecting External Devices 13 When you connect a digital camera or storage device, the printer treats it 's done, your camera or storage device. Connect the USB cable from your photo lab. Tip: When you connect a CD drive, you can also print...

Printer Basics
Page 14
...: Once the backup starts, don't press any cameras or drives. Note: Epson cannot guarantee the compatibility of the printer (see page 12). 4. Press the Setup button on the memory card may lose photos on . If the printer is connected to your computer, unplug the USB cable that are on how many... memory card and reuse it without losing your original photos. When you see a screen saying that you connect directly to your printer. You may take several minutes. This lets you delete the images on the printer screen. Saving Your Photos to an External Device If you don't have to...
...: Once the backup starts, don't press any cameras or drives. Note: Epson cannot guarantee the compatibility of the printer (see page 12). 4. Press the Setup button on the memory card may lose photos on . If the printer is connected to your computer, unplug the USB cable that are on how many... memory card and reuse it without losing your original photos. When you see a screen saying that you connect directly to your printer. You may take several minutes. This lets you delete the images on the printer screen. Saving Your Photos to an External Device If you don't have to...

Printer Basics
Page 15
...stop the slide show . Insert the memory card into your printer's memory card slot and copy the photos to Your Computer If you've taken digital photos with your camera, you can access the contents of the card just like any portrait photos so they appear upright. 5. Viewing a Slide Show of ...Your Photos 1. Open the memory card door. 3. Press OK. The printer plays the slide show , press Back. Press l to Memory Card mode. 3. To pause the slide show...
...stop the slide show . Insert the memory card into your printer's memory card slot and copy the photos to Your Computer If you've taken digital photos with your camera, you can access the contents of the card just like any portrait photos so they appear upright. 5. Viewing a Slide Show of ...Your Photos 1. Open the memory card door. 3. Press OK. The printer plays the slide show , press Back. Press l to Memory Card mode. 3. To pause the slide show...

Printer Basics
Page 16
...set to open when a digital camera is flashing or without performing the steps described below to remove it will open the drive and copy your photos to the card, or format the card, the card may not work correctly with your computer. Depending on the card. Click Stop USB ... on your operating system, you access the card from your computer and delete files from your computer. Always format cards and delete pictures using your printer. Caution: Do not eject a card while the card light is connected, it . Then click Safely Remove USB Mass Storage Device. ■ On a Macintosh, ...
...set to open when a digital camera is flashing or without performing the steps described below to remove it will open the drive and copy your photos to the card, or format the card, the card may not work correctly with your computer. Depending on the card. Click Stop USB ... on your operating system, you access the card from your computer and delete files from your computer. Always format cards and delete pictures using your printer. Caution: Do not eject a card while the card light is connected, it . Then click Safely Remove USB Mass Storage Device. ■ On a Macintosh, ...
Printer Basics
Page 18
..."Resetting Default Settings" on page 28 Printing Photos Before you begin, make sure you print photos quickly and easily without a computer. If the printer is in the appropriate card slot (see page 11), or connect an external device that has photos (see page 9) and insert your digital ...camera's memory card, choose print settings from the control panel, and press the x Start button. Printing Without a Computer Your Epson Stylus Photo R340 lets ...
..."Resetting Default Settings" on page 28 Printing Photos Before you begin, make sure you print photos quickly and easily without a computer. If the printer is in the appropriate card slot (see page 11), or connect an external device that has photos (see page 9) and insert your digital ...camera's memory card, choose print settings from the control panel, and press the x Start button. Printing Without a Computer Your Epson Stylus Photo R340 lets ...
Printer Basics
Page 22
...color and improve the image quality of your photos without using a computer. Touching Up Your Photos Your Epson Stylus Photo R340 lets you don't see the entire image in your photos. Prints one photo per sheet with twenty-four photos; Prints eight photos per sheet; Prints 20 photos per sheet. twelve on each photo... Up Your Photos 21 fits the photo lengthwise on the top half of the insert. Prints a photo on the paper. the photo number and date are also printed with one photo on one of the insert. Automatically Adjusting Your Photos When you use the printer's automatic image...
...color and improve the image quality of your photos without using a computer. Touching Up Your Photos Your Epson Stylus Photo R340 lets you don't see the entire image in your photos. Prints one photo per sheet with twenty-four photos; Prints eight photos per sheet; Prints 20 photos per sheet. twelve on each photo... Up Your Photos 21 fits the photo lengthwise on the top half of the insert. Prints a photo on the paper. the photo number and date are also printed with one photo on one of the insert. Automatically Adjusting Your Photos When you use the printer's automatic image...

Printer Basics
Page 25
...Your CD or DVD" on page 26 ■ "Adjusting the Printing Position" on your selected layout, part of the image will be used with this printer. Thermal-printable and regular CDs and DVDs should not be automatically cropped. Highlight Fit to Frame and press r. 3. Follow the steps in effect until ...them. Cropped area Fit to Frame turned on Fit to Frame turned off To turn automatic cropping off or on your computer. To reset all photos, not just borderless layouts. Printing on CDs and DVDs You can order ink jet-printable CDs and DVDs from your local retailer or several ...
...Your CD or DVD" on page 26 ■ "Adjusting the Printing Position" on your selected layout, part of the image will be used with this printer. Thermal-printable and regular CDs and DVDs should not be automatically cropped. Highlight Fit to Frame and press r. 3. Follow the steps in effect until ...them. Cropped area Fit to Frame turned on Fit to Frame turned off To turn automatic cropping off or on your computer. To reset all photos, not just borderless layouts. Printing on CDs and DVDs You can order ink jet-printable CDs and DVDs from your local retailer or several ...

Printer Basics
Page 26
... three or four times. Note: To print on small CDs (8 cm), you must print from the printer. 7. Press OK to load CDs and DVDs into the printer. 5. Otherwise, the disc may cause errors when you burn the data. Press OK again to make ... guide Push in the output tray extension and lower the CD/DVD tray guide. Press d to clean the roller inside the printer. Cleaning the Roller Before you print on CDs or DVDs, it's a good idea to select Paper Feed/Paper Eject and ... print a small sample, then wait a day and check the quality to eject the paper from EPSON Print CD on CDs and DVDs 25
... three or four times. Note: To print on small CDs (8 cm), you must print from the printer. 7. Press OK to load CDs and DVDs into the printer. 5. Otherwise, the disc may cause errors when you burn the data. Press OK again to make ... guide Push in the output tray extension and lower the CD/DVD tray guide. Press d to clean the roller inside the printer. Cleaning the Roller Before you print on CDs or DVDs, it's a good idea to select Paper Feed/Paper Eject and ... print a small sample, then wait a day and check the quality to eject the paper from EPSON Print CD on CDs and DVDs 25

Printer Basics
Page 27
... guide are aligned. Printing Your CD or DVD After you have loaded a CD or DVD, you're ready to print. 1. Insert the tray into the printer carefully, making sure it in too far; 2.
... guide are aligned. Printing Your CD or DVD After you have loaded a CD or DVD, you're ready to print. 1. Insert the tray into the printer carefully, making sure it in too far; 2.

Printer Basics
Page 29
You can adjust the position by up . Resetting Default Settings You can adjust the position by up to the default settings before printing other photos. 1. Press OK. 5. Then press the OK button. Press the OK button to set the changes you made and return to choose Restore Factory Settings. 3. ... u to adjust the position each time you are returned to their defaults using the Restore to 2 mm in either direction. 4. You can reset the printer's settings (such as the layout, color effects, or crop settings) to 2 mm in either direction. Press r. 4. Then press the OK button.
You can adjust the position by up . Resetting Default Settings You can adjust the position by up to the default settings before printing other photos. 1. Press OK. 5. Then press the OK button. Press the OK button to set the changes you made and return to choose Restore Factory Settings. 3. ... u to adjust the position each time you are returned to their defaults using the Restore to 2 mm in either direction. 4. You can reset the printer's settings (such as the layout, color effects, or crop settings) to 2 mm in either direction. Press r. 4. Then press the OK button.


