Printer Basics
Page 4
... 27 Resetting Default Settings 28 Printing From Your Computer 29 Basic Printing in Windows 29 Selecting Default Settings 31 Basic Printing in Mac OS X 31 Selecting the Correct Paper Type 34 Printing Borderless Photos 35 Windows 36 Mac OS X 37 Printing on CDs or DVDs 38 Cleaning the Roller 38 Inserting a CD or DVD 39 Printing Your Design 41 Adjusting the Print Position 41 Adjusting the Print Density 43 Maintaining Your Printer 45 Cleaning the Print Head 45 Replacing an Ink Cartridge 47 Removing and Installing Ink Cartridges 48 Aligning the Print Head...
... 27 Resetting Default Settings 28 Printing From Your Computer 29 Basic Printing in Windows 29 Selecting Default Settings 31 Basic Printing in Mac OS X 31 Selecting the Correct Paper Type 34 Printing Borderless Photos 35 Windows 36 Mac OS X 37 Printing on CDs or DVDs 38 Cleaning the Roller 38 Inserting a CD or DVD 39 Printing Your Design 41 Adjusting the Print Position 41 Adjusting the Print Density 43 Maintaining Your Printer 45 Cleaning the Print Head 45 Replacing an Ink Cartridge 47 Removing and Installing Ink Cartridges 48 Aligning the Print Head...
Printer Basics
Page 7
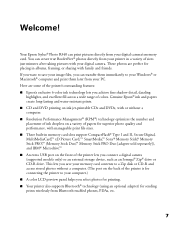
.... This lets you select photos for printing. ■ Your printer also supports Bluetooth® technology (using an optional adapter) for superior photo quality and performance, with family and friends. These photos are some of sizes just minutes after taking pictures with your digital camera's memory card. Genuine Epson® ink and papers create long-lasting and water-resistant prints. ■ CD and DVD printing on ink jet-printable CDs and DVDs, with or without...
.... This lets you select photos for printing. ■ Your printer also supports Bluetooth® technology (using an optional adapter) for superior photo quality and performance, with family and friends. These photos are some of sizes just minutes after taking pictures with your digital camera's memory card. Genuine Epson® ink and papers create long-lasting and water-resistant prints. ■ CD and DVD printing on ink jet-printable CDs and DVDs, with or without...
Printer Basics
Page 10
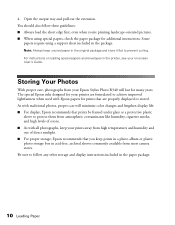
... first, even when you keep unused paper in the paper package. 10 Loading Paper The special Epson inks designed for prints that you 're printing landscape-oriented pictures. ■ When using a support sheet included in acid-free, archival sleeves commonly available from your on loading special papers and envelopes in the printer, see your Epson Stylus Photo R340 will minimize color changes and lengthen display life: ■ For display, Epson recommends that prints be framed under glass or a protective...
... first, even when you keep unused paper in the paper package. 10 Loading Paper The special Epson inks designed for prints that you 're printing landscape-oriented pictures. ■ When using a support sheet included in acid-free, archival sleeves commonly available from your on loading special papers and envelopes in the printer, see your Epson Stylus Photo R340 will minimize color changes and lengthen display life: ■ For display, Epson recommends that prints be framed under glass or a protective...
Printer Basics
Page 33
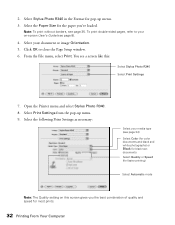
... the Page Setup window. 6. From the File menu, select Print. Select the Paper Size for pop-up menu. 9. Select your media type (see a screen like this screen gives you 've loaded. Select Print Settings from the pop-up menu. 3. Select the following Print Settings as necessary: Select your document or image Orientation. 5. Open the Printer menu and select Stylus Photo R340. 8. 2. Select Stylus Photo R340 in the Format for the paper you the best combination of quality and speed for faster printing) Select Automatic mode Note: The Quality setting on -screen User's Guide (see...
... the Page Setup window. 6. From the File menu, select Print. Select the Paper Size for pop-up menu. 9. Select your media type (see a screen like this screen gives you 've loaded. Select Print Settings from the pop-up menu. 3. Select the following Print Settings as necessary: Select your document or image Orientation. 5. Open the Printer menu and select Stylus Photo R340. 8. 2. Select Stylus Photo R340 in the Format for the paper you the best combination of quality and speed for faster printing) Select Automatic mode Note: The Quality setting on -screen User's Guide (see...
Printer Basics
Page 46
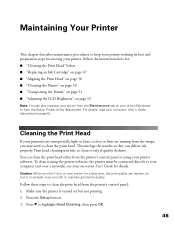
... quality declines. For details, read your on-screen User's Guide (described on but not printing. 2. Print head cleaning uses ink, so clean it using your printer software. Make sure the printer is turned on page 8). Caution: When you may need to your computer (not over a network); Press the Setup button. 3. Follow the instructions here for moving your printer. Cleaning the Print Head If your printouts are unexpectedly light or faint, or dots or lines are missing from the image, you don't turn...
... quality declines. For details, read your on-screen User's Guide (described on but not printing. 2. Print head cleaning uses ink, so clean it using your printer software. Make sure the printer is turned on page 8). Caution: When you may need to your computer (not over a network); Press the Setup button. 3. Follow the instructions here for moving your printer. Cleaning the Print Head If your printouts are unexpectedly light or faint, or dots or lines are missing from the image, you don't turn...
Printer Basics
Page 54
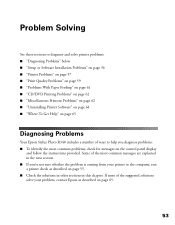
... printer problems: ■ "Diagnosing Problems" below ■ "Setup or Software Installation Problems" on page 56 ■ "Printer Problems" on page 57 ■ "Print Quality Problems" on page 59 ■ "Problems With Paper Feeding" on page 61 ■ "CD/DVD Printing Problems" on page 62 ■ "Miscellaneous Printout Problems" on page 62 ■ "Uninstalling Printer Software" on page 64 ■ "Where To Get Help" on page 65 Diagnosing Problems Your Epson Stylus Photo R340 includes a number of ways to help you diagnose problems: ■ To identify the most common messages...
... printer problems: ■ "Diagnosing Problems" below ■ "Setup or Software Installation Problems" on page 56 ■ "Printer Problems" on page 57 ■ "Print Quality Problems" on page 59 ■ "Problems With Paper Feeding" on page 61 ■ "CD/DVD Printing Problems" on page 62 ■ "Miscellaneous Printout Problems" on page 62 ■ "Uninstalling Printer Software" on page 64 ■ "Where To Get Help" on page 65 Diagnosing Problems Your Epson Stylus Photo R340 includes a number of ways to help you diagnose problems: ■ To identify the most common messages...
Printer Basics
Page 55
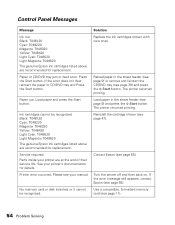
... Replace the ink cartridges shown with new ones. Reload paper in the sheet feeder (see page 9) and press the x Start button. The printer resumes printing. Reinstall the cartridge shown (see page 65). If the error message still appears, contact Epson (see page 47). Paper or CD/DVD tray jam or feed error. Service required. Parts inside your printer's documentation for details. Please see page 65). Paper out. Contact Epson (see your manual. Printer error occurred. Use a compatible, formatted memory card (see page 39) and press the x Start button. Black...
... Replace the ink cartridges shown with new ones. Reload paper in the sheet feeder (see page 9) and press the x Start button. The printer resumes printing. Reinstall the cartridge shown (see page 65). If the error message still appears, contact Epson (see page 47). Paper or CD/DVD tray jam or feed error. Service required. Parts inside your printer's documentation for details. Please see page 65). Paper out. Contact Epson (see your manual. Printer error occurred. Use a compatible, formatted memory card (see page 39) and press the x Start button. Black...

Printer Basics
Page 58
.... Printer Problems 57 Try deleting any photos you don't need to set up your printer for network printing, as though it on a flat, stable surface that the cable meets the system requirements on page 67. ■ If you're printing from your camera. ■ With Windows 2000, if you see your on-screen User's Guide for instructions on configuring your printer for use on a network. To clean the print head, see page 45...
.... Printer Problems 57 Try deleting any photos you don't need to set up your printer for network printing, as though it on a flat, stable surface that the cable meets the system requirements on page 67. ■ If you're printing from your camera. ■ With Windows 2000, if you see your on-screen User's Guide for instructions on configuring your printer for use on a network. To clean the print head, see page 45...
Printer Basics
Page 59
... fastest printing, try these tips: ■ Choose Black ink if your document doesn't include color (except for the printer to install your Windows storage device driver. 58 Problem Solving Your memory card does not work correctly with a DCF-compliant digital camera. ■ If you access the card from your computer and delete files, the card may not work correctly. ■ If you're using different kinds of the paper. You may need to...
... fastest printing, try these tips: ■ Choose Black ink if your document doesn't include color (except for the printer to install your Windows storage device driver. 58 Problem Solving Your memory card does not work correctly with a DCF-compliant digital camera. ■ If you access the card from your computer and delete files, the card may not work correctly. ■ If you're using different kinds of the paper. You may need to...
Printer Basics
Page 60
... ink cartridge, see page 50 for instructions. ■ Remove each sheet from a computer, make sure the paper Type or Media Type setting matches the paper you 're printing without a computer, make sure the printer's Paper Type setting matches the type of paper. ■ When printing on -screen User's Guide. ■ Run the Print Head Alignment utility; You may need to ensure proper saturation and absorption of genuine Epson inks. ■ Make sure you 're printing on transparencies. ■ If the options above don't work, try using ; see page...
... ink cartridge, see page 50 for instructions. ■ Remove each sheet from a computer, make sure the paper Type or Media Type setting matches the paper you 're printing without a computer, make sure the printer's Paper Type setting matches the type of paper. ■ When printing on -screen User's Guide. ■ Run the Print Head Alignment utility; You may need to ensure proper saturation and absorption of genuine Epson inks. ■ Make sure you 're printing on transparencies. ■ If the options above don't work, try using ; see page...
Printer Basics
Page 61
... a new stack of paper, or print quality may need cleaning; However, you 're using ; You see page 31. ■ Run the Print Head Alignment utility; Also check if you can use your software documentation. Make sure you disable the thick paper and envelopes option before printing on -screen User's Guide for more information. 60 Problem Solving If it in the image. ■ The print head nozzles may be old or low on -screen colors. Also make sure the paper Type or Media Type setting matches the paper...
... a new stack of paper, or print quality may need cleaning; However, you 're using ; You see page 31. ■ Run the Print Head Alignment utility; Also check if you can use your software documentation. Make sure you disable the thick paper and envelopes option before printing on -screen User's Guide for more information. 60 Problem Solving If it in the image. ■ The print head nozzles may be old or low on -screen colors. Also make sure the paper Type or Media Type setting matches the paper...
Printer Basics
Page 64
... "Printer Specifications" in your on-screen User's Guide. ■ If you are printing without a computer, make sure the Crop and Fit to Frame settings are correct for your paper size. ■ Make sure the paper is positioned correctly in the Print Center or Printer Setup Utility. ■ If you 're using a USB hub, connect the printer directly to fit the paper and layout. The margins are incorrect. ■ Make sure the paper settings are set to Off; Image size or position is not set...
... "Printer Specifications" in your on-screen User's Guide. ■ If you are printing without a computer, make sure the Crop and Fit to Frame settings are correct for your paper size. ■ Make sure the paper is positioned correctly in the Print Center or Printer Setup Utility. ■ If you 're using a USB hub, connect the printer directly to fit the paper and layout. The margins are incorrect. ■ Make sure the paper settings are set to Off; Image size or position is not set...
Printer Basics
Page 65
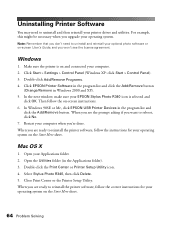
... click the Add/Remove button (Change/Remove in the Applications folder). 3. Uninstalling Printer Software You may need to reinstall the printer software, follow the instructions for your operating system on the Start Here sheet. 64 Problem Solving Double-click Add/Remove Programs. 4. Open the Utilities folder (in Windows 2000 and XP). 5. Close Print Center or the Printer Setup Utility. Make sure the printer is selected and click OK. In Windows 98SE or Me, click EPSON USB Printer Devices in the...
... click the Add/Remove button (Change/Remove in the Applications folder). 3. Uninstalling Printer Software You may need to reinstall the printer software, follow the instructions for your operating system on the Start Here sheet. 64 Problem Solving Double-click Add/Remove Programs. 4. Open the Utilities folder (in Windows 2000 and XP). 5. Close Print Center or the Printer Setup Utility. Make sure the printer is selected and click OK. In Windows 98SE or Me, click EPSON USB Printer Devices in the...
Product Brochure
Page 2
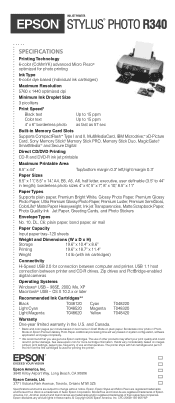
... Draft Mode on Epson Premium Glossy Photo Paper. CPD-20629 15K 9/05 WP INK JET PRINTER EPSON® STYLUS® PHOTO R340 SPECIFICATIONS Printing Technology 6-color (CcMmYK) advanced Micro Piezo® optimized for photo printing Ink Type 6-color dye based (individual ink cartridges) Maximum Resolution 5760 x 1440 optimized dpi Minimum Ink Droplet Size 3 picoliters Print Speed* Black text Color text 4" x 6" borderless photo Up to 15 ppm Up to 15 ppm as fast as 57 sec Built-in Memory Card Slots Supports...
... Draft Mode on Epson Premium Glossy Photo Paper. CPD-20629 15K 9/05 WP INK JET PRINTER EPSON® STYLUS® PHOTO R340 SPECIFICATIONS Printing Technology 6-color (CcMmYK) advanced Micro Piezo® optimized for photo printing Ink Type 6-color dye based (individual ink cartridges) Maximum Resolution 5760 x 1440 optimized dpi Minimum Ink Droplet Size 3 picoliters Print Speed* Black text Color text 4" x 6" borderless photo Up to 15 ppm Up to 15 ppm as fast as 57 sec Built-in Memory Card Slots Supports...

Product Information Guide
Page 2
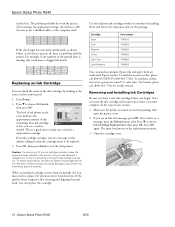
... S041465 S041331 S041982 S041405 S041106 Paper name Epson Ink Jet Transparencies Epson Iron-On Transfer Paper Epson Glossy Photo Greeting Cards Epson Photo Stickers Epson Semigloss Scrapbook Photo Paper PremierArt™ Matte Scrapbook Photo Paper for information about paper settings. Epson Stylus Photo R340 Accessories Ink Cartridges Cartridge Black Magenta Cyan Yellow Light Magenta Light Cyan Color Multipack Part number T048120 T048320 T048220 T048420 T048620 T048520 T048920 Epson Papers When printing from your computer using the Epson® printer driver, you can choose from any...
... S041465 S041331 S041982 S041405 S041106 Paper name Epson Ink Jet Transparencies Epson Iron-On Transfer Paper Epson Glossy Photo Greeting Cards Epson Photo Stickers Epson Semigloss Scrapbook Photo Paper PremierArt™ Matte Scrapbook Photo Paper for information about paper settings. Epson Stylus Photo R340 Accessories Ink Cartridges Cartridge Black Magenta Cyan Yellow Light Magenta Light Cyan Color Multipack Part number T048120 T048320 T048220 T048420 T048620 T048520 T048920 Epson Papers When printing from your computer using the Epson® printer driver, you can choose from any...
Product Information Guide
Page 4
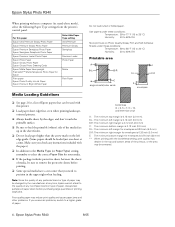
... guide. (Some papers should be changed by the manufacturer at a time. Make sure you check any instructions included with the paper.) ❏ In addition to the Media Type (or Paper Type) setting, remember to select the correct Paper Size for envelopes is 0.78 inch (20 mm) ** When printing with this Paper Type setting Ultra Premium Premium Glossy Semigloss Premium Luster Photo Paper Matte Plain Paper Media Loading Guidelines ❏ See page 2 for a list of Epson papers that you encounter problems...
... guide. (Some papers should be changed by the manufacturer at a time. Make sure you check any instructions included with the paper.) ❏ In addition to the Media Type (or Paper Type) setting, remember to select the correct Paper Size for envelopes is 0.78 inch (20 mm) ** When printing with this Paper Type setting Ultra Premium Premium Glossy Semigloss Premium Luster Photo Paper Matte Plain Paper Media Loading Guidelines ❏ See page 2 for a list of Epson papers that you encounter problems...
Product Information Guide
Page 5
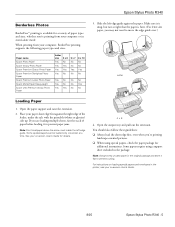
... need to move the edge guide over.) Letter Loading Paper 1. Open the output tray and pull out the extension. See your on -screen User's Guide. 8/05 Epson Stylus Photo R340 - 5 Slide the left edge guide. Open the paper support and raise the extension. 2. For instructions on loading special papers and envelopes in the printer, see your computer or in stand-alone mode. Some papers require using special papers, check the paper package for additional instructions. When printing from your on -screen User's Guide...
... need to move the edge guide over.) Letter Loading Paper 1. Open the output tray and pull out the extension. See your on -screen User's Guide. 8/05 Epson Stylus Photo R340 - 5 Slide the left edge guide. Open the paper support and raise the extension. 2. For instructions on loading special papers and envelopes in the printer, see your computer or in stand-alone mode. Some papers require using special papers, check the paper package for additional instructions. When printing from your on -screen User's Guide...
Product Information Guide
Page 7
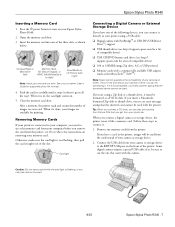
... also print photos from Picture CDs that came with the printer. Some digital cameras require a special USB cable; Epson Stylus Photo R340 Inserting a Memory Card 1. When it 's not compatible, you remove the card from the card instead of any memory cards from your memory card. If it is not flashing, then pull the card straight out of the printer. Push the card in , the card light comes on the card. 8/05 Epson Stylus Photo R340 - 7 Removing Memory Cards If your images are using a USB cable: ❏ Digital camera with a commercially available USB adapter...
... also print photos from Picture CDs that came with the printer. Some digital cameras require a special USB cable; Epson Stylus Photo R340 Inserting a Memory Card 1. When it 's not compatible, you remove the card from the card instead of any memory cards from your memory card. If it is not flashing, then pull the card straight out of the printer. Push the card in , the card light comes on the card. 8/05 Epson Stylus Photo R340 - 7 Removing Memory Cards If your images are using a USB cable: ❏ Digital camera with a commercially available USB adapter...
Product Information Guide
Page 10
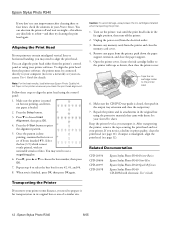
... the printer. Press Setup. 2. When an installed cartridge is empty. sales only). If you have a new ink cartridge before the expiration date on the icons indicates the approximate amount of ink shown on the package: Cartridge Black Cyan Magenta Yellow Light Cyan Light Magenta Part number T048120 T048220 T048320 T048420 T048520 T048620 You can replace the cartridge. Epson Stylus Photo R340 itself . If the quality doesn't improve after cleaning and aligning the print head, you...
... the printer. Press Setup. 2. When an installed cartridge is empty. sales only). If you have a new ink cartridge before the expiration date on the icons indicates the approximate amount of ink shown on the package: Cartridge Black Cyan Magenta Yellow Light Cyan Light Magenta Part number T048120 T048220 T048320 T048420 T048520 T048620 You can replace the cartridge. Epson Stylus Photo R340 itself . If the quality doesn't improve after cleaning and aligning the print head, you...
Product Information Guide
Page 12
... securing the print head and test your printer software. If you notice a decline in print quality, clean the print head (see page 12). You can also turn off and wait overnight-this allows any dried ink to align the print head. Press the Setup button. 3. To align the print head from the printer and close the paper support. 5. Secure the ink cartridge holder to use a magnifying glass. 6. Epson Stylus Photo R340 If you don't see any improvement after cleaning three or four times, check the...
... securing the print head and test your printer software. If you notice a decline in print quality, clean the print head (see page 12). You can also turn off and wait overnight-this allows any dried ink to align the print head. Press the Setup button. 3. To align the print head from the printer and close the paper support. 5. Secure the ink cartridge holder to use a magnifying glass. 6. Epson Stylus Photo R340 If you don't see any improvement after cleaning three or four times, check the...


