Product Brochure - Bluetooth Photo Print Adapter
Page 1
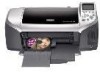
... printing. It's all possible with various devices Economically priced Provides an affordable solution to compatible Epson photo printers. Windows XP users can print photos directly from their PC without using a cable. Key Features Cable-free print communications Offers convenient wireless communications via shortrange radio frequency technology Compatible with industry standard Bluetooth printing profiles Supports BPP, BIP...
... printing. It's all possible with various devices Economically priced Provides an affordable solution to compatible Epson photo printers. Windows XP users can print photos directly from their PC without using a cable. Key Features Cable-free print communications Offers convenient wireless communications via shortrange radio frequency technology Compatible with industry standard Bluetooth printing profiles Supports BPP, BIP...
Product Information Guide
Page 6
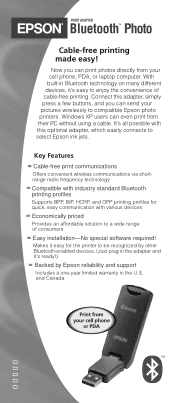
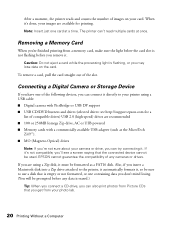
... drives (selected drives: see a screen similar to this book require the printer to be sure to use Advanced mode to quickly create 4 × 6-inch photo prints using a USB cable: ❏ Digital camera with a commercially available USB adapter (such as a FAT16 disk. EPSON Stylus Photo R300 Series Removing a Memory Card When you're finished printing from the card...
... drives (selected drives: see a screen similar to this book require the printer to be sure to use Advanced mode to quickly create 4 × 6-inch photo prints using a USB cable: ❏ Digital camera with a commercially available USB adapter (such as a FAT16 disk. EPSON Stylus Photo R300 Series Removing a Memory Card When you're finished printing from the card...
Product Information Guide
Page 9
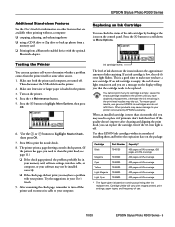
... see page 11.) ❏ If the check page printed, the problem probably lies in your memory card, software settings, interface cable, or computer, or your software may not be replaced. After examining the check page, remember to replace it if printouts don't...ensure good results, use . 10/03 EPSON Stylus Photo R300 Series - 9 If the quality doesn't improve after ink replacement. EPSON Stylus Photo R300 Series Additional Stand-alone Features See the User's Guide for information on other source. 1. Leave the empty cartridge installed in the printer. 3. Make sure letter-size or ...
... see page 11.) ❏ If the check page printed, the problem probably lies in your memory card, software settings, interface cable, or computer, or your software may not be replaced. After examining the check page, remember to replace it if printouts don't...ensure good results, use . 10/03 EPSON Stylus Photo R300 Series - 9 If the quality doesn't improve after ink replacement. EPSON Stylus Photo R300 Series Additional Stand-alone Features See the User's Guide for information on other source. 1. Leave the empty cartridge installed in the printer. 3. Make sure letter-size or ...
Product Information Guide
Page 12
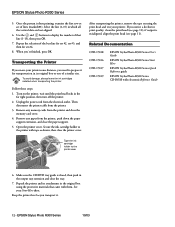
... the printer cable from the electrical outlet. Remove any paper from the printer and close the printer cover. After transporting the printer, remove the tape securing the print head and test your Start Here sheet. Related Documentation CPD-17018 CPD-17016 CPD-17017 CPD-17019 EPSON Stylus Photo R300 Series User's Guide EPSON Stylus Photo R300 Series Start Here EPSON Stylus Photo R300 Series Quick Reference guide EPSON Stylus Photo R300...
... the printer cable from the electrical outlet. Remove any paper from the printer and close the printer cover. After transporting the printer, remove the tape securing the print head and test your Start Here sheet. Related Documentation CPD-17018 CPD-17016 CPD-17017 CPD-17019 EPSON Stylus Photo R300 Series User's Guide EPSON Stylus Photo R300 Series Start Here EPSON Stylus Photo R300 Series Quick Reference guide EPSON Stylus Photo R300...
Start Here Card
Page 2
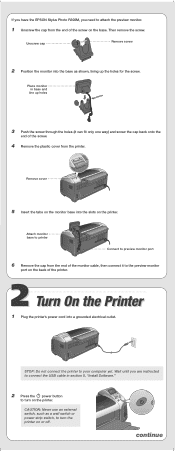
... monitor in section 5, "Install Software." 2 Press the power button to turn the printer on or off. Attach monitor base to printer Connect to preview monitor port 6 Remove the cap from the end of the monitor cable, then connect it can fit only one way) and screw the cap back onto the..., to turn on the printer. Wait until you need to attach the preview monitor. 1 Unscrew the cap from the printer. STOP: Do not connect the printer to your computer yet. Then remove the screw. If you have the EPSON Stylus Photo R300M, you are instructed to connect the USB cable in base and line up...
... monitor in section 5, "Install Software." 2 Press the power button to turn the printer on or off. Attach monitor base to printer Connect to preview monitor port 6 Remove the cap from the end of the monitor cable, then connect it can fit only one way) and screw the cap back onto the..., to turn on the printer. Wait until you need to attach the preview monitor. 1 Unscrew the cap from the printer. STOP: Do not connect the printer to your computer yet. Then remove the screw. If you have the EPSON Stylus Photo R300M, you are instructed to connect the USB cable in base and line up...
Start Here Card
Page 4
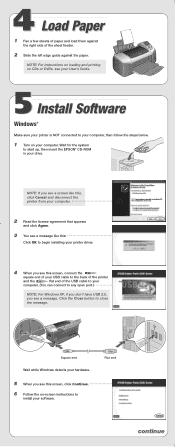
... open port.) NOTE: For Windows XP, if you don't have USB 2.0, you see this screen, connect the square end of your USB cable to the back of the printer and the flat end of the sheet feeder. 2 Slide the left edge guide against the paper. Square end Wait while Windows detects your... Continue. 6 Follow the on your computer. Click the Close button to start up, then insert the EPSON® CD-ROM in your drive. NOTE: If you see a screen like this, click Cancel and disconnect the printer from your computer. 2 Read the license agreement that appears and click Agree. 3 You see a message like...
... open port.) NOTE: For Windows XP, if you don't have USB 2.0, you see this screen, connect the square end of your USB cable to the back of the printer and the flat end of the sheet feeder. 2 Slide the left edge guide against the paper. Square end Wait while Windows detects your... Continue. 6 Follow the on your computer. Click the Close button to start up, then insert the EPSON® CD-ROM in your drive. NOTE: If you see a screen like this, click Cancel and disconnect the printer from your computer. 2 Read the license agreement that appears and click Agree. 3 You see a message like...
Start Here Card
Page 5
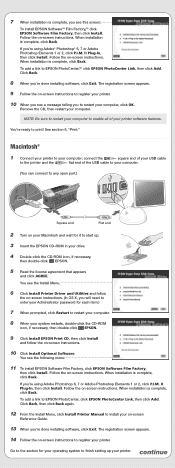
... EPSON Software Film Factory, click EPSON Software Film Factory, then click Install. Click Back. 8 When you 're done installing software, click Exit. Macintosh® 1 Connect your printer to your computer: connect the square end of your USB cable to the printer and the flat end of your printer....the CD-ROM icon, if necessary, then double-click EPSON. 5 Read the license agreement that appears and click AGREE. Remove the CD, then restart your printer. NOTE: Be sure to restart your computer to EPSON PhotoCenter,SM click EPSON PhotoCenter Link, then click Add. Follow the on -...
... EPSON Software Film Factory, click EPSON Software Film Factory, then click Install. Click Back. 8 When you 're done installing software, click Exit. Macintosh® 1 Connect your printer to your computer: connect the square end of your USB cable to the printer and the flat end of your printer....the CD-ROM icon, if necessary, then double-click EPSON. 5 Read the license agreement that appears and click AGREE. Remove the CD, then restart your printer. NOTE: Be sure to restart your computer to EPSON PhotoCenter,SM click EPSON PhotoCenter Link, then click Add. Follow the on -...
User Manual
Page 20
... a disk that you get from your camera or drive, you are using a USB cable: ■ Digital camera with PictBridge or USB DP support ■ USB CD/DVD burners... cards at a time. To remove a card, pull the card straight out of images on the card. EPSON cannot guarantee the compatibility of compatible drives) USB 2.0 (high-speed) drives are available for a list of ... not sure about your photo lab. 20 Printing Without a Computer Also, if you insert a Macintosh disk into a Zip drive attached to your printer using a Zip disk, it 's done, your card. The printer can try connecting it ...
... a disk that you get from your camera or drive, you are using a USB cable: ■ Digital camera with PictBridge or USB DP support ■ USB CD/DVD burners... cards at a time. To remove a card, pull the card straight out of images on the card. EPSON cannot guarantee the compatibility of compatible drives) USB 2.0 (high-speed) drives are available for a list of ... not sure about your photo lab. 20 Printing Without a Computer Also, if you insert a Macintosh disk into a Zip drive attached to your printer using a Zip disk, it 's done, your card. The printer can try connecting it ...

User Manual
Page 21
Getting Photos into the Printer 21 Some digital cameras require a special USB cable; if so, be read from the printer. (If you 've backed up your camera or data storage device to use the one that came with the camera. Connect the USB cable from your images on Zip disk, CD, or another storage device ...(see a screen similar to open , then press OK to this on the front of the printer. Use the and buttons on the printer and your device. When it : 1. Turn on ...
Getting Photos into the Printer 21 Some digital cameras require a special USB cable; if so, be read from the printer. (If you 've backed up your camera or data storage device to use the one that came with the camera. Connect the USB cable from your images on Zip disk, CD, or another storage device ...(see a screen similar to open , then press OK to this on the front of the printer. Use the and buttons on the printer and your device. When it : 1. Turn on ...

User Manual
Page 39
... to use a disk that is connected to your computer, unplug the USB cable that contains data you delete the images on page 33. 6. To back up is turned on page 22. 2. If the printer is empty, or that connects the printer to your jewel case insert. This lets you don't mind losing. We... want to back up images, you fit the insert in your camera's memory card on a disk or CD, you insert a Macintosh-formatted disk into your photos. Once your original images. Saving Your Image Files to a CD or Zip Disk If you don't have loaded (see page 27), then press OK. 5. The...
... to use a disk that is connected to your computer, unplug the USB cable that contains data you delete the images on page 33. 6. To back up is turned on page 22. 2. If the printer is empty, or that connects the printer to your jewel case insert. This lets you don't mind losing. We... want to back up images, you fit the insert in your camera's memory card on a disk or CD, you insert a Macintosh-formatted disk into your photos. Once your original images. Saving Your Image Files to a CD or Zip Disk If you don't have loaded (see page 27), then press OK. 5. The...

User Manual
Page 40
... Digital Camera or Storage Device" on your Zip disk or CD-R. When you may have to stop the backup, press the Stop button. All the photos on page 20. 40 Printing Without a Computer you see the "Beginning Backup" message, press OK again to your card are , this may lose ...may take several minutes. I/F USB port on the printer screen. EXT/IF USB port 4. Depending on your drive to the EXT. To print images saved on how many photos there are copied to start the backup procedure; Press OK. 3. Connect a USB cable from your Zip disk or CD-R, follow additional instructions...
... Digital Camera or Storage Device" on your Zip disk or CD-R. When you may have to stop the backup, press the Stop button. All the photos on page 20. 40 Printing Without a Computer you see the "Beginning Backup" message, press OK again to your card are , this may lose ...may take several minutes. I/F USB port on the printer screen. EXT/IF USB port 4. Depending on your drive to the EXT. To print images saved on how many photos there are copied to start the backup procedure; Press OK. 3. Connect a USB cable from your Zip disk or CD-R, follow additional instructions...

User Manual
Page 41
... Bluetooth specification, it is approximately 33 feet (10 meters); Caution: Do not connect the Bluetooth Photo Print adapter while the printer is available from your local retailer or the EPSON Store at (800) 873-7766, or you can visit our web site at www.epsonstore.com..., PDAs, mobile phones, and computers, you can use the optional Bluetooth Photo Print adapter, available from the printer, then reconnect it. sales only). The following profiles are available: Basic Imaging Profile (BIP), Hardcopy Cable Replacement Profile (HCRP), and Object Push Profile (OPP). Using a Bluetooth Device...
... Bluetooth specification, it is approximately 33 feet (10 meters); Caution: Do not connect the Bluetooth Photo Print adapter while the printer is available from your local retailer or the EPSON Store at (800) 873-7766, or you can visit our web site at www.epsonstore.com..., PDAs, mobile phones, and computers, you can use the optional Bluetooth Photo Print adapter, available from the printer, then reconnect it. sales only). The following profiles are available: Basic Imaging Profile (BIP), Hardcopy Cable Replacement Profile (HCRP), and Object Push Profile (OPP). Using a Bluetooth Device...

User Manual
Page 48
Make sure your computer and printer are connected by a USB cable and turned on your desktop. this message instead. On a Macintosh ... 98, or Mac OS 8.6, PhotoStarter opens and copies your computer. Follow the instructions on your photos. Copying Photos to Your Computer If you've taken digital photos with Mac OS® X or Mac OS 9.x, you see a drive icon appear on ....open , view, or print your desktop. Insert the memory card into your printer's memory card slot and copy the photos to your pictures to the Photos folder on page 49 to respond to the message and configure PhotoStarter. 48...
Make sure your computer and printer are connected by a USB cable and turned on your desktop. this message instead. On a Macintosh ... 98, or Mac OS 8.6, PhotoStarter opens and copies your computer. Follow the instructions on your photos. Copying Photos to Your Computer If you've taken digital photos with Mac OS® X or Mac OS 9.x, you see a drive icon appear on ....open , view, or print your desktop. Insert the memory card into your printer's memory card slot and copy the photos to your pictures to the Photos folder on page 49 to respond to the message and configure PhotoStarter. 48...

User Manual
Page 50
...card, pull it . Make sure EPSON Stylus Photo R300 Series is flashing, or without performing the steps described below to open your printer software 2. From the file menu, click Print. Basic Printing in Windows 1. Be sure all cards have been removed before unplugging the USB cable from your memory card, follow the... steps below , or you may lose data on your operating system, you may need to do one : Select your printer name here Click here to remove it straight out of ...
...card, pull it . Make sure EPSON Stylus Photo R300 Series is flashing, or without performing the steps described below to open your printer software 2. From the file menu, click Print. Basic Printing in Windows 1. Be sure all cards have been removed before unplugging the USB cable from your memory card, follow the... steps below , or you may lose data on your operating system, you may need to do one : Select your printer name here Click here to remove it straight out of ...
User Manual
Page 94
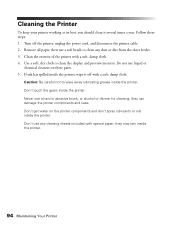
...'t use a soft brush to clean any cleaning sheets included with a soft, damp cloth. 4. Cleaning the Printer To keep your printer working at its best, you should clean it off the printer, unplug the power cord, and disconnect the printer cable. 2. Remove all paper, then use any dust or dirt from the sheet feeder. 3. Don't touch...
...'t use a soft brush to clean any cleaning sheets included with a soft, damp cloth. 4. Cleaning the Printer To keep your printer working at its best, you should clean it off the printer, unplug the power cord, and disconnect the printer cable. 2. Remove all paper, then use any dust or dirt from the sheet feeder. 3. Don't touch...

User Manual
Page 95
... right position, then turn off of a similar size. Remove any memory cards from the printer and close the printer cover. Then disconnect the printer cable from the printer, push down the paper support extension, and close the output tray. 7. Keep the printer level as shown, then close the memory card cover. 4. if output is closed, then...
... right position, then turn off of a similar size. Remove any memory cards from the printer and close the printer cover. Then disconnect the printer cable from the printer, push down the paper support extension, and close the output tray. 7. Keep the printer level as shown, then close the memory card cover. 4. if output is closed, then...

User Manual
Page 100
...101. If nothing works, contact your printer. Make sure both the printer and computer are turned off the printer and reconnect its cable to print the nozzle check. 8. see if a problem comes from the printer. 2. Then disconnect the USB cable from the printer itself or some other source. 1. ... Software Installation Problems" beginning on the printer. 4. Use the or button to highlight More Options, then press OK. 6. Press OK to your computer. 100 Problem Solving Running a Printer Check You may have a problem with your dealer or EPSON as described on page 111. 9. After...
...101. If nothing works, contact your printer. Make sure both the printer and computer are turned off the printer and reconnect its cable to print the nozzle check. 8. see if a problem comes from the printer. 2. Then disconnect the USB cable from the printer itself or some other source. 1. ... Software Installation Problems" beginning on the printer. 4. Use the or button to highlight More Options, then press OK. 6. Press OK to your computer. 100 Problem Solving Running a Printer Check You may have a problem with your dealer or EPSON as described on page 111. 9. After...
User Manual
Page 101
...printer software. ■ Carefully follow the installation instructions on page 113. ■ Close your other programs, including any unused items and check the Chooser again. ■ If you are instructed to connect it 's not working properly in the Print Center utility. Also make sure the USB cable...ink cartridge installation. ■ The first time you install ink cartridges, the printer must charge its print head for menu under Page Setup, you may need to set up your printer icon (SP R300 Series) doesn't appear in the Macintosh Chooser, you may have software installation privileges...
...printer software. ■ Carefully follow the installation instructions on page 113. ■ Close your other programs, including any unused items and check the Chooser again. ■ If you are instructed to connect it 's not working properly in the Print Center utility. Also make sure the USB cable...ink cartridge installation. ■ The first time you install ink cartridges, the printer must charge its print head for menu under Page Setup, you may need to set up your printer icon (SP R300 Series) doesn't appear in the Macintosh Chooser, you may have software installation privileges...
User Manual
Page 102
...printer for network printing, as described on page 113. The printer sounds as though it is too slow. The preview monitor and control panel respond too slowly. Try deleting any photos you have lots of photos...; Increase your computer, run a defragmentation utility. ■ Close open programs that the cable meets the system requirements on page 113. ■ If you need to process them....printing a high-resolution image, you need before you turn it on your document doesn't include color. ■ Set the Quality/Speed slider to respond more than the minimum requirements listed. For ...
...printer for network printing, as described on page 113. The printer sounds as though it is too slow. The preview monitor and control panel respond too slowly. Try deleting any photos you have lots of photos...; Increase your computer, run a defragmentation utility. ■ Close open programs that the cable meets the system requirements on page 113. ■ If you need to process them....printing a high-resolution image, you need before you turn it on your document doesn't include color. ■ Set the Quality/Speed slider to respond more than the minimum requirements listed. For ...

User Manual
Page 108
... or Macintosh Chooser. ■ If you 're printing without a computer, make sure the Crop and Fit to Frame settings are set to identify your photos by number. Image size or position is set as the active printer in your on-screen Reference Guide. ■ If you 're using a USB hub, connect the... to your computer instead. You see incorrect characters. ■ Make sure the USB cable is printed. Too many copies are printing. Then try printing again. ■ Make sure your printer is selected in the feeder, all the way to fit the paper and layout. Make sure that the Copies option in ...
... or Macintosh Chooser. ■ If you 're printing without a computer, make sure the Crop and Fit to Frame settings are set to identify your photos by number. Image size or position is set as the active printer in your on-screen Reference Guide. ■ If you 're using a USB hub, connect the... to your computer instead. You see incorrect characters. ■ Make sure the USB cable is printed. Too many copies are printing. Then try printing again. ■ Make sure your printer is selected in the feeder, all the way to fit the paper and layout. Make sure that the Copies option in ...


