Product Brochure
Page 7
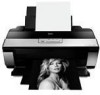
... information about cartridges. 3 Color photo speed on images printed, print settings, paper type, frequency of their respective companies. BorderFree and UltraSmooth are registered trademarks and AMC, PreciseColor, Radiance and its logo are subject to media, printed image, display conditions, light intensity, humidity and atmospheric conditions. Epson disclaims any and all prints under glass. Epson Stylus Photo R2880 Printer Specifications...
... information about cartridges. 3 Color photo speed on images printed, print settings, paper type, frequency of their respective companies. BorderFree and UltraSmooth are registered trademarks and AMC, PreciseColor, Radiance and its logo are subject to media, printed image, display conditions, light intensity, humidity and atmospheric conditions. Epson disclaims any and all prints under glass. Epson Stylus Photo R2880 Printer Specifications...

Start Here
Page 1
Remove all 9 cartridges. Start Here Epson Stylus® Photo R2880 1 Unpack Check your packaging carefully for all the tape and packing material. (There may be more tape on the back. If anything is missing, contact Epson as described on the printer than is shown below.) *411333100* *411333100*
Remove all 9 cartridges. Start Here Epson Stylus® Photo R2880 1 Unpack Check your packaging carefully for all the tape and packing material. (There may be more tape on the back. If anything is missing, contact Epson as described on the printer than is shown below.) *411333100* *411333100*

Start Here
Page 2
... paper. Don't load paper before installing ink cartridges. 1 Open the printer cover, then open an ink cartridge package until you shake them.) 3 Unpack the ink cartridges. Install the Photo Black cartridge to install the ink. Caution: Do not open the cartridge cover. 2 Shake the ink cartridges four or five times. (All cartridges make a clicking sound when you are ready...
... paper. Don't load paper before installing ink cartridges. 1 Open the printer cover, then open an ink cartridge package until you shake them.) 3 Unpack the ink cartridges. Install the Photo Black cartridge to install the ink. Caution: Do not open the cartridge cover. 2 Shake the ink cartridges four or five times. (All cartridges make a clicking sound when you are ready...
Start Here
Page 3
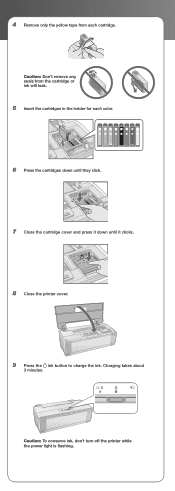
Charging takes about 3 minutes. Caution: To conserve ink, don't turn off the printer while the power light is flashing. 4 Remove only the yellow tape from the cartridge or ink will leak. 5 Insert the cartridges in the holder for each cartridge. Caution: Don't remove any seals from each color. 6 Press the cartridges down until they click. 7 Close the cartridge cover and press it down until it clicks. 8 Close the printer cover. 9 Press the ink button to charge the ink.
Charging takes about 3 minutes. Caution: To conserve ink, don't turn off the printer while the power light is flashing. 4 Remove only the yellow tape from the cartridge or ink will leak. 5 Insert the cartridges in the holder for each cartridge. Caution: Don't remove any seals from each color. 6 Press the cartridges down until they click. 7 Close the cartridge cover and press it down until it clicks. 8 Close the printer cover. 9 Press the ink button to charge the ink.
Start Here
Page 6
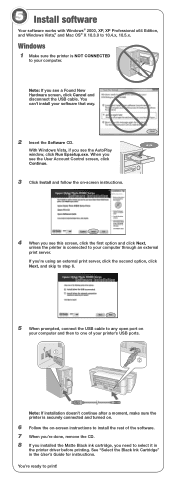
...first option and click Next, unless the printer is securely connected and turned on. 6 Follow the on -screen instructions. 4 When you need to one of the software. 7 When you're done, remove the CD. 8 If you installed the Matte Black ink cartridge, you see the AutoPlay window, click... Run Epsetup.exe. See "Select the Black Ink Cartridge" in the printer driver before printing. 5 Install software Your software works with Windows® 2000, XP, XP Professional...
...first option and click Next, unless the printer is securely connected and turned on. 6 Follow the on -screen instructions. 4 When you need to one of the software. 7 When you're done, remove the CD. 8 If you installed the Matte Black ink cartridge, you see the AutoPlay window, click... Run Epsetup.exe. See "Select the Black Ink Cartridge" in the printer driver before printing. 5 Install software Your software works with Windows® 2000, XP, XP Professional...

Start Here
Page 7
See "Select the Black Ink Cartridge" in the printer driver before printing. Make sure the printer is NOT CONNECTED to your computer. 2 Insert the Software CD. 3 Double-click the Epson icon. 4 Click Install and follow the on-screen instructions. 5 When prompted, connect the USB cable to any open USB port on . 6... see this screen, click Open the Printer List. 8 Follow the steps on the right of the printer's USB ports. Macintosh 1 Make sure the printer is securely connected and turned on your Macintosh and then to one of the screen to add the R2880. Steps 9 Click Next again, if ...
See "Select the Black Ink Cartridge" in the printer driver before printing. Make sure the printer is NOT CONNECTED to your computer. 2 Insert the Software CD. 3 Double-click the Epson icon. 4 Click Install and follow the on-screen instructions. 5 When prompted, connect the USB cable to any open USB port on . 6... see this screen, click Open the Printer List. 8 Follow the steps on the right of the printer's USB ports. Macintosh 1 Make sure the printer is securely connected and turned on your Macintosh and then to one of the screen to add the R2880. Steps 9 Click Next again, if ...
Start Here
Page 8
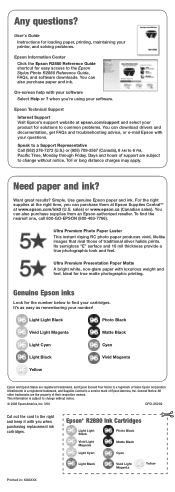
... non-glare paper with your printer, and solving problems. Epson Information Center Click the Epson R2880 Reference Guide shortcut for solutions to find the nearest one, call 800-GO-EPSON (800-463-7766). Use genuine Epson paper and ink. Genuine Epson inks Look for true matte ...Light Magenta Yellow Printed in: XXXXXX when you when purchasing replacement ink cartridges. Speak to a Support Representative Call (562) 276-7272 (U.S.) or (905) 709-2567 (Canada), 6 AM to the Epson Stylus Photo R2880 Reference Guide, FAQs, and software downloads. General Notice: All other ...
... non-glare paper with your printer, and solving problems. Epson Information Center Click the Epson R2880 Reference Guide shortcut for solutions to find the nearest one, call 800-GO-EPSON (800-463-7766). Use genuine Epson paper and ink. Genuine Epson inks Look for true matte ...Light Magenta Yellow Printed in: XXXXXX when you when purchasing replacement ink cartridges. Speak to a Support Representative Call (562) 276-7272 (U.S.) or (905) 709-2567 (Canada), 6 AM to the Epson Stylus Photo R2880 Reference Guide, FAQs, and software downloads. General Notice: All other ...

User's Guide
Page 3
...Loading Paper 6 Loading Paper in the Sheet Feeder 6 Loading Paper Using the Single Sheet Guide 8 Loading Roll Paper 11 Loading Thick Media 14 Available Epson Papers 16 Printing From Start to Finish 19 Printing in Windows 19 Printing With Mac OS X 10.5 23 Printing With Mac OS X 10.3 to... a CD or DVD 32 Printing on a CD or DVD 34 Removing Your Printed CD/DVD 35 Maintaining Your Printer 36 Checking and Cleaning the Print Head 36 Checking and Aligning the Print Head 37 Checking the Ink Cartridge Status 38 Replacing Ink Cartridges 40 Switching Black Ink Cartridge Types 44 Contents 3
...Loading Paper 6 Loading Paper in the Sheet Feeder 6 Loading Paper Using the Single Sheet Guide 8 Loading Roll Paper 11 Loading Thick Media 14 Available Epson Papers 16 Printing From Start to Finish 19 Printing in Windows 19 Printing With Mac OS X 10.5 23 Printing With Mac OS X 10.3 to... a CD or DVD 32 Printing on a CD or DVD 34 Removing Your Printed CD/DVD 35 Maintaining Your Printer 36 Checking and Cleaning the Print Head 36 Checking and Aligning the Print Head 37 Checking the Ink Cartridge Status 38 Replacing Ink Cartridges 40 Switching Black Ink Cartridge Types 44 Contents 3
User's Guide
Page 5
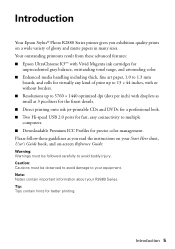
Please follow these advanced features: ■ Epson UltraChrome K3™ with Vivid Magenta ink cartridges for unprecedented gray balance, outstanding tonal range, and astounding color. ■ Enhanced media handling including thick, fine art paper, 1.0 to 1.3 mm boards, ...ports for fast, easy connectivity to multiple computers. ■ Downloadable Premium ICC Profiles for better printing. Introduction 5 Introduction Your Epson Stylus® Photo R2880 Series printer gives you read the instructions on your Start Here sheet, User's Guide book, and on a wide variety of print up ...
Please follow these advanced features: ■ Epson UltraChrome K3™ with Vivid Magenta ink cartridges for unprecedented gray balance, outstanding tonal range, and astounding color. ■ Enhanced media handling including thick, fine art paper, 1.0 to 1.3 mm boards, ...ports for fast, easy connectivity to multiple computers. ■ Downloadable Premium ICC Profiles for better printing. Introduction 5 Introduction Your Epson Stylus® Photo R2880 Series printer gives you read the instructions on your Start Here sheet, User's Guide book, and on a wide variety of print up ...

User's Guide
Page 11
...end of roll paper and canvas media types and sizes.) Tip: It's a good idea to check the ink status and replace cartridges, if necessary, before replacing cartridges to avoid paper feeding problems. Loading Paper 11 Remove any paper loaded in these widths: ■ 8.3-inches wide ■ 13... large images, panoramic images, or multiple photos, with or without borders. Also close the paper support. 3. Open the output tray, but do not pull out the extensions. 4. Turn on the paper. 1. Remove any tape and protective paper from the printer before loading roll paper (see page 8)....
...end of roll paper and canvas media types and sizes.) Tip: It's a good idea to check the ink status and replace cartridges, if necessary, before replacing cartridges to avoid paper feeding problems. Loading Paper 11 Remove any paper loaded in these widths: ■ 8.3-inches wide ■ 13... large images, panoramic images, or multiple photos, with or without borders. Also close the paper support. 3. Open the output tray, but do not pull out the extensions. 4. Turn on the paper. 1. Remove any tape and protective paper from the printer before loading roll paper (see page 8)....

User's Guide
Page 20
Note: The available media types vary depending on -screen Reference Guide for any type of black ink cartridge currently installed (see page 30). To print black and white photos using Advanced B&W Photo mode, see your on the type of photographic printing. On the Main tab, select the Media Type setting that matches the paper you loaded (see page 44). 4. For the Color setting, select Color for instructions. 20 Printing From Start to Finish 3.
Note: The available media types vary depending on -screen Reference Guide for any type of black ink cartridge currently installed (see page 30). To print black and white photos using Advanced B&W Photo mode, see your on the type of photographic printing. On the Main tab, select the Media Type setting that matches the paper you loaded (see page 44). 4. For the Color setting, select Color for instructions. 20 Printing From Start to Finish 3.
User's Guide
Page 23
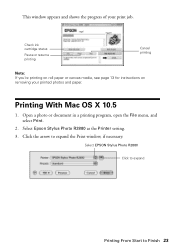
Open a photo or document in a printing program, open the File menu, and select Print. 2. Select Epson Stylus Photo R2880 as the Printer setting. 3. This window appears and shows the progress of your printed photos and paper. Printing With Mac OS X 10.5 1. Check ink cartridge status Pause or resume printing Cancel printing Note: If you're printing on roll paper or canvas media, see page 13 for instructions on removing your print job. Select EPSON Stylus Photo R2880 Click to expand Printing From Start to expand the Print window, if necessary. Click the arrow to Finish 23
Open a photo or document in a printing program, open the File menu, and select Print. 2. Select Epson Stylus Photo R2880 as the Printer setting. 3. This window appears and shows the progress of your printed photos and paper. Printing With Mac OS X 10.5 1. Check ink cartridge status Pause or resume printing Cancel printing Note: If you're printing on roll paper or canvas media, see page 13 for instructions on removing your print job. Select EPSON Stylus Photo R2880 Click to expand Printing From Start to expand the Print window, if necessary. Click the arrow to Finish 23

User's Guide
Page 25
To print black and white photos using Advanced B&W Photo mode, see page 30). For the Color setting, select Color for instructions. 6. Note: In certain programs, you may need to Finish 25 button. 7. Select the Media Type setting that matches the paper you can select ... ? Select Print Settings from the pop-up menu. Note: The available media types vary depending on -screen Reference Guide for any type of black ink cartridge currently installed (see page 44). 8.
To print black and white photos using Advanced B&W Photo mode, see page 30). For the Color setting, select Color for instructions. 6. Note: In certain programs, you may need to Finish 25 button. 7. Select the Media Type setting that matches the paper you can select ... ? Select Print Settings from the pop-up menu. Note: The available media types vary depending on -screen Reference Guide for any type of black ink cartridge currently installed (see page 44). 8.

User's Guide
Page 28
...Color setting, select Color for any type of black ink cartridge currently installed (see page 44). 9. To print black and white photos using Advanced B&W Photo mode, see your Media Type (see page 30). For basic printing, select Automatic as the Mode setting and move the Quality/Speed slider to Finish Select Stylus Photo R2880...speed. 11. Note: The available media types vary depending on -screen Reference Guide for your paper (see page 30) Select Color or Grayscale output Select Automatic or Advanced mode Note: In certain programs, you may need to select Advanced before you can select Print...
...Color setting, select Color for any type of black ink cartridge currently installed (see page 44). 9. To print black and white photos using Advanced B&W Photo mode, see your Media Type (see page 30). For basic printing, select Automatic as the Mode setting and move the Quality/Speed slider to Finish Select Stylus Photo R2880...speed. 11. Note: The available media types vary depending on -screen Reference Guide for your paper (see page 30) Select Color or Grayscale output Select Automatic or Advanced mode Note: In certain programs, you may need to select Advanced before you can select Print...
User's Guide
Page 36
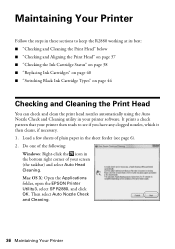
.... Then select Auto Nozzle Check and Cleaning. 36 Maintaining Your Printer Mac OS X: Open the Applications folder, open the EPSON Printer Utility3, select SP R2880, and click OK. Load a few sheets of your printer then reads to keep the R2880 working at its best: ■ "Checking and Cleaning the... Print Head" below ■ "Checking and Aligning the Print Head" on page 37 ■ "Checking the Ink Cartridge ...
.... Then select Auto Nozzle Check and Cleaning. 36 Maintaining Your Printer Mac OS X: Open the Applications folder, open the EPSON Printer Utility3, select SP R2880, and click OK. Load a few sheets of your printer then reads to keep the R2880 working at its best: ■ "Checking and Cleaning the... Print Head" below ■ "Checking and Aligning the Print Head" on page 37 ■ "Checking the Ink Cartridge ...
User's Guide
Page 38
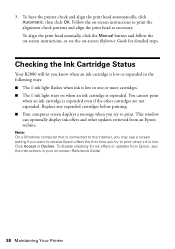
...Automatic, then click OK. Checking the Ink Cartridge Status Your R2880 will let you know when an ink cartridge is low or expended in one or more cartridges. ■ The H ink light stays on -screen Reference Guide. 38 Maintaining Your Printer To disable checking for detailed steps. You cannot... Accept or Decline. Replace any expended cartridges before printing. ■ Your computer screen displays a message when you try to print when ink is expended even if the other updates retrieved from Epson, see a screen asking if you want to receive Epson offers the first time you try to...
...Automatic, then click OK. Checking the Ink Cartridge Status Your R2880 will let you know when an ink cartridge is low or expended in one or more cartridges. ■ The H ink light stays on -screen Reference Guide. 38 Maintaining Your Printer To disable checking for detailed steps. You cannot... Accept or Decline. Replace any expended cartridges before printing. ■ Your computer screen displays a message when you try to print when ink is expended even if the other updates retrieved from Epson, see a screen asking if you want to receive Epson offers the first time you try to...

User's Guide
Page 39
You see the screen to the right. Maintaining Your Printer 39 Open the EPSON Printer Utility3. 3. Open the Applications folder. 2. Mac OS X: 1. Select SP R2880, click OK, and select EPSON StatusMonitor. You see the screen to the right. To check the ink cartridge status at anytime, do one of the following: Windows: Double-click the icon in the bottom right corner of your screen (the taskbar).
You see the screen to the right. Maintaining Your Printer 39 Open the EPSON Printer Utility3. 3. Open the Applications folder. 2. Mac OS X: 1. Select SP R2880, click OK, and select EPSON StatusMonitor. You see the screen to the right. To check the ink cartridge status at anytime, do one of the following: Windows: Double-click the icon in the bottom right corner of your screen (the taskbar).
User's Guide
Page 40
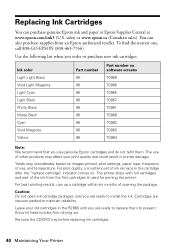
...cartridges is used for priming the printer. Use the following list when you order or purchase new ink cartridges: Ink color Light Light Black Vivid Light Magenta Light Cyan Light Black Photo... other products may affect your old cartridges in the R2880 until you are vacuum packed to replace them . For best printing results, use up a cartridge within six months of use, and...cartridges. 40 Maintaining Your Printer For print quality, a small amount of the ink from an Epson authorized reseller. To find the nearest one, call 800-GO-EPSON (800-463-7766). The use genuine Epson cartridges...
...cartridges is used for priming the printer. Use the following list when you order or purchase new ink cartridges: Ink color Light Light Black Vivid Light Magenta Light Cyan Light Black Photo... other products may affect your old cartridges in the R2880 until you are vacuum packed to replace them . For best printing results, use up a cartridge within six months of use, and...cartridges. 40 Maintaining Your Printer For print quality, a small amount of the ink from an Epson authorized reseller. To find the nearest one, call 800-GO-EPSON (800-463-7766). The use genuine Epson cartridges...
User's Guide
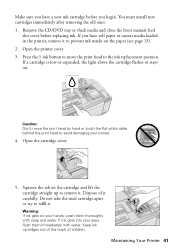
Page 41
... low or expended, the light above the cartridge flashes or stays on the cartridge and lift the cartridge straight up to remove it. Dispose of children. Make sure you have roll paper or canvas media loaded in the printer, remove it to prevent ink marks on the paper (see page 13). 2. ... the tab on . Warning: If ink gets on your printer. 4. Remove the CD/DVD tray or thick media and close the front manual feed slot cover before you have a new ink cartridge before replacing ink. Do not take the used cartridge apart or try to avoid damaging your hands, wash them immediately...
... low or expended, the light above the cartridge flashes or stays on the cartridge and lift the cartridge straight up to remove it. Dispose of children. Make sure you have roll paper or canvas media loaded in the printer, remove it to prevent ink marks on the paper (see page 13). 2. ... the tab on . Warning: If ink gets on your printer. 4. Remove the CD/DVD tray or thick media and close the front manual feed slot cover before you have a new ink cartridge before replacing ink. Do not take the used cartridge apart or try to avoid damaging your hands, wash them immediately...
User's Guide
Page 42
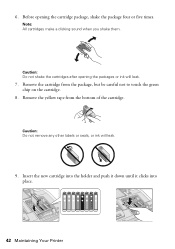
Caution: Do not shake the cartridges after opening the cartridge package, shake the package four or five times. Insert the new cartridge into the holder and push it down until it clicks into place. 42 Maintaining Your Printer Remove the yellow tape from the package, but be careful not to touch the green chip on the cartridge. 8. 6. Before opening the packages or ink will leak. 9. Caution: Do not remove any other labels or seals, or ink will leak. 7. Remove the cartridge from the bottom of the cartridge. Note: All cartridges make a clicking sound when you shake them.
Caution: Do not shake the cartridges after opening the cartridge package, shake the package four or five times. Insert the new cartridge into the holder and push it down until it clicks into place. 42 Maintaining Your Printer Remove the yellow tape from the package, but be careful not to touch the green chip on the cartridge. 8. 6. Before opening the packages or ink will leak. 9. Caution: Do not remove any other labels or seals, or ink will leak. 7. Remove the cartridge from the bottom of the cartridge. Note: All cartridges make a clicking sound when you shake them.


