Product Brochure
Page 7
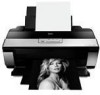
... of Seiko Epson Corporation. Copyright 2008, Epson America, Inc. CPD-25416oss 6/08 PC interchangeable Matte or Photo Black Droplet Technology Smallest droplet size 3 picoliters Advanced MicroPiezo print head with Vivid Magenta pigment ink Ink Palette 8-color (Cyan, ... Canvas Matte, PremierArt™ Matte Scrapbook Photo Paper and ink jet printable CD/DVDs. Epson Stylus Photo R2880 Printer Specifications Printing Technology Advanced, MicroPiezo®, 8-color, pigment ink jet technology, optimized for photo printing Ink Type Epson UltraChrome K3 with AMC™ (Advanced Meniscus...
... of Seiko Epson Corporation. Copyright 2008, Epson America, Inc. CPD-25416oss 6/08 PC interchangeable Matte or Photo Black Droplet Technology Smallest droplet size 3 picoliters Advanced MicroPiezo print head with Vivid Magenta pigment ink Ink Palette 8-color (Cyan, ... Canvas Matte, PremierArt™ Matte Scrapbook Photo Paper and ink jet printable CD/DVDs. Epson Stylus Photo R2880 Printer Specifications Printing Technology Advanced, MicroPiezo®, 8-color, pigment ink jet technology, optimized for photo printing Ink Type Epson UltraChrome K3 with AMC™ (Advanced Meniscus...

User's Guide
Page 3
... Roll Paper 11 Loading Thick Media 14 Available Epson Papers 16 Printing From Start to Finish 19 Printing in Windows 19 Printing With Mac OS X 10.5 23 Printing With Mac OS X 10.3 to 10.4 27 Selecting the Correct Paper Type 30 Printing on CDs and DVDs 31 Cleaning the Rollers ...31 Loading a CD or DVD 32 Printing on a CD or DVD 34 Removing Your Printed CD/DVD 35 Maintaining Your Printer 36 Checking and Cleaning the Print Head 36 Checking and Aligning the Print Head 37 Checking the Ink Cartridge Status 38 Replacing Ink Cartridges 40 Switching Black Ink Cartridge Types...
... Roll Paper 11 Loading Thick Media 14 Available Epson Papers 16 Printing From Start to Finish 19 Printing in Windows 19 Printing With Mac OS X 10.5 23 Printing With Mac OS X 10.3 to 10.4 27 Selecting the Correct Paper Type 30 Printing on CDs and DVDs 31 Cleaning the Rollers ...31 Loading a CD or DVD 32 Printing on a CD or DVD 34 Removing Your Printed CD/DVD 35 Maintaining Your Printer 36 Checking and Cleaning the Print Head 36 Checking and Aligning the Print Head 37 Checking the Ink Cartridge Status 38 Replacing Ink Cartridges 40 Switching Black Ink Cartridge Types...
User's Guide
Page 36
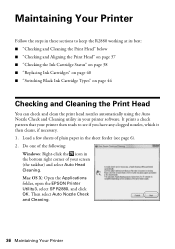
..., open the EPSON Printer Utility3, select SP R2880, and click OK. Do one of the following: Windows: Right-click the icon in your printer then reads to keep the R2880 working at its best: ■ "Checking and Cleaning the Print Head" below ■ "Checking and Aligning the Print Head" on page 37... ■ "Checking the Ink Cartridge Status" on page 38 ■ "Replacing Ink Cartridges" on page 40...
..., open the EPSON Printer Utility3, select SP R2880, and click OK. Do one of the following: Windows: Right-click the icon in your printer then reads to keep the R2880 working at its best: ■ "Checking and Cleaning the Print Head" below ■ "Checking and Aligning the Print Head" on page 37... ■ "Checking the Ink Cartridge Status" on page 38 ■ "Replacing Ink Cartridges" on page 40...
User's Guide
Page 38
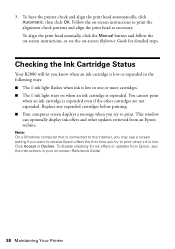
Checking the Ink Cartridge Status Your R2880 will let you know when an ink cartridge is low or expended in the following ways: ■ The H ink light flashes when ink is low in your on -screen instructions to print when ink is low. This window can .... ■ The H ink light stays on -screen Reference Guide for ink offers or updates from an Epson website. Replace any expended cartridges before printing. ■ Your computer screen displays a message when you try to print. To have the printer check and align the print head automatically, click Automatic, then click OK.
Checking the Ink Cartridge Status Your R2880 will let you know when an ink cartridge is low or expended in the following ways: ■ The H ink light flashes when ink is low in your on -screen instructions to print when ink is low. This window can .... ■ The H ink light stays on -screen Reference Guide for ink offers or updates from an Epson website. Replace any expended cartridges before printing. ■ Your computer screen displays a message when you try to print. To have the printer check and align the print head automatically, click Automatic, then click OK.
User's Guide
Page 40
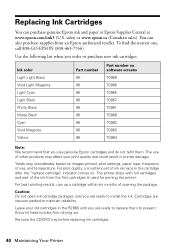
... images printed, print settings, paper type, frequency of use genuine Epson cartridges and do not refill them to prevent the print head nozzles from drying out. Caution: Do not open ink cartridge packages until you are vacuum packed to install the ink. Remove the CD/DVD tray before replacing ink cartridges. 40 Maintaining Your Printer The printer ships...
... images printed, print settings, paper type, frequency of use genuine Epson cartridges and do not refill them to prevent the print head nozzles from drying out. Caution: Do not open ink cartridge packages until you are vacuum packed to install the ink. Remove the CD/DVD tray before replacing ink cartridges. 40 Maintaining Your Printer The printer ships...
User's Guide
Page 41
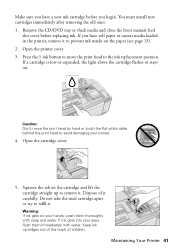
... the tab on . Press the H ink button to move the print head by hand or touch the flat white cable behind the print head to avoid damaging your printer. 4. Make sure you have roll paper or canvas media loaded in the printer, remove it to prevent ink marks on the paper (see page 13.... 5. Keep ink cartridges out of the reach of it . Open the printer cover. 3. Caution: Don't move the print head to refill it carefully. Dispose of children. Do not take the used cartridge apart or try to the ink replacement position. If ink gets into your hands, wash them immediately with soap and...
... the tab on . Press the H ink button to move the print head by hand or touch the flat white cable behind the print head to avoid damaging your printer. 4. Make sure you have roll paper or canvas media loaded in the printer, remove it to prevent ink marks on the paper (see page 13.... 5. Keep ink cartridges out of the reach of it . Open the printer cover. 3. Caution: Don't move the print head to refill it carefully. Dispose of children. Do not take the used cartridge apart or try to the ink replacement position. If ink gets into your hands, wash them immediately with soap and...
User's Guide
Page 45
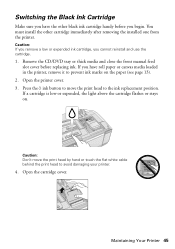
...white cable behind the print head to avoid damaging your printer. 4. Open the cartridge cover. You must install the other black ink cartridge handy before replacing ink. If you cannot reinstall and use the cartridge. 1. Caution: Don't move the print head to the ink replacement position. Switching the ...Black Ink Cartridge Make sure you have roll paper or canvas media loaded in the printer, remove it to prevent ink marks on . Remove the CD/DVD...
...white cable behind the print head to avoid damaging your printer. 4. Open the cartridge cover. You must install the other black ink cartridge handy before replacing ink. If you cannot reinstall and use the cartridge. 1. Caution: Don't move the print head to the ink replacement position. Switching the ...Black Ink Cartridge Make sure you have roll paper or canvas media loaded in the printer, remove it to prevent ink marks on . Remove the CD/DVD...

User's Guide
Page 53
...(see page 38) and replace cartridges, if necessary (see page 30). ■ Remove sheets from the output tray as they are too faint, you may be low on ink. Run the Auto Nozzle Check and Cleaning utility to automatically check and clean the print head (see page 37). &#...9632; The ink cartridges may need to automatically check and align the print head (see page 36). ■ If you can adjust the print quality using Epson Print CD software. Handle printed discs carefully and let them dry for 24 hours before framing or placing in your printer software...
...(see page 38) and replace cartridges, if necessary (see page 30). ■ Remove sheets from the output tray as they are too faint, you may be low on ink. Run the Auto Nozzle Check and Cleaning utility to automatically check and clean the print head (see page 37). &#...9632; The ink cartridges may need to automatically check and align the print head (see page 36). ■ If you can adjust the print quality using Epson Print CD software. Handle printed discs carefully and let them dry for 24 hours before framing or placing in your printer software...


