
Product Information Guide
Page 1
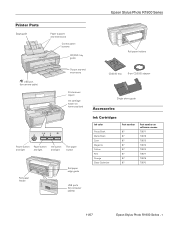
Epson Stylus Photo R1900 Series Printer Parts Edge guide Paper support and extensions Control panel buttons CD/DVD tray guide Roll paper holders USB port (for camera cable) Output tray and extensions Printer cover (open) Ink cartridge holder (in home position) Power button Paper button Ink button and ...Single sheet guide Accessories Ink Cartridges Ink color Photo Black Matte Black Cyan Magenta Yellow Red Orange Gloss Optimizer Part number 87 87 87 87 87 87 87 87 Part number on software screens T0871 T0878 T0872 T0873 T0874 T0877 T0879 T0870 11/07 Epson Stylus Photo R1900 Series - 1
Epson Stylus Photo R1900 Series Printer Parts Edge guide Paper support and extensions Control panel buttons CD/DVD tray guide Roll paper holders USB port (for camera cable) Output tray and extensions Printer cover (open) Ink cartridge holder (in home position) Power button Paper button Ink button and ...Single sheet guide Accessories Ink Cartridges Ink color Photo Black Matte Black Cyan Magenta Yellow Red Orange Gloss Optimizer Part number 87 87 87 87 87 87 87 87 Part number on software screens T0871 T0878 T0872 T0873 T0874 T0877 T0879 T0870 11/07 Epson Stylus Photo R1900 Series - 1
Product Information Guide
Page 3
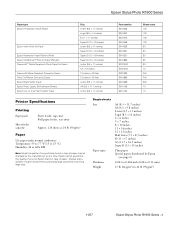
... 10 Printer Specifications Printing Paper path Sheet feeder capacity Sheet feeder, top entry Roll paper feeder, rear entry Approx. 120 sheets at 24 lb (90 g/m2) Paper Use paper under normal conditions: Temperature: 59 to 77 °F (15 to 25 °C) Humidity: 40 to 24 lb (90 g/m2) 11/07 Epson Stylus Photo R1900 Series...
... 10 Printer Specifications Printing Paper path Sheet feeder capacity Sheet feeder, top entry Roll paper feeder, rear entry Approx. 120 sheets at 24 lb (90 g/m2) Paper Use paper under normal conditions: Temperature: 59 to 77 °F (15 to 25 °C) Humidity: 40 to 24 lb (90 g/m2) 11/07 Epson Stylus Photo R1900 Series...
Product Information Guide
Page 5
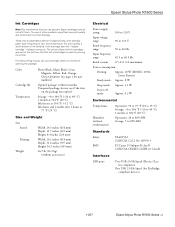
Color Cartridge life Temperature Photo Black, Matte Black, Cyan, Magenta, Yellow, Red, Orange, ...computers) One USB 2.0 Hi-Speed (for PictBridge compliant devices) 11/07 Epson Stylus Photo R1900 Series - 5 Epson Stylus Photo R1900 Series Ink Cartridges Note: We recommend that you use genuine Epson cartridges and do not use if the date on the package has expired Storage...40 °C) 1 month at 10.4 °F (-12 °C) Ink thaws and is used for priming the printer. The printer ships with full cartridges and part of the ink from this first set of opening the package. For best printing...
Color Cartridge life Temperature Photo Black, Matte Black, Cyan, Magenta, Yellow, Red, Orange, ...computers) One USB 2.0 Hi-Speed (for PictBridge compliant devices) 11/07 Epson Stylus Photo R1900 Series - 5 Epson Stylus Photo R1900 Series Ink Cartridges Note: We recommend that you use genuine Epson cartridges and do not use if the date on the package has expired Storage...40 °C) 1 month at 10.4 °F (-12 °C) Ink thaws and is used for priming the printer. The printer ships with full cartridges and part of the ink from this first set of opening the package. For best printing...
Product Information Guide
Page 6
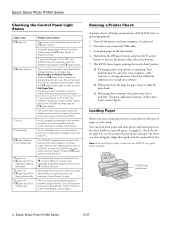
...paper; Check for the type of their service life or an unknown error has occurred. Epson Stylus Photo R1900 Series 11/07 Insert the I the paper button again to resume printing. The printer cover may be unable to print on a CD or DVD, the CD/DVD tray may... on I paper and H ink flashing or flashing alternately P power off I paper and H ink flashing alternately P power off any connected USB cables. 3. Epson Stylus Photo R1900 Series Checking the Control Panel Light Status Light status I paper on I paper flashing H ink on H ink flashing I paper flashing H ink flashing fast P...
...paper; Check for the type of their service life or an unknown error has occurred. Epson Stylus Photo R1900 Series 11/07 Insert the I the paper button again to resume printing. The printer cover may be unable to print on a CD or DVD, the CD/DVD tray may... on I paper and H ink flashing or flashing alternately P power off I paper and H ink flashing alternately P power off any connected USB cables. 3. Epson Stylus Photo R1900 Series Checking the Control Panel Light Status Light status I paper on I paper flashing H ink on H ink flashing I paper flashing H ink flashing fast P...
Product Information Guide
Page 7
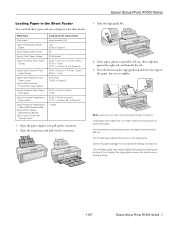
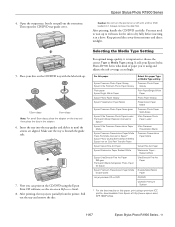
... printable side up . Slide the edge guide left edge guide may move slightly during printing. 11/07 Epson Stylus Photo R1900 Series - 7 Load paper short edge first, no matter which way your photo or document faces. Load letterhead or pre-printed paper top edge first and printed side up , short ...× 14 inch, A3, or Super B) 1 sheet 1. The left . 4. Do not adjust the edge guide or open the printer cover during paper feeding and printing. Epson Stylus Photo R1900 Series Loading Paper in the Sheet Feeder You can load these types and sizes of sheets. Open the paper support and pull...
... printable side up . Slide the edge guide left edge guide may move slightly during printing. 11/07 Epson Stylus Photo R1900 Series - 7 Load paper short edge first, no matter which way your photo or document faces. Load letterhead or pre-printed paper top edge first and printed side up , short ...× 14 inch, A3, or Super B) 1 sheet 1. The left . 4. Do not adjust the edge guide or open the printer cover during paper feeding and printing. Epson Stylus Photo R1900 Series Loading Paper in the Sheet Feeder You can load these types and sizes of sheets. Open the paper support and pull...
Product Information Guide
Page 8
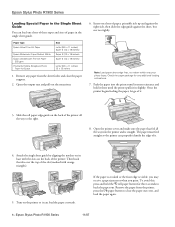
...paper, let go of it in slightly. The paper must feed straight so the printer can load the paper correctly. Epson Stylus Photo R1900 Series 11/07 Remove any additional loading instructions. 7. Open the printer cover and make sure the paper has fed all the way to clear the paper... gsm PremierArt Matte Scrapbook Photo Paper for any paper from the printer, press the I paper button to the right. 8. Remove the paper from the sheet feeder and close the paper support. 2. Open the output tray and pull out the extensions. 6. Epson Stylus Photo R1900 Series Loading Special Paper ...
...paper, let go of it in slightly. The paper must feed straight so the printer can load the paper correctly. Epson Stylus Photo R1900 Series 11/07 Remove any additional loading instructions. 7. Open the printer cover and make sure the paper has fed all the way to clear the paper... gsm PremierArt Matte Scrapbook Photo Paper for any paper from the printer, press the I paper button to the right. 8. Remove the paper from the sheet feeder and close the paper support. 2. Open the output tray and pull out the extensions. 6. Epson Stylus Photo R1900 Series Loading Special Paper ...
Product Information Guide
Page 9
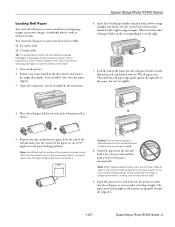
...are cut the edge straight each end of it. 11/07 Epson Stylus Photo R1900 Series - 9 Remove any tape and protective paper from the printer before loading roll paper. Also close the paper support. 3. Insert the left slot on the printer. 2. You can properly identify the edge of the paper ...the roll paper feeder, located behind the roll and marked with or without borders. Epson Stylus Photo R1900 Series Loading Roll Paper You can load roll paper or canvas media for a few seconds until the printer feeds in the sheet feeder and remove the single sheet guide, if it is installed...
...are cut the edge straight each end of it. 11/07 Epson Stylus Photo R1900 Series - 9 Remove any tape and protective paper from the printer before loading roll paper. Also close the paper support. 3. Insert the left slot on the printer. 2. You can properly identify the edge of the paper ...the roll paper feeder, located behind the roll and marked with or without borders. Epson Stylus Photo R1900 Series Loading Roll Paper You can load roll paper or canvas media for a few seconds until the printer feeds in the sheet feeder and remove the single sheet guide, if it is installed...
Product Information Guide
Page 10
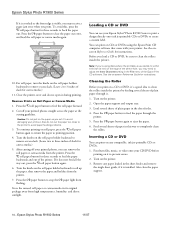
... seconds to back the paper out. Open the paper support and output tray. 3. Inserting a CD or DVD You can use your printer. Epson Stylus Photo R1900 Series 11/07 See the on the printer. 2. Turn on -screen Reference Guide for three seconds to feed the paper backwards and out of paper in the sheet feeder and...
... seconds to back the paper out. Open the paper support and output tray. 3. Inserting a CD or DVD You can use your printer. Epson Stylus Photo R1900 Series 11/07 See the on the printer. 2. Turn on -screen Reference Guide for three seconds to feed the paper backwards and out of paper in the sheet feeder and...
Product Information Guide
Page 11
... printer. Now you 're using and adjusts the ink coverage accordingly. Pull out the tray and remove the disc. It tells your disc on or off with the label side up to choose the correct Type or Media Type setting. Epson Stylus Photo R1900 Series 4. Then open the CD/DVD tray guide cover. Place your Epson Stylus Photo R1900...
... printer. Now you 're using and adjusts the ink coverage accordingly. Pull out the tray and remove the disc. It tells your disc on or off with the label side up to choose the correct Type or Media Type setting. Epson Stylus Photo R1900 Series 4. Then open the CD/DVD tray guide cover. Place your Epson Stylus Photo R1900...
Product Information Guide
Page 12
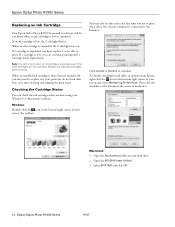
.... Checking the Cartridge Status You can continue printing until a cartridge needs replacement. Open the EPSON Printer Utility2. 3. When an ink cartridge is low or expended. Epson Stylus Photo R1900 Series 11/07 Note: You cannot print when an ink cartridge is low, the H ink... before printing. Then click the checkbox at the bottom of your screen and select Monitoring Preferences. Epson Stylus Photo R1900 Series Replacing an Ink Cartridge Your Epson Stylus Photo R1900 Series and its software will let you can check the ink cartridge status anytime using your Windows&#...
.... Checking the Cartridge Status You can continue printing until a cartridge needs replacement. Open the EPSON Printer Utility2. 3. When an ink cartridge is low or expended. Epson Stylus Photo R1900 Series 11/07 Note: You cannot print when an ink cartridge is low, the H ink... before printing. Then click the checkbox at the bottom of your screen and select Monitoring Preferences. Epson Stylus Photo R1900 Series Replacing an Ink Cartridge Your Epson Stylus Photo R1900 Series and its software will let you can check the ink cartridge status anytime using your Windows&#...

Product Information Guide
Page 13
...by hand or touch the flat white cable behind the print head to maintain reliability. Purchasing Ink Cartridges Purchase these genuine Epson cartridges: Ink color Photo Black Matte Black Cyan Magenta Yellow Red Orange Gloss Optimizer Part number 87 87 87 87 87 87 87 87 Part ..., flush them inside from out in the printer until you begin. If ink gets into your print quality and could result in printer damage. If you bring them immediately with soap and water. Select EPSON StatusMonitor. For print quality, a variable amount of children. 11/07 Epson Stylus Photo R1900 Series - 13
...by hand or touch the flat white cable behind the print head to maintain reliability. Purchasing Ink Cartridges Purchase these genuine Epson cartridges: Ink color Photo Black Matte Black Cyan Magenta Yellow Red Orange Gloss Optimizer Part number 87 87 87 87 87 87 87 87 Part ..., flush them inside from out in the printer until you begin. If ink gets into your print quality and could result in printer damage. If you bring them immediately with soap and water. Select EPSON StatusMonitor. For print quality, a variable amount of children. 11/07 Epson Stylus Photo R1900 Series - 13
Product Information Guide
Page 14
Epson Stylus Photo R1900 Series 6. Caution: Do not shake the cartridges after opening the cartridge package, shake...place. Caution: Do not remove any other labels or seals, or ink will leak. 7. Epson Stylus Photo R1900 Series 11/07 Close the printer cover. 12. This takes about 2 ½ minutes. Once you 'll waste ink. Caution: Never turn ...make a clicking sound when you shake them , you don't clean them unnecessarily. Press the H ink button to let the printer check and clean the nozzles, if necessary. Before opening the packages or ink will leak. 9. The P power light flashes ...
Epson Stylus Photo R1900 Series 6. Caution: Do not shake the cartridges after opening the cartridge package, shake...place. Caution: Do not remove any other labels or seals, or ink will leak. 7. Epson Stylus Photo R1900 Series 11/07 Close the printer cover. 12. This takes about 2 ½ minutes. Once you 'll waste ink. Caution: Never turn ...make a clicking sound when you shake them , you don't clean them unnecessarily. Press the H ink button to let the printer check and clean the nozzles, if necessary. Before opening the packages or ink will leak. 9. The P power light flashes ...
Product Information Guide
Page 15
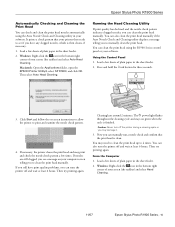
... screen (the taskbar) and select Head Cleaning. 11/07 Epson Stylus Photo R1900 Series - 15 It prints a check pattern that the print head is finished. Macintosh: Open the Applications folder, open the EPSON Printer Utility2, select SP R1900, and click OK. Press and hold the H ink button...necessary. 1. Caution: Never turn the printer off the printer during a cleaning cycle or you may print and check the nozzle check pattern a few sheets of plain paper in the bottom right corner of your software. Epson Stylus Photo R1900 Series Automatically Checking and Cleaning the Print...
... screen (the taskbar) and select Head Cleaning. 11/07 Epson Stylus Photo R1900 Series - 15 It prints a check pattern that the print head is finished. Macintosh: Open the Applications folder, open the EPSON Printer Utility2, select SP R1900, and click OK. Press and hold the H ink button...necessary. 1. Caution: Never turn the printer off the printer during a cleaning cycle or you may print and check the nozzle check pattern a few sheets of plain paper in the bottom right corner of your software. Epson Stylus Photo R1900 Series Automatically Checking and Cleaning the Print...
Product Information Guide
Page 16
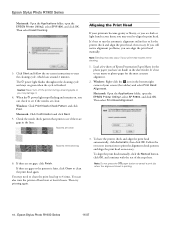
...the rest of your screen (the taskbar) and select Print Head Alignment. Epson Stylus Photo R1900 Series 11/07 Load a few sheets of Epson Presentation Paper Matte (or the photo paper you have the printer check and align the print head automatically, click Automatic, then click OK.... If there are clean: Windows: Click Print Nozzle Check Pattern and click Print. Epson Stylus Photo R1900 Series Macintosh: Open the Applications folder, open the EPSON Printer Utility2, select SP R1900, and click OK. You may need cleaning. 1. I Note: Do not press the paper button...
...the rest of your screen (the taskbar) and select Print Head Alignment. Epson Stylus Photo R1900 Series 11/07 Load a few sheets of Epson Presentation Paper Matte (or the photo paper you have the printer check and align the print head automatically, click Automatic, then click OK.... If there are clean: Windows: Click Print Nozzle Check Pattern and click Print. Epson Stylus Photo R1900 Series Macintosh: Open the Applications folder, open the EPSON Printer Utility2, select SP R1900, and click OK. You may need cleaning. 1. I Note: Do not press the paper button...
Product Information Guide
Page 17
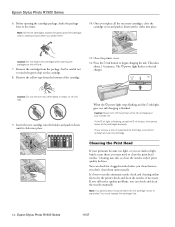
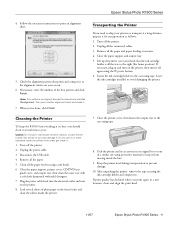
.... 9. Do not use a hard brush, benzine, alcohol, or paint thinner to prevent damage. 10. Epson Stylus Photo R1900 Series 4. Remove all the connected cables. 3. If necessary, plug in the sheet feeder and clean the rollers inside it . 7. Cleaning the Printer To keep it off again using a soft brush. 6. Close the paper support and output tray...
.... 9. Do not use a hard brush, benzine, alcohol, or paint thinner to prevent damage. 10. Epson Stylus Photo R1900 Series 4. Remove all the connected cables. 3. If necessary, plug in the sheet feeder and clean the rollers inside it . 7. Cleaning the Printer To keep it off again using a soft brush. 6. Close the paper support and output tray...

Start Here
Page 1
Remove all the tape and packing material. (There is shown below.) *411086800* *411086800* Start Here Epson Stylus® Photo R1900 1 Unpack If anything is missing, contact Epson® as described on the printer than is more tape on the back.
Remove all the tape and packing material. (There is shown below.) *411086800* *411086800* Start Here Epson Stylus® Photo R1900 1 Unpack If anything is missing, contact Epson® as described on the printer than is more tape on the back.
Start Here
Page 8
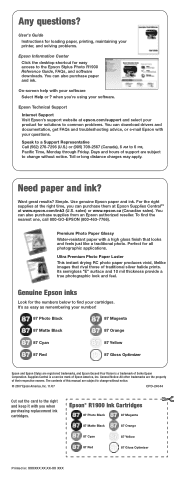
...? User's Guide Instructions for loading paper, printing, maintaining your printer, and solving problems. Epson Information Center Click the desktop shortcut for the numbers below to the Epson Stylus Photo R1900 Reference Guide, FAQs, and software downloads. Toll or long distance charges may apply. sales) or www.epson.ca (Canadian sales). It's as easy as remembering your cartridges...
...? User's Guide Instructions for loading paper, printing, maintaining your printer, and solving problems. Epson Information Center Click the desktop shortcut for the numbers below to the Epson Stylus Photo R1900 Reference Guide, FAQs, and software downloads. Toll or long distance charges may apply. sales) or www.epson.ca (Canadian sales). It's as easy as remembering your cartridges...
User's Guide - PDF
Page 5
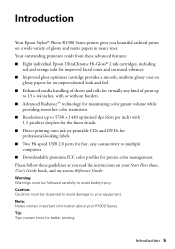
... of print up to 13 × 44 inches, with or without borders. ■ Advanced Radiance™ technology for maximizing color gamut volume while providing smoother color transitions. ■ Resolutions up to 5760 × 1440 optimized dpi (dots per inch) with 1.5 picoliter droplets for the ...for professional-looking labels. ■ Two Hi-speed USB 2.0 ports for fast, easy connectivity to your equipment. Introduction Your Epson Stylus® Photo R1900 Series printer gives you read the instructions on your Start Here sheet, User's Guide book, and on glossy papers for an unprecedented look...
... of print up to 13 × 44 inches, with or without borders. ■ Advanced Radiance™ technology for maximizing color gamut volume while providing smoother color transitions. ■ Resolutions up to 5760 × 1440 optimized dpi (dots per inch) with 1.5 picoliter droplets for the ...for professional-looking labels. ■ Two Hi-speed USB 2.0 ports for fast, easy connectivity to your equipment. Introduction Your Epson Stylus® Photo R1900 Series printer gives you read the instructions on your Start Here sheet, User's Guide book, and on glossy papers for an unprecedented look...
User's Guide - PDF
Page 16
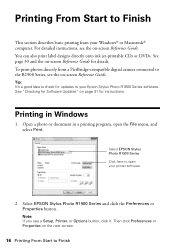
... connected to the R1900 Series, see a Setup, Printer, or Options button, click it. You can also print label designs directly onto ink jet-printable CDs or DVDs. Select EPSON Stylus Photo R1900 Series Click here to your Epson Stylus Photo R1900 Series software. Select EPSON Stylus Photo R1900 Series and click ..., open your Windows® or Macintosh® computer. See "Checking for details. Open a photo or document in Windows 1. To print photos directly from your printer software 2. Then click Preferences or Properties on -screen Reference Guide. See page 30 and the ...
... connected to the R1900 Series, see a Setup, Printer, or Options button, click it. You can also print label designs directly onto ink jet-printable CDs or DVDs. Select EPSON Stylus Photo R1900 Series Click here to your Epson Stylus Photo R1900 Series software. Select EPSON Stylus Photo R1900 Series and click ..., open your Windows® or Macintosh® computer. See "Checking for details. Open a photo or document in Windows 1. To print photos directly from your printer software 2. Then click Preferences or Properties on -screen Reference Guide. See page 30 and the ...
User's Guide - PDF
Page 29
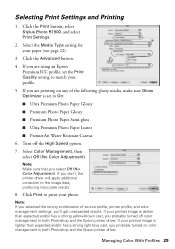
... probably turned off the High Speed option. 7. Managing Color With Profiles 29 If you are using an Epson Premium ICC profile, set to match your profile. 5. Turn off color management in both Photoshop and the Epson printer driver. If your printed image is set the Print ...Advanced button. 4. Click the Print button, select Stylus Photo R1900, and select Print Settings. 2. If your printed image is lighter than expected and/or has a strong yellow-brown cast, you probably turned on any of source profile, printer profile, and color management settings, you select Off (No...
... probably turned off the High Speed option. 7. Managing Color With Profiles 29 If you are using an Epson Premium ICC profile, set to match your profile. 5. Turn off color management in both Photoshop and the Epson printer driver. If your printed image is set the Print ...Advanced button. 4. Click the Print button, select Stylus Photo R1900, and select Print Settings. 2. If your printed image is lighter than expected and/or has a strong yellow-brown cast, you probably turned on any of source profile, printer profile, and color management settings, you select Off (No...


