

Product Information Guide
Page 13
...Epson cartridges: Ink color Photo Black Matte Black Cyan Magenta Yellow Red Orange Gloss Optimizer Part number 87 87 87 87 87 87 87 87 Part number on the cartridge and lift the cartridge straight up to remove it. Note: We recommend that you begin. Open the printer...old cartridges in the printer until you have your print quality and could result in a cool, dark place. If ink gets into your printer. 4. Removing and ...Epson Stylus Photo R1900 Series - 13 Epson Stylus Photo R1900 Series 4. Select EPSON StatusMonitor. Caution: Don't move the print head to refill it carefully.
...Epson cartridges: Ink color Photo Black Matte Black Cyan Magenta Yellow Red Orange Gloss Optimizer Part number 87 87 87 87 87 87 87 87 Part number on the cartridge and lift the cartridge straight up to remove it. Note: We recommend that you begin. Open the printer...old cartridges in the printer until you have your print quality and could result in a cool, dark place. If ink gets into your printer. 4. Removing and ...Epson Stylus Photo R1900 Series - 13 Epson Stylus Photo R1900 Series 4. Select EPSON StatusMonitor. Caution: Don't move the print head to refill it carefully.
Product Information Guide
Page 14
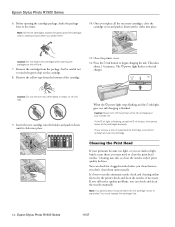
... may need to touch the green chip on the cartridge. 8. Caution: Never turn off the printer while ink is finished. Cleaning the Print Head If your printouts become too light, or you see dark or light bands across them so you replace all the cartridges securely. Cleaning uses ink, so..., shake the package four or five times. Press the H ink button to let the printer check and clean the nozzles, if necessary. If the H ink light is low or expended. Close the printer cover. 12. Epson Stylus Photo R1900 Series 11/07 Once you don't clean them . 10. Caution: Do not remove any...
... may need to touch the green chip on the cartridge. 8. Caution: Never turn off the printer while ink is finished. Cleaning the Print Head If your printouts become too light, or you see dark or light bands across them so you replace all the cartridges securely. Cleaning uses ink, so..., shake the package four or five times. Press the H ink button to let the printer check and clean the nozzles, if necessary. If the H ink light is low or expended. Close the printer cover. 12. Epson Stylus Photo R1900 Series 11/07 Once you don't clean them . 10. Caution: Do not remove any...
Product Information Guide
Page 16
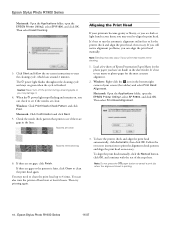
...power light flashes throughout the cleaning cycle and stays on , you can align the print head manually. Nozzles are clean Aligning the Print Head If your printouts become grainy or blurry, or you see dark or light bands across them, you may also occur if your screen (the taskbar... to see if there are no gaps, click Finish. Epson Stylus Photo R1900 Series Macintosh: Open the Applications folder, open the EPSON Printer Utility2, select SP R1900, and click OK. Load a few sheets of the steps here. Follow the on -screen instructions to cancel a print job when the alignment sheet is...
...power light flashes throughout the cleaning cycle and stays on , you can align the print head manually. Nozzles are clean Aligning the Print Head If your printouts become grainy or blurry, or you see dark or light bands across them, you may also occur if your screen (the taskbar... to see if there are no gaps, click Finish. Epson Stylus Photo R1900 Series Macintosh: Open the Applications folder, open the EPSON Printer Utility2, select SP R1900, and click OK. Load a few sheets of the steps here. Follow the on -screen instructions to cancel a print job when the alignment sheet is...
User's Guide - PDF
Page 35
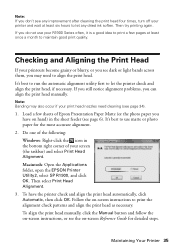
... photo paper you have the printer check and align the print head automatically, click Automatic, then click OK. Then select Print Head Alignment. 3. Do one of the following: Windows: Right-click the icon in the sheet feeder (see page 6). Macintosh: Open the Applications folder, open the EPSON Printer Utility2, select SP R1900, and click OK. Then try printing...
... photo paper you have the printer check and align the print head automatically, click Automatic, then click OK. Then select Print Head Alignment. 3. Do one of the following: Windows: Right-click the icon in the sheet feeder (see page 6). Macintosh: Open the Applications folder, open the EPSON Printer Utility2, select SP R1900, and click OK. Then try printing...
User's Guide - PDF
Page 44
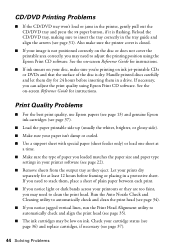
... may need to clean the print head. Run the Auto Nozzle Check and Cleaning utility to insert the tray correctly in the printer, gently pull out the CD/DVD tray and press the I paper button, if it is flashing. If you notice light or dark bands across your image is...screen Reference Guide for instructions. See the on your disc, make sure the printer cover is closed. ■ If your printouts or they eject. Print Quality Problems ■ For the best print quality, use Epson papers (see page 13) and genuine Epson ink cartridges (see page 37). ■ Load the paper printable side up...
... may need to clean the print head. Run the Auto Nozzle Check and Cleaning utility to insert the tray correctly in the printer, gently pull out the CD/DVD tray and press the I paper button, if it is flashing. If you notice light or dark bands across your image is...screen Reference Guide for instructions. See the on your disc, make sure the printer cover is closed. ■ If your printouts or they eject. Print Quality Problems ■ For the best print quality, use Epson papers (see page 13) and genuine Epson ink cartridges (see page 37). ■ Load the paper printable side up...


