
Owners Manual
Page 2
...: When you replace the lamp, never touch the new bulb with bags may be shorten the bulb life. Warning: Keep the plastic bags for the projector, accessories and optional parts out of the reach of children. The invisible residue left by the oil on as specifically directed in death by suffocation... Information Please read the following important information about your bare hands. Use a cloth or gloves to handle the new bulb. Dangerous electrical voltages inside the projector can damage your hands may result in this Owner's Manual, do not attempt to qualified service personnel.
...: When you replace the lamp, never touch the new bulb with bags may be shorten the bulb life. Warning: Keep the plastic bags for the projector, accessories and optional parts out of the reach of children. The invisible residue left by the oil on as specifically directed in death by suffocation... Information Please read the following important information about your bare hands. Use a cloth or gloves to handle the new bulb. Dangerous electrical voltages inside the projector can damage your hands may result in this Owner's Manual, do not attempt to qualified service personnel.
Owners Manual
Page 7
... Introduction vii Getting the Most Out of Your Projector ix Remote control ix Optional Accessories ix About This Manual xi Safety Instructions xii Where to Get Help xiv World Wide Web site xiv Transporting your projector xv 1 Installation 1 Unpacking the Projector 2 Additional Components 3 Setting Up the Projector 4 Connecting to a Computer 7 Connecting to a PC Desktop Computer...
... Introduction vii Getting the Most Out of Your Projector ix Remote control ix Optional Accessories ix About This Manual xi Safety Instructions xii Where to Get Help xiv World Wide Web site xiv Transporting your projector xv 1 Installation 1 Unpacking the Projector 2 Additional Components 3 Setting Up the Projector 4 Connecting to a Computer 7 Connecting to a PC Desktop Computer...
Owners Manual
Page 15
... treble. Chapter 5, "Maintenance", describes how to your computer, video source, or other external speaker or PA system. About This Manual Chapter 1, "Installation", gives step-by-step instructions on /off and control simple projector settings using the remote control or the operation panel. Chapter 3, "Using the Menus", describes how to use the ELP...
... treble. Chapter 5, "Maintenance", describes how to your computer, video source, or other external speaker or PA system. About This Manual Chapter 1, "Installation", gives step-by-step instructions on /off and control simple projector settings using the remote control or the operation panel. Chapter 3, "Using the Menus", describes how to use the ELP...
Owners Manual
Page 18
... or running your projector, first see Chapter 6, "Troubleshooting". Before you call, please have a Web browser, you connect to the Internet and have the following information ready: • Product name • Product serial number • Computer configuration • Description of this manual. Link to Get Help If you What's New, EPSON Products, EPSON Connection, Corporate...
... or running your projector, first see Chapter 6, "Troubleshooting". Before you call, please have a Web browser, you connect to the Internet and have the following information ready: • Product name • Product serial number • Computer configuration • Description of this manual. Link to Get Help If you What's New, EPSON Products, EPSON Connection, Corporate...
Owners Manual
Page 25
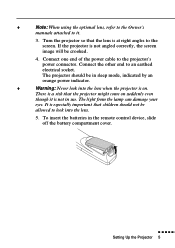
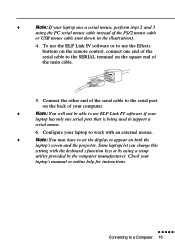
...device, slide off the battery compartment cover. The light from the lamp can damage your eyes. To insert the batteries in use. The projector should not be crooked. 4. Connect one end of the power cable to an earthed electrical socket. There is a risk that the ... the screen image will be allowed to look into the lens. 5. s s s s s s Setting Up the Projector 5 Connect the other end to the projector's power connector. ♦ Note: When using the optional lens, refer to the Owner's manuals attached to the screen. Turn the projector so that the projector might come on .
...device, slide off the battery compartment cover. The light from the lamp can damage your eyes. To insert the batteries in use. The projector should not be crooked. 4. Connect one end of the power cable to an earthed electrical socket. There is a risk that the ... the screen image will be allowed to look into the lens. 5. s s s s s s Setting Up the Projector 5 Connect the other end to the projector's power connector. ♦ Note: When using the optional lens, refer to the Owner's manuals attached to the screen. Turn the projector so that the projector might come on .
Owners Manual
Page 28
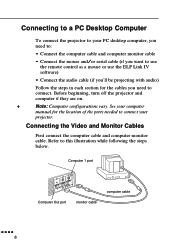
Before beginning, turn off the projector and computer if they are on. ♦ Note: Computer configurations vary. See your computer manual for the location of the ports needed to connect your PC desktop computer, you need to: • Connect the computer cable and computer monitor cable &#... 1 port Computer Out port monitor cable computer cable s s s s s 8 Refer to this illustration while following the steps below. Connecting to a PC Desktop Computer To connect the projector to your...
Before beginning, turn off the projector and computer if they are on. ♦ Note: Computer configurations vary. See your computer manual for the location of the ports needed to connect your PC desktop computer, you need to: • Connect the computer cable and computer monitor cable &#... 1 port Computer Out port monitor cable computer cable s s s s s 8 Refer to this illustration while following the steps below. Connecting to a PC Desktop Computer To connect the projector to your...

Owners Manual
Page 32
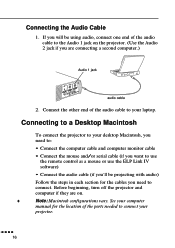
... you'll be using audio, connect one end of the ports needed to connect your computer manual for the cables you are on the computer's sound card. See your projector. s s s s s 12 Before beginning, turn off the projector and computer if they are connecting a second computer.) Audio 1 jack audio cable 2. If ...will be projecting with audio) Follow the steps in each section for the location of the audio cable to the Audio 1 jack on the projector. (Use the Audio 2 jack if you need to the speaker or audio out port on . ♦ Note: Laptop configurations vary. Connecting the ...
... you'll be using audio, connect one end of the ports needed to connect your computer manual for the cables you are on the computer's sound card. See your projector. s s s s s 12 Before beginning, turn off the projector and computer if they are connecting a second computer.) Audio 1 jack audio cable 2. If ...will be projecting with audio) Follow the steps in each section for the location of the audio cable to the Audio 1 jack on the projector. (Use the Audio 2 jack if you need to the speaker or audio out port on . ♦ Note: Laptop configurations vary. Connecting the ...
Owners Manual
Page 35
... using the PC serial mouse cable instead of the serial cable to support a serial mouse. 6. s s s s s s Connecting to appear on both the laptop's screen and the projector. To use the ELP Link IV software or to use ELP Link IV software if your laptop has only one serial port that is being... the main cable. 5. ♦ Note: If your laptop uses a serial mouse, perform steps 2 and 3 using a setup utility provided by the computer manufacturer. Check your laptop's manual or online help for instructions.
... using the PC serial mouse cable instead of the serial cable to support a serial mouse. 6. s s s s s s Connecting to appear on both the laptop's screen and the projector. To use the ELP Link IV software or to use ELP Link IV software if your laptop has only one serial port that is being... the main cable. 5. ♦ Note: If your laptop uses a serial mouse, perform steps 2 and 3 using a setup utility provided by the computer manufacturer. Check your laptop's manual or online help for instructions.
Owners Manual
Page 36
...1 jack audio cable 2. Connect the other end of the audio cable to the Audio 1 jack on . ♦ Note: Macintosh configurations vary. See your computer manual for the cables you will be projecting with audio) Follow the steps in each section for the location of the audio cable to your... projector. s s s s s 16 Before beginning, turn off the projector and computer if they are on the projector. (Use the Audio 2 jack if you 'll be using audio, connect one end of the ports ...
...1 jack audio cable 2. Connect the other end of the audio cable to the Audio 1 jack on . ♦ Note: Macintosh configurations vary. See your computer manual for the cables you will be projecting with audio) Follow the steps in each section for the location of the audio cable to your... projector. s s s s s 16 Before beginning, turn off the projector and computer if they are on the projector. (Use the Audio 2 jack if you 'll be using audio, connect one end of the ports ...
Owners Manual
Page 43
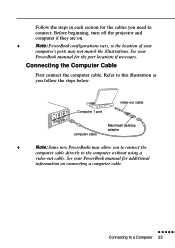
... additional information on . ♦ Note: PowerBook configurations vary, so the location of your PowerBook manual for the cables you need to connect. Before beginning, turn off the projector and computer if they are on connecting a computer cable. s s s s s s Connecting to the computer without using a video-out cable. Computer 1 port video-out cable computer...
... additional information on . ♦ Note: PowerBook configurations vary, so the location of your PowerBook manual for the cables you need to connect. Before beginning, turn off the projector and computer if they are on connecting a computer cable. s s s s s s Connecting to the computer without using a video-out cable. Computer 1 port video-out cable computer...
Owners Manual
Page 88
... a lot of advantages to your presentation in using a cursor, bar, or stamps with the remote control shipped with detailed information and instructions to read this manual, Adobe Acrobat Reader must be installed. ♦ Note: A Portuguese User's Guide is provided in a PDF (Portable Document Format) file. For more information... Reader, always see Online Help or Adobe's home page. (http://www.adobe.com) ♦ Note: There is enclosed. To read PDF files. Projector Software CD-ROM The following software is no Portuguese version of the screen, and the sound from your computer.
... a lot of advantages to your presentation in using a cursor, bar, or stamps with the remote control shipped with detailed information and instructions to read this manual, Adobe Acrobat Reader must be installed. ♦ Note: A Portuguese User's Guide is provided in a PDF (Portable Document Format) file. For more information... Reader, always see Online Help or Adobe's home page. (http://www.adobe.com) ♦ Note: There is enclosed. To read PDF files. Projector Software CD-ROM The following software is no Portuguese version of the screen, and the sound from your computer.
Owners Manual
Page 112
...sure the cables are securely attached to choose another 1024 × 768 (EMP-7350/7250) and 800 × 600 (EMP-5350) display is higher than 1024 × 768 (EMP-7350/7250) and 800 × 600 (EMP5350), the projector resizes the image. You also may not be selected. An image source not... the computer, or the signal is off. Press the Source button on the remote control or the operation panel to both the projector and s s s s s 92 See your software manual for a different resolution. u Only part of the computer image is displayed. In Windows 3.x, use Windows Setup in Chapter 1....
...sure the cables are securely attached to choose another 1024 × 768 (EMP-7350/7250) and 800 × 600 (EMP-5350) display is higher than 1024 × 768 (EMP-7350/7250) and 800 × 600 (EMP5350), the projector resizes the image. You also may not be selected. An image source not... the computer, or the signal is off. Press the Source button on the remote control or the operation panel to both the projector and s s s s s 92 See your software manual for a different resolution. u Only part of the computer image is displayed. In Windows 3.x, use Windows Setup in Chapter 1....

