Owners Manual
Page 3
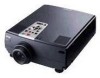
..., or to change numeric settings during menu operations. Synchronize the computer's graphic signal. Use these buttons to adjust an overall image that you can increase or decrease the sound volume. Tracking +/- EMP-7350/7250/5350 QUICK START operation panel operation indicator speaker remoto control receiver zoom ring focus ring speaker foot adjust lever front foot Power Help Computer A/Vmute Resize Video Menu Esc Sync Tracking Tracking Sync Keystone Shift Volume Operation Panel Button Function Power Turns the projector on the audio/video output, press...
..., or to change numeric settings during menu operations. Synchronize the computer's graphic signal. Use these buttons to adjust an overall image that you can increase or decrease the sound volume. Tracking +/- EMP-7350/7250/5350 QUICK START operation panel operation indicator speaker remoto control receiver zoom ring focus ring speaker foot adjust lever front foot Power Help Computer A/Vmute Resize Video Menu Esc Sync Tracking Tracking Sync Keystone Shift Volume Operation Panel Button Function Power Turns the projector on the audio/video output, press...
Owners Manual
Page 4
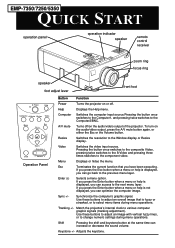
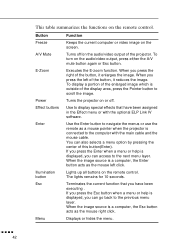
... Link IV software. Adjusts the volume. EMP-7350/7250/5350 QUICK START Freeze A/V Mute E-Zoom Power R/C ON OFF 3 2 5 4 1 Enter Esc Remote control Button Function Freeze Keeps the current computer or video image on the audio/video output, press either the A/V mute button again or Esc button. Power Turns the projector on or off /on the audio/video output of the button, it again. Help Displays the Help menu. Preset The current settings for the next use the remote as the...
... Link IV software. Adjusts the volume. EMP-7350/7250/5350 QUICK START Freeze A/V Mute E-Zoom Power R/C ON OFF 3 2 5 4 1 Enter Esc Remote control Button Function Freeze Keeps the current computer or video image on the audio/video output, press either the A/V mute button again or Esc button. Power Turns the projector on or off /on the audio/video output of the button, it again. Help Displays the Help menu. Preset The current settings for the next use the remote as the...
Owners Manual
Page 8
Turning the Projector On and Off 35 Focusing and Positioning the Screen Image 37 Resize Button 39 Controlling the Projector 40 Using the Remote Control 41 Using the Operation Panel 44 Projector Status Indicators 46 Operation Indicator 46 Lamp Indicator 47 Temperature Indicator 47 3 Using the Projector Menus 49 Accessing the Main Menu 50 Changing a Menu Setting 50 Menu Options 53 Video Menu (Image source = Computer 53 Video Menu (Image source = Video 56 Audio Menu 57 Effect Menu 58 Setting Menu 59 User's Logo Menu 60 Reset All Menu 62 Advanced Menu 62 About Menu...
Turning the Projector On and Off 35 Focusing and Positioning the Screen Image 37 Resize Button 39 Controlling the Projector 40 Using the Remote Control 41 Using the Operation Panel 44 Projector Status Indicators 46 Operation Indicator 46 Lamp Indicator 47 Temperature Indicator 47 3 Using the Projector Menus 49 Accessing the Main Menu 50 Changing a Menu Setting 50 Menu Options 53 Video Menu (Image source = Computer 53 Video Menu (Image source = Video 56 Audio Menu 57 Effect Menu 58 Setting Menu 59 User's Logo Menu 60 Reset All Menu 62 Advanced Menu 62 About Menu...
Owners Manual
Page 11
... for rich, powerful audio output. Your projector produces bright images that can also act as a video tape deck, camcorder, or digital camera. You can control your computer screen during presentations. The remote control can be easily seen in 3D Sound System for image source switching and image adjustment. s s s s ss s s s s s s s s s Introduction Your compact, lightweight EPSON EMP-7350/7250/5350 projector lets you can install the projector's ELP Link IV software to control the projector's setting from a computer...
... for rich, powerful audio output. Your projector produces bright images that can also act as a video tape deck, camcorder, or digital camera. You can control your computer screen during presentations. The remote control can be easily seen in 3D Sound System for image source switching and image adjustment. s s s s ss s s s s s s s s s Introduction Your compact, lightweight EPSON EMP-7350/7250/5350 projector lets you can install the projector's ELP Link IV software to control the projector's setting from a computer...
Owners Manual
Page 15
... projector and configure special effects. Chapter 4, "Using the ELP Link IV Software", describes how to use the menus to interpret your projector's indicator lights and gives helpful information for avoiding errors, optimizing image quality and solving problems. Chapter 7, "Technical Specifications," lists the technical specifications for your computer, video source, or other external speaker or PA system. s s s s s s About This Manual xi Read the installation procedures that apply to clean...
... projector and configure special effects. Chapter 4, "Using the ELP Link IV Software", describes how to use the menus to interpret your projector's indicator lights and gives helpful information for avoiding errors, optimizing image quality and solving problems. Chapter 7, "Technical Specifications," lists the technical specifications for your computer, video source, or other external speaker or PA system. s s s s s s About This Manual xi Read the installation procedures that apply to clean...
Owners Manual
Page 25
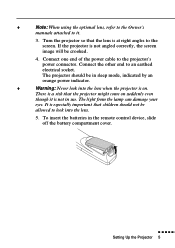
..., the screen image will be in the remote control device, slide off the battery compartment cover. To insert the batteries in sleep mode, indicated by an orange power indicator. ♦ Warning: Never look into the lens when the projector is at right angles to the screen. ♦ Note: When using the optional lens, refer to the Owner's manuals attached to an earthed electrical socket. s s s s s s Setting Up the Projector 5 Connect one end...
..., the screen image will be in the remote control device, slide off the battery compartment cover. To insert the batteries in sleep mode, indicated by an orange power indicator. ♦ Warning: Never look into the lens when the projector is at right angles to the screen. ♦ Note: When using the optional lens, refer to the Owner's manuals attached to an earthed electrical socket. s s s s s s Setting Up the Projector 5 Connect one end...
Owners Manual
Page 30
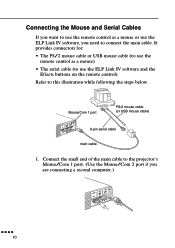
... 1 port PS/2 mouse cable (or USB mouse cable) 9-pin serial cable main cable 1. Connect the small end of the main cable to the projector's Mouse/Com 1 port. (Use the Mouse/Com 2 port if you need to connect the main cable. It provides connectors for: • The PS/2 mouse cable or USB mouse cable (to use the remote control as a mouse or use the ELP Link IV software and the Effects buttons on the remote control) Refer...
... 1 port PS/2 mouse cable (or USB mouse cable) 9-pin serial cable main cable 1. Connect the small end of the main cable to the projector's Mouse/Com 1 port. (Use the Mouse/Com 2 port if you need to connect the main cable. It provides connectors for: • The PS/2 mouse cable or USB mouse cable (to use the remote control as a mouse or use the ELP Link IV software and the Effects buttons on the remote control) Refer...
Owners Manual
Page 33
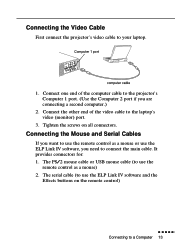
... video cable to use the remote control as a mouse or use the ELP Link IV software, you are connecting a second computer.) 2. The PS/2 mouse cable or USB mouse cable (to the laptop's video (monitor) port. 3. It provides connectors for: 1. Computer 1 port computer cable 1. Connecting the Video Cable First connect the projector's video cable to use the remote control as a mouse) 2. The serial cable (to a Computer 13 Tighten the screws on the remote control) s s s s s s Connecting to use the ELP Link IV software and the Effects buttons...
... video cable to use the remote control as a mouse or use the ELP Link IV software, you are connecting a second computer.) 2. The PS/2 mouse cable or USB mouse cable (to the laptop's video (monitor) port. 3. It provides connectors for: 1. Computer 1 port computer cable 1. Connecting the Video Cable First connect the projector's video cable to use the remote control as a mouse) 2. The serial cable (to a Computer 13 Tighten the screws on the remote control) s s s s s s Connecting to use the ELP Link IV software and the Effects buttons...
Owners Manual
Page 35
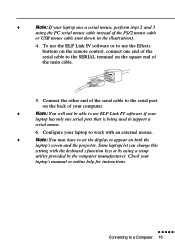
... IV software if your laptop to work with the keyboard's function keys or by using the PC serial mouse cable instead of the main cable. 5. Some laptops let you change this setting with an external mouse. ♦ Note: You may have to set the display to the SERIAL terminal on both the laptop's screen and the projector. ♦ Note: If your laptop's manual or online help for instructions. Configure your laptop...
... IV software if your laptop to work with the keyboard's function keys or by using the PC serial mouse cable instead of the main cable. 5. Some laptops let you change this setting with an external mouse. ♦ Note: You may have to set the display to the SERIAL terminal on both the laptop's screen and the projector. ♦ Note: If your laptop's manual or online help for instructions. Configure your laptop...
Owners Manual
Page 39
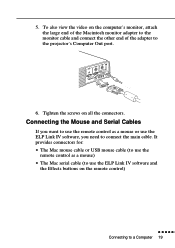
... and Serial Cables If you want to use the remote control as a mouse) • The Mac serial cable (to use the ELP Link IV software, you need to connect the main cable. 5. It provides connectors for: • The Mac mouse cable or USB mouse cable (to use the remote control as a mouse or use the ELP Link IV software and the Effects buttons on the remote control) s s s s s s Connecting to the projector's Computer Out port. 6. To also view the video...
... and Serial Cables If you want to use the remote control as a mouse) • The Mac serial cable (to use the ELP Link IV software, you need to connect the main cable. 5. It provides connectors for: • The Mac mouse cable or USB mouse cable (to use the remote control as a mouse or use the ELP Link IV software and the Effects buttons on the remote control) s s s s s s Connecting to the projector's Computer Out port. 6. To also view the video...
Owners Manual
Page 45
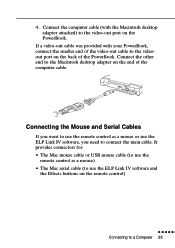
... cable or USB mouse cable (to the video-out port on the end of the PowerBook. 4. If a video-out cable was provided with the Macintosh desktop adapter attached) to use the remote control as a mouse or use the ELP Link IV software and the Effects buttons on the back of the computer cable. Connecting the Mouse and Serial Cables If you want to use the remote control as a mouse) • The Mac serial cable...
... cable or USB mouse cable (to the video-out port on the end of the PowerBook. 4. If a video-out cable was provided with the Macintosh desktop adapter attached) to use the remote control as a mouse or use the ELP Link IV software and the Effects buttons on the back of the computer cable. Connecting the Mouse and Serial Cables If you want to use the remote control as a mouse) • The Mac serial cable...
Owners Manual
Page 55
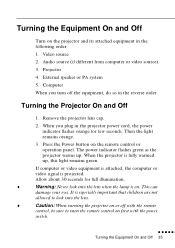
... the power switch. Press the Power button on the projector and its attached equipment in the projector power cord, the power indicator flashes orange for full illumination. ♦ Warning: Never look into the lens when the lamp is projected. s s s s s s Turning the Equipment On and Off 35 Turning the Projector On and Off 1. Remove the projector lens cap. 2. Then the light remains orange. 3. Projector 4. When you turn the remote control on . The power indicator flashes green as the projector warms up , this light remains green. If...
... the power switch. Press the Power button on the projector and its attached equipment in the projector power cord, the power indicator flashes orange for full illumination. ♦ Warning: Never look into the lens when the lamp is projected. s s s s s s Turning the Equipment On and Off 35 Turning the Projector On and Off 1. Remove the projector lens cap. 2. Then the light remains orange. 3. Projector 4. When you turn the remote control on . The power indicator flashes green as the projector warms up , this light remains green. If...
Owners Manual
Page 62
... of the projector. Power Turns the projector on the audio/video output of this button(Enter). When the image source is connected to the next menu layer. When you can go back to display special effects that you press the right of the enlarged image which is displayed, you press the left click. The lights remains for 10 seconds. E-Zoom Executes the E-zoom function. To display a portion of...
... of the projector. Power Turns the projector on the audio/video output of this button(Enter). When the image source is connected to the next menu layer. When you can go back to display special effects that you press the right of the enlarged image which is displayed, you press the left click. The lights remains for 10 seconds. E-Zoom Executes the E-zoom function. To display a portion of...

Owners Manual
Page 67
...Color Status Meaning - Orange Flashing Projection lamp has reached the end of over heating. Red Flashing There is too hot. Red Flashing There is functioning normally. Off The projector is in a normal condition. Temperature Indicator Displays the internal temperature condition. Color Status Meaning - Red Lit The projector has turned off when the projector is functioning normally. s s s s s s Projector Status Indicators 47 This indicator is off automatically because of its life and will not longer project images. Off Lamp is a problem with a new...
...Color Status Meaning - Orange Flashing Projection lamp has reached the end of over heating. Red Flashing There is too hot. Red Flashing There is functioning normally. Off The projector is in a normal condition. Temperature Indicator Displays the internal temperature condition. Color Status Meaning - Red Lit The projector has turned off when the projector is functioning normally. s s s s s s Projector Status Indicators 47 This indicator is off automatically because of its life and will not longer project images. Off Lamp is a problem with a new...
Owners Manual
Page 69
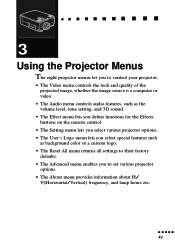
s s s s ss s s s s s s s s s 3 Using the Projector Menus The eight projector menus let you to control your projector. • The Video menu controls the look and quality of the projected image, whether the image source is a computer or video. • The Audio menu controls audio features, such as the volume level, tone setting, and 3D sound. • The Effect menu lets you define functions for the Effects buttons on the remote control. • The Setting menu lets you select...
s s s s ss s s s s s s s s s 3 Using the Projector Menus The eight projector menus let you to control your projector. • The Video menu controls the look and quality of the projected image, whether the image source is a computer or video. • The Audio menu controls audio features, such as the volume level, tone setting, and 3D sound. • The Effect menu lets you define functions for the Effects buttons on the remote control. • The Setting menu lets you select...

Owners Manual
Page 84
Image source = Computer or Component Video Menu item Description Lamp Displays the number of the computer. Sync Mode Resolution Displays the sync mode of hours the current lamp has been used . The lamp light turns red when the projector lamp is near the end of hours the current lamp has been used . Video Signal Displays the input image signal mode. The lamp light turns red when the projector lamp is near the end of its normal life. Frequency Displays the horizontal and vertical frequency of the computer video output. Displays the output resolution of...
Image source = Computer or Component Video Menu item Description Lamp Displays the number of the computer. Sync Mode Resolution Displays the sync mode of hours the current lamp has been used . The lamp light turns red when the projector lamp is near the end of hours the current lamp has been used . Video Signal Displays the input image signal mode. The lamp light turns red when the projector lamp is near the end of its normal life. Frequency Displays the horizontal and vertical frequency of the computer video output. Displays the output resolution of...
Owners Manual
Page 91
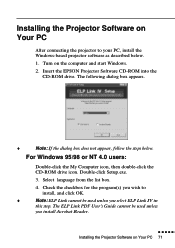
... After connecting the projector to install, and click OK. ♦ Note: ELP Link cannot be used unless you install Acrobat Reader. Insert the EPSON Projector Software CD-ROM into the CD-ROM drive. Double-click Setup.exe. 3. For Windows 95/98 or NT 4.0 users: Double-click the My Computer icon, then double-click the CD-ROM drive icon. The ELP Link PDF User's Guide...
... After connecting the projector to install, and click OK. ♦ Note: ELP Link cannot be used unless you install Acrobat Reader. Insert the EPSON Projector Software CD-ROM into the CD-ROM drive. Double-click Setup.exe. 3. For Windows 95/98 or NT 4.0 users: Double-click the My Computer icon, then double-click the CD-ROM drive icon. The ELP Link PDF User's Guide...
Owners Manual
Page 103
You should replace are the lamp and air filter. A clogged air filter can injure you severely. Never open any cover on the screen. Do not try to periodically clean the air filter at the bottom of the projector, turn off the projector and unplug the power cord. Refer all other part needs replacing, contact your dealer or a qualified service person. ♦ Warning: Before you should keep it from overheating. The only parts you clean any dirt...
You should replace are the lamp and air filter. A clogged air filter can injure you severely. Never open any cover on the screen. Do not try to periodically clean the air filter at the bottom of the projector, turn off the projector and unplug the power cord. Refer all other part needs replacing, contact your dealer or a qualified service person. ♦ Warning: Before you should keep it from overheating. The only parts you clean any dirt...
Owners Manual
Page 106
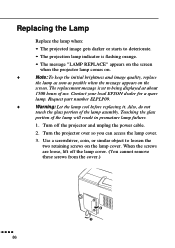
... part number ELPLP09. ♦ Warning: Let the lamp cool before replacing it. Turn off the lamp cover. (You cannot remove these screws from the cover.) s s s s s 86 2 1 Contact your local EPSON dealer for a spare lamp. Use a screwdriver, coin, or similar object to being displayed at about 1500 hours of use. The replacement message is flashing orange. • The message "LAMP REPLACE" appears on the screen when the projector lamp comes on. ♦ Note: To keep the initial brightness and image...
... part number ELPLP09. ♦ Warning: Let the lamp cool before replacing it. Turn off the lamp cover. (You cannot remove these screws from the cover.) s s s s s 86 2 1 Contact your local EPSON dealer for a spare lamp. Use a screwdriver, coin, or similar object to being displayed at about 1500 hours of use. The replacement message is flashing orange. • The message "LAMP REPLACE" appears on the screen when the projector lamp comes on. ♦ Note: To keep the initial brightness and image...
Owners Manual
Page 110
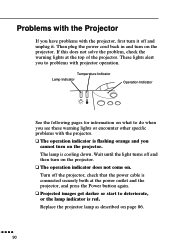
... have problems with projector operation. The lamp is red. Replace the projector lamp as described on . Then plug the power cord back in and turn on what to deteriorate, or the lamp indicator is cooling down. These lights alert you see these warning lights or encounter other specific problems with the projector. If this does not solve the problem, check the warning lights at the power outlet and the projector, and press the Power button again. Temperature Indicator Lamp Indicator Operation Indicator See...
... have problems with projector operation. The lamp is red. Replace the projector lamp as described on . Then plug the power cord back in and turn on what to deteriorate, or the lamp indicator is cooling down. These lights alert you see these warning lights or encounter other specific problems with the projector. If this does not solve the problem, check the warning lights at the power outlet and the projector, and press the Power button again. Temperature Indicator Lamp Indicator Operation Indicator See...


