Product Information Guide
Page 1
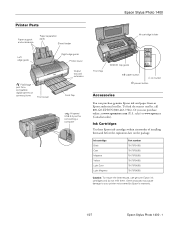
Or you can purchase genuine Epson ink and paper from an Epson authorized reseller. sales) or www.epson.ca (Canadian sales). Other products may cause damage to your printer not covered by Epson's warranty. 1/07 Epson Stylus Photo 1400 - 1 Epson Stylus Photo 1400 Printer Parts Paper support and extensions Paper separation pads Sheet feeder Ink cartridge holder Left edge guide PictBridge port for a compatible digital camera or...
Or you can purchase genuine Epson ink and paper from an Epson authorized reseller. sales) or www.epson.ca (Canadian sales). Other products may cause damage to your printer not covered by Epson's warranty. 1/07 Epson Stylus Photo 1400 - 1 Epson Stylus Photo 1400 Printer Parts Paper support and extensions Paper separation pads Sheet feeder Ink cartridge holder Left edge guide PictBridge port for a compatible digital camera or...

Product Information Guide
Page 3
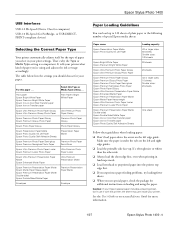
Before printing large jobs using the borderless setting, print a single sheet to 60% RH 1/07 Epson Stylus Photo 1400 - 3 Always test a sample of paper. Load envelopes flap edge left margin is 0.78 inch (20 mm) for envelopes. Note...of any particular brand or type of paper may be changed by Epson Thickness 0.003 to 0.004 inch (0.08 to 0.11 mm) Weight (for envelopes. Epson Stylus Photo 1400 Printer Specifications Printing Printing method Ink configuration Print direction MicroPiezo ink jet 6 individual ink cartridges in black, cyan, magenta, yellow, light cyan, and ...
Before printing large jobs using the borderless setting, print a single sheet to 60% RH 1/07 Epson Stylus Photo 1400 - 3 Always test a sample of paper. Load envelopes flap edge left margin is 0.78 inch (20 mm) for envelopes. Note...of any particular brand or type of paper may be changed by Epson Thickness 0.003 to 0.004 inch (0.08 to 0.11 mm) Weight (for envelopes. Epson Stylus Photo 1400 Printer Specifications Printing Printing method Ink configuration Print direction MicroPiezo ink jet 6 individual ink cartridges in black, cyan, magenta, yellow, light cyan, and ...
Product Information Guide
Page 4
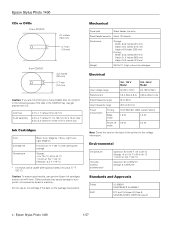
... B CAN/CSA-CEI/IEC CISPR 22 Class B 4 - Do not use genuine Epson ink cartridges and do not print in the following areas of the printer for a 8-cm disc Ink Cartridges Color Cartridge life Temperature Black, Cyan, Magenta, Yellow, Light Cyan, Light Magenta 6 months...20 to 80% RH Storage: 5 to 40 °C) 1 month at 77 °F (25 °C). Epson Stylus Photo 1400 1/07 Environmental Temperature Humidity (without ink cartridges Electrical Input voltage range Rated current Rated frequency range Input frequency range Power consumption Printing Sleep mode Power off mode...
... B CAN/CSA-CEI/IEC CISPR 22 Class B 4 - Do not use genuine Epson ink cartridges and do not print in the following areas of the printer for a 8-cm disc Ink Cartridges Color Cartridge life Temperature Black, Cyan, Magenta, Yellow, Light Cyan, Light Magenta 6 months...20 to 80% RH Storage: 5 to 40 °C) 1 month at 77 °F (25 °C). Epson Stylus Photo 1400 1/07 Environmental Temperature Humidity (without ink cartridges Electrical Input voltage range Rated current Rated frequency range Input frequency range Power consumption Printing Sleep mode Power off mode...
Product Information Guide
Page 5
... you experience paper feeding problems, try loading fewer sheets. ❏ When you use it with this printer; Caution: If your Epson special paper includes a cleaning sheet, don't use special paper, check the package for more information. 1/07 Epson Stylus Photo 1400 - 5 That's why the Type or Media Type setting is under the tabs on the left...
... you experience paper feeding problems, try loading fewer sheets. ❏ When you use it with this printer; Caution: If your Epson special paper includes a cleaning sheet, don't use special paper, check the package for more information. 1/07 Epson Stylus Photo 1400 - 5 That's why the Type or Media Type setting is under the tabs on the left...
Product Information Guide
Page 6
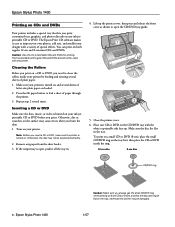
... and ejecting several sheets of letter-size plain paper are loaded. 2. otherwise the printer may not be positioned correctly. 2. The Epson Print CD software makes it all the way in the tray. Make sure your ink jetprintable CD or DVD before you need to clean the rollers inside the ring. ...dirt or scratches on the surface may cause errors when you insert a CD or DVD, make sure the printer is open the CD/DVD tray guide. 5. Epson Stylus Photo 1400 Printing on CDs and DVDs Your printer includes a special tray that the disc and ring lie flat on the tray; Note: Before you burn the...
... and ejecting several sheets of letter-size plain paper are loaded. 2. otherwise the printer may not be positioned correctly. 2. The Epson Print CD software makes it all the way in the tray. Make sure your ink jetprintable CD or DVD before you need to clean the rollers inside the ring. ...dirt or scratches on the surface may cause errors when you insert a CD or DVD, make sure the printer is open the CD/DVD tray guide. 5. Epson Stylus Photo 1400 Printing on CDs and DVDs Your printer includes a special tray that the disc and ring lie flat on the tray; Note: Before you burn the...
Product Information Guide
Page 7
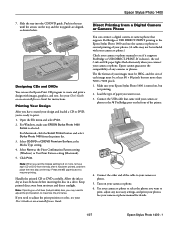
...Epson Stylus Photo 1400 7. Push in a drive. Designing CDs and DVDs You can connect a digital camera or camera phone that came with images, graphics, and text. For Macintosh, click the Select Printer button and select Stylus Photo 1400 from a Digital Camera or Camera Phone You can use the camera or phone to adjust the print position or color...dry at least 80 × 80 pixels but not printing. 2. Allow the ink to print. 1. Keep printed discs away from the tray after it doesn't, the red H ink and ) paper lights flash alternately when you connect your design and loaded a CD...
...Epson Stylus Photo 1400 7. Push in a drive. Designing CDs and DVDs You can connect a digital camera or camera phone that came with images, graphics, and text. For Macintosh, click the Select Printer button and select Stylus Photo 1400 from a Digital Camera or Camera Phone You can use the camera or phone to adjust the print position or color...dry at least 80 × 80 pixels but not printing. 2. Allow the ink to print. 1. Keep printed discs away from the tray after it doesn't, the red H ink and ) paper lights flash alternately when you connect your design and loaded a CD...
Product Information Guide
Page 8
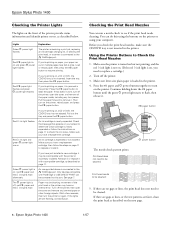
..., it . Load or reload paper, then press the ) paper button to check the ink status. Turn off the printer. 3. Epson Stylus Photo 1400 Checking the Printer Lights The lights on the front of the print head or the printer may be incompatible with the printer or incorrectly installed. Red ) paper light is on and green P power light flashes If...
..., it . Load or reload paper, then press the ) paper button to check the ink status. Turn off the printer. 3. Epson Stylus Photo 1400 Checking the Printer Lights The lights on the front of the print head or the printer may be incompatible with the printer or incorrectly installed. Red ) paper light is on and green P power light flashes If...
Product Information Guide
Page 9
.... Caution: Never turn off . (If the red H ink light is flashing or on but not printing, and the red H ink light is turned on , you notice light or dark bands across your printer often it . 1/07 Epson Stylus Photo 1400 - 9 The printer cleans the print head and the green P power light flashes.... Make sure the printer is off and wait at least once a ...
.... Caution: Never turn off . (If the red H ink light is flashing or on but not printing, and the red H ink light is turned on , you notice light or dark bands across your printer often it . 1/07 Epson Stylus Photo 1400 - 9 The printer cleans the print head and the green P power light flashes.... Make sure the printer is off and wait at least once a ...
Product Information Guide
Page 10
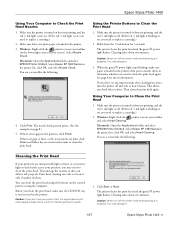
... are no streaks or lines, enter its number in the printer. 1. Select Print Head Alignment. For each set contains lines or streaks, select the pattern that looks best. Epson Stylus Photo 1400 1/07 If you may also see any dried ink to clean the print head. Make sure the ) paper ...and H ink lights are faint, click Clean to be cleaned: 5. Note: Do not cancel ...
... are no streaks or lines, enter its number in the printer. 1. Select Print Head Alignment. For each set contains lines or streaks, select the pattern that looks best. Epson Stylus Photo 1400 1/07 If you may also see any dried ink to clean the print head. Make sure the ) paper ...and H ink lights are faint, click Clean to be cleaned: 5. Note: Do not cancel ...
Product Information Guide
Page 11
...about your printer not covered by Epson's warranty. Ink Cartridge Precautions Warning: Keep ink cartridges out of the reach of installing them . If ink gets on your screen when you print telling you which you have received an "Ink low" message), you cannot reuse it. 1/07 Epson Stylus Photo 1400 - 11... on your skin, wash it off . sales) or www.epson.ca (Canadian sales). Epson Stylus Photo 1400 Replacing an Ink Cartridge ❏ When the red H ink light flashes, one or more ink cartridges are low on ink. ❏ When the red H ink light stays on, you need to replace it if printouts don...
...about your printer not covered by Epson's warranty. Ink Cartridge Precautions Warning: Keep ink cartridges out of the reach of installing them . If ink gets on your screen when you print telling you which you have received an "Ink low" message), you cannot reuse it. 1/07 Epson Stylus Photo 1400 - 11... on your skin, wash it off . sales) or www.epson.ca (Canadian sales). Epson Stylus Photo 1400 Replacing an Ink Cartridge ❏ When the red H ink light flashes, one or more ink cartridges are low on ink. ❏ When the red H ink light stays on, you need to replace it if printouts don...
Product Information Guide
Page 12
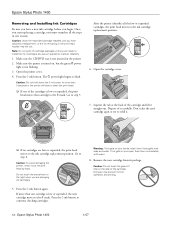
... hands, wash them immediately with soap and water. Epson Stylus Photo 1400 1/07 Make sure the printer is low or expended, the next cartridge moves to maintain reliability. 1. Warning: If ink gets on your eyes, flush them thoroughly with water. 8. Doing so may dry out. Epson Stylus Photo 1400 Removing and Installing Ink Cartridges Be sure you have obtained a replacement, or...
... hands, wash them immediately with soap and water. Epson Stylus Photo 1400 1/07 Make sure the printer is low or expended, the next cartridge moves to maintain reliability. 1. Warning: If ink gets on your eyes, flush them thoroughly with water. 8. Doing so may dry out. Epson Stylus Photo 1400 Removing and Installing Ink Cartridges Be sure you have obtained a replacement, or...
Product Information Guide
Page 13
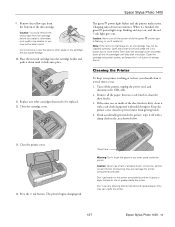
... clean the sheet feeder. 3. Caution: Never use a soft brush to charge the ink. Don't get water on , and the red H ink light goes out. Epson Stylus Photo 1400 The green P power light flashes and the printer makes noise. If ink accidentally gets inside the printer. 1/07 Epson Stylus Photo 1400 - 13 they may not be able to prevent water from the cartridge before...
... clean the sheet feeder. 3. Caution: Never use a soft brush to charge the ink. Don't get water on , and the red H ink light goes out. Epson Stylus Photo 1400 The green P power light flashes and the printer makes noise. If ink accidentally gets inside the printer. 1/07 Epson Stylus Photo 1400 - 13 they may not be able to prevent water from the cartridge before...
Product Information Guide
Page 14
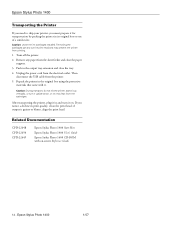
..., or turn it upside down, or ink may prevent the printer from the cartridges. Caution: Leave the ink cartridges installed. If you must prepare it . Removing the cartridges can dry out the print head and may leak from printing. 1. Epson Stylus Photo 1400 1/07 Epson Stylus Photo 1400 Transporting the Printer If you need to ship your printer, you notice a decline in print...
..., or turn it upside down, or ink may prevent the printer from the cartridges. Caution: Leave the ink cartridges installed. If you must prepare it . Removing the cartridges can dry out the print head and may leak from printing. 1. Epson Stylus Photo 1400 1/07 Epson Stylus Photo 1400 Transporting the Printer If you need to ship your printer, you notice a decline in print...
Start Here
Page 1
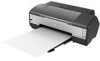
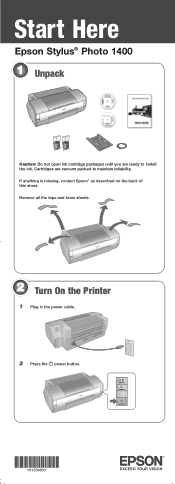
Remove all the tape and foam sheets. 2 Turn On the Printer 1 Plug in the power cable. 2 Press the power button. *411559800* *411559800* Cartridges are ready to maintain reliability. If anything is missing, contact Epson® as described on the back of this sheet. Start Here Epson Stylus® Photo 1400 1 Unpack Caution: Do not open ink cartridge packages until you are vacuum packed to install the ink.
Remove all the tape and foam sheets. 2 Turn On the Printer 1 Plug in the power cable. 2 Press the power button. *411559800* *411559800* Cartridges are ready to maintain reliability. If anything is missing, contact Epson® as described on the back of this sheet. Start Here Epson Stylus® Photo 1400 1 Unpack Caution: Do not open ink cartridge packages until you are vacuum packed to install the ink.
Start Here
Page 7
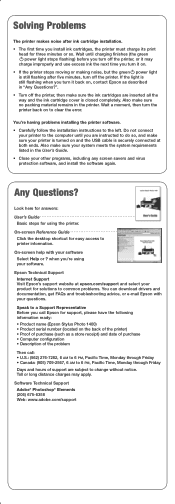
... of support are inserted all the way and the ink cartridge cover is still flashing after ink cartridge installation. • The first time you install ink cartridges, the printer must charge its print head for support, please have the following information ready: • Product name (Epson Stylus Photo 1400) • Product serial number (located on the back of...
... of support are inserted all the way and the ink cartridge cover is still flashing after ink cartridge installation. • The first time you install ink cartridges, the printer must charge its print head for support, please have the following information ready: • Product name (Epson Stylus Photo 1400) • Product serial number (located on the back of...
Start Here
Page 8
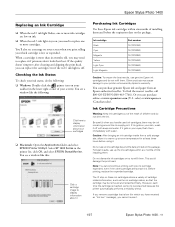
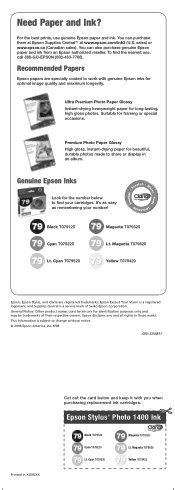
... card below to work with you when purchasing replacement ink cartridges. Black T079120 Cyan T079220 Lt. You can also purchase genuine Epson paper and ink from an Epson authorized reseller. Premium Photo Paper Glossy High gloss, instant-drying paper for optimal image quality and maximum longevity. Epson Stylus® Photo 1400 Ink Black T079120 Cyan T079220 Lt. It's as easy...
... card below to work with you when purchasing replacement ink cartridges. Black T079120 Cyan T079220 Lt. You can also purchase genuine Epson paper and ink from an Epson authorized reseller. Premium Photo Paper Glossy High gloss, instant-drying paper for optimal image quality and maximum longevity. Epson Stylus® Photo 1400 Ink Black T079120 Cyan T079220 Lt. It's as easy...
User's Guide
Page 7
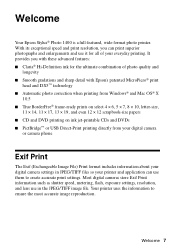
...ink jet-printable CDs and DVDs ■ PictBridge™ or USB Direct-Print printing directly from your digital camera or camera phone Exif Print The Exif (Exchangeable Image File) Print format includes information about your everyday printing. Your printer uses the information to create accurate print settings. Welcome 7 Welcome Your Epson Stylus® Photo 1400... is a full-featured, wide-format photo printer. With its exceptional speed ...
...ink jet-printable CDs and DVDs ■ PictBridge™ or USB Direct-Print printing directly from your digital camera or camera phone Exif Print The Exif (Exchangeable Image File) Print format includes information about your everyday printing. Your printer uses the information to create accurate print settings. Welcome 7 Welcome Your Epson Stylus® Photo 1400... is a full-featured, wide-format photo printer. With its exceptional speed ...
User's Guide
Page 34
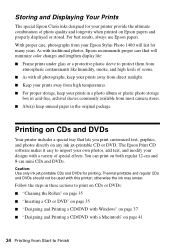
... with this printer; Follow the steps in the original package. For best results, always use Epson papers. You can print on page 41 34 Printing from most camera stores. ■ Always keep unused paper in these sections to Finish otherwise the ink may smear. With proper care, photographs from your Epson Stylus Photo 1400 will minimize color changes...
... with this printer; Follow the steps in the original package. For best results, always use Epson papers. You can print on page 41 34 Printing from most camera stores. ■ Always keep unused paper in these sections to Finish otherwise the ink may smear. With proper care, photographs from your Epson Stylus Photo 1400 will minimize color changes...
User's Guide
Page 39
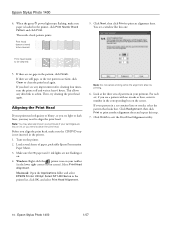
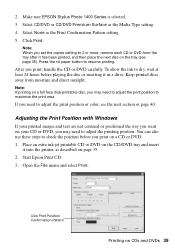
.... Click Print Position Confirmation Pattern Printing on a full face (hub-printable) disc, you print, handle the CD or DVD carefully. Place an extra ink-jet printable CD or DVD on the CD/DVD tray and insert it has been printed, and then place the next disc on the tray...from the tray after it into the printer, as the Media Type setting. 4. If you set the copies setting to adjust the printing position. Press the ) paper button to adjust the print position or color, see page 35). Note: If printing on CDs and DVDs 39 Make sure EPSON Stylus Photo 1400 Series is selected. 3.
.... Click Print Position Confirmation Pattern Printing on a full face (hub-printable) disc, you print, handle the CD or DVD carefully. Place an extra ink-jet printable CD or DVD on the CD/DVD tray and insert it has been printed, and then place the next disc on the tray...from the tray after it into the printer, as the Media Type setting. 4. If you set the copies setting to adjust the printing position. Press the ) paper button to adjust the print position or color, see page 35). Note: If printing on CDs and DVDs 39 Make sure EPSON Stylus Photo 1400 Series is selected. 3.
User's Guide
Page 40
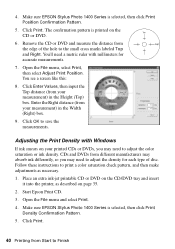
...with millimeters for each type of the hole to adjust the color saturation or ink density. Follow these instructions to save the measurements. Start Epson Print CD. 3. Open the File menu and select Print. 4. Make sure EPSON Stylus Photo 1400 Series is selected, then click Print Density Confirmation Pattern. 5.... Print. Place an extra ink-jet printable CD or DVD on the CD/DVD tray and insert it into the printer, as necessary. 1. The confirmation pattern is printed on page 35. 2. You see a screen like this: 8. Make sure EPSON Stylus Photo 1400 Series is selected, then click...
...with millimeters for each type of the hole to adjust the color saturation or ink density. Follow these instructions to save the measurements. Start Epson Print CD. 3. Open the File menu and select Print. 4. Make sure EPSON Stylus Photo 1400 Series is selected, then click Print Density Confirmation Pattern. 5.... Print. Place an extra ink-jet printable CD or DVD on the CD/DVD tray and insert it into the printer, as necessary. 1. The confirmation pattern is printed on page 35. 2. You see a screen like this: 8. Make sure EPSON Stylus Photo 1400 Series is selected, then click...


