Managing Color Guide
Page 6
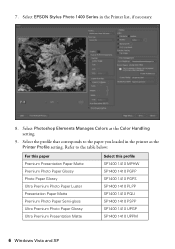
... 1410 PGPS SP1400 1410 PLPP SP1400 1410 PQIJ SP1400 1410 PSPP SP1400 1410 UPGP SP1400 1410 UPPM 6 Windows Vista and XP Select Photoshop Elements Manages Colors as the Printer Profile setting. Select EPSON Stylus Photo 1400 Series in the printer as the Color Handling setting. 9. Refer to the paper you loaded in the...
... 1410 PGPS SP1400 1410 PLPP SP1400 1410 PQIJ SP1400 1410 PSPP SP1400 1410 UPGP SP1400 1410 UPPM 6 Windows Vista and XP Select Photoshop Elements Manages Colors as the Printer Profile setting. Select EPSON Stylus Photo 1400 Series in the printer as the Color Handling setting. 9. Refer to the paper you loaded in the...

Managing Color Guide
Page 7
10. This reduces the color saturation so that the colors fit within the printer's color gamut. 11. Click the Print button. 12. Make sure EPSON Stylus Photo 1400 Series is selected, then click the Preferences or Properties button. Windows Vista and XP 7 Select Relative Colorimetric as the Rendering Intent setting. Note: If your image contains very saturated colors, select Perceptual.
10. This reduces the color saturation so that the colors fit within the printer's color gamut. 11. Click the Print button. 12. Make sure EPSON Stylus Photo 1400 Series is selected, then click the Preferences or Properties button. Windows Vista and XP 7 Select Relative Colorimetric as the Rendering Intent setting. Note: If your image contains very saturated colors, select Perceptual.
Managing Color Guide
Page 12
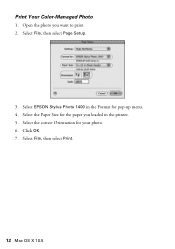
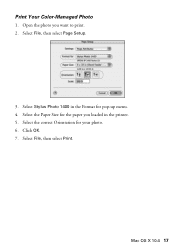
Select the Paper Size for the paper you want to print. 2. Select the correct Orientation for pop-up menu. 4. Select EPSON Stylus Photo 1400 in the printer. 5. Click OK. 7. Open the photo you loaded in the Format for your photo. 6. Select File, then select Page Setup. 3. Select File, then select Print. 12 Mac OS X 10.5 Print Your Color-Managed Photo 1.
Select the Paper Size for the paper you want to print. 2. Select the correct Orientation for pop-up menu. 4. Select EPSON Stylus Photo 1400 in the printer. 5. Click OK. 7. Open the photo you loaded in the Format for your photo. 6. Select File, then select Page Setup. 3. Select File, then select Print. 12 Mac OS X 10.5 Print Your Color-Managed Photo 1.
Managing Color Guide
Page 13
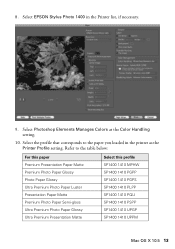
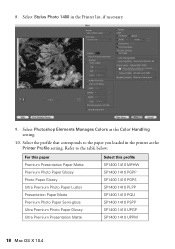
...gloss Ultra Premium Photo Paper Glossy Ultra Premium Presentation Matte Select this profile SP1400 1410 MPHW SP1400 1410 PGPP SP1400 1410 PGPS SP1400 1410 PLPP SP1400 1410 PQIJ SP1400 1410 PSPP SP1400 1410 UPGP SP1400 1410 UPPM Mac OS X 10.5 13 Select EPSON Stylus Photo 1400 in the printer as the Color Handling setting.... 10. Select Photoshop Elements Manages Colors as the Printer Profile setting. 8.
...gloss Ultra Premium Photo Paper Glossy Ultra Premium Presentation Matte Select this profile SP1400 1410 MPHW SP1400 1410 PGPP SP1400 1410 PGPS SP1400 1410 PLPP SP1400 1410 PQIJ SP1400 1410 PSPP SP1400 1410 UPGP SP1400 1410 UPPM Mac OS X 10.5 13 Select EPSON Stylus Photo 1400 in the printer as the Color Handling setting.... 10. Select Photoshop Elements Manages Colors as the Printer Profile setting. 8.
Managing Color Guide
Page 15
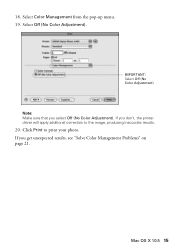
18. IMPORTANT: Select Off (No Color Adjustment) Note: Make sure that you don't, the printer driver will apply additional correction to print your photo. Select Color Management from the pop-up menu. 19. If you select Off (No Color Adjustment). If you get unexpected results, see "Solve Color Management Problems" on page 21. Mac OS X 10.5 15 Click Print to the image, producing inaccurate results. 20. Select Off (No Color Adjustment).
18. IMPORTANT: Select Off (No Color Adjustment) Note: Make sure that you don't, the printer driver will apply additional correction to print your photo. Select Color Management from the pop-up menu. 19. If you select Off (No Color Adjustment). If you get unexpected results, see "Solve Color Management Problems" on page 21. Mac OS X 10.5 15 Click Print to the image, producing inaccurate results. 20. Select Off (No Color Adjustment).
Managing Color Guide
Page 17
Select the correct Orientation for pop-up menu. 4. Mac OS X 10.4 17 Select the Paper Size for the paper you want to print. 2. Select File, then select Page Setup. 3. Print Your Color-Managed Photo 1. Click OK. 7. Open the photo you loaded in the Format for your photo. 6. Select File, then select Print. Select Stylus Photo 1400 in the printer. 5.
Select the correct Orientation for pop-up menu. 4. Mac OS X 10.4 17 Select the Paper Size for the paper you want to print. 2. Select File, then select Page Setup. 3. Print Your Color-Managed Photo 1. Click OK. 7. Open the photo you loaded in the Format for your photo. 6. Select File, then select Print. Select Stylus Photo 1400 in the printer. 5.
Managing Color Guide
Page 18
... Matte Premium Photo Paper Semi-gloss Ultra Premium Photo Paper Glossy Ultra Premium Presentation Matte Select this profile SP1400 1410 MPHW SP1400 1410 PGPP SP1400 1410 PGPS SP1400 1410 PLPP SP1400 1410 PQIJ SP1400 1410 PSPP SP1400 1410 UPGP SP1400 1410 UPPM 18 Mac OS X 10.4 Select Stylus Photo 1400 in the printer as the Color Handling...
... Matte Premium Photo Paper Semi-gloss Ultra Premium Photo Paper Glossy Ultra Premium Presentation Matte Select this profile SP1400 1410 MPHW SP1400 1410 PGPP SP1400 1410 PGPS SP1400 1410 PLPP SP1400 1410 PQIJ SP1400 1410 PSPP SP1400 1410 UPGP SP1400 1410 UPPM 18 Mac OS X 10.4 Select Stylus Photo 1400 in the printer as the Color Handling...
Managing Color Guide
Page 20
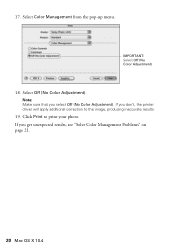
17. Note: Make sure that you get unexpected results, see "Solve Color Management Problems" on page 21. 20 Mac OS X 10.4 If you select Off (No Color Adjustment). If you don't, the printer driver will apply additional correction to print your photo. Select Off (No Color Adjustment). Select Color Management from the pop-up menu. IMPORTANT: Select Off (No Color Adjustment) 18. Click Print to the image, producing inaccurate results. 19.
17. Note: Make sure that you get unexpected results, see "Solve Color Management Problems" on page 21. 20 Mac OS X 10.4 If you select Off (No Color Adjustment). If you don't, the printer driver will apply additional correction to print your photo. Select Off (No Color Adjustment). Select Color Management from the pop-up menu. IMPORTANT: Select Off (No Color Adjustment) 18. Click Print to the image, producing inaccurate results. 19.
Managing Color Guide
Page 21
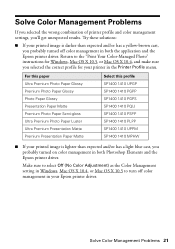
... your printer in the Printer Profile menu. Solve Color Management Problems If you selected the wrong combination of printer profile and color management settings, you probably turned on color management in both the application and the Epson printer driver. Try these solutions: ■ If your Epson printer driver. Return to turn off color management in both Photoshop Elements and the Epson printer driver...
... your printer in the Printer Profile menu. Solve Color Management Problems If you selected the wrong combination of printer profile and color management settings, you probably turned on color management in both the application and the Epson printer driver. Try these solutions: ■ If your Epson printer driver. Return to turn off color management in both Photoshop Elements and the Epson printer driver...
Product Information Guide
Page 1
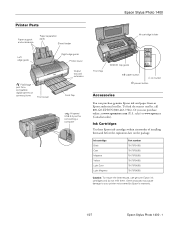
... (T079220) 79 (T079320) 79 (T079420) 79 (T079520) 79 (T079620) Caution: To ensure the best results, use genuine Epson ink cartridges and do not refill them and before the expiration date on the package. Epson Stylus Photo 1400 Printer Parts Paper support and extensions Paper separation pads Sheet feeder Ink cartridge holder Left edge guide PictBridge port...
... (T079220) 79 (T079320) 79 (T079420) 79 (T079520) 79 (T079620) Caution: To ensure the best results, use genuine Epson ink cartridges and do not refill them and before the expiration date on the package. Epson Stylus Photo 1400 Printer Parts Paper support and extensions Paper separation pads Sheet feeder Ink cartridge holder Left edge guide PictBridge port...

Product Information Guide
Page 3
...have print quality problems, switch to 60% RH 1/07 Epson Stylus Photo 1400 - 3 Use paper only under these conditions: Temperature: 59 to 77 °F (15 to 25 °C) Humidity: 40 to a higher grade paper. Epson Stylus Photo 1400 Printer Specifications Printing Printing method Ink configuration Print direction MicroPiezo ink ...and light magenta Bidirectional with logic seeking Paper Since the quality of any particular brand or type of paper may be changed by Epson Thickness 0.003 to 0.004 inch (0.08 to confirm printout quality. B-R: The minimum right margin is 0.12 inch (3.0 mm) ...
...have print quality problems, switch to 60% RH 1/07 Epson Stylus Photo 1400 - 3 Use paper only under these conditions: Temperature: 59 to 77 °F (15 to 25 °C) Humidity: 40 to a higher grade paper. Epson Stylus Photo 1400 Printer Specifications Printing Printing method Ink configuration Print direction MicroPiezo ink ...and light magenta Bidirectional with logic seeking Paper Since the quality of any particular brand or type of paper may be changed by Epson Thickness 0.003 to 0.004 inch (0.08 to confirm printout quality. B-R: The minimum right margin is 0.12 inch (3.0 mm) ...
Product Information Guide
Page 4
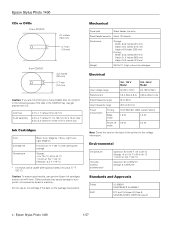
... Operation: 50 to 95 °F (10 to 35 °C) Storage: -4 to 104 °F (-20 to 40 °C) 1 month at 77 °F (25 °C). Epson Stylus Photo 1400 CDs or DVDs 12-cm CD/DVD 4.7 inches (120 mm) 0.7 inch (18 mm) 8-cm CD/DVD 3.2 inches (80 mm) 0.7 inch (18 mm) Caution: If you... part 15 Subpart B Class B CAN/CSA-CEI/IEC CISPR 22 Class B 4 - Do not use genuine Epson ink cartridges and do not print in the following areas of the printer for a 8-cm disc Ink Cartridges Color Cartridge life Temperature Black, Cyan, Magenta, Yellow, Light Cyan, Light Magenta 6 months at 77 °F (...
... Operation: 50 to 95 °F (10 to 35 °C) Storage: -4 to 104 °F (-20 to 40 °C) 1 month at 77 °F (25 °C). Epson Stylus Photo 1400 CDs or DVDs 12-cm CD/DVD 4.7 inches (120 mm) 0.7 inch (18 mm) 8-cm CD/DVD 3.2 inches (80 mm) 0.7 inch (18 mm) Caution: If you... part 15 Subpart B Class B CAN/CSA-CEI/IEC CISPR 22 Class B 4 - Do not use genuine Epson ink cartridges and do not print in the following areas of the printer for a 8-cm disc Ink Cartridges Color Cartridge life Temperature Black, Cyan, Magenta, Yellow, Light Cyan, Light Magenta 6 months at 77 °F (...
Product Information Guide
Page 5
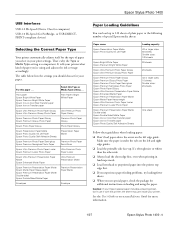
... a cleaning sheet, don't use special paper, check the package for additional instructions on the left edge guide. Epson Stylus Photo 1400 USB Interfaces USB 2.0 Hi-Speed (Device Class for computers) USB 2.0 Hi-Speed (for your paper. or USB DIRECTPRINT-compliant devices) Selecting the Correct Paper Type Your printer automatically adjusts itself for more information. 1/07 Epson Stylus Photo 1400 - 5
... a cleaning sheet, don't use special paper, check the package for additional instructions on the left edge guide. Epson Stylus Photo 1400 USB Interfaces USB 2.0 Hi-Speed (Device Class for computers) USB 2.0 Hi-Speed (for your paper. or USB DIRECTPRINT-compliant devices) Selecting the Correct Paper Type Your printer automatically adjusts itself for more information. 1/07 Epson Stylus Photo 1400 - 5
Product Information Guide
Page 6
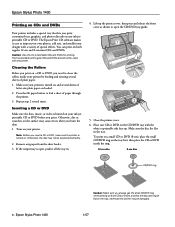
..., dirt or scratches on any paper from the sheet feeder. 3. otherwise the printer may not be positioned correctly. 2. Epson Stylus Photo 1400 Printing on CDs and DVDs Your printer includes a special tray that the disc and ring lie flat on your printer. Otherwise, the disc may be used with the white or printable side face-up the...
..., dirt or scratches on any paper from the sheet feeder. 3. otherwise the printer may not be positioned correctly. 2. Epson Stylus Photo 1400 Printing on CDs and DVDs Your printer includes a special tray that the disc and ring lie flat on your printer. Otherwise, the disc may be used with the white or printable side face-up the...
Product Information Guide
Page 7
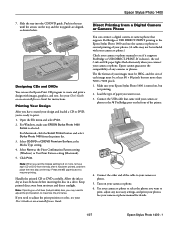
... If you want to adjust the print position or color, see if it has been printed, and then place the next disc on , but not more than 9200 × 9200 pixels. 1. Use your photos. (A cable may need to use the Epson Print CD program to resume printing. Printing Your Design...CD or DVD carefully. Keep printed discs away from the printer list. 3. Make sure your photos. Designing CDs and DVDs You can connect a digital camera or camera phone that supports PictBridge or USB DIRECT-PRINT printing to the Epson Stylus Photo 1400 and use the camera or phone to dry at least ...
... If you want to adjust the print position or color, see if it has been printed, and then place the next disc on , but not more than 9200 × 9200 pixels. 1. Use your photos. (A cable may need to use the Epson Print CD program to resume printing. Printing Your Design...CD or DVD carefully. Keep printed discs away from the printer list. 3. Make sure your photos. Designing CDs and DVDs You can connect a digital camera or camera phone that supports PictBridge or USB DIRECT-PRINT printing to the Epson Stylus Photo 1400 and use the camera or phone to dry at least ...
Product Information Guide
Page 8
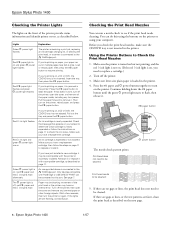
...PictBridge port. red ) paper and red H ink lights flash alternately An unsupported device is not inserted in the printer. 4. If there are still flashing, contact Epson. Epson Stylus Photo 1400 1/07 Press the ) paper button to be cleaned: 5. Pull out the tray and press the ) paper... is nearly expended or follow the steps on paper, it . Epson Stylus Photo 1400 Checking the Printer Lights The lights on , you need to replace a cartridge.) 2. Lights Explanation Green P power light flashes The printer is receiving a print job, replacing an ink cartridge, charging ink...
...PictBridge port. red ) paper and red H ink lights flash alternately An unsupported device is not inserted in the printer. 4. If there are still flashing, contact Epson. Epson Stylus Photo 1400 1/07 Press the ) paper button to be cleaned: 5. Pull out the tray and press the ) paper... is nearly expended or follow the steps on paper, it . Epson Stylus Photo 1400 Checking the Printer Lights The lights on , you need to replace a cartridge.) 2. Lights Explanation Green P power light flashes The printer is receiving a print job, replacing an ink cartridge, charging ink...
Product Information Guide
Page 9
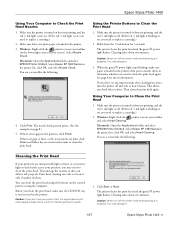
... improvement after cleaning four times, turn off . (If the red H ink light is loaded in the patterns, click Finish. See page 8 for 3 seconds. Epson Stylus Photo 1400 Using Your Computer to soften. Click Start or Next. Cleaning takes about two minutes. Make sure letter-size plain paper is flashing or on -screen... instructions to print a few pages at least 6 hours. Click Print. Make sure the printer is turned on but not printing, and the red H ink light is not on. (If the red H ink light is a good idea to clean...
... improvement after cleaning four times, turn off . (If the red H ink light is loaded in the patterns, click Finish. See page 8 for 3 seconds. Epson Stylus Photo 1400 Using Your Computer to soften. Click Start or Next. Cleaning takes about two minutes. Make sure letter-size plain paper is flashing or on -screen... instructions to print a few pages at least 6 hours. Click Print. Make sure the printer is turned on but not printing, and the red H ink light is not on. (If the red H ink light is a good idea to clean...
Product Information Guide
Page 10
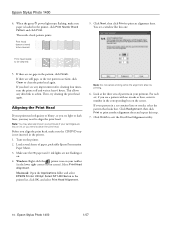
...printer. 2. Note: Do not cancel printing while the alignment sheet is not inserted in the lower right corner of paper, preferably Epson Presentation Paper Matte. 3. Click Realignment, then click Print to print another alignment sheet and repeat this one: Print head needs to clean the print head again. Epson Stylus Photo 1400...gaps, or the test patterns are low on . 4. The nozzle check pattern prints: Print head does not need to soften. Epson Stylus Photo 1400 4. Select Print Head Alignment. If every pattern in a set , if you don't see lines in your printouts if your ...
...printer. 2. Note: Do not cancel printing while the alignment sheet is not inserted in the lower right corner of paper, preferably Epson Presentation Paper Matte. 3. Click Realignment, then click Print to print another alignment sheet and repeat this one: Print head needs to clean the print head again. Epson Stylus Photo 1400...gaps, or the test patterns are low on . 4. The nozzle check pattern prints: Print head does not need to soften. Epson Stylus Photo 1400 4. Select Print Head Alignment. If every pattern in a set , if you don't see lines in your printouts if your ...
Product Information Guide
Page 11
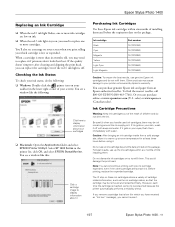
... off with soap and water. You'll also see a message on your cartridges ❏ Macintosh: Open the Applications folder and select EPSON Printer Utility2. Be careful when you can purchase online at least three hours before the expiration date on the package. This could damage the print...) 79 (T079420) 79 (T079520) 79 (T079620) Caution: To ensure the best results, use an ink cartridge beyond the date printed on the package. Epson Stylus Photo 1400 Replacing an Ink Cartridge ❏ When the red H ink light flashes, one or more ink cartridges are low on ink. ❏ When the red...
... off with soap and water. You'll also see a message on your cartridges ❏ Macintosh: Open the Applications folder and select EPSON Printer Utility2. Be careful when you can purchase online at least three hours before the expiration date on the package. This could damage the print...) 79 (T079420) 79 (T079520) 79 (T079620) Caution: To ensure the best results, use an ink cartridge beyond the date printed on the package. Epson Stylus Photo 1400 Replacing an Ink Cartridge ❏ When the red H ink light flashes, one or more ink cartridges are low on ink. ❏ When the red...
User's Guide
Page 7
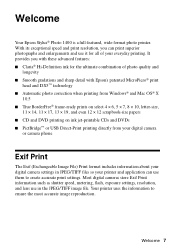
... information such as shutter speed, metering, flash, exposure settings, resolution, and lens use them to ensure the most accurate image reproduction. Welcome Your Epson Stylus® Photo 1400 is a full-featured, wide-format photo printer. With its exceptional speed and print resolution, you with these advanced features: ■ Claria® Hi-Definition ink for all of...
... information such as shutter speed, metering, flash, exposure settings, resolution, and lens use them to ensure the most accurate image reproduction. Welcome Your Epson Stylus® Photo 1400 is a full-featured, wide-format photo printer. With its exceptional speed and print resolution, you with these advanced features: ■ Claria® Hi-Definition ink for all of...


